Usually we make instant sweet appam with wheat flour / godhumai maavu inippu appam / wheat appam with banana for Ganesh Chaturthi, Gokulashtami, Diwali and Karthigai deepam. It can be made with or without paniyaram pan. Being a calorie conscious women, I always make sweet appam in paniyaram pan to reduce oil consumption. But yesterday I purposefully tried this deep fried version to post in my blog. I made it with wheat flour, banana and jaggery asking the recipe from my MIL. It was awesome. I couldn’t resist myself stopping with one or two.
My MIL usually make this instant appam using maida, banana and sugar for our guests as evening snacks. It comes out super soft, spongy and fluffy. We make this instant wheat flour appam on Ganesh chaturthi evening and offer Lord Ganesh. If you have the practice of offering appam for Vinayagar chaturthi, do try this one. U will love its softness and taste. Ok, lets see how to make this sweet appam recipe using wheat flour, banana and jaggery with step by step pictures and video ! I have shown 2 methods in video - Deep fried appam without paniyaram pan and appam in paniyaram pan.
Wheat flour appam recipe
Sweet appam recipe using wheat flour, jaggery for Ganesh chaturthi, Karthigai deepam and Gokulashtami
Cuisine:Indian
Category:Sweet
Serves:7 nos
Prep time:5 Minutes
Cook time:5 Minutes
Total time:10 Minutes
INGREDIENTS
1 cup - 250ml
Wheat flour - 1 cup
Fully Ripe banana - 1 no ( You can use yelakki/poovazhai or rasthali banana)
Grated jaggery - 1/2 cup ( add 2 tbsp for more sweetness)
Rice flour - 1.5 tbsp
Cooking soda - a big pinch
Salt - a pinch
Cardamom seeds - 2 no ( crushed)
Cooking oil - to deep fry
Water - as needed
HOW TO MAKE SWEET APPAM - METHOD
In a wide bowl,take all the ingredients except oil and water. Mash the ripen banana and add to the flour. Add the required water and make a thick batter.The consistency of batter should be like thick idli batter. It should be pourable.
Heat oil for deep frying. Use less oil to get a nice round shape. Take a small curved ladle and pour a ladleful full of batter. Make one or two at a time. Appam should rise slowly from the bottom to top. This is the correct heating point. It helps the appam to cook evenly. If the oil is very hot, appam will brown outside and it doesn’t get cooked inside. So keep the oil at right heating point. First check with a drop of batter and proceed further. Pour a small ladle of batter and splash the oil over the top of appam while it cooks.
As soon as the color of appam turns golden brown, flip it and cook the other side till golden brown. Remove & drain in a tissue paper.
You can also make this appam using paniyaram pan to use less oil. Please watch the video. I have shown in detail.
Sweet appam is ready to serve.Enjoy !
Note
For variations,u can add maida and sugar instead of wheat flour and jaggery.
U can also make spicy version by adding finely chopped onions, ginger, curry leaves, coriander leaves & green chillies along with hing. It tastes great.
Do not add more cooking soda. Less than a pinch would be enough. Adding more soda makes the appam absorb more oil. Sometimes appam disintegrates in oil if Soda goes more.
Banana gives a super soft, spongy texture to the appam. Never skip it.
It stays soft and good for hours. So yoou can make them in advance too.
Make this super soft and delicious appam & offer GOD !
As u all know,Paal kozhukattai is an yummy Chettinad dessert recipe.It is loved by all irrespective of ages.I should have made this post for Gokulashtami but I din’t.Now I am posting this easy paal kozhukattai recipe for my Bachelor friend , Jayagopal.He wanted to make it for potluck party in his office this week.So he told me share this recipe as soon as possible.This is not the authentic chettinad version though.I must learn that and post here soon. Actually I had planned to post some Ganesh chathurthi recipes as the festival is around. But then I thought, this is also a variety of kozhukattai which we can make easily and offer Lord Ganesh. So I prepared this easy paal kolukattai version using milk, coconut milk powder and sugar as Vinayagr chathurthi special recipe. It was tasting great. I had already shared my MIL’s Paal kohukattai recipe with jaggery which is Sendhil’s most favourite recipe. But I love this version more than that .So I usually make it more often for myself and Raksha as evening snack or dessert for your guests.Special thanks to my friend Jayagopal, otherwise i would not have done this post even now .Ok,Lets see how to make this yummy and easy paal kozhukattai recipe.
Easy paal kozhukattai recipe
Easy paal kozhukattai recipe using coconut milk powder,milk and sugar
Cuisine:Indian
Category:Sweets
Serves:2 persons
Prep time:10 Minutes
Cook time:15 Minutes
Total time:25 Minutes
INGREDIENTS
Store bought rice flour - 1/2 cup
Water - 1/2 cup + 2-3 tbsp (for dough)
Gingely oil – a drop
Salt – a pinch
Sugar – 2 tbsp
Boiled milk – 1/2 cup
Coconut milk powder - 1.5 tbsp or thick coconut milk - 1/2 cup
Cardamom seeds - 1 no (crushed)
Saffron threads - few
METHOD
In a wide bowl , take the rice flour.Add a pinch of salt ,mix well & set aside.
Boil water adding a drop of gingely oil.when the water starts to boil,initially u can see some small bubbles on the bottom and sides of vessel.After few minutes,water will start to roll boil with big bubbles.Switch off the flame as soon as water starts to roll boil with big bubbles.
Add the boiled water to the rice flour little by little and mix well.Rice flour may not take all the water.Stop adding water as soon as u get a non-sticky dough.If u feel the dough is dry,add little more hot water.Make sure the dough is not sticky.Knead the dough when it is warm.Make small balls of seedai size by greasing your fingers.Cover it till use.
Now boil water in idli pot or in a kadai.Grease the idli plate with oil and spread the balls.If u are using kadai,keep the balls in a small plate.Place a small wide bowl and keep the plate over the bowl.Cover the kadai and cook for 5 – 10 minutes.
In the mean time,mix 1.5 tbsp of coconut milk powder in 1/2 cup of boiled n cooled milk without any lumps.To this add sugar, saffron thread and cardamom powder.Stir well.
Allow it to boil for 2 minutes in medium flame.Milk will thicken slightly.To this, add the cooked rice balls and boil for few seconds.
Remove and serve warm or cold.
Note
U can cook the rice balls directly in milk instead of cooking in idli pot.In that case,use 1/2 cup of milk + 1/2 cup of water.Cook till rice balls float on top.Now mix 1 tbsp of coconut milk powder in 1/4 cup of milk and add to the cooked rice balls.Boil for a minute and switch off the flame.Add cardamom powder & few saffron threads. Mix well and serve !
I cooked the rice balls in idli plate to ensure proper & easy cooking.Also balls won’t break or dissolve.
The consistency of dough is important for getting soft rice balls. No problem even if u make the dough little sticky.U can grease ur hands with oil and make balls.But if u make the dough hard and dry,u will never get soft balls.so please add water carefully.
If u don't have coconut milk powder in hand,use 1/2 cup of grated coconut.Grind & take thick coconut milk adding 1/2 cup of water.Add to the milk at the end.Give a boil in low flame & switch off.
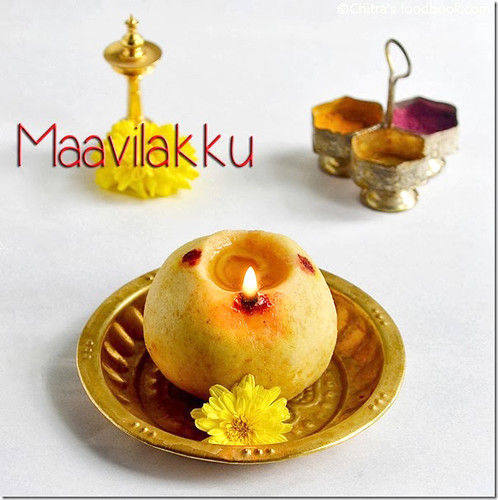
Maa vilakku / Rice flour Lamp in English is an edible lamp made using rice flour, jaggery, honey and ghee. Maavilakku is a must and should neivedyam recipe in all our households for Karthigai deepam and Aadi month to offer Amman. My mom and mil makes different naivedyam recipes to God for karthigai deepam but offering maavilakku maavu is a common practice for both of them. Not only for Karthigai deepam , we make it during tamil month Aadi, Thai and Purattasi sani. Actually maavilakku maavu has to be made by mixing jaggery with home made processed wet rice flour.
My MIL follows this procedure. But my mom makes it very simple using store bought rice flour. It can be done in minutes. Though I follow my MIL’s procedure, I thought of sharing my mom’s easy version with simple decoration in my blog. I have shared some tips and tricks from my mom to make a perfectly shaped maavilakku without losing its shape. For people who are not able to soak and grind the raw rice, this version would be useful. Do try this easy maavilakku maavu recipe with step by step pictures and video. Let me know your feedback.
I wish you all a very happy karthigai deepam, enjoy the festival of lights.
Store bought rice flour/ arisi maavu/ idiyappam flour - 1/2 cup
Grated jaggery – 1/2 cup
Ghee – 2 to 3 tbsp (6 tsp, unmelted,thick ghee)
Honey - 1/2 tbsp ( 1.5 tsp)
Cardamom powder - 1/2 tsp
To make lamp
Thread/thirinool - 1 no
Ghee - 2 tsp(melted)
Kumkum and turmeric - little
METHOD
Take the rice flour and grated jaggery in a mixie jar. Pulse it 3-4 times. Do not grind continuously. But make sure, they are mixed well without any lumps. ( I got this tip from sharmi’s blog, thank you sharmi .) As the rice flour is dry, it will absorb all the water from jaggery.
Remove in a plate. Make a dent and add the thick, unmelted ghee.(The key here is if you use melted ghee, you can shape it easily but later on as the ghee hardens, maavilakku will also become hard. So if you use unmelted ghee, maavilakku will stay soft without losing its shape and taste). Initially add 1 tbsp and mix well. Again add 1/2 tbsp more, mix well. Add 1.5 tsp honey and mix well. Try to make a ball. Roll it tight between two hands. If it cracks, seal it with fingers. As you roll tight, jaggery will melt because of the heat of your hands and it will make a smooth ball.
Make a smooth ball without cracks. Make a small dent in the center using your pointer finger for pouring ghee. Seal with fingers if any crack appears.( I used overall 2 tbsp unmelted ghee)
Apply turmeric and kumkum on all the sides. Put the thread and lit the lamp. Keep a flower nearby and offer to God.
Note
Maavilakku stays good for a week in room temperature. I have seen people keeping it for months by freezing it. When you freeze the dough, bring it to room temperature before u consume.
My mom never use water or milk to make the dough as it reduces the shelf life. But if you are concerned about adding ghee OR if you can consume it immediately, you can add water or milk to make the dough.
You can add more honey if you want to reduce ghee. But reduce the quantity of jaggery accordingly.
Using unmelted, paste like ghee is more important for maavilakku to hold its shape for long time.
If you add more jaggery, it may leave water and maa vilakku will lose its shape.
For making home made wet rice flour, wash and soak the raw rice/maavu arisi for 30 minutes. Drain the water and spread it on a paper for few minutes. Remove and powder it nicely. Sieve the flour and proceed as mentioned above.
To see the step by step pictures, please click this link. Remember if you are using homemade rice flour, quantity of jaggery and ghee used would be less.
Enjoy maavilakku with chopped coconut pieces. Tastes heavenly !
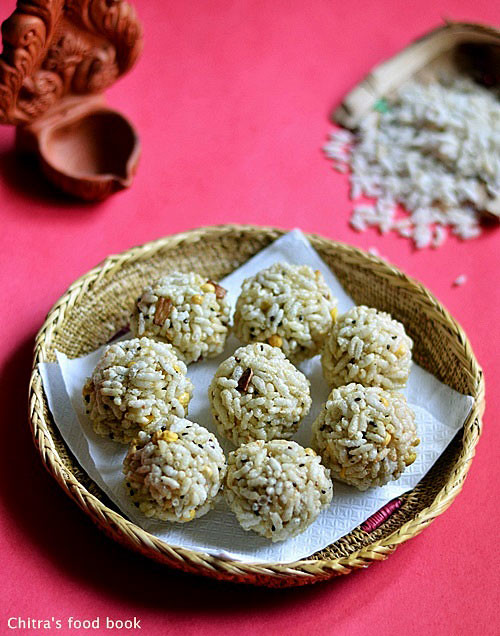
In Tamil nadu, Pori urundai is a must try recipe for Karthigai deepam. Last year I posted Pori urundai recipe with poha/aval for karthigai deepam. This year I wanted to make pori urundai using puffed rice. We call it as arisi pori in Tamil.
As I don’t get nel pori here, I used arisi pori / Puffed rice. Procedure for making pori urundai is similar. It may be aval , nel or arisi. So I wanted to share this recipe in my space with step by step pictures and a video. Hope it will be useful for beginners.
As my MIL usually says, the ratio of pori and jaggery is 8:1 based on the sweetness of jaggery. You can follow 6:1 too. I follow the same every year and it comes out very well. Over to recipe with a picture and my latest video recipe !
Pori urundai recipe for Karthigai deepam
Pori urundai recipe using arisi pori/puffed rice for karthigai deepam
Dry roast sesame seeds in a kadai till it crackles.
Measure 3 cups of puffed rice ( 4 cups for less sweet) and take in a bowl. Add the roasted sesame seeds to it. Chop coconut into small pieces. Heat 1 tsp ghee in a pan. Roast coconut pieces till it turns golden in color. Add to the measured puffed rice.
In a wide kadai , take the grated jaggery. Add water to it. Make sure jaggery should be immersed completely. I used 1/4 cup of water for 1/2 cup of jaggery. Measure the puffed rice and keep it ready. Keep ready a small plate with water. Melt the jaggery completely and strain it to remove impurities. No need to boil the syrup. After straining the syrup, wash the kadai and then heat it again adding the strained syrup.
Boil the syrup till it becomes frothy and thick. Take the syrup in the ladle and drop it. The syrup will drop slowly and the last drop will make a string. This is an indication of reaching the correct consistency. At this time , simmer the flame and pour little syrup in a plate of water. Try to gather all the syrup and remove it. It will be non-sticky and you’ll be able to make a ball but firm in shape. Ball should hold its shape but not too hard. It is called as uruttu padham in Tamil. This is the right stage. Switch off the flame.
Suppose if you miss this stage, add little water to the syrup and boil again. Check the consistency and proceed. ( some people make hard ball consistency too. i.e you should make a ball and if you drop the ball in a plate, it should make a tung sound. But you should roll the balls as soon as you mix with the syrup because syrup will thicken very quickly).
Add the puffed rice mixture along with roasted sesame seeds, coconut pieces, fried gram dal immediately. Mix well. All should be done within few seconds. Take care.
Mix the puffed rice well in the syrup till the bottom of kadai. All the puffed rice should be coated well with the syrup. Grease your hands with rice flour or ghee and make balls tightly when the mixture is slightly warm. If the mixture cools down, you can't shape it. So do it fast. U’ll be able to make a perfect round.
If you are a beginner, you cannot handle the heat of balls. So make balls roughly and arrange in a plate. Then roll it tightly when the mixture becomes warm. I usually follow this for aval pori urundai.
If the mixture cools down before making balls, heat the kadai slightly in low flame. The syrup will melt and helps you to make balls. Make round balls. Give a setting time of 10 minutes and enjoy ! U can store these balls and use it for 2 weeks. If the mixture cools down, you can't shape it. So do it fast.
Note
Jaggery consistency is very important here. Please have a look after the jaggery syrup becomes frothy. It takes hardly 2-3 minutes in high flame to reach the consistency.
Make balls when the mixture is with bearable heat. When it cools down, you can’t make it. So you have to reheat again in low flame for few seconds.
Adding coconut bits, sesame seeds and fried gram dal are optional. I have seen my neighbours making pori urundai without all these. But we add sesame seeds for sure as we keep it for neivedyam.
Wish you all a very happy karthigai deepam. Enjoy the festival of lights with pori urundai!
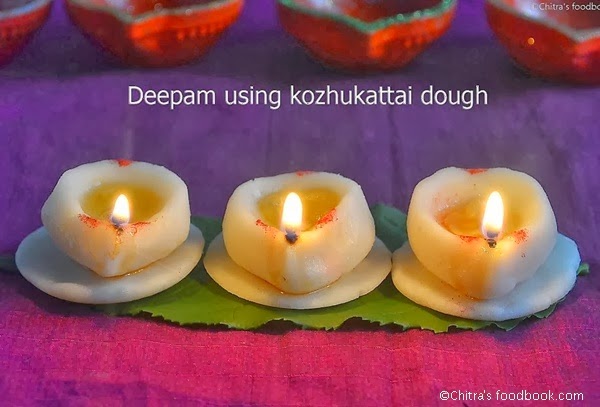
Thirukarthigai/Karthigai deepam falls every year on full moon day of Karthigai, tamil month. Karthigai deepam 2020 ie this year it is on 29(Sunday), November. Generally, kozhukattai is prepared for Ganesh chaturthi. U may wonder why am I posting this kozhukattai recipe for Karthigai deepam festival. In my native place(Tirunelveli ), people used to make this kozhukattai without salt on Karthigai. They make plates and lamps (agal vilakku) using this kozhukattai dough and light it along with the other lamps. The number of plates and lamps should be equal to the number of family members. Usually our people says, it is very auspicious to make this lamp on karthigai deepam for the well-being of family members.
My friend’s mom told that they keep this lamp by praying God to bless their family with health, wealth and peace. My mom also used to do this every year. Not only this lamp, mom makes finger shaped kozhukattai with the remaining dough and offer to God along with pori urundai , appam and maavilakku. As it is salt-less, we used to have this kozhukattai adding lots of grated coconut. We call this as “Neer kozhukattai, uppilla kozhukattai etc.
My MIL also makes this kozhukattai for avvaiyar viratham/Chevvai pillayar viratham. This kozhukattai recipe is known to all of you. But keeping this dough lamp may be new to some of you. So I wanted to share with u all :)..This year, I am going to make this dough deepam/diya for the well-being of my family. Friends, do make this for your family too and get the blessings of God :).Use ghee for lighting the lamp. After the lamp goes off, eat it as prasadam along with jaggery and grated coconut !
The dough making method I have shared here is not the authentic one. Usually my mom used to make this kozhukattai dough adding plain, cold water to the rice flour and she cooks the kozhukattai in an open pan in boiling water for few minutes.
By doing this way, kozhukattai comes out little hard and chewy. Sometimes kozhukattai may dissolve in water if the dough consistency is not correct. So my mom suggested me to follow our usual kozhukattai dough(with video) method. Thanks to my sister’s SIL Mrs.Thangam for telling this recipe with correct water measurement. Kozhukattai came out very well and soft.. Please adjust the water quantity by keeping this as reference. Do not add all the water at once. Keep adding slowly to make a perfect non sticky dough.
kozhukattai Recipe
Kozhukattai recipe for karthigai deepam.
Cuisine: South IndianCategory: Festival recipesServes: 3
Idiyappam flour / Rice flour - 1 cup (You can use homemade or store bought idiyappam flour)
Water - 1.25 to 1.5 cups (Water quantity varies based on rice flour )
Gingely oil - 1 tsp
METHOD
In a wide bowl, take the rice flour. In a vessel , take the required quantity of water and add a tsp of gingely oil.
Let the water boil for 2-3 minutes. Add this water to the rice flour by mixing with a ladle. Rice flour gets half cooked by the heat of this water and increases in quantity. After the dough becomes slightly warm , knead it to make a soft , non-sticky dough.
Make plates an lamps as per the number of family members. For making plate , take a big lemon sized ball, pat it on a sheet. Seal the cracks if any. For lamp , take a small lemon sized ball. Press it in the center and make a dent to pour ghee/oil. Narrow down one edge of the ball and make like a lamp. Hope this picture helps you..
Arrange them in a greased idli plate. Keep the plate only after the water starts to roll boil. Steam it for 7-8 minutes. Deepam is ready. Remove the lamps from the plate after it becomes warm , else it may break.
Make finger shaped kozhukattai or small balls using the remaining dough, steam it for 6-8 minutes. Remove.
While lighting the lamps in the evening, put ghee for this rice flour lamp and light it, Once its turned off,u can have it with grated or chopped coconut pieces. As it is without salt, you should have this rice flour lamp with either grated coconut or grated jaggery.
Note
Do not add all the boiling water to the rice flour at once. Please add little by little by mixing with the ladle simultaneously. By this way , you can find the rice flour getting cooked and make a non-sticky dough.
Knead the dough well for few minutes to make a crack free lamps and plates. Grease your hands with oil whenever necessary..
Do not steam for long time. Keep the idli plate only after the water in the idli pot starts boiling..
Serve this kozhukattai adding lots of grated coconut. As it is salt-less, you have to eat it this way :)
This is my first attempt in clicking a lamp at night, is it looking good or at least ok ? ;)
Pori urundai and sweet appam are prepared for karthigai deepam in every house.I learnt both these recipes from my MIL. In bangalore, we don’t get aval pori or nel pori . So we used to dry roast the thick aval and make pori urundai.This urundai can also be made using the ordinary puffed rice. It tastes great with both. Recipe & method are almost the same. The ratio of aval pori and jaggery is 8:1.Some people used to add the puffed rice to the jaggery syrup and some do the reverse. My MIL usually adds the jaggery syrup to the roasted poha. Sometimes we keep it as such without making balls ( pori kilari vaipathu).
Sweet appam can be made in many ways.It can be made using rice & coconut OR maida & rava OR wheat flour and rice flour. Here i’ve given the recipe using wheat flour and rice flour which makes the job easier and healthy too.Actually appam has to be deep fried but i make in paniyaram pan due to calorie consciousness ;). It stays soft for long time.
Update: This year I bought aval pori from Gandhi bazaar,Bangalore and made pori urundai. U can find that picture above.
Do try these recipe and share ur thoughts. Happy karthigai deepam :)
In a heavy bottomed kadai , dry roast the fried gram dal , sesame seeds .Roast coconut pieces in a tsp of ghee..If u are using poha/aval,dry roast thick poha in low flame carefully without changing the color.It may take around 10-15 mins. I roasted it in two batches ( 1/4 cup in each batch)..Roasting in batches helps uniform roasting. Aval will puff up and becomes crispy./Remove and keep it in a broad plate.\
If u are using ready made aval pori , u don't have to roast it. Roast coconut bits in a tsp of ghee and set aside.
Now put the grated jaggery & the water in the bowl and after the jaggery is melted , strain it to remove the impurities.. Boil the jaggery syrup till it reaches the soft ball consistency. U should be able to make a soft ball out the syrup..Please be careful and dont miss this consistency.(suppose if u miss this stage,just add little water to syrup and boil again.wait for right consistency and Proceed)Switch off the flame immediately. Add cardamom powder & dry ginger powder to it.Mix well.
Now in a broad kadai, take the roasted poha, sesame seeds & fried gram dal & coconut bits. Add the syrup to this mixture and mix well. When the mixture is warm, grease ur hands withe ghee or rice flour and make balls.Roll it tightly to make a perfect round.Give a setting time of 30 minutes.
Crispy aval pori urundai is ready , Enjoy !!
Note
For making pori urundai with puffed rice , follow the same procedure. If ur puffed rice is soggy , Heat a kadai and then put the soggy puffed rice , mix well and switch off the flame. Allow the puffed rice to remain in the kadai and mix it in regular intervals. Puffed rice will become crispy..
Jaggery syrup consistency is very important here. Soft ball should be made out of jaggery..syrup will be frothy & thick to look.
Adjust the amount of jaggery as per the sweetness u require..The color of the pori urundai depends on the color of jaggery and the amount of jaggery u use.
Appam recipe
Appam using wheat flour and jaggery for karthigai deepam
Powdered jaggery – 1/4 cup + 1/8 cup ( the ratio of wheat flour & jaggery should be 1:3/4)
Banana – 1 no ( small)
Cardamom powder – 2 pinches
Cooking soda – 1 big pinch
Water – 1/2 cup + 2 tbsp
METHOD
Grind the banana to a smooth paste adding little water in a mixie.
In a bowl take the flour , powdered jaggery , cardamom powder , ground banana and mix well. Add water to make a smooth batter. Finally before making the appam add the cooking soda , mix well.
Place the paniyaram pan , add little oil/ghee and pour the batter. Cover & cook for sometime. flip it and again cook for sometime.I wanted mine to be brown in color and i kept in high flame for few seconds before removing it..
Remove and serve.. Hot n soft appam is ready!!
Note
Adding mashed banana gives the softness to the appam
If desired coconut gratings can also be added.
Ghee can used to make this appam to make it more rich n flavourful.
U can also deep fry this appam instead of making in paniyaram pan ..
For getting nice round shape, use less oil while u deep fry and make it one by one…


 Sweet appam recipe using wheat flour, jaggery for Ganesh chaturthi, Karthigai deepam and Gokulashtami


 .So I usually make it more often for myself and Raksha as evening snack or dessert for your guests.Special thanks to my friend Jayagopal, otherwise i would not have done this post even now
  .Ok,Lets see how to make this yummy and easy paal kozhukattai recipe.