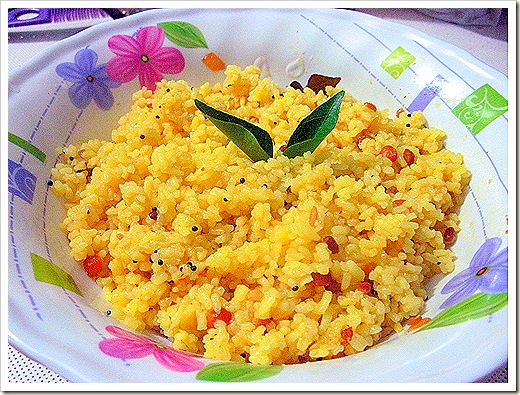
This is my first post on Karnataka recipes. As you all know, Chitrannam/Chitranna is a very popular breakfast/lunch recipe in Karnataka houses. Here people make this for all occasions and poojas. Not just in houses, this would be the breakfast recipe you can find in most of the small roadside hotels apart from thatte idli. I have tasted this chitranna with avalakki(poha) and Mandakki (puffed rice) in Davangere benne dosa stall.
Chitranna is nothing but our South indian variety rice with slight variations. They call it as Nimbe hannu chitranna for lemon rice. It can be made very quickly and its a tasty lunch box recipe too. Most of the kids in school bring this rice for their lunch box. I am really happy to share this most popular Chitranna recipe (
recipe with my name) as my first Karnataka recipes post. The recipe I have shared here tastes close to the ones that is served in restaurants here. I have also shared a coconut chutney recipe in the “Notes” section which is the side dish served in road side hotels for Chitranna. In small hotels, I have seen people having this chitranna with coriander leaves chutney and
Besan Bonda for breakfast. So I too served in the same way. It was awesome. Sendhil loved it a lot.
Before going to this recipe, I would like to mention about my Kannadiga friends, without them this post wouldn’t have come up.
I have been in Bangalore for 8 years but I have not even blogged a single Karnataka recipe. I feel so bad for this. The reason behind this is I have not tasted typical Karnataka food in hotels or in friend’s places and I did not get a good source to teach me all their recipes too. We had tried several times to visit MTR & Vidyarthi bhavan which are very famous restaurants here. But by seeing the crowd, we step out each time.
Last year I got some 6 good kannadiga friends. We met & became friends in Raksha’s school. As all of them are mom’s of Raksha’s class mates, we used to discuss about school, studies, food, movies etc and we have a group named “School moms” in Watsapp too. They all cook authentic Karnataka recipes like ragi mudde, bisibelebath, Thatte idli etc very well .They know about my food blog & suggest me some good recipes to try. I am really lucky and proud to get those friends.
Earlier I used to speak butler kannada and now my language has much improved just because of them. Not just the language, I explored Bangalore only becoz of my friends. We used to go to famous hotels, malls, chaat shops etc during vacations and weekends. Now I thoroughly enjoy my life in Bangalore because of these sweet souls. I wanted to write about them in one of my blog post for a long time but I feel this post would be apt to mention about these wonderful people. Here is the picture of my friends.
From left- Nagalakshmi, Priya, Padmini, Archana, Megha(with baby) and Thara(right side corner) in the second picture.
I have already told much about Megha in my
peanut chutney &
aloo paratha posts who is very close to my heart. This Chitranna recipe is also from Megha. Thanks a lot dearie.
I will mention about my other friends in my upcoming Karnataka recipes post. With all these great resources, I had started venturing Karnataka recipes & I have planned to post them once in a week. Wish me good luck friends. Ok,without much blah blahss, let me proceed how to make this yummy, easy chitranna recipe..
Chitranna recipe
 How to make Karnataka style nimbehannu chitranna /Lemon rice recipe
Cuisine: Indian
Category: Lunch
Serves: 3
Prep time: 5 Minutes
Cook time: 15 Minutes
Total time: 20 Minutes
INGREDIENTS
1 cup - 250ml
- Raw rice- 1/2 cup(Sona masoori rice)
- Big onion - 1 no(small sized, skip onions if making for pooja)
- Garlic cloves – 3 nos(finely chopped)
- Green chillies - 4 nos
- Turmeric powder - 1/4 tsp
- Lemon juice - 2 tbsp
- Grated coconut- 2 tbsp(optional)
- Salt- as needed
- Water - 2.5 cups
To temper
- Cooking oil - 1 tbsp
- Mustard seeds - 1/2 tsp
- Urad dal - 1 tsp
- Chana dal - 2 tsp
- Roasted peanuts - 2 tbsp
- Curry leaves - few
- Coriander leaves - to garnish
|
HOW TO MAKE CHITRANNA - METHOD
- Wash and pressure cook the rice adding required water and a drop of oil in low flame for one whistle. Open the lid and spread the rice in a plate.. Allow it to cool. Rice should be separate.
- Finley chop onions, green chillies, curry leaves and coriander leaves. Set aside .
- In a kadai, heat oil and temper all the ingredients given above.

- Now add onions, garlic, green chillies and saute till transparent. Add grated coconut (if using) & mix well. Add turmeric powder, salt, mix well and switch off the flame

- Add this to the cooked rice and mix well. Add the required lemon juice and check for taste. Add more salt or lime juice if necessary.

- Finally garnish with lots of coriander leaves and enjoy serving hot.
|
Note
- U can try this recipe with leftover rice too.
- U can make this as a no onion, no garlic version by omitting these two ingredients. In that case, you must add grated coconut and serve. U can prepare this way for occasions and festivals.
- For chutney: Grind 1/2 cup of grated coconut, 3 tbsp of fried gram dal, 3-4 green chillies, salt, little turmeric powder, a pinch of tamarind, 3 garlic cloves adding water. Adjust consistency as per your need. Usually it is served in watery consistency in hotels.
|
Enjoy this chitranna with green chutney and bonda !
Continue Reading...


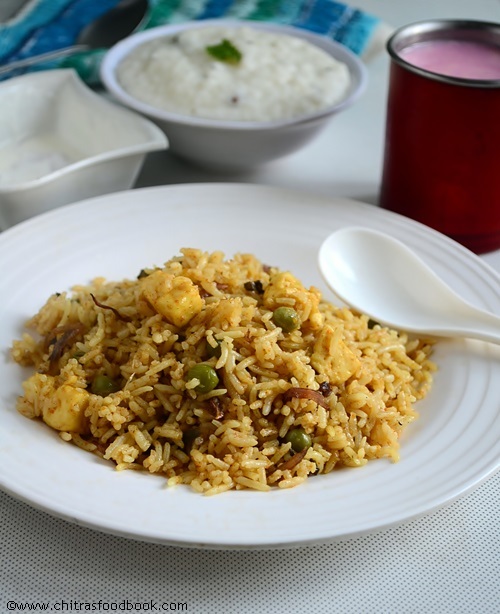
 Delicious paneer biryani in an easy way - No grinding and less chopping !