Search Chitra's Food Book

Showing posts with label LUNCH RECIPES. Show all posts

May 20, 2015

South Indian Full Meals | Lunch Menu For Guests | Thalai Vazhai Ilai Virundhu

South indian meals

Last week I made this full meals for my guests. Its been years since I posted a South Indian full meal lunch menu here. So I thought of sharing this yummy platter with you all. After Onam Sadya, I din’t get any chance to make an elaborate lunch menu and serve in Thalai Vazha Ilai / Banana leaf. 

Generally South Indians especially Tamil people make this kind of lunch menu for marriage feast, guests, newly wedded couple / Maapilai virundhu or for festivals and occasions. According to Tamil people, serving food in Thalai Vazhai ilai is considered to be the way of showing love and respect towards our guests. Not just that, there is a traditional serving order that has to be maintained while keeping the dishes in banana leaf.

In Tirunelveli, our people give more importance to the serving order. Before I served this platter, I called my mom and asked her about the serving order but still I got confused on where to keep the pickle and kept it wrong I think. So I asked my mom again and wrote this post with corrections. There may be slight variations from the write up and picture. So please don’t get confused. I have divided this post into sections for easier understanding. 

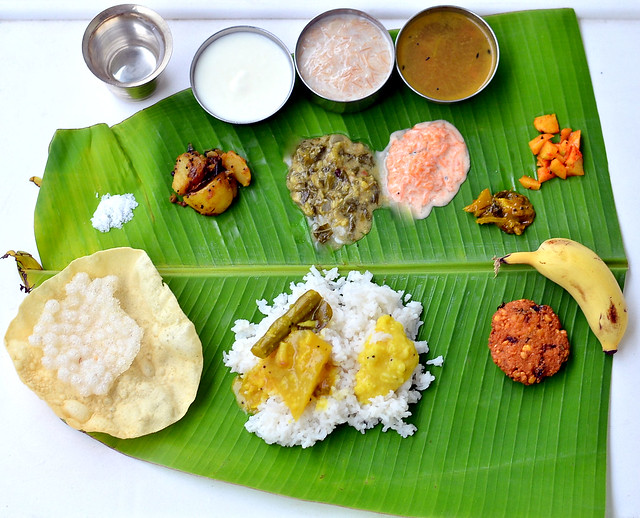
Hope this lunch menu post would help beginners especially newly wedded girls who are new to cooking. In the above platter, you can find (from left) Salt, Poriyal/Curry, Kootu, Thayir pachadi, Pickle, Rasam, Payasam, Curd, Banana,Vada, Rice, Dal, Sambar and Appalam. I have shared all these points based on my understanding and cooking style. Pardon me for mistakes :)

Check out my other state and some more Tamil nadu lunch recipes here .

Thalai vazhai ilai virundhu

SERVING ORDER
First lets see how to place the banana leaf and serve the dishes in order.
  1. Always place the banana leaf such that the broader side of leaf should be on the right side of person who is going to eat. 
  2. Start with salt on upper part left side of banana leaf (as shown in the pic). Some people may need more salt in dishes. Hence salt should be kept so that the person can add if its needed.
  3. Then serve the thayir pachadi on the right side upper part. Then comes kootu. Next to kootu keep poriyal, curry/roast. Here I served carrot thayir pachadi, keerai kootu and potato curry.
  4. Lastly keep the pickle varieties next to salt. Don’t forget to keep a tumbler of water.
  5. In the below part of banana leaf, keep the appalam, chips, vadam, masala vada or urad dal vada, Banana in the left side. Keep the rice in the middle of leaf and put some dal +ghee in one corner of rice. In Tirunelveli, people keep the dal in the right side and pour some ghee over it. In another corner of rice, add some sambar with vegetables.
  6. After the person finished eating dal rice, serve the sambar along with ghee if needed.
  7. Next to sambar, serve vathakuzhambu or more kuzhambu if you have prepared it.
  8. Then comes rasam. Before serving the curd, serve payasam. Some people wish to have in banana leaf and some prefer to have payasam in bowls. So serve it as per their wish.
  9. Lastly add the buttermilk / curd.
  10. After you finish eating, if its a marriage feast, close the banana leaf by pulling the upper part and cover the bottom part with it. It signifies that the person wishes to have this kind of food very often. Whereas if you have this food in a condolence meeting, then you should close the upper part with bottom part in the reverse manner.
South Indian Lunch menu

South Indian Full Meals


South Indian Full Meals South Indian lunch menu for guests - Banana leaf spread / Thalai vazhai ilai virundhu
Cuisine: Indian
Category: Lunch
Serves: Serves 4
Prep time: 45 Minutes
Cook time: 45 Minutes
Total time: 90 Minutes


INGREDIENTS
Vegetables to be chopped
For sambar
  • Raw mango - 1 no (Use 1/4 mango for pickle)
  • Drumstick - 1 no
  • Big onion - 1 no
  • Green chillies - 3 nos
  • Curry leaves - few
  • Coriander leaves - to garnish
For curry
  • Potatoes - 4 nos
  • Big onion -1 no
  • Curry leaves - few
For kootu
  • Keerai - 1 bunch ( I used mulai keerai)
  • Small onions - 5 nos
Other Ingredients
  • Rice – 2 cups
  • Toor dal – 1/2 cup
  • Moong dal – 1/4 cup for serving + 2 tbsp for kootu
  • Sambar powder – as needed
  • Salt & water – as needed
  • Cooking oil,mustard,urad dal,cumin seeds – as required


    HOW TO COOK A FEAST
    I prepared this lunch menu for 4 adults + 1 kid. It took nearly 1 hour 30 minutes for me to finish the preparation. I started around 10 am and finished making all the dishes except rice at around 11.30 am. I used 2 pressure cookers, a small & a big one and 3 kadai. I always pressure cook the rice at the end while making feast so that you can serve the rice hot hot while eating. No worries even if sambar, rasam and other dishes are cold. In fact making these dishes earlier gives more taste. So the earlier you prepare, the better its taste would be ; ))
  • In the previous day night, wash and soak the dal for vada. Soak it over night. Soak the tamarind in separate bowls for sambar and rasam in the previous day night.
  • The next day morning, start the cooking at least 3 hours before serving time. First take a big pressure cooker and add the toor dal, salt, turmeric powder, hing and a drop of oil (for making sambar). Take a small container or tiffin box like thing that suits the cooker. In that, put the moong dal,water, hing, turmeric powder and a drop of oil. This dal is for serving. Wash and cut the potatoes into two and put them inside the cooker. Hope you can get the idea by seeing the picture. It takes nearly 15 minutes for cooking.
South Indian lunch menu
  • In that 15 minutes of time, you can go for chopping works. First grate 2 carrots and finely chop a green chilli for pachadi. Keep in a bowl adding salt. Chop onion, green chillies, Drumstick and mango for sambar. Keep in a plate. Chop a portion of mango into small pieces for pickle. Add salt, red chilli powder and hing to it. Mix well and set aside. Now wash the greens / Keerai twice and chop it roughly. Take it in a small cooker. Chop few small onions for kootu. Keep in a plate. Chop some onions, curry leaves, mint leaves and coriander leaves for vada.
South Indian lunch menu
  • By this time, the pressure would be released in the cooker, dals & potatoes would be ready. So remove the potatoes using a tong and keep them immersed in cold water. It helps to peel the skin easily. Chop them into cubes and set aside.
South Indian lunch menu
  • In a small cooker, take the chopped greens, add moong dal, salt and required water. Cook for 1 whistle in low flame. It takes 10 minutes to cook.
  • In that time, do the grinding job. First grind for vada and then for kootu. Keep them in separate bowl. Mix the chopped onions+greens with vada batter & set aside.
  • Now you have cooked the dal for sambar, dal for serving, potato for poriyal and keerai for kootu. So pressure cooking, chopping and grinding jobs are over simultaneously.
  • Then heat a kadai with ghee and roast the vermicelli for payasam. Add milk and cook it. Transfer the payasam into a bowl and close it with a lid.
South Indian lunch menu
  • In another kadai, make sambar. While the drumstick and mango is getting cooked in tamarind extract, add the ground coconut paste to the pressure cooker in which you cooked the keerai. Let it boil for sometime till kootu thickens.
  • Now the veggies in sambar would have cooked. Add cooked dal to the sambar and let it boil for sometime. Garnish the sambar with coriander leaves and add a tbsp of ghee at the end. Cover the bowl and set aside. Heat oil in another kadai and temper the ingredients for potato curry. Add the peeled potatoes and roast it well.
South Indian lunch menu
  • Sambar, poriyal, kootu making is over. Now heat a small tempering kadai with 3 tbsp of oil and splutter mustard seeds, urad dal, curry leaves, jeera. Add half the tempered items in small quantities to serving dal ( thick dal), thayir pachadi and lastly add the chopped onions in the kadai and saute till transparent. Add it to kootu. Add some coconut oil. Close the kootu with a bowl to retain the aroma.
  • Now make rasam and close the bowl by adding a tsp of ghee. Add some water to the tempered moong dal along with salt and hing. Mix well. Similarly add the curd to the grated carrot with some salt. Mix well. Thayir pachadi is ready.
South Indian lunch menu
  • Just 45 minutes before serving, pressure cook the rice in one burner. Heat oil for deep frying in another burner. Make vada, roast papad, chips or vadam. That’s all.Rice, Sambar, rasam, kootu, curry, thayir pachadi, paruppu/dal,  vada, appalam is ready.
  • Start to serve following the above mentioned order. Enjoy the feast !
  • TIPS : Add a tbsp of ghee in the sambar, garnish with coriander leaves,check for salt and close the lid of sambar bowl.Addition of ghee & coriander leaves gives a nice aroma to the sambar.Similarly add a pinch of sugar and a tsp of ghee to rasam. It enhances the taste and gives a clear rasam while you serve.
    If you want to finish the entire process within an hour, you can do some pre preparatory jobs in the previous day night. Finish the chopping works and refrigerate the vegetables, grated coconut and carrot in separate zip lock bags. Soak the dal for 4 hours and grind the vada batter. Mix onions,greens and refrigerate the batter too. Doing all these jobs will spare 30 minutes of your cooking time on feast day. So its your choice. Enjoy the South Indian Full Meals : ))

LINKS FOR DISHES WITH CHOICE
Please check out my recipe index page for more sambar, rasam, kootu, poriyal and pachadi ideas.

Try and Amaze your guests and family members with this South Indian Full Meals menu, get the applause !
Continue Reading...


February 22, 2015

Bitter Gourd Biryani Recipe-Pavakkai Sadam-Sunday Lunch Recipes-7

Bitter gourd biryani recipe
Bitter gourd biryani/Pavakkai masala rice -Yeah, you heard it right. Its an easy, yummy biryani recipe using bitter gourd. If you love bitter gourd like me, you must try this rice. It tastes super flavorful with mild bitter taste. When I was looking for this week’s Sunday Biryani Recipes, my MIL suggested me to try this biryani by reading this recipe from a Tamil Magazine.

Initially I was hesitant to try this worrying about its bitter taste but she also told suggested me a method to remove its bitterness. So I tried it confidently & the result was unbelievably great with a very mild bitter taste only in pavakkai pieces and not in rice at all. Raksha took two servings of this rice without knowing it had pavakkai. 

U can make it very easily in busy morning hours as it has no grinding job and pack it for your lunch box too. But soak the bitter gourd pieces in curd+salt mixture and refrigerate it overnight so that you can prepare this biryani instantly in the morning. You can also use vinegar as suggested in the original recipe. But squeeze and rinse the bitter gourd thoroughly to remove vinegar smell.

Bachelors & working women can try this biryani if you love bitter gourd recipes. Try and share your feedack with me. Lets see how to make this yummy bitter gourd biryani.

Pavakkai rice recipe

Bitter gourd biryani recipe


Bitter gourd biryani recipe Bitter gourd biryani/Pavakkai Masala rice- Easy n delicious rice variety
Cuisine: Indian
Category: Lunch
Serves: 2
Prep time: 30 Minutes
Cook time: 15 Minutes
Total time: 45 Minutes


INGREDIENTS

  • Basmati rice - 1 cup
  • Milk - 1 cup
  • Water - 0.75 cups
  • Salt - as needed
  • Oil - 1 drop
To soak for 30 minutes ( helps to remove bitterness)
  • Bittergourd – 1 no ( medium size)
  • Sour curd – 1/2 cup
  • Salt – little(u can use vinegar in place of curd)
  • To saute
  • Cooking oil - 1.5 tbsp
  • Cinnamon - 1 inch piece
  • Cloves - 3nos
  • Biryani leaf- 1 no
  • Kalpasi/Black stone flower - 1 no
  • Big onion - 1 no ( sliced)
  • Turmeric powder - 1/4 tsp
  • Red chilli powder - 1 tsp ( use more for extra spicy taste)
  • Mint & coriander leaves - a fistful
  • Ginger & Garlic paste - 1/2 tbsp ( Grind 2 inch ginger & 7 cloves garlic)
  • Ghee - 1/2 tbsp
  • Lemon juice – 2 tsp
HOW TO MAKE BITTER GOURD BIRYANI - METHOD

  • Wash and slice the bitter gourd pieces thinly as possible. Remove the seeds if any OR If you like the crunchy taste of seeds,retain it. Take half cup of sour curd. Add some salt, mix well and soak bittergourd for 30 minutes. Similarly wash and soak the basmati rice in water for minimum 30 minutes. Chop the onions,coriander & mint leaves and set aside.
Pavakkai rice
  • After 30 minutes, squeeze the bitter gourd pieces very well using your hands and discard the curd mixture. Take the bitter gourd pieces alone in a plate.
Pavakkai rice
  • Heat oil in a pressure cooker base and put the cinnamon, cloves, biryani leaf, kalpasi. Add onions and saute for a minute and then add the ginger, garlic paste.
Pavakkai rice
  • Mix well for few seconds and add the mint+coriander leaves. Mix it. Now add the turmeric powder & red chilli powder, salt. Lastly add the squeezed bitter gourd pieces and saute well for a minute till it shrinks a bit. Add little more oil if needed.
Pavakkai sadam
  • Now add the soaked basmati rice without water. Add 1 cup of milk and 0.75 cups of water. Add 1/2 tbsp of ghee & 2 tsp of lemon juice in water. Check for salt & spiciness. 
  • Pressure cook in low flame till one whistle. It takes 8-10 minutes. Remove & fluff with a fork after the steam is released. Serve it hot with onion raita.
Pavakkai sadam

Enjoy !


Note

  • Add more chilli powder if you want extra spicy taste.The quantity I have mentioned here would be just right.
  • U can also add 1/2 tsp of biryani masala powder or garam masala powder for more spicy flavor.
  • I have used milk + Water. U can also use coconut milk for more richness.
  • Do not skip mint & coriander leaves as they lend a special fragrance.
  • I din’t use biryani leaf here. 
  • I used freshly ground ginger, garlic paste. U can use store bought too.
  • Soak basmati rice for minimum 30 minutes to get lengthy rice after cooking.


Try this unique and healthy bitter gourd biryani. It tastes yum with simple onion raita !
Pavakkai sadam

Continue Reading...


February 8, 2015

Kerala Veg Biryani Recipe-Malabar Veg Dum Biryani-Sunday Lunch Recipes 5

Vegetable Layered Biryani
Sorry friends.I was not able to post this recipe last Sunday as I travelled to Palani, Tamil nadu. It was an unexpected trip. So I am posting this yummy Kerala style Vegetable layered biryani recipe for this week’s Sunday Lunch Recipes series-5.

Generally Kerala biryani / Malabar biryani is mostly done with chicken or mutton. But when I saw this Kerala style veg biryani recipe in this and this blogs, I became very happy and bookmarked them immediately. I was expecting coconut in the recipe but to my surprise the recipe and making is very similar to Hyderabad DUM biryani sans saffron. I just combined both the blog recipes and it came out awesome. I was happy with this Kerala style Veg DUM biryani recipe. Everyone loved its taste & flavor. 

If you don’t want to follow DUM method, you can make it simple by just sauting everything in cooker base as we do for our normal biryani. I had tried this in either ways. It tastes good. So try this biryani for your family, friends & relatives and take the credits!!  Lets see how to make this Kerala Vegetable biryani recipe !
Kerala Vegetable Biryani recipe

Kerala vegetable biryani - Malabar style


Kerala vegetable biryani - Malabar style Malabar style vegetable biryani - Kerala Veg biryani recipe
Cuisine: Indian
Category: Lunch
Serves: 3
Prep time: 60 Minutes
Cook time: 20 Minutes
Total time: 80 Minutes


INGREDIENTS

  • Basmati rice - 1 Cup (I used India gate)
  • Cloves – 3 nos
  • Cinnamon – 1 inch piece
  • Cardamom – 2 nos
  • Water – 1.5 cups
  • Ghee – 1 tsp
For Gravy
  • Ghee – 3 tbsp  (OR use oil + ghee in equal measure)
  • Bayleaf – 1 no
  • Kalpasi/Black stone flower – 2 nos
  • Big onion - 2 nos
  • Ginger & Garlic Paste – 2tsp
  • Green chilli paste – 1 tsp( grind 3-4 nos)
  • Tomato – 1 no ( finely chopped)
  • Garam masala powder or Biryani masala powder - 1/2 tbsp
  • Chilli powder/Pepper powder – 1/2 tsp ( optional)
  • Yogurt - 2 tbsp
  • Mixed vegetables - 1/2 cup ( 1 carrot, 5 beans, handful of peas, 1 big potato)
To  roast & garnish
  • Ghee- 1 tbsp
  • Big onion - 1 no
  • Cashews - few
Coriander & mint leaves – few
Lemon juice – as needed

HOW TO MAKE KERALA VEG BIRYANI - METHOD

  • Wash and soak the basmati rice for 30 minutes to 1 hour. Cook the rice in a pot or kadai adding 1.5 cups of water by adding cinnamon, cardamom, cloves. Cover cook in medium flame till rice is cooked 3/4th. Remove the rice once all the water is absorbed by it. Spread it in a plate and fluff it with a fork. Set aside.
Kerala Veg Biryani
  • Wash and chop all the vegetables.
  • In a pressure cooker base, heat ghee, saute bayleaf and kalpasi. Add  the gg paste and green chilli paste. Saute till raw smell emanates completely. Now add the onion slices.
Kerala Veg biryani
  • Now add the finely chopped tomato pieces. Saute till it turns mushy. Now add the garam masala or biryani masala powder. Mix well. Check for taste and add chilli powder or pepper powder if needed. Lastly add the vegetables, salt and curd. Mix well. Add little water(say 1/2 cup) & pressure cook in high flame for one whistle.( Do not over cook the veggies.One whistle in high flame would do).
Kerala vegetable biryani
  • After the steam is released, open the cooker & mix the masala. Make sure the masala is not too dry. If it looks dry, add 1/4 cup of water, give a boil & make it wet with some moisture content.
  • Heat 1 tbsp of ghee in a kadai & roast onions & cashews till golden brown. Set aside.
Kerala Veg biryani
  • HOW TO LAYER THE RICE FOR BIRYANI : Now take a kadai or a pot with flat bottom. Spread one layer of rice & sprinkle few drops of lemon juice. Now spread a layer of cooked vegetable masala over the rice. Sprinkle some finely chopped mint and coriander leaves. Again spread the rice, then masala and mint leaves. Repeat the same until all the rice and masala are over. Lastly add the fried onions, cashews. Cover the kadai with a suitable tight flat lid.
Vegetable Layered biryani
Kerala Vegetable biryani
  • HOW TO PUT IN DUM : Heat a dosa pan in high flame for 3 minutes & after the pan is heated well, simmer the flame completely. Keep the biryani pot/Kadai. Boil water in a bowl and keep the boiled water above the biryani pot/kadai. Let it sit for 10 minutes in very low flame. 
  • If you feel, vapour comes out of the kadai, wrap the mouth of kadai/Pot with thermal foil before you put in dum. If you have a tight lid, then you don’t have to wrap the pan. After 10 minutes, remove the pan and fluff the rice with a fork. Serve hot with raita.

Vegetable Dum biryani
Enjoy !


Note

  • Adjust the quantity of spices as per your taste.
  • U can also add saffron soaked milk while layering.
  • U can put the dum using pressure cooker but keep the cooker directly over very low flame for 5-10 minutes.


Have this yummy Kerala Malabar Vegetable biryani recipe. I served it with onion raita and made Gulab Jamun for dessert !
Kerala Malabar biryani recipe

Continue Reading...


January 25, 2015

Chettinad Baby Potato Biryani Recipe-Sunday Lunch Recipes-4


Baby potato biryani
Actually i wanted to try some Chettinad biryani recipe for Sunday's lunch recipes & browsed for Anjappar Hotel style biryani to try with vegetables.But ended up making this chettinad baby potato/Kutti Urulai kilangu(in Tamil) biryani recipe.This is the first time i made a biryani using baby potatoes.I referred Jeyashri’s blog for the recipe but modified it slightly to suit our taste buds.I am very happy & completely satisfied with its flavor & taste.Now i can confidently try this recipe for my guests too.Lets see how to make this yummy potato biryani recipe in my Sunday Special Lunch Recipes Series-4.
Small potato biryani

Baby Potato Biryani Recipe


Baby Potato Biryani Recipe Baby Potato Biryani Recipe - Chettinad style
Cuisine: Indian
Category: Lunch
Serves: Serves 3
Prep time: 60 Minutes
Cook time: 15 Minutes
Total time: 75 Minutes


INGREDIENTS

  • Basmati rice - 1 cup ( I used India Gate)
  • Water - 1.5 cups(I used 1.75 cups )
  • Salt - as needed
To grind & Marinate
  • Boiled & Peeled Baby potatoes/small potato - 15 nos
  • Cooking oil - 1 tsp
  • Big onion - 1no
  • Green chillies - 3 nos
  • Mint leaves - 1/4 cup
  • Curd/Yogurt - 1tbsp
  • Cashewnuts - 5 nos
  • Soambu/Fennel seeds - 1/2 tsp
  • Ginger - 1 inch piece
  • Garlic cloves - 5 nos
  • Cloves/Krambu - 2 nos
  • Cardamom - 2 nos
  • Kalpasi/Black stone flower/Kallu hoova - 4 nos( small)
To saute in oil
  • Cooking oil - 2tbsp
  • Ghee - 1 tbsp
  • Biryani leaf - 1 no
  • Cinnamon/Pattai - 1 no
  • Big onion - 1 no
  • Tomato - 1 no ( optional,i dint use)
  • Red chilli powder - 1/4 tsp
  • Coriander powder/Dhania powder - 1/4 tsp
  • Turmeric powder - 1/4 tsp
METHOD

  • Wash the rice well & drain the water.Add 1.75 cups of water to it & soak the rice for 1 hour.
  • In the mean time,wash & pressure cook the baby potatoes in high flame for 3 whistles.Peel the skin and set aside.
  • Heat a kadai with 1 tsp of oil and saute the big onion slices.Remove & take this in a mixie jar.Add green chillies and other ingredients given under “ To grind & marinate” & grind everything to a smooth paste adding enough water.
Potato biryani-1
  • Take the peeled potatoes & add the ground paste to it.Prick the potatoes with a fork & mix well.Let it marinate for 20 minutes.
Potato biryani-2
  • Heat oil + ghee in a pressure cooker base and saute the biryani leaf & cinnamon.Then add the onion slices.Saute well till it turns transparent.Then add the finely chopped tomatoes if using.Saute well till mushy.Now add the marinated potatoes along with masala.Add chilli powder,dhania pwd & turmeric pwd.Saute well till raw smell goes off.
Potato biryani-3
  • Now add the soaked rice along with water & required salt.Mix well & cover cook in low flame for one whistle.It takes 10-12 minutes.Remove the lid after the steam is released.Fluff it with a fork.
Potato biryani-4

Enjoy !
Note

  • If u don’t have small potatoes in hand,use big potatoes but cook it & chop them into bite sized pieces before marination.
  • You can also add the combination of coriander & mint leaves in equal ratio while grinding.
  • Skip adding kal pasi if u don’t have in hand.But please use it if u have because it gives a great smell to the biryani.
  • You can also sprinkle some lemon juice at the end before closing the cooker.Its optional.


Try this Chettinad baby potato biryani for this weekend ! I served with homemade potato chips.It was yummy to tummy Drooling
Small-potato-biryani
Continue Reading...


January 18, 2015

Veg Fried Rice Recipe In Rice Cooker(Indian)-Sunday Lunch Recipes-3


I am glad i have successfully reached the 3rd post in my Sunday lunch Recipes SeriesHappy.I have been sharing biryani,pulao & other rice varieties that i make in weekends.This week,i have blogged my vegetable fried rice recipe in Indian style using electric rice cooker.I know most of u make veg biryani & veg pulao in rice cooker.But making a fried rice in rice cooker may be new to some of u.Not just this,the method i have shared here may also be new & it is somehow different from our usual fried rice recipe.A very big thanks to my dear friend Shalini for teaching me this easy,hassle free,wonderful ,Indian style fried rice recipe.Whenever i go out for shopping in weekends with my family,i make this rice recipe along with curd rice.It stays warm & as soon as we reach home,i just saute the required amount in ghee & serve it hot hot.As we love to have fried rice with tomato sauce as side dish,i don’t make any specifically.But my friend suggested peas butter masala & paneer butter masala as the best side dish for fried rice.So make it as per your choice.Ok,Lets see how to make fried rice recipe in electric rice cooker.
Check out my tomato rice recipe using rice cooker & Chinese veg fried rice recipe


Veg fried rice recipe in rice cooker


Veg fried rice recipe in rice cooker Indian style Vegetable fried rice recipe using Rice cooker
Cuisine: Indian
Category: Lunch
Serves: Serves 3
Prep time: 60 Minutes
Cook time: 20 Minutes
Total time: 80 Minutes


INGREDIENTS
To cook in rice cooker
  • Basmati rice - 1 cup
  • Water - 2.25 cups
  • Lemon juice - 1/4 tsp
  • Oil - 1 tsp
  • Finely chopped vegetables - 1/2 cup ( 1 carrot,5 beans,1 potato,green peas)
  • Salt - as needed
To saute in oil
  • Cooking oil - 2 tbsp
  • Shredded cabbage - 1/4 cup
  • Capsicum - a small piece
  • Spring onion - 2 sprigs
  • Big onion - 1 no (optional)
  • Garlic cloves - 5 nos ( optional) 
  • White pepper powder - 1tsp ( add more for spicy taste)

  • Ghee - 1 tsp ( for one person)
  • spring onions – to garnish
METHOD

  • Wash the rice twice & drain the water.Soak it adding 2.25 cups of water,lemon juice & oil for 1 hour.Rice will be soaked well.In the mean time,finely chop the vegetables,onion,capsicum & spring onion.Keep it ready.

  • Switch on the rice cooker,keep in cooking mode & allow it to heat for sometime. As soon as the plate is heated,add the soaked rice along with water,finely chopped carrot,beans & potato.Add the required salt,mix well & cover the rice cooker.Let the rice cook well.Open it once in the middle & fluff it with a fork.Once its cooked,rice cooker will switch to Keep Warm mode automatically.
Veg fried rice-1

  • Finely chop the cabbage,onions,garlic cloves,bottom part of spring onion & capsicum. Heat oil in a kadai & saute them well adding little salt( remember we have added salt in rice) Add this to the cooked rice.Add pepper powder & keep it closed till use.Now the rice cooker will be in”Keep warm” mode.
Veg fried rice-2
Veg fried rice-3
  • Just before serving,heat ghee in a kadai and add the required amount of fried rice.Saute well in high flame for a minute,Keep tossing & serve hot immediately.Enjoy with any side dish or tomato sauce.
Veg fried rice-4


Note

  • I have not used soya sauce here.You can use it if  u need.
  • Adding onions & garlic is purely optional.My friend doesn’t add it.
  • Adding lemon juice in rice helps to give u white colored rice after cooking.But do not add more.
  • I don’t add ajinomotto as it is not good for health.


Try this easy veg fried rice recipe using rice cooker & enjoy ur weekend lunchHappy


Continue Reading...