Search Chitra's Food Book

Showing posts with label SWEETS RECIPES. Show all posts

July 1, 2016

Pineapple Kesari Recipe – Pineapple Kesari Bath

Pineapple kesari bath recipe
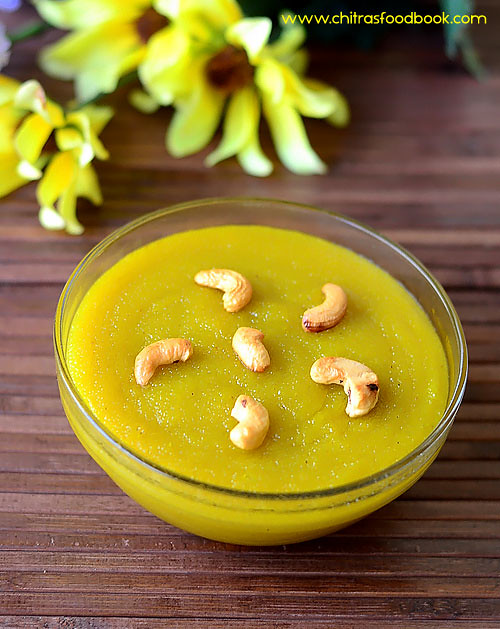
Usually I make Pineapple Kesari just by adding Pineapple essence and yellow food color to the normal rava kesari. I have never tried it with Pineapple chunks. Yesterday I bought a small pineapple to try this authentic pineapple kesari served in weddings, functions and Karnataka special Pineapple Gojju recipes.So this morning I made kesari bath for my Thursday Guru pooja. 

I followed my microwave rava kesari procedure and ingredients which I adapted from Revathy Shanmugam mam’s recipe. It came out very well, soft and flavorful. Being a Pineapple lover, I loved each and every bite of it in the kesari. But the only thing I felt was, I chopped Pineapple into big chunks thinking it would mash up in the kesari but it remained as it is. So please chop the pieces very finely or make it a coarse paste to avoiding biting chunks in between the super soft Kesari. 

Friends, do try this different type of kesari using pineapple for your friends & family, Enjoy!! Lets see how to make pineapple kesari recipe with step by step photos.

Check out my basic rava kesari recipe, Karnataka kesari bath recipe, Milk kesari, Semiya Kesari, Microwave rava kesari & mango kesari recipes

Check out the health benefits and more details about Pineapple HERE

Pineapple kesari

Pineapple Kesari Recipe


Pineapple Kesari Recipe Pineapple Kesari Recipe - An easy, Indian dessert recipe !
Cuisine: Indian
Category: Sweet
Serves: Serves 3-4
Prep time: 10 Minutes
Cook time: 15 Minutes
Total time: 25 Minutes


INGREDIENTS
1 cup - 200ml
  • Rava/ Bombay Sooji - 1/2 cup
  • Sugar - 1 cup
  • Small Pineapple pieces - 1/2 cup
  • Pineapple essence - few drops
  • Yellow food color - 2 pinches
  • Water - 2.5 cups
  • Ghee - 2 tbsp + 2 tsp
  • Cooking oil - 2 tbsp ( No flavored oils)
  • Cashews and raisins – few ( optional)
METHOD

  • Wash and chop the pineapple into very small pieces or coarsely grind the pieces ( I chopped it big by mistake). Take them in a bowl and add 2 tbsp of sugar from 1 cup of sugar. Mix well and cover the bowl. Let the pineapple pieces soak in sugar for 20 minutes and becomes soft.
  • Take a wide plate and grease it with ghee.Set aside. In a kadai , heat 2 tbsp ghee + 2 tbsp oil.
Pineapple kesari recipe
  • After its heated, reduce the flame to medium and roast the cashews & raisins.Remove it in a plate after cashews turn golden and raisins bloat. Now add the rava. Rava should sizzle as soon as you add it. Roast the rava well for 2-3 minutes by staying nearby. Make sure you don’t burn the rava or change its color.Switch off the flame and let the rava be in the same kadai.
Pineapple kesari recipe
  • In a bowl, roll boil 2.5 cups of water adding yellow food color and soaked pineapple pieces. Do not add the sugar water in the pineapple pieces. Add the fruit alone. Cover & cook the pineapple pieces. Add this water to the roasted rava. Take care, water will splash. Now switch on the flame and keep stirring. As soon as rava becomes thick, close the kadai with a lid & simmer the flame completely. Cook the rava for 3-4 minutes.
Pineapple kesari recipe
  • Open the lid and mix the cooked rava. Add sugar and stir it without lumps. Do it fast, Sugar will melt, mixture will become thin and watery. Add pineapple essence.
Pineapple kesari recipe
  • Keep stirring till the kesari starts to leave the sides of pan. As soon as kesari starts to leave the sides of pan, add 2 tsp pf ghee, mix well & switch off the flame. Transfer to the ghee greased plate. No problem if the kesari is not thick, it will thicken as it turns warm.
Pineapple kesari recipe
    Enjoy !
Note
  • I used rava and sugar in the ratio of 1:2. You can reduce to 1.5 cups if you want mild sweetness.
  • Adding more water makes the kesari soft. So I used 1:5 rava and water.
  • Oil helps to maintain the texture of kesari and prevent its from hardening. So do not skip it. Use unflavored oils like refined oil or olive oil. Never use groundnut oil/Kadalai ennai.
  • If you don’t like eating pineapple pieces in the kesari, chop it very finely so that it will mash up while cooking and you won’t get pieces in your mouth. You can also try grinding them coarsely.
  • If you don’t have pineapple essence, skip it or add cardamom crushed seeds if you like.

  Yummy , flavorful kesari is ready to enjoy !
Pineapple kesari recipe
Continue Reading...


April 29, 2016

Mango Kesari Recipe – Mango Sheera – Kesari Varieties

Mango kesari recipe
Mango season has started. Last year I shared few ripe mango recipes like Mango ice cream, Mango sago and Aamras. This year I wanted to start my mango recipes with this easy and yummy mango kesari as I love to make different varieties of kesari at home. 

Mango kesari is nothing but our usual rava kesari cooked with mango pulp. It is known as Aam ka sheera in Hindi, Ambyacha sheera in Marathi and Mambazha kesari in Tamil. Yesterday I tried it for the first time I followed the procedure of my rava kesari recipe and prepared this. It came out so well with the awesome flavor of ripe mango. Do try this kesari recipe for a change. You will love it for sure. Lets see how to make this easy, delicious mango kesari. Even beginners & bachelors can make a perfect kesari by following this recipe.
 
Check out my Semiya kesari, Karnataka Kesari bath, Milk kesari, Microwave Rava Kesari recipes too.
Mango sheera recipe

Mango kesari recipe


Mango kesari recipe How to make rava kesari with mango pulp - Mango sheera / Mango kesari recipe
Cuisine: Indian
Category: Sweet
Serves: Serves 4
Prep time: 10 Minutes
Cook time: 10 Minutes
Total time: 20 Minutes


INGREDIENTS
1 cup = 250ml
  • Rava/Sooji - 1/2 cup
  • Mango Pulp - 1/4 cup ( Use 1/2 of ripe mango or readymade mango pulp)
  • Sugar - 3/4 cup
  • Cardamom powder - 1/2 tsp
  • Ghee - 3 tbsp
  • Cashews - few
  • Water - 2.5 cups
  • Lemon yellow food color – a pinch ( Optional)
METHOD

  • Take the ripe mango, peel the skin. Remove the pulp and grind it to a smooth paste without adding water. Measure 1/4 cup of it and set aside.I used readymade mango pulp here.
  • Heat 1 tbsp of ghee in a kadai. Roast the cashews till golden and remove in  a plate leaving the ghee in the kadai. Add the rava. It should sizzle in the sides as you see in the picture. Roast it in medium flame for 3-4 minutes. Remove in a plate.
Mango kesari
Mango kesari
  • In the same kadai add 2.5 cups of water and 1/4 cup of mango pulp ( you can add 1/2 cup of mango pulp if you want more mango flavor) I din’t want dominating mango flavor in my kesari, so I added the pulp half the quantity of rava.
Mango kesari
  • When the water comes to roll boil,lower the flame completely and add the roasted rava. Mix it well using a whisk. Make sure there are no lumps in it. Rava splashes, be careful while mixing. After all the water is absorbed by the rava, close the kadai with a lid and keep the flame medium. Let the rava cook well for 2-3 minutes.
Mango kesari
Mango kesari
  • Open the kadai and add sugar. Mix well with a whisk without lumps. It will become watery. So mix well till the kesari becomes slightly thicker.
Mango kesari
  • Add the remaining 2 tbsp of ghee and cardamom powder. Mix till the ghee is absorbed by the kesari. Don’t wait for the kesari to leave the sides of kadai. Remove it as soon as the ghee is absorbed by the kesari.
Mango kesari
  • If you keep on stirring after this stage, kesari will become hard and chewy.So remove the kesari in a ghee greased bowl or plate. Don’t worry, Kesari will be very slightly watery, sticky and it falls like a ribbon as shown in the picture. It will thicken and tastes soft when it becomes warm. You can make them into pieces if you spread the kesari in a plate OR serve it as a scoop in bowls. Enjoy !
Mango kesari


Note
  • Add 1 cup of sugar if you want more sweetness in your kesari. As we are adding mango pulp, the quantity of sugar I mentioned here is enough.
  • You can add more mango pulp if you like dominating mango flavor.
  • I have used readymade mango pulp here. You can take the pulp from the ripe mangoes, grind to a puree and use it.
Enjoy this easy, yummy mango flavored kesari at home with your loved ones Happy
Mango kesari recipe
Continue Reading...


March 21, 2016

Gujiya Recipe With Mawa, Suji - How To Make Gujiya With Step by Step Pictures

Gujiya recipe
Holi festival is around the corner.When I was looking for Holi special recipes, I found Gujiya is a must to do recipe for this festival. When I browsed for the recipe, I found it was very similar to Sweet samosa/Karanji , Chandrakala and Suryakala sweet recipes. Of course there are some slight variations between each of them. So this time I tried an Authentic North Indian style Gujiya recipe using mawa and suji by following the recipe shared by Sandhya Soni, a member of Facebook’s Chef at large group. Here is the link. It came out very well.

 I was very happy & satisfied with the result. Sendhil & Raksha loved it too. So I thought of sharing this wonderful recipe as my contribution to Holi festival recipes. I used khoya/mawa for gujiya filling as mentioned in the original recipe. If you wish to try without khoya, you can replace it with dessicated coconut and powdered nuts. Please refer my Sweet samosa recipe to know its procedure. Try it and share with your friends and relatives on HOLI day !! Have a colorful celebration. Lets see how to make Gujiya recipe with mawa and sooji stuffing with step by step pictures.

Gujiya recipe

Gujiya recipe


Gujiya recipe How to make gujiya with khoya/mawa filling - Holi festival recipes
Cuisine: Indian
Category: Sweet
Serves: 8-10 
Prep time: 30 Minutes
Cook time: 20 Minutes
Total time: 50 Minutes


INGREDIENTS
1 cup = 240ml
  • Maida - 1 cup
  • Melted ghee - 1.5 tbsp ( at room temp)
  • Water - as needed
For filling
  • Unsweetened khoya - 1/2 cup  ( I used Amul)
  • Powdered sugar - 1/2 - 3/4 cup ( based on taste)
  • Chopped nuts - 2 tbsp ( badam, cashew,pista)
  • Roasted sooji - 3 tbsp
  • Cardamom powder - 1/8 tsp
  • Cooking oil - to deep fry
HOW TO MAKE GUJIYA - METHOD

  • Take a wide bowl and add the flour. Add the melted ghee at room temperature and mix the flour. After the ghee is well mixed with the flour, add water little by little and make a smooth dough. Knead the dough for 5 minutes and rest it for 30 minutes. Cover the dough with a wet cloth.
Gujiya recipe
Gujiya recipe
  • In the mean time,make the filling. Take the unsweetened khoya in a non-stick kadai. Heat the khoya in medium flame and mix until it leaves the pan and starts to rotate with the ladle. The color of khoya will turn golden brown. This process takes around 10 minutes or more. So do it patiently in low to medium flame. Remove in a plate. Dry roast the sooji well. Collect in another plate.
  • Gujiya recipe
  • Let the cooked khoya  & roasted rava cool down completely. Now mix the finely chopped nuts, powdered sugar, khoya and rava very well till the mixture looks crumbly. Add cardamom powder, mix well. Stuffing is ready.
Gujiya recipe
Gujiya recipe
  • Now take the dough and roll it to a cylinder.Make balls of equal size. Roll the ball into small poori and keep a tbsp of stuffing in the center. Apply water on the corners and fold the poori into a half moon shape. Now fold the edges as shown in the pic OR press the corners with a fork.
Gujiya recipe
Gujiya recipe
Gujiya recipe
  • Heat oil and drop a pinch of batter. If it rises to the top and does not brown, oil heat is just right. Now keep the flame low to medium and drop the gujiya. Deep frying the gujiya patiently in low to medium flame give you really crispy gujiyas. So do not  hurry up while frying. Do not over crowd the kadai. Fry 2-3 gujiyas based on the size of kadai. Deep fry them in batches.
Gujiya recipe
  • Cook the gujiya patiently on both sides by flipping now and then. Once the bubbles cease and gujiya turn golden brown, remove them in a tissue. Drain the excess oil and serve hot OR store them in an air tight box after it comes to room temperature. It stays good for a week !! But to enjoy its best taste, eat it on the same day of preparation. Enjoy !
Gujiya recipe


Note

  • Adjust the quantity of powdered sugar based on your taste buds.
  • Deep frying in medium flame for long time gives a crispy gujiya.
  • For best taste, serve gujiya as soon as you prepare them.
  • Another important point is “Rolling” . Roll the dough like a thick poori. It should be thick in the centre and slightly thin in the corners. If you make it very thin , stuffing will ooze out in the oil while deep frying and the oil becomes a waste . Please be careful. I had experienced this. 
  • If you make it too thick , it takes more time to cook and spiral corners may not be cooked properly.To avoid this disaster , first make one , deep fry in little oil. If you get it right , proceed making the remaining ones. Else adjust the rolling and try again.This will surely help.
  • Suppose if the stuffing ooze out in oil , immediately switch off the stove and remove the sweet. Strain the oil and reuse it.
Enjoy these yummy Gujiya & Thandai on HOLI Day and have a great celebration !
Gujiya recipe
Continue Reading...


November 4, 2015

Gulab Jamun Recipe With Khoya - Diwali Sweets Recipes

gulab jamun recipe
Diwali celebration would not be fulfilled without Gulab Jamun for Indians. Not just for Diwali, we make this delicious sweet recipe for celebrations like New year, Birthday, anniversary to make it more special. It’s one of the most popular dessert recipes that tastes the best with Vanilla ice cream. Even beginners who are new in making sweets never fail to try jamun at least with store bought gulab jamun mix like MTR, Aachi, Gits during Diwali. 

Long back,I had tried gulab jamun with homemade khova and posted here too. Then due to my laziness, I started making jamun using instant mix every year. But this year for Diwali, I was determined to try gulab jamun with khoya or milk powder. I used store bought khoya here. To make this sweet, I watched many youtube video recipes like Samayal Samayal with Venkatesh Bhat , Vahchef , Sanjeev kapoor & went through many recipes for the ratio of ingredients and tips to make perfect jamun. I came across few recipes with khoya and paneer too.

As its my first attempt with store bought khoya, I chose the gulab jamun recipe with khoya alone and tried it. After so many trial & errors, I made a perfect gulab jamun following Chitra Viswanathan Mam’s recipe with slight changes. I was very happy to see my golden colored, soft and juicy gulab jamun. I made them like mini jamuns in very small size to suit my serving bowls. It did double in size & well soaked too. I have given the recipe for lesser quantity. 

If you are attempting jamun with khoya for the first time, go ahead with this recipe. Once you get it perfect you can double this recipe and make in large quantity. Beginners, do follow the tips I have shared in this post. I am sure you will get the same results like me. Lets see how to make Gulab jamun using store bought khoya !

Gulab jamun recipe with khoya

Gulab jamun recipe with khoya


Gulab jamun recipe with khoya How to make gulab jamun with store bought khoya
Cuisine: Indian
Category: Sweet
Serves: 12 nos
Prep time: 10 Minutes
Cook time: 20 Minutes
Total time: 30 Minutes


INGREDIENTS
1 cup - 200ml
  • Store bought sugarless khoya - 1/2 cup Grated ( I used Milky mist brand)
  • All purpose flour / Maida - 3 levelled tbsp
  • Cooking soda - A pinch (approx. half of 1/8th tsp)
  • Salt - a pinch
  • Water - as needed
  • Cooking oil - to deep fry jamun
For sugar syrup
  • Sugar -1 cup
  • Water - 1.5 cups
  • Cardamom powder - 1/8 tsp
  • Saffron threads - few ( Optional)
  • Note : Double the recipe for more quantity
METHOD
  • Take the khoya from the refrigerate and bring it to room temperature.If the khoya is too moist n soft to handle,crumble it well using your hands. If its dry and slightly hard,grate it using a grater. Measure 1/2 cup of khoya and knead it well for 2-3 minutes using the heel of your palm. Make it smooth and soft without any grains.
Gulab jamun recipe
Gulab jamun recipe

  • After kneading add the maida,a small pinch of salt & cooking soda. Mix well to make a crumbly mixture. Add water very little by little and make a smooth,non-sticky dough. If the khoya is too moist, you don’t need to add water. So add water only if needed. Its not necessary that the dough should be completely crack free. No issues if there are mild cracks. Keep the dough covered for 5-10 minutes.
Gulab jamun recipe
Gulab jamun recipe

  • In the mean time, make the sugar syrup. Take the sugar & water in a bowl, mix well. Melt the sugar and boil it for 5 minutes in medium flame.Syrup should reach sticky consistency.i.e If you take the syrup in your finger, it should coat well with a glossy look and sticky to touch. No need of half thread or single thread consistency.
  • Add cardamom powder and few saffron threads if using. Switch off the flame and let the syrup become warm. As we have added more water, the syrup won’t become thick. If you wish, you can add 2 tsp of lemon juice to avoid crystallization of sugar syrup. But I din’t add it.
Gulab jamun recipe

  • Beginners,please do this testing step.Heat a kadai with oil and take a small ball from the dough. Make it round and crack free. Check the temperature of oil by dropping a pinch of dough. If it rise to the top slowly, oil temperature is correct. Stir the oil twice and drop the small ball which we kept for testing. Flame should be low to medium. Check whether the balls are not dissolved in oil and crack free. It should be doubled in size and cook properly. The color of jamun should change slowly. If the flame is high,jamun will become brown quickly but it won’t be cooked inside.So open the jamun and see whether its properly cooked inside. Please do this testing to make a perfect jamun.
  • The balls will dissolve in oil if cooking soda is more.In that case,add little more maida and make the dough by sprinkling few drops of water.If there are cracks in the ball after cooking, sprinkle a tsp of water and mix well to make the dough moist. If the ball comes out properly, make the remaining balls using the dough and proceed cooking. Switch off the flame till you make the remaining balls.
Gulab jamun recipe
  • Make small crack free balls by rolling the dough between your hands. Grease your hands with ghee if needed. Make sure the balls should be crack free & smooth. This is more important to get crack free,smooth gulab jamun.If there are more cracks in the balls, slightly dip one edge of the ball in milk or water and make the balls smooth.
  • Now heat the oil in medium flame and check the temperature.Stir the oil and drop the balls one by one. Do not mix it for few seconds. Then mix the oil using the ladle without touching the jamun. Stirring the oil helps to cook the jamun evenly with nice color. Make sure the flame is medium low. Color of jamun should change gradually. If the flame is high, it will brown quickly and inner portion won’t cook well. Gulab jamun will almost double in size after cooking.
  • Please watch Vahchef’s gulab jamun video if you wish to see the cooking process in detail. Remove the jamun after it becomes golden brown to a tissue paper. Drain the excess oil and immediately transfer the jamun to the warm sugar syrup. Let it soak in the syrup for 1-2 hours.
Gulab jamun recipe
Gulab jamun recipe
Enjoy ! It stays good without refrigeration for 2 days if its properly handled. Use a clean spoon every time to take the jamun. Do not use your hands. Refrigerating the jamun may make it slightly harder and chewy.
Note
  • Gulab jamun will dissolve in oil if you add more cooking soda.
  • If the moisture content is more in khoya,u don’t have to add water for making the dough. The wetness of khoya is enough to make the smooth dough.
  • Gulab jamun will become flat if the moist in khoya is more. In that case you should add little more maida.
  • Adding more maida make the jamun hard.So add the mentioned quantity.
  • Do not make the dough too sticky or watery. In that case, grease your hands with ghee and make crack free ball. Do the oil test and proceed.
  • Cook the jamun slowly and patiently else it won’t cook inside properly.
  • If the sugar syrup is too hot, jamun won’t absorb the syrup. So add the hot jamun to the warm syrup.Allow it to soak for minimum 1 hour.Do not refrigerate the jamun.Use a clean spoon to handle every time.
  • You can also use boiled,cooled milk to make the dough instead of water.

Gulab Jamun Recipe
Make yummy,juicy Gulab jamun for this Diwali and have a great celebration !
Gulab Jamun Recipe with khoya

Continue Reading...


October 31, 2015

Kasi Halwa Recipe - Vella Poosanikai Halwa - Easy Diwali Sweets Recipe

Kasi halwa 
Kasi Halwa (Vellai Poosanikai Halwa in Tamil,Ash Gourd Halwa /Winter Melon Halwa in English, Boodida Gummaikaya Halwa in Telugu, Kumbalanga Halwa in Malayalam, Kushmandha halwa, காசி அல்வா /  பூசணிக்காய் அல்வா / Kalyana Poosani Halwa ) is one of the most popular sweet recipes which is served in Brahmin weddings. I had tasted this only once and that too years ago in a marriage. So all I remember is its yellow color ( some make in red color), glossy & ghee dripping texture
Recently I watched this halwa preparation in Samayal Samayal with Venkatesh Bhat in Vijay TV. The way he explained fascinated me to prepare Kashi halwa at home during this Diwali. But I slightly tweaked his recipe & method of cooking.I made this halwa for my guest yesterday. It came out very well.According to me Kasi halwa aka Vellai poosanikai halwa is purely a beginners sweet. You don’t need any expertise to make this. 
The beauty of this ash gourd halwa is it requires less ghee and cooking time is also less when compared with Tirunelveli Godhumai halwa & Thiruvarur Ashoka halwa. So anyone can make it easily without fear. But I felt the pre preparatory works like slicing the skin, removing the seeds, chopping the inner part, grating & squeezing the water Huuuuhhh!!, took more time than preparation
Once you finish this tiresome job, your halwa will be ready in the next 15 minutes. But all this pain will vanish as soon as you see & taste this ghee dripping halwa. I clicked the pictures by removing the hot halwa directly to banana leaf. So you could find the ghee oozing out of the halwa. Ok,enough of boring stories,lets see how to make this easy, yummy Kasi Halwa recipe in detail ! Bookmark this easy sweet recipe for this Diwali 2015 and enjoy with your Kith and Kin ! 
Kasi halwa

Kasi Halwa Recipe


Kasi Halwa Recipe Kasi Halwa / Poosanikai Halwa - Easy Diwali Sweets
Cuisine: Indian
Category: Sweet
Serves: Serves 2-3
Prep time: 20 Minutes
Cook time: 15 Minutes
Total time: 35 Minutes


INGREDIENTS
1 cup - 250ml
  • Grated Ash gourd / Vellai poosanikai - 2 cups
  • Sugar - 3/4 to 1 cup
  • Ghee - 2 tbsp (  4 to 5 tbsp for more ghee)
  • Cardamom - 2 nos
  • Edible camphor - a pinch (optional)
  • Cashew nuts – few
  • Saffron threads – few
METHOD
  • Wash and remove a big piece of ash gourd from the whole vegetable. Remove the middle soft portion along with seeds. Then peel the skin and discard it. Grate the ash gourd and keep in a plate. 
Kasi halwa recipe

Kasi halwa recipe

  • Take a muslin cloth or thin cloth and squeeze the grated ash gourd well using your hands. Collect the water in a bowl. We should use in the next step. Measure the squeezed ash gourd and take equal amount of sugar.
Kasi halwa recipe

Kasi halwa recipe

  • Heat 1 tbsp of ghee in a kadai and roast the nuts. Take in a plate. Put the squeezed ash gourd and saute it for 3-4 minutes in medium flame. Now add the reserved ash gourd water and cook it in low flame by covering the kadai with a lid. Add 1/2 – 1 cup more water if needed. The vegetable should cook well else you will get raw smell in the halwa. So cook it properly. You can do this process in cooker too.
Kasi halwa recipe

Kasi halwa recipe

Kasi halwa recipe
  • After the veggie is cooked well and all the water is absorbed, add sugar. Mix well and add few saffron threads, a pinch of yellow food color optionally. Mix well.
Kasi halwa recipe
  • The mixture will become goey. As you mix, it will thicken and start to leave the sides of the pan.When it starts to become thick and leave the sides of kadai, add the remaining 1 tbsp of ghee, edible camphor (optional) and cardamom powder. Stir well and remove in a bowl. Initially the halwa looks goey as shown in the above pictures but it thickens as it cools down. Over cooking make the halwa hard and chewy. 
  • Enjoy eating hot and serve it warm as per your choice.
  • Alternatively, you can add more ghee at regular intervals and stir till halwa absorbs the ghee. Then keep mixing till the ghee is started to release in the sides and halwa thickens. Switch off the flame and remove the halwa. It tastes more rich. 
Kasi halwa recipe

Note
  • You can add 4-5 tbsp of ghee to the maximum, keep mixing and wait for the halwa to ooze out all the ghee. It will be even more rich. But this method consumes very little ghee. The ghee you find in the pictures is the one I added before removing from the flame. I felt 2 tbsp itself is more for this halwa.
  • You can replace yellow food color with red food color or more saffron threads to bring the natural color.
  • 1:1 is the ratio of grated ash gourd and sugar. For more sweetness, you can use 1:1.25 cups.
  • Do not add more edible camphor. Its smell may become dominant in the sweet.


Ash gourd halwa

Enjoy this easy,yummy Kasi halwa for Diwali & other special occasions !
Kasi halwa recipe


Continue Reading...