Search Chitra's Food Book

Showing posts with label VARALAKSHMI VRATHAM RECIPES. Show all posts

September 16, 2015

Kara Pidi Kozhukattai Recipe with Rice flour - Kara Kozhukattai Recipe

Kara pidi kozhukattai recipe
Kara pidi kozhukattai with store bought rice flour ( spicy kozhukattai recipe ) is my favorite kozhukattai recipes since my childhood. My mom makes it at least once in a month as an evening snack for me. Actually my mom makes this kara kolukattai by grinding soaked idli rice or instantly using store bought rice flour or idiyappam flour. 

Today I made an instant version using store bought rice flour. This is an easy version of spicy kozhukattai recipe. If you are not able to make Ulundu pooranam kozhukattai for Ganesh chaturthi, this kara kozhukattai is a good alternate option. You can eat this kozhukattai as such or with some coconut chutney or tomato chutney as side dish. Ok, Lets see how to make kara pidi kozhukattai recipe with step by step pictures.

Check out my entire collection of Ganesh Chaturthi Recipes HERE


Kara kozhukattai recipe


Kara Pidi Kozhukattai Recipe


Kara Pidi Kozhukattai Recipe Pidi kozhukattai recipe -  Kara kozhukattai / Spicy kozhukattai recipe
Cuisine: South Indian
Category: Festival recipes
Serves: 12
Prep time: 5 Minutes
Cook time: 10 Minutes
Total time: 15 Minutes


INGREDIENTS
1 cup = 250 ml
  • Store bought rice flour - 1 cup (Use idiyappam or kozhukattai flour)
  • Water - 2 cups
  • Salt - as needed
To temper
  • Coconut oil - 1 tbsp
  • Mustard seeds - 1 tsp
  • Urad dal - 1 tbsp
  • Chana dal - 1.5 tbsp
  • Red chillies – 3-4 nos ( pinched into small pieces)
  • Curry leaves - few
  • Asafetida/Hing - a big pinch
  • Grated coconut - 1/4 cup
HOW TO MAKE KARA PIDI KOZHUKATTAI - METHOD
  • Heat oil in a kadai and splutter mustard seeds, urad dal & chana dal. Saute till golden. Add pinched red chillies and curry leaves. Add hing. Mix well. Add water, grated coconut and salt.
Kara pidi kozhukattai
  • When the water starts to roll boil, simmer the flame completely and add the rice flour. Mix well without lumps. Rice flour absorbs all the water and becomes a whole mass. Gather it and remove in a plate. Let it become warm.
Kara pidi kozhukattai
  • Grease your hands with oil and make kozhukattai using your fingers.Take a big gooseberry sized ball and press it with your fingers to make it elongated. Kozhukattai will get the impression of fingers. Make all the kozhukattai and arrange them in a greased idli plate.
  • Heat water in a idli pot and let it roll boil. Now keep the idli plate and cook for 5 minutes. Switch off the flame and remove the kozhukattai when it becomes slightly warm. Enjoy !
Kara pidi kozhukattai

Note
  • You can use homemade rice flour if you have in hand.Water quantity may vary slightly.
  • Red chillies can be replaced with finely chopped green chillies too.
  • My mom makes this kozhukattai by reserving some idli rice batter while grinding for idli,dosa batter.You can also try that way.
  • You can also make it by soaking and grinding raw rice. It tastes even more better.

Make this easy, spicy kozhukattai for Ganesh Chaturthi and enjoy !
Easy kara pidi kozhukattai recipe

Continue Reading...


August 22, 2015

Varalakshmi Vratham Pooja Procedure | Puja Vidhanam

Picture Courtesy – My friend Archana

In this post I have shared how to do Varalakshmi vratham Pooja at home with details about the decoration, things needed, requirements for pooja, slokhas, Varalakshmi viratham neivedyam recipes and also about a simple Varamahalakshmi pooja at home for first timers. Hope beginners would find this information useful to you. Usually Varalakshmi pooja is celebrated in last Shukla paksha/ Valarpirai, Friday of Shravana month. This year Varalakshmi pooja falls on Friday,  AUGUST 25, 2023.

Varalakshmi Vratham/Varamahalakshmi festival is the most auspicious festival celebrated by married woman (Hindu) to commemorate Goddess Mahalakshmi."Vara" means "boon" and Goddess Lakshmi grants all boons to those who performs pooja with utmost devotion on this day

Varalakshmi Vratam is a most popular festival in South Indian states like Andhra Pradesh, Karnataka, Tamilnadu & North Indian states like Maharashtra & Orissa. Worshipping Goddess Lakshmi on this day is equivalent to worshipping Ashtalakshmi ( 8 Lakshmi)– Goddesses of Wealth(Shri), Earth (Bhu), Learning (Saraswati), Love (Priti), Fame(Kirti), Peace (Shanti), Pleasure (Tushti) and Strength (Pushti). 

This pooja is performed for the well being of family members especially for the life of Husband & to get children, wealth etc. Every year Varalakshmi Vratham is observed in Sravana (in Telugu) month (Avani in Tamil & Sawan in Hindi). It is celebrated on Friday preceeding the full moon day (Pournami). Those who cannot perform it on that day, can do it on any other Friday in that month. On this day, married woman should observe fasting till they finish the puja.

In my family, both Mom & MIL don’t have the practice of doing Varalakshmi Viratham but every Friday we used to do Vilakku poojai for Goddess Mahalakshmi. But still I am making this post as per a reader's request. A reader from Chennai mailed me to share the details of Varalakshmi Vratham with pooja vidhanam/procedures and slokas as she is a beginner. 

So I thought of asking my friends who perform Varalakshmi Vrata every year in a grand manner. For making this post, I took the help from two of my friends Shalini and Archana. When I told them about this post, they became very happy and shared their pooja procedures along with their Varalakshmi decoration pictures.

Shalini gave me a book titled “Aadi, Avani maadha Pooja Vidhanam” in which all the important festivals like Ganesh Chaturthi, Varalakshmi Vratham, Naga Chathurthi and Garuda Panchami were discussed in detail with slokhas in Tamil. Not just that, Shalini spent nearly 3-4 hours over phone , explained each and everything about the pooja while I was drafting the post. Without the help of Shalini, this post would not have come up in my blog. I must really thank God for giving me such a helpful friend in all aspects of my life.

 If you are a beginner and looking for Varalakshmi pooja slokas in Tamil, right click on the images and click "Save as", download and save them in your mobile or PC and chant these slokas while doing the pooja. I have also shared some audio, video links for people who look for Varalakshmi vratham pooja vidhanam and idol decoration in Telugu and Tamil . 

Please scroll through the end of this post to check the links. Lets see the Neivedyam recipes list, pooja items requirements list, Things needed for varalakshmi pooja, Pooja procedures, Varalakshmi vratham story and slokhas for Varalakshmi Vrata in step by step.

Please visit my in-laws kolam blog "Learn Kolam" for Rangoli ideas. Lets see how to do Varamahalakshmi Pooja at home :)

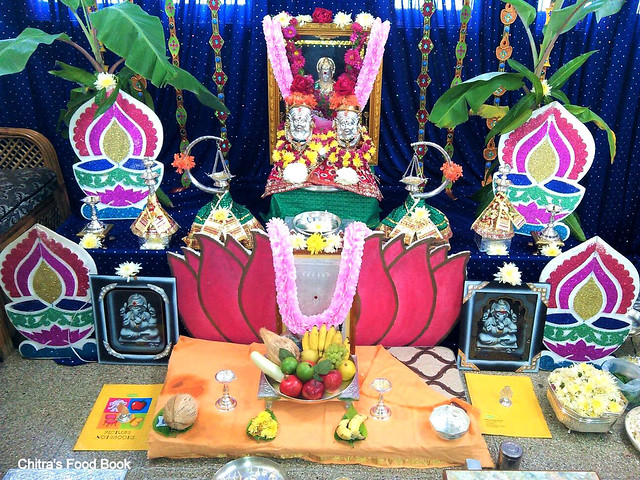
Pic courtesy – My friend Shalini made God's face with turmeric powder.

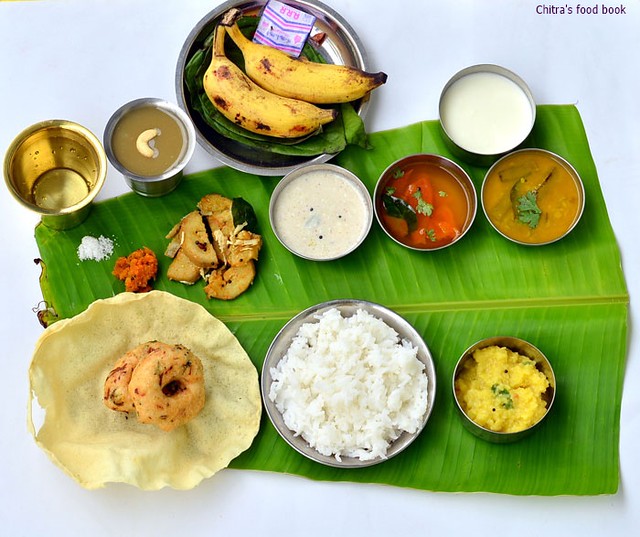
Varalakshmi Pooja Prasadam Recipes

Let me start with the list of Neivedyam Recipes. You can make any 5, 7 or 9 dishes for count.

Check out my list of Varalakshmi vratham recipes of Tamil nadu, Andhra and Karnataka. 


Items required for Varalakshmi Pooja
  • Rice flour & colors – for drawing rangoli ( Please visit my in-laws kolam blog "Learn Kolam" for Rangoli ideas.)
  • Thambaalam/A big plate OR A wooden plank/Peeta
  • Few Banana leaves
  • Raw Rice – as needed ( to spread over the peeta)
  • One Kudam/Kalasha ( silver, bronze or copper)
  • Water scented with Jathikai/Mace, Cardamom, Saffron threads/edible camphor, Cloves(to fill the kalasha)
  • few Mango leaves ( to keep on top of kalasha)
  • One coconut for kalasha and few more for thamboolam bags
  • Turmeric powder ( for making gowri,if you have the practice)
  • Kumkum
  • Chandan( Sandal paste)
  • Akshatha ( Raw rice coated with turmeric/Manjal podi)
  • One lotus flower
  • Face of goddess ( Available ready made in Market)
  • Jewelries ( For Eyes, Nose – Available in market)
  • Dress and blouse piece for Lakshmi ( Buy in market)
  • Flowers and garland ( for archanai & decoration)
  • Betel leaves, Betel nut, Banana ( Vetrilai, Paaku, Vazhai Pazham)
  • Thoram for hands/pongu nool for neck (Thoram is nothing but a sacred thread  coated with turmeric powder with 9 strings and 9 knots whereas Pongu nool is a single thread smeared with turmeric powder)
  • Milk, Dry fruits & nuts ( optional)
  • Fruits ( all seasonal fruits)
  • Panchamirtham ( a mixture of fruits, jaggery, dry fruits, nuts and ghee)(optional)
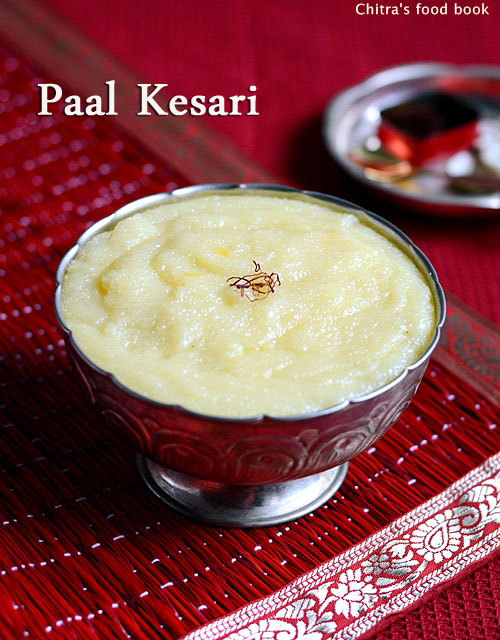
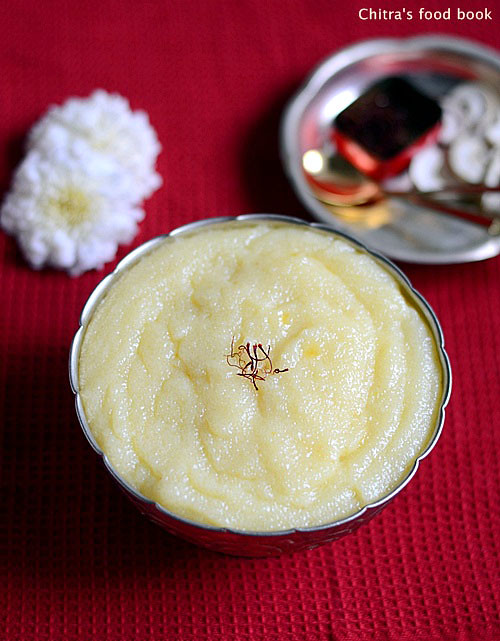
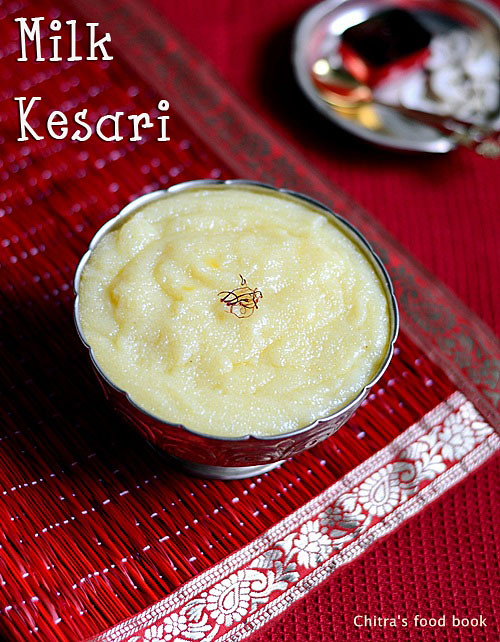
  • Neivedyam recipes ( Idli, Sweet pooran kozhukattai ( poornam borelu), ellu kozhukattai, Karjikai/fried sweet samosa, Chitranna, Payasam, sweet appam ( based on your tradition).
  • Thamboolam set of kumkum,chandan,bangles, Betel leaves and nuts, Yellow rope, blouse pieces, coconut, banana along with 1 rupee coins) – Make them ready as per the number of ladies you invite.
  • Ready made(plastic) cups and bowls for distributing prasadam.
  • Mahalakshmi stothram book or download the images I have shared here.

About the Pooja Vidhanam book

The slokas I have shared here is from a book titled "Aadi avani maadha Pooja vidhanam". This book was given as a compliment for my friend's mom in Pudukottai and it was published in the year 2000. I don't think whether this book is available in the market. But I am sure you can get the book for Varalakshmi vratham with story, Mahalakshmi Ashtothram in Giri trading agency.
I have shared the title pages of book as per a reader's suggestion. 

Please leave a comment in the feedback section if you get any books of this kind. It would be useful for all the people landing in this page. Thanks ! Please click on the image to see the bigger sized picture.

Varalakshmi viratham pooja book


Pre preparatory works for Varalakshmi Pooja

On Thursday morning,wash all the pooja vessels and kalasha pot.Wash the lamps, keep kumkum dots and put threads. Oil the lamp and keep it ready for the next day use. Make the thoran and pongu nool and arrange the other pooja things in a plate.
 
You can also prepare the stuffing for sweet pooran kozhukattai, soak the pulses for sundal and grind the batter for idli.

Padi Poojai/Chukkalu pette pandaga(Telugu)on Thursday evening

On thursday evening around 5.30 pm, sweep the entrance of each room (Nilai padi/vaasal padi).  Apply turmeric on the sides and draw 2 lines using kumkum. It is partitioned into three divisions. Put chandan & kumkum dots. This pooja is done to welcome Goddess Lakshmi and it shows the beginning of next day function. 

Light the lamp, perform pooja by keeping some neivdeyam like sundal, sweet appam etc. Read the Varalakshmi Vratham story. I have attached the story picture in Tamil. Please refer it. Some people read the stories on Friday after completing the pooja.So its your choice.
 
You can also keep the manai/Wooden plank/Peeta and place a banana leaf over it. Spread the raw rice and keep it ready for next day’s pooja. Remember you should not keep the kalasha now. It should be kept only on Friday. Please click on the image to see the bigger sized picture.


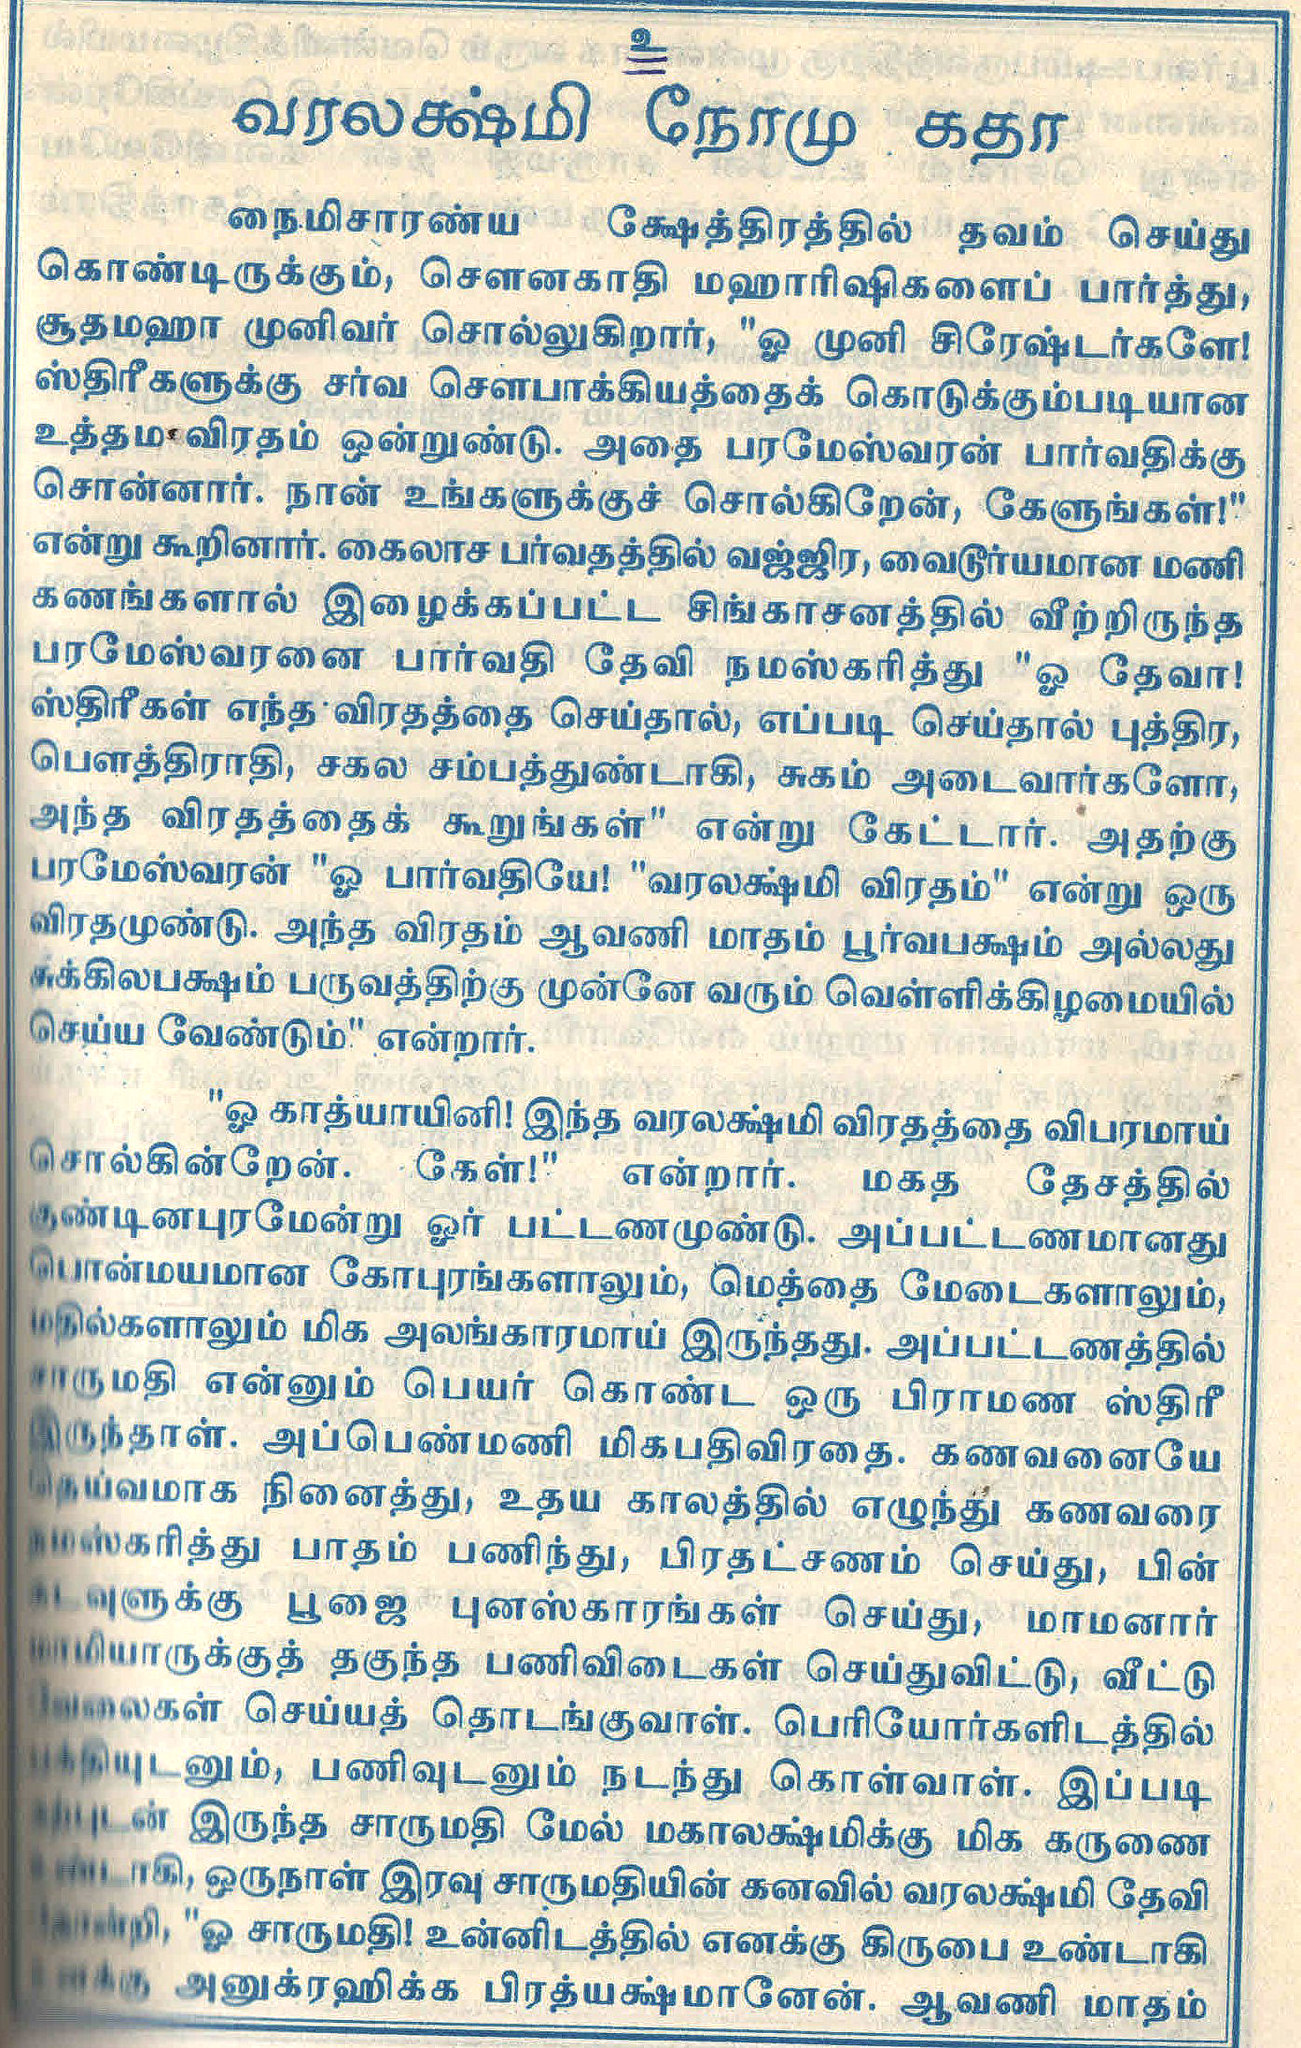
Varalakshmi Pooja Story in English
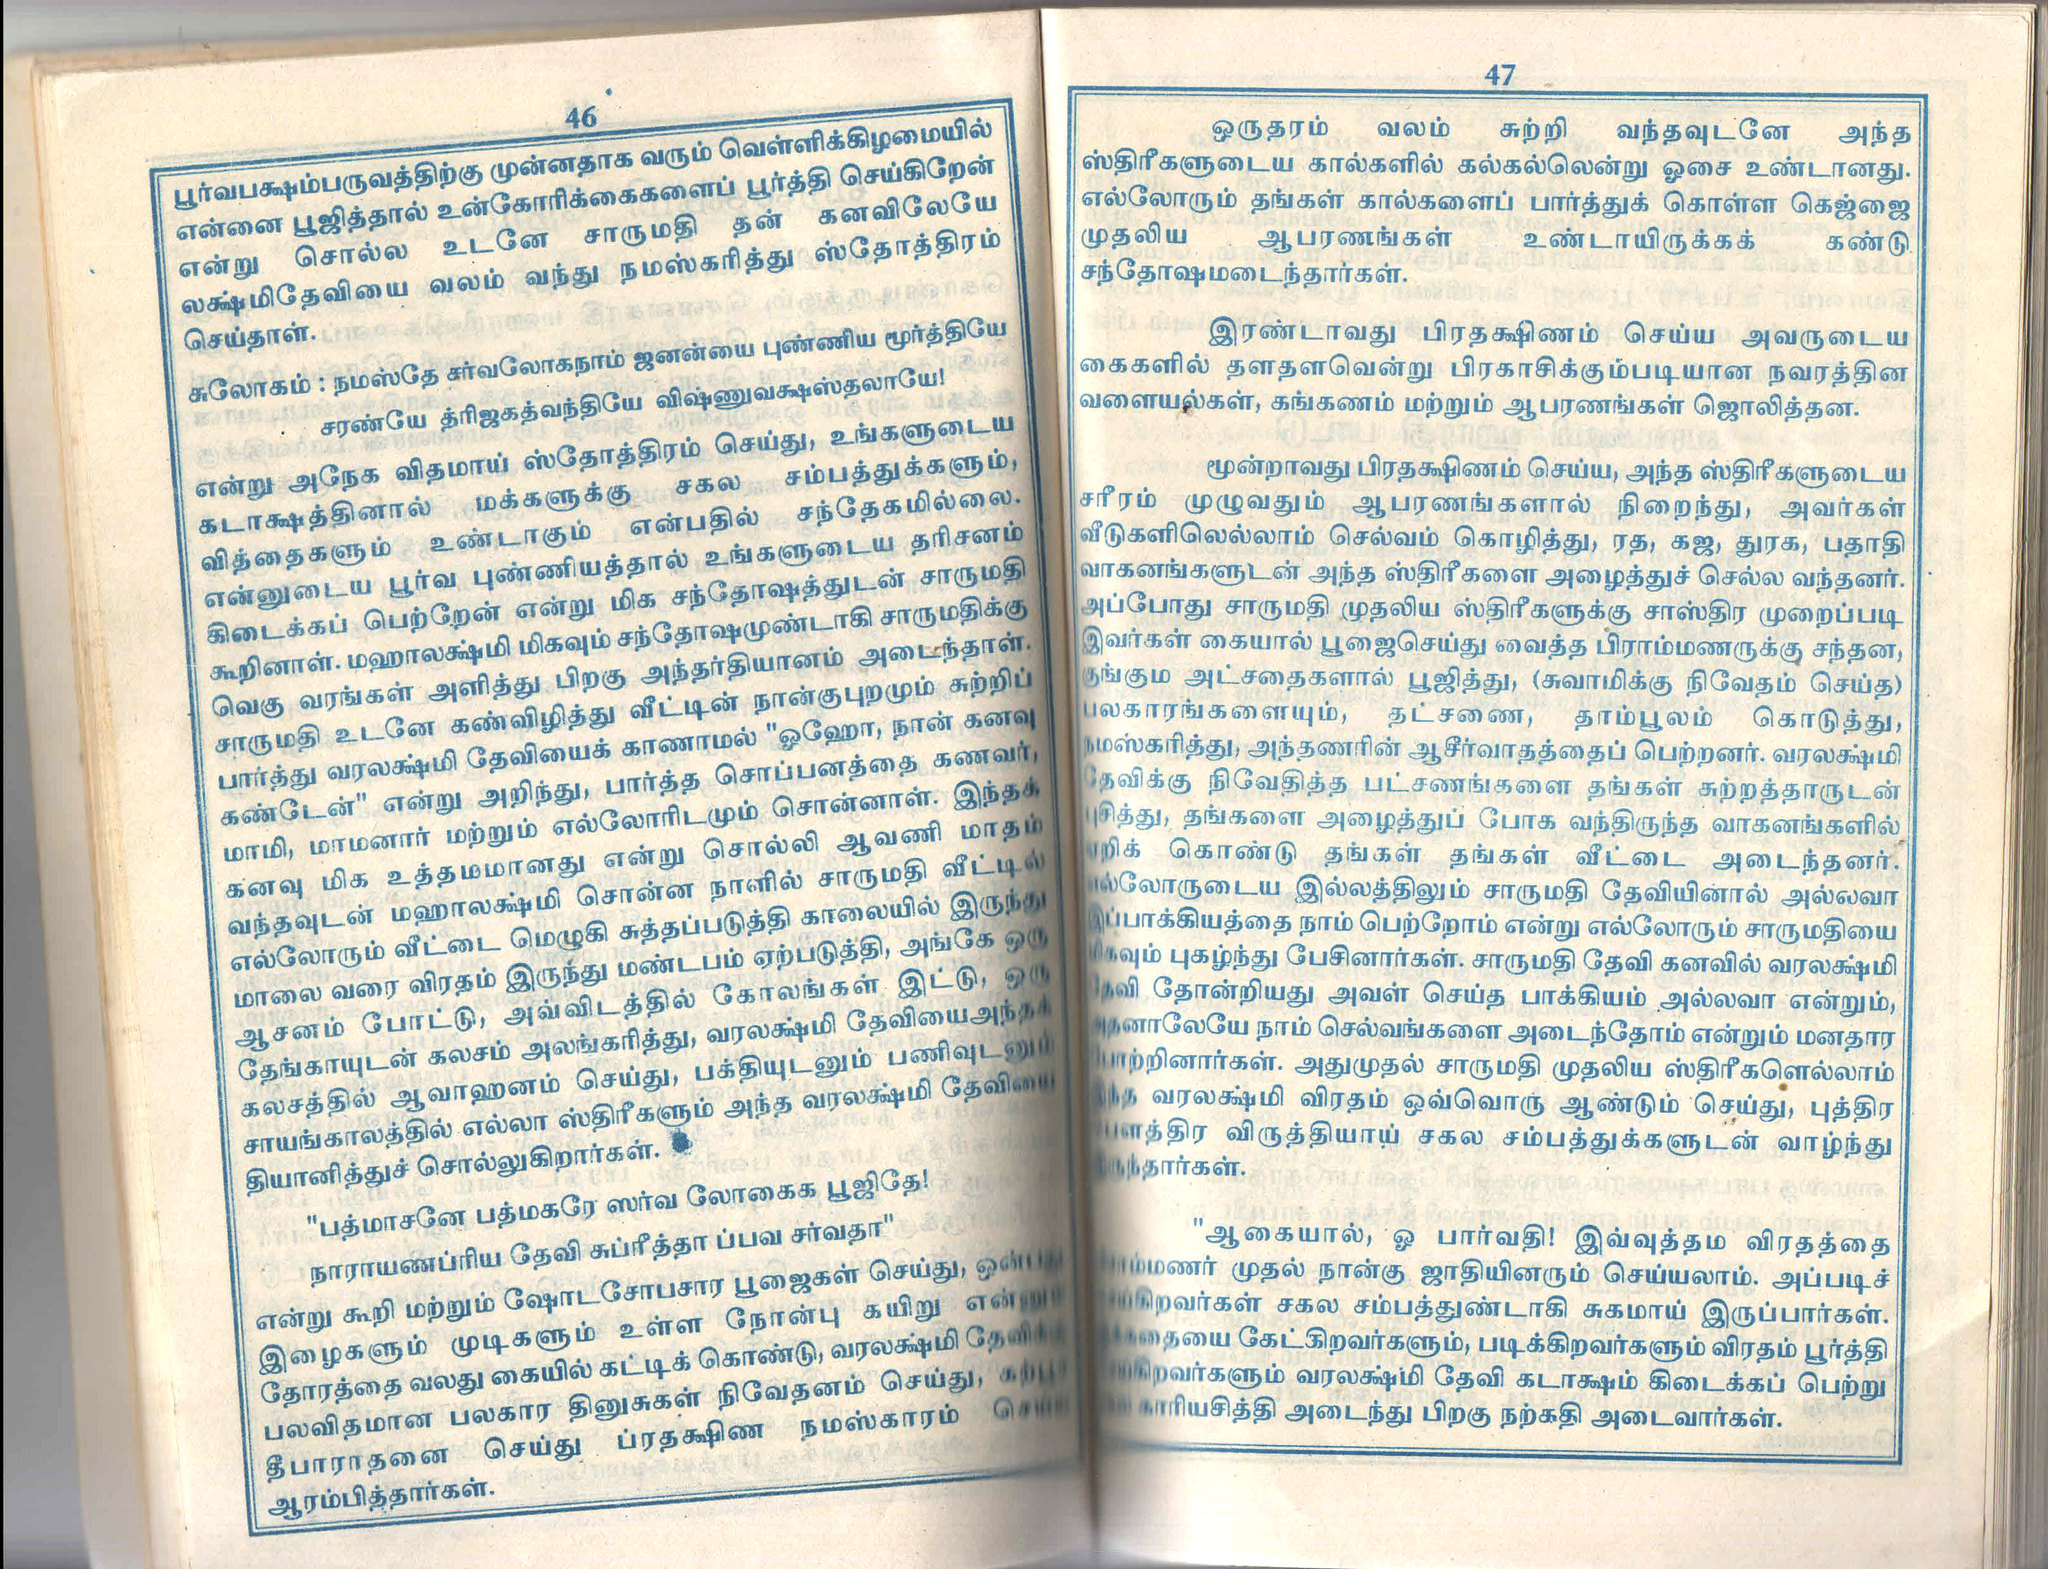
The story happens in a beautiful town called Kundinagaram located in the Kingdom of Vidarbha /Vidharba Rajyam. In that Kundinagram town, Goddess Adilakshmi, being pleased by her devotion tells Charumathi in a dream and directed her to perform the vrata to enable her to fulfil her desires. Charumathi wakes up and tells her husband about the dream. 
Charumathi along with some neighbourhood women takes bath in the early morning hours and prepare a mandapam and invites Varalakshmi Devi. She recites the following sloka along with other women with utmost faith and devotion.
Lakshmi Ksheerasamudra rajatanyam sri rangadhameswareem
Dasibootha samastha devavanitham lokaika deepamkuram
Sri manmanda kataksha labdhivibhat brahmendra gangadharam
Twamtrayamlokyakutumbhineem sasijavandemukunda priyam
Then she wore nine threads / Thoranam to right hand and offers naivadyam to Goddess Lakshmi Devi. On the completion of the first circumstance, she heard she found Gajjelu, Andelu and other ornaments. On the second circumstance, they found kankanams made of navaratnams to their hands. On completion of the third circumstance, they found immense wealth.

Then Charumathi offers Tambulam to the brahmin priests and distribute the vrata prasadam to the relatives and lead a happy life. Since then, Hindu women perform this vrata with utmost faith and trust till today. With this, Lord Eswara concludes telling the story to Goddess Parvathi.

Source:http://devotionalonly.com/varalakshmi-vratam-pooja-procedure-and-story/

How to make thoram and Pongu nool

Thoram and Pongu nool are nothing but the sacred thread smeared with turmeric powder. Thoram is made by taking 9 strings of thread. Put 9 knots in equal intervals. The number of thoram depends on the number of ladies & young girls at home. Thoram has to be tied around your wrist and Pongu nool is nothing but a single thread smeared with turmeric powder.

You should tie it around your neck.Married ladies wear both Pongu nool and thoram whereas young girls tie thoram alone. Keep the thoram, Pongu nool, 9 betel leaves, 9 betel nuts, 9 banana, 9 dates, 9 turmeric sticks, kumkum box, Karimani mala ( black beads chain) in a plate and keep it ready for pooja. You can do all these works on Thursday night itself.

How to make the kalasha/Kalasam for Varalakshmi Pooja

For making Kalasam / Kalash, Fill the silver or bronze pot(kudum) with scented water (add cardamom, nutmeg, edible camphor etc) till its brim. Some people add kumkum, turmeric powder, dry fruits in the water. Some people have the practice of keeping raw rice, 1 lemon, 9 betel leaves(vetrilai), 9 betel nuts, 9 turmeric sticks( manjal kizhangu), 9 dry grapes, 1 moulded jaggery (Achu vellam), dry fruits & a karimani mala (black bead chain), coins inside the kalasha instead of scented water. 

So please make the kalasha according to your tradition. On the top of kalasha, place 5 mango leaves( keep in odd numbers) and keep a coconut smeared with turmeric. The tail portion of coconut should face upward. Kalasam should face east. After making the kalasha, keep a kumkum dot and keep aside till you make other arrangements.

How To Make Kalasam For Varalakshmi Pooja


The next day i.e Friday, after taking bath, wear a silk saree and some gold ornaments ( old or new). Wash the place where the pooja is going to be held. One should observe fasting till the Pooja is finished( Elderly woman can have milk and fruits). Draw rangoli using rice flour and place the peeta/Wooden plank/Manai OR Big plate/Thambaalam. 

Spread a banana leaf and put some raw rice ( If you have done this on Thursday night, skip this step and proceed to the next step).
Place the kalasha over the rice. Cover the coconut using a new blouse piece( made into cone shape by referring the video link given below). 
 
To this coconut, an image of Goddess Lakshmi is fixed or the image of Lakshmi made using turmeric powder. My friend makes the face of Lakshmi using turmeric powder as shown in the second picture. In some areas, women place a mirror behind the kalasham. Today, there are specially made Varalakshmi pots  and faces available in the market. So you can buy and fix it with the blouse piece.Now the kalasham symbolically represents Goddess Lakshmi.

Decorate the idol with dress and Jewelries and garlands. You can dress it with a tucked saree or skirt (Pavadai). Put some jewels (Preferably gold) and tie a pongu nool around the neck. It is considered to be the Mangal sutra(Thali) Keep chandan & KumKum dots. Now Goddess Lakshmi idol is ready to perform pooja. Make a cone shaped Ganesh/Pillayar using turmeric powder mixed with water and keep it near the kalasha. Light the lamps at the time of pooja and start doing it.

Please refer this video for decorating Goddess Lakshmi Idol.

How to Perform Varalakshmi Pooja

Lets see how to do Varalakshmi Pooja with all slokhas below. 

Ganesh pooja

Any auspicious festival should be started with Lord Ganesh pooja. So make a small cone shaped Ganesha using turmeric powder ( Manjal pillayar). Place it near the kalasha. Read the sthothram given below and worship Lord Ganesha to do this pooja without any obstacle and after chanting the sthothram, move the Ganesh towards North direction.

शुक्लाम्बरधरं विष्णुं शशिवर्णं चतुर्भुजम् ।
प्रसन्नवदनं ध्यायेत् सर्वविघ्नोपशान्तये ॥


Shukla-Ambara-Dharam Vissnnum Shashi-Varnnam Chatur-Bhujam |
Prasanna-Vadanam Dhyaayet Sarva-Vighno[a-U]pashaantaye
||

Meaning:
1: (We Meditate on Sri Vishnu) Who is Wearing White Clothes, Who is All-Pervading, Who is Bright in Appearance like the Moon and Who is Having Four Hands,
2: Who is Having a Compassionate and Gracious Face, Let us Meditate on Him To Ward of all Obstacles.
Source : (http://www.greenmesg.org/mantras_slokas/sri_vishnu-shuklambaradharam_vishnum.php)


Varalakshmi vratham slokha


Avahanam and Anga Pooja
After finishing Ganesha pooja, take some flowers and akshatha in hand and chant the Avahanam slokha. Visualise Goddess Lakshmi in mind and offer the flowers and akshatha to kalasha. Goddess Lakshmi is invited to our house.

Lakshmi Ksheera Samudra Raaja Tanaya
Sree Ranga Dhaameshvari
Daasi Bhootha Samasata Deva Vanithaam
Lokaika Deepankuraam
Sreeman Manda Kataaksha Labdha Vibhava
Brahmendra Gangaadharam
Tvaam Trailokya Kudumbineem
Sarasijam Vande Mukunda Priyaam

Meaning: Goddess Lakshmi, who is the daughter of the king of the ocean of milk, whose abode is Srirangam (with Lord Ranganatha), who is served by all the divine ladies in heaven, who is the guiding light for the world, who has obtained the sustained (continued, everlasting) glance (Grace) from Brahma, Indra and Shiva, whose abode is the three worlds (Bhu, Bhuva, Suvaha) - I offer my prostrations to Thee, the beloved of Lord Krishna (Mukunda). 
 
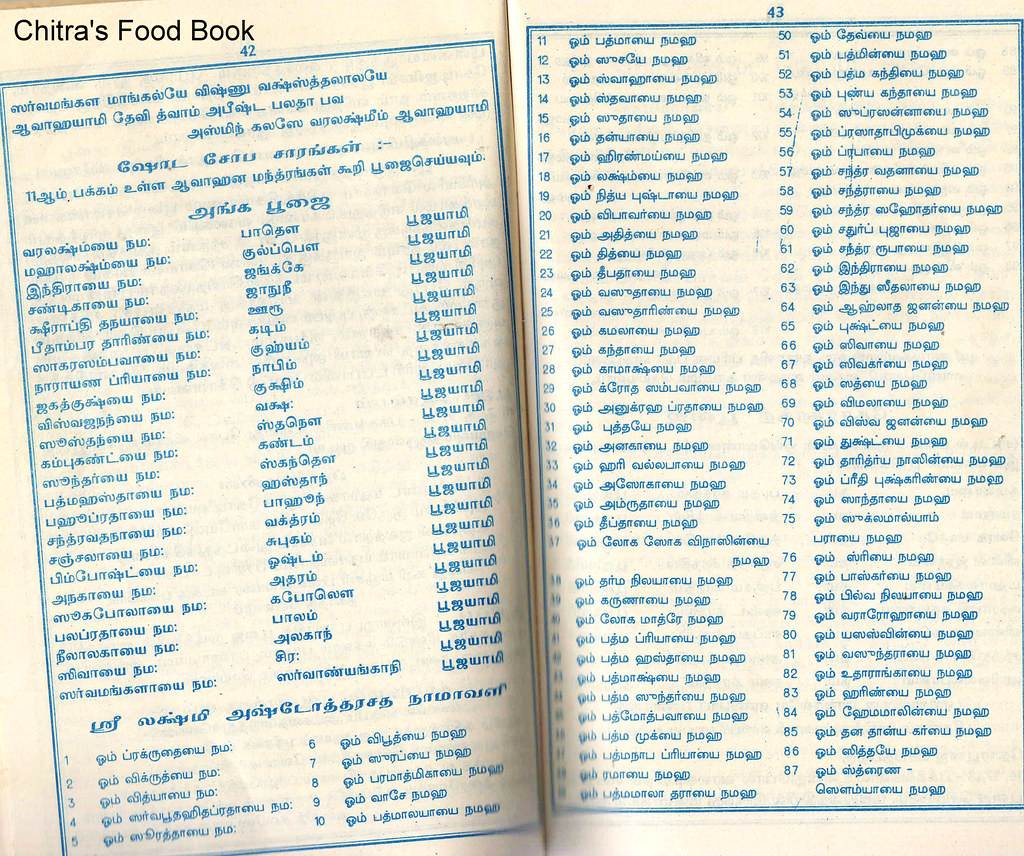
Now perform Anga Pooja (Worshipping each body parts of Lakshmi). Offer flowers to Kalasha by chanting Anga pooja sthothram. Refer the picture below for Anga pooja Sthothram in Tamil. Please refer this link in Hindupad for sthothra in English.

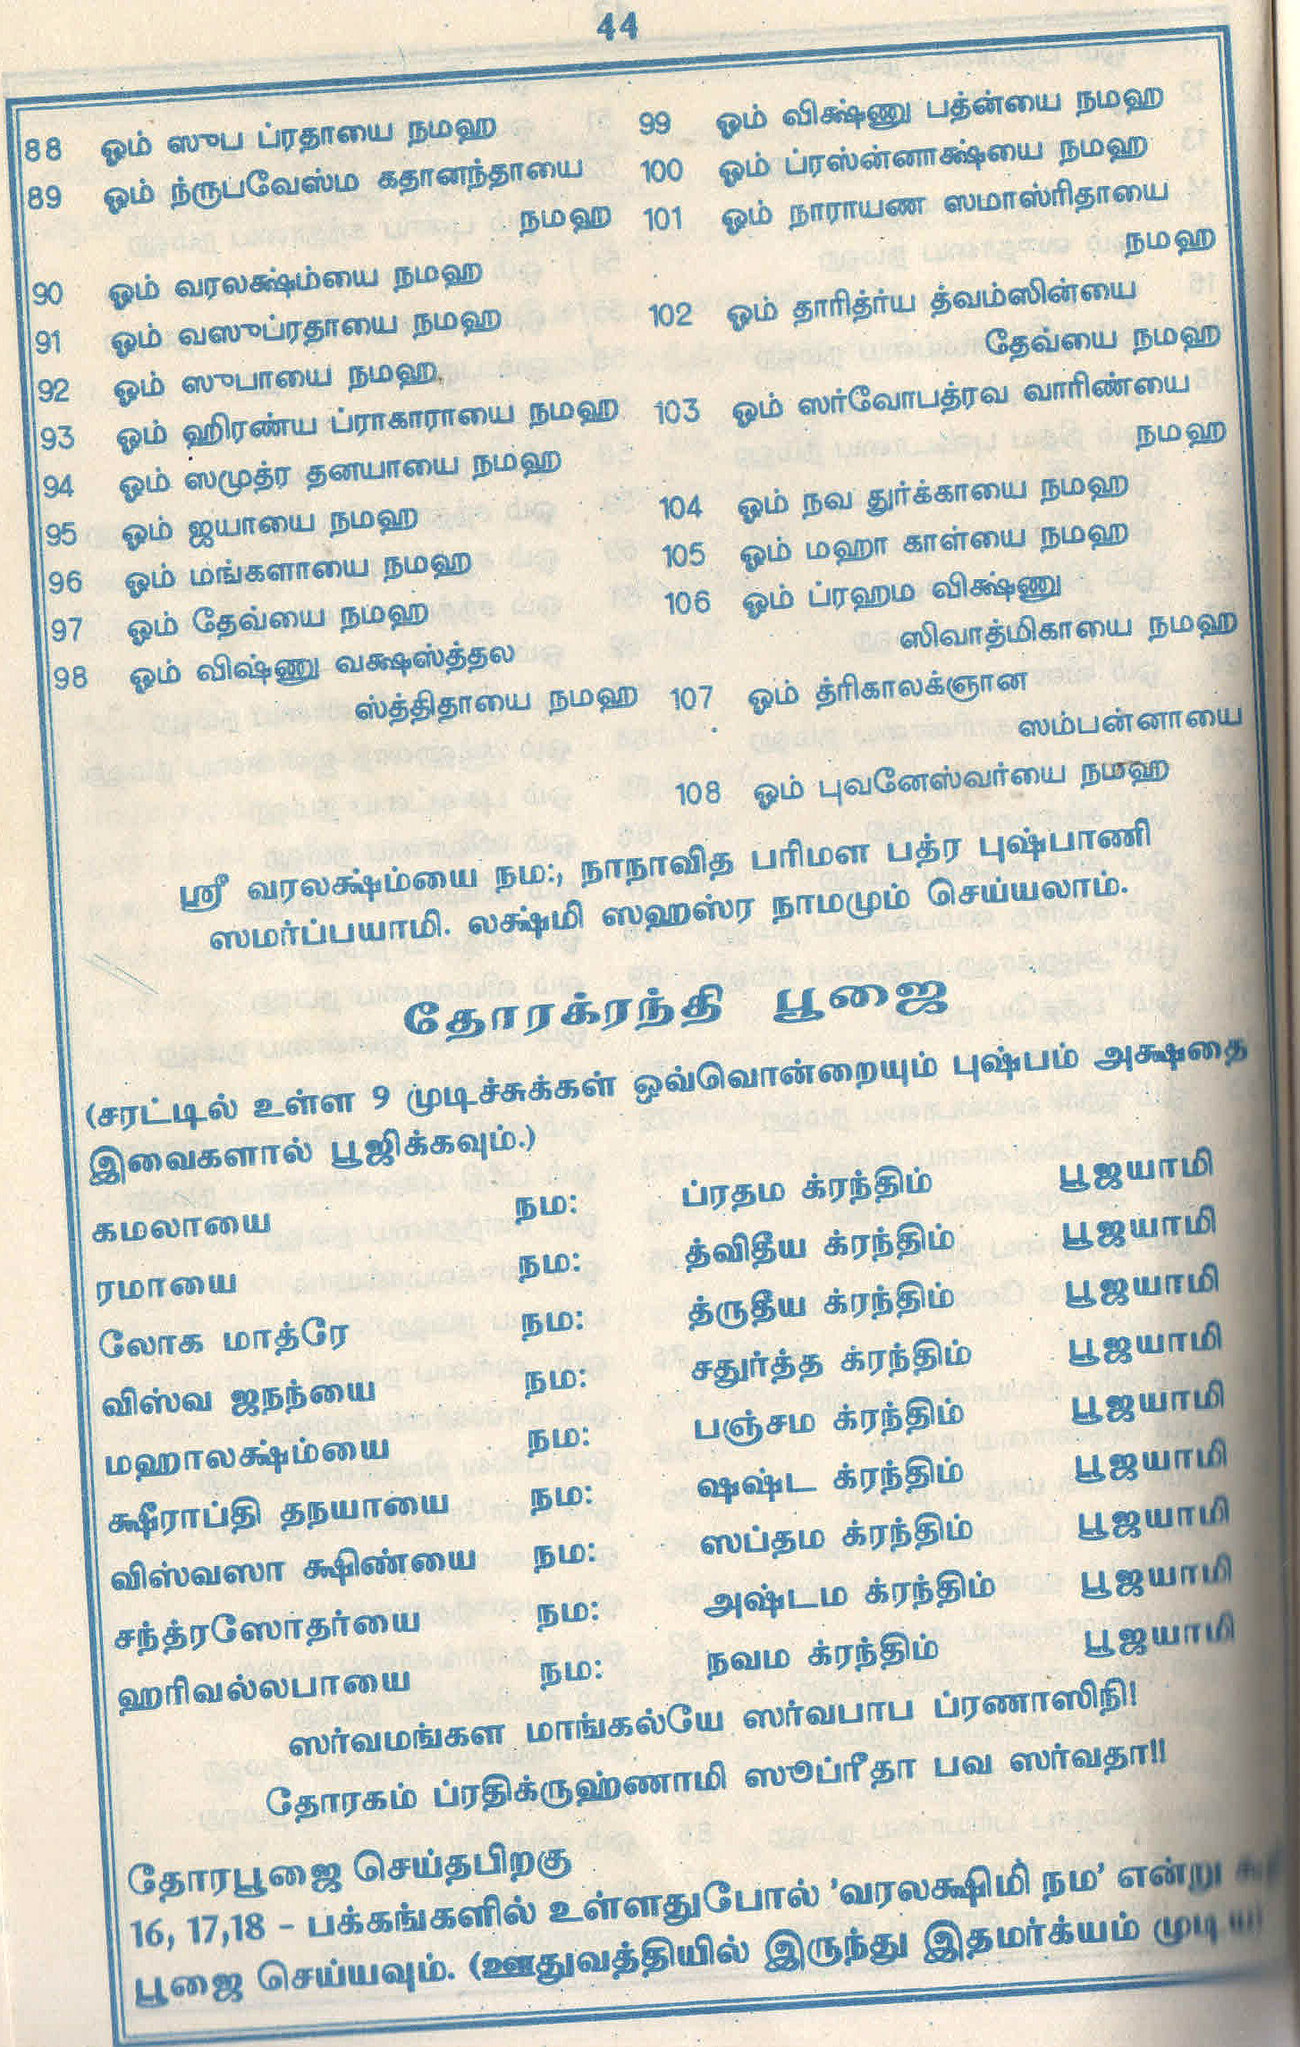
Following this, chant Lakshmi Ashtothram(108) by offering flowers to Kalasha.
Refer the below picture for Anga Pooja slokha & Lakshmi ashtothram ( Click on the image to see the bigger sized picture). 


Varalakshmi viratham slokhas


Varalakshmi vratham slokhas


Proceed with thoram Pooja/Nonbu Saradu poojai which is known as Thorakrandhi pooja.

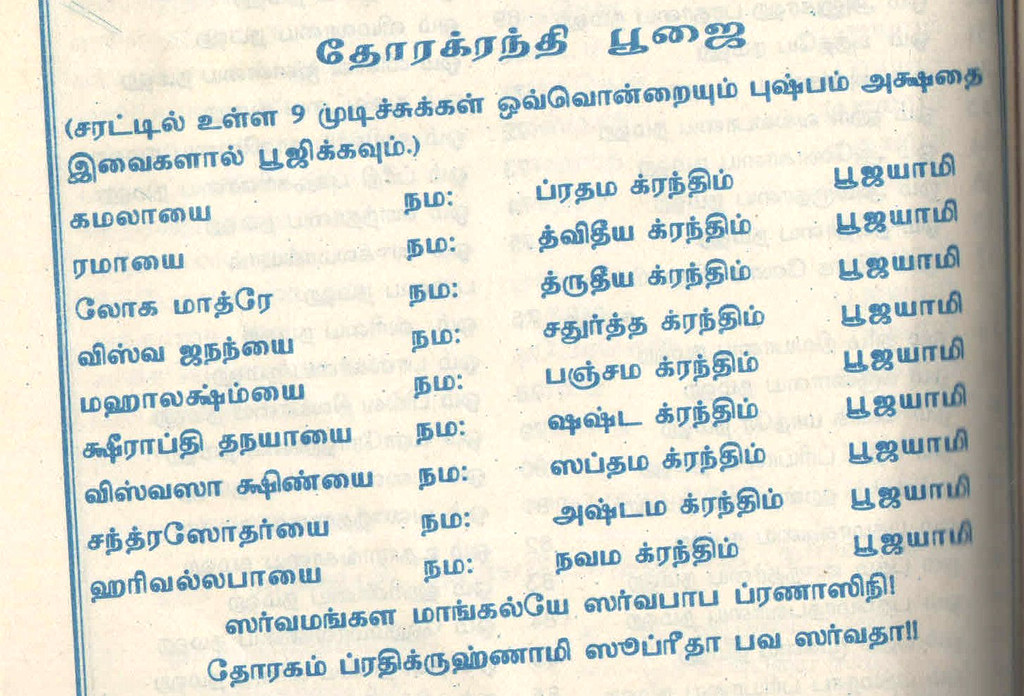
Thorakrandhi pooja / Nonbu pooja


Neivedyam and Mangala Aarathi
Finally, Mangala Harathi is performed for the kalasha. Different types of sweets/neivedyam are offered in front of the God. Nonbu saradu/Thoram (yellow thread) should be tied on the woman's right hand and Pongu nool should be tied around your neck. You can ask your Husband to do this. At the end, take harathi by mixing turmeric & kumkum in water. Sing the Harathi song while taking mangala aarathi.

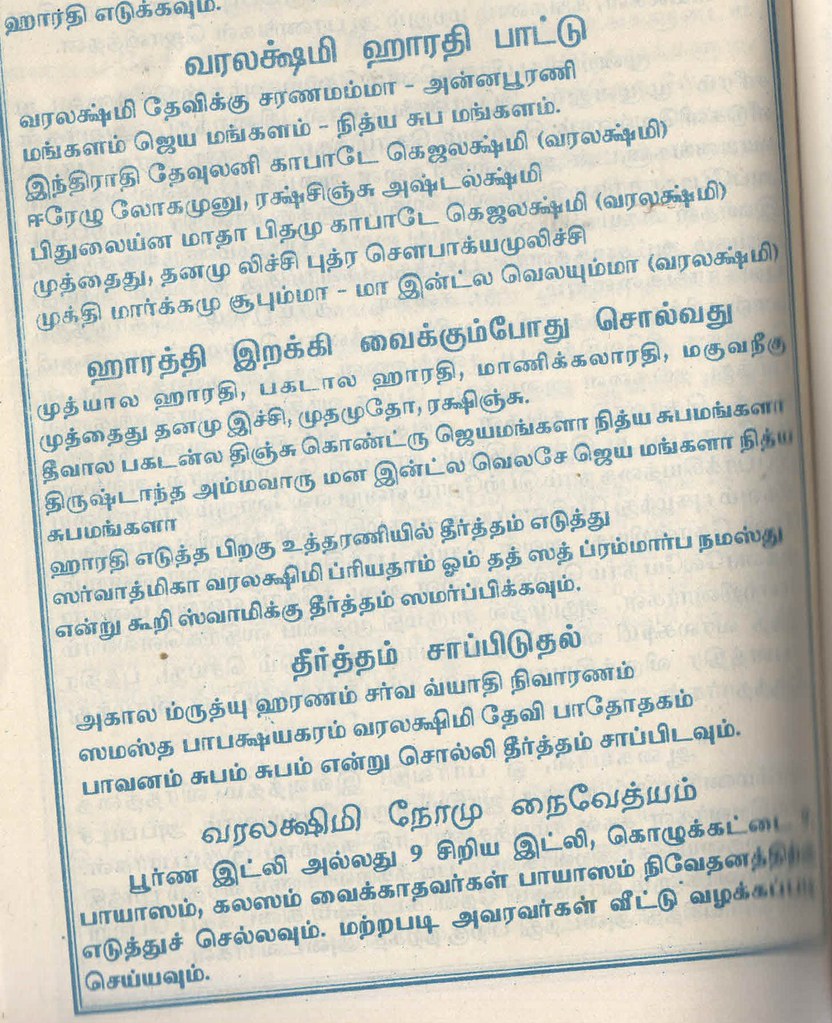
Mangala harathi song

If you have not read the Varalakshmi Vratham story on Thursday, do it now.
 
Offer the Thamboolam – Coconut, betel leaf and nuts, turmeric sticks, kumkum, coconut along with flowers, blouse piece, mirror and comb is offered to women in the locality and in the evening an Harathi is offered to Lakshmi with some neivedyam.

Punar Puja - How To Remove Kalasha

Some people remove the kalasha on Friday night. But my friends told me to do it on Saturday. On Saturday morning, after taking bath, perform a pooja for the kalasha. Then dismantle it at auspicious time of the day.  Consume little water as theertha. Sprinkle it all around in the house. Then pour the remaining water in well, trees or tulsi plant. If rice is used in Kalasha, mix it with rice in the house. If you used coins, keep in the locker safe. You can remove the nonbu saradu/Pongu nool and thoram after 3 days or on Saturday. Make some sweets with the coconut you kept in kalasam and enjoy with your family. Do not make any spicy dishes with the coconut. 

If you want to strictly follow all the rules and methods of Varalakshmi Puja, then it would be wise to take the advice from an elderly woman who is regularly performing the puja. What I have shared here is purely based on the procedure given in the book and pooja methods shared by my friend Shalini. It may vary from place to place and tradition. Thanks for visiting this page. Please write few words in the comment section if you find this post useful. I will be more happy to know it.
Last but not the least please find the links which I felt them useful for beginners.

Some useful Links for Slokhas & Videos for beginners

Refer THIS LINK for the detailed pooja procedure with slokhas in English
  1. This VIDEO will help you to decorate Lakshmi Idol & placing Kalasha.
  2. If you want to do the pooja by listening to slokhas chanted by a priest, please refer this AUDIO, AUDIO & VIDEO , THIS VIDEO for Telugu Version. You can just follow the instructions and perform pooja.

How to do simple Varalakshmi Pooja

Some people don’t have the practice of Varalakshmi Vratham but still they may like to perform this pooja in a simple way. For doing a simple pooja: Light the lamp, keep some neivedyam and do the pooja by chanting Mahalakshmi Ashtothram. 

Distribute the Thamboolam and prasadam by inviting married woman to your house in the evening. There are no hard and fast rules in performing the Varalakshmi Puja and you can be flexible on the puja items. Even a simple prayer will please Goddess Lakshmi.

On this auspicious day, lets pray Goddess Vara Mahalakshmi to bless us with peace, health & wealth !!

NOTE from a reader Mrs. REVATI

She has been doing this Pooja since 27yrs. Thanks a lot for sharing this valuable information mam.

 If any close relative from in-laws side dies, we should not perform full puja BUT on the festival day one must take out Amman moham/ face and keep in silver glass or panchatram with rice, tambulam, coin in it in silver or peetalai / brass plate with banana leaf below. Yellow thread should be kept in amman, neivedyam should be done with fruits, beetal leaf, supari, manjal. After that tie sharadu in your right hand.

Please go through the comments section for frequently asked queries and answers. As the number of comments have exceeded the limit, most of the latest comments are available in second page. So please click "LOAD MORE" BUTTON in MOBILE below the comments box to see the second page in your mobile. If you are using desktop or tablet, please click the " 1-200 of 219 newer newest >> " to see the second page. Experienced people, do share your pooja methods with us, it will help everyone. Thanks !

Continue Reading...


June 17, 2015

South Indian Lunch Menu Recipes For Amavasya -No Onion No Garlic Lunch Menu

No onion No garlic lunch menu
I have been thinking to share our amavasai vazha ilai saapadu for years. But somehow I couldn’t do it.Yesterday I made this South Indian style No onion No garlic thali for No moon day/Amavasya (Mahalaya amavasya). 

Every month on No moon day my FIL used to do “Tharpanam” by keeping all these dishes in banana leaf. So we make Vadai and payasam along with Rice, Sambar, Kootu or curry, Pachadi, Paruppu, Rasam, Appalam and Pickle.Vada and Payasam/Kheer are optional. Some people make it every month.Vaikasi and Aadi amavasai are very special to us for which Vadai and payasam are compulsory.

Yesterday I prepared all these dishes especially for this post. I love cooking this Amavasai lunch menu as it is very easy to prepare with less chopping and grinding works. It takes just 45 minutes to make this platter if you don’t prepare Payasam and vada. I have shared the method of preparation and recipes with links. Please click them to view the particular recipe. I have also shared more ideas for cooking a no onion no garlic lunch menu. 

Hope this post would help the South Indian beginners who want to cook a No onion No garlic food for their lunch. Please check out my Tamil nadu lunch menu ideas – 1 , Lunch menu ideas – 2  and a complete South Indian thali for guest with a detailed serving procedure if interested !

As I told in my South Indian full meals post,I will share a North Indian Thali very soon. Stay tuned !!


South Indian lunch menu ideas
Vegetables to be used for No moon day lunch menu
Lady’s finger, Broad beans, Cluster beans, Raw mango, Red pumpkin,White pumpkin, Chayote/chow chow, Raw banana, Sweet potato, Yam, Karunai kizhangu, Seppan kizhangu, Stem of greens ( Keerai thandu), Banana stem, Banana flower, Bitter gourd, Sundakkai/Turkey berry.

Vegetables to be avoided
Drumstick, Brinjal, Bottle gourd, Carrot, Beans, Potato, Onion, Garlic, Green leaves ( Keerai)

South Indian Lunch Menu

No onion No Garlic Lunch Menu


No onion No Garlic Lunch Menu South Indian style No onion No Garlic Lunch Menu for No Moon Day/Amavasya
Cuisine: Indian
Category: Lunch menu
Serves: Serves 3
Prep time: 45 Minutes
Cook time: 40 Minutes
Total time: 85 Minutes


INGREDIENTS
How to prepare this amavasya lunch menu
  • Wash and soak Urad dal for 30-45 minutes for making vada. Refrigerate and soak it. Use the soaked ice water for grinding to get crispy vada. Within this soaking time,u can prepare this lunch menu if you follow the below steps.
  • Soak the tamarind for sambar and rasam.Crush a tomato and add to tamarind soaked for rasam. Add some salt for quick soaking.
South Indian lunch menu ideas
  • You need to use 2 pressure cooker and 2 burner gas stove. Take one cooker, wash and pressure cook the rice till its done. In another cooker, take the toor dal for sambar and keep a small bowl inside the cooker. Place the moong dal needed for serving dal/paruppu. Pressure cook them in low flame for 15 minutes. This takes nearly 15 minutes for both the cooker to release the steam.

  • In that 15 minutes, chop all the vegetables need for making sambar, poriyal, pachadi etc. For this menu, you have to chop Lady’s finger, Green chillies for sambar. Raw banana for poriyal and Gooseberry for pachadi. Grate 1/4 cup of coconut for Pachadi and poriyal.

  • First grind coconut, green chilli, amla, salt and hing for pachadi. Mix the paste to curd and keep aside. Pachadi is ready. You can temper at the end.
South Indian lunch menu ideas
  • Now let's make sambar and rasam. Heat oil in a kadai and when it gets heated splutter mustard, methi seeds and saute the lady’s finger, green chilli, red chilli, curry leaves for making sambar. Add tamarind extract and boil well.
South Indian lunch menu ideas
  • When it is boiling, heat another kadai and temper with mustard seeds,jeera for making rasam. Prepare the rasam in this kadai. The steam would have released in the cooker. So remove the dal, mash it well and add to the boiling sambar and little dal water to the boiling rasa as well.
  • Now sambar and rasam would be ready. Heat little oil in a kadai and splutter mustard seeds, urad dal and cumin seeds for topping the moong dal and thayir pachadi. Add this tempering to pachadi and dal. Add little water to adjust the consistency of dal and pachadi. Both are ready now.
South Indian lunch menu ideas
  • In the same kadai,roast the sago for making payasam. Roast till it becomes white and puffs up well. I used Nylon variety sago. If you are using big white ones, soak it for 30 minutes in hot water and then cook it. Add water and cook the sago by covering the kadai with a lid. Keep the flame medium.
South Indian lunch menu ideas
  • In another burner,cook the raw banana in a kadai adding sambar powder, a seed of tamarind, water and salt. Raw banana and sago takes almost the same time to cook. So keep an eye on both. Make sure nothing gets burnt. Raw Banana should not become mushy. It should be firm in shape.
  • After the sago is cooked well, add crushed jaggery, cardamom to it. Boil well by adding some water. Lastly add some plain milk or coconut milk and switch off the flame immediately.
South Indian lunch menu ideas
  • Take the cooked raw banana and drain the excess water. Temper mustard seeds, cumin seeds and curry leaves. Put the raw banana pieces and saute well. Lastly add some grated coconut. All the dishes are ready now. Lets make vada.
By this time, urad dal would have soaked well. Heat oil in a kadai to deep fry the vada.Keep the flame medium. Grind the dal adding pepper corns and hing in mixie. Add little water ( say few tbsp at a time) and grind a thick batter.

To the ground batter, add salt, chopped curry leaves and mix well. Check the oil temperature and make vada. Lastly roast few papad if you wish and switch off the flame.
South Indian lunch menu ideas

Rice, sambar, rasam, Poriyal, Pachadi, Vada, appalam are ready to serve.
I had already made and kept mango thokku. U can keep any pickle as you wish.
Enjoy this no onion no garlic thali !


Please refer my

No Onion No Garlic Recipe collection for more ideas .

Other Options
  • You can replace Lady’s finger with Broad beans or cluster beans to make sambar. In that case, pressure cook the veggies along with dal.
  • You can make the same poriyal using sweet potato or lady’s finger too.
  • For Pachadi, you can make simple curd raita by grinding coconut+green chilli+ginger or Lady’s finger raita.
  • You can also make masala vada instead of urad dal vada but do not add onions in the batter.
  • Instead of Sago payasam, you can make moong dal payasam,Aval payasam or Vermicelli kheer too. Please go through my 15 payasam varieties for more ideas.
Please refer my No Onion No Garlic Recipe Collection for more ideas .

South Indian lunch menu ideas

Make this No onion No garlic lunch feast for occasions and celebrate the day !

Amavasya Lunch menu


Continue Reading...


March 19, 2015

Karnataka Style Holige/Obbattu/Puran Poli Recipe

OBBATTU RECIPE

Karnataka style Holige also know as Obbattu in Kannada, bobbatlu in Telugu, Puran Poli in Hindi, Paruppu Boli in Tamil is a very popular sweet in Karnataka, Andhra and North India. Of course each recipe has its own variations. People in Karnataka should make this sweet for festivals like Varamahalakshmi pooja, Ganesh chaturthi and Ugadi.  

We Tamil people don’t celebrate Ugadi but being in Bangalore for the past ten years, I wanted to celebrate Ugadi at least by making holige. Holige/Obbattu is considered to be one of the most important Neivedyam recipes for Ugadi. People in Karnataka & Andhra make it along with Mango pachadi or Maavinkayi chitranna and vada. Here in Bangalore, people make this holige not only for offering GOD, its a must serve sweet in weddings, Sathya Narayana pooja etc. I

n Karnataka,  people make it with two different stuffing. One using dal ( bele obbattu) and the other one with coconut (Kayi holige). But the most famous one is bele obbattu. In Tamil nadu, we call this as Boli /Poli and we make the same stuffing with chana dal. In North India, it is called as Puran poli. I am not a big fan of this sweet recipe but I love Obbattu saaru (a spicy rasam kind of gravy made from the stuffing and the cooked dal water)so much. My husband Sendhil loves obbattu like anything. He loves to have it hot hot drizzled with a tsp of ghee. I have tasted holige in my school moms friends houses and in marriage feasts. 

My friends make it extremely soft and tasty. So with the help of Megha and Tara’s recipes, I tried holige after a long time to make a special post for Ugadi festival. By God’s grace, it came out well and soft as I expected but not 100% like my friends. No worries. Practice makes a man perfect.After this successful attempt, I am pretty much confident of making it perfect next time. But I became very happy when Sendhil gave thumbs up with a broad smile on his face. So its a hit recipe in my home. I have mentioned all the possible tips and tricks shared by my friends. Hope it will be useful for beginners. 

Now lets see how to make Karnataka special Holige/Obbattu recipe with stepwise pictures in detail ! Please don’t forget to go through the “Points to remember” before you start making it.
Wish u all a very happy Ugadi !.
Points to remember
  1. Please be generous in adding oil. Oil helps you to get a really soft holige. So use the mentioned quantity of oil strictly. U can add more oil but definitely not lesser the given quantity.
  2. My friend Tara use the combination of maida and chiroti rava in the ratio of 2:1 for making the dough but Megha uses only maida. Here I used only maida as I din’t have chiroti rava in hand.
  3. You should knead the dough at least for 5-7 minutes adding oil in regular intervals. Its a very important step.
  4. Holige/Obattu dough needs to be fermented and soaked in oil at least for 8 hours to achieve the best result. i.e. If you want to make obattu in the evening around 6 pm, I suggest you to make the dough in the morning around 7 am. This tip was shared by Tara. This time I fermented the dough for just 4 hours as I wanted to click the pictures before sun light goes off. Next time I am planning to soak the dough overnight.
  5. Rolling the dough along with stuffing also plays a major role in bringing out soft obattu. Do not roll the holige too thin or too thick. You can either pat it using your hands or use a rolling pin by keeping the dough between two greased obbattu sheets which is easily available in Market. If you don’t get it, use oil sheets, milk cover or any plastic sheets. You can use banana leaf as well. 
  6. Make sure the size of maida dough should be half the size of stuffing ball. This helps in uniform spreading of stuffing all over the holige. Suffing should be more than the outer covering.
  7. Always cook the obbattu in medium flame and never forget to drizzle a tsp of oil around the corners and all over the obbattu to get a shiny look.
  8. To keep the obbattu stay soft for long time, always stack the cooked obbattu one over the other after they turn warm. Keep it covered till you eat.
  9. Last but not the least,serve the obbattu adding few tsp of melted ghee topped with it. If desired, you can add warm milk too. This is how it is served in Wedding feasts here. This combo is just out of the world ;)).
  10. You can keep this holige for a week and enjoy !
Obbattu recipe

Obattu/Holige recipe


Obattu/Holige recipe How to make obattu/Holige recipe for Ugadi festival
Cuisine: Indian
Category: Sweet
Serves: 10 nos
Prep time: 8 Hours
Cook time: 5 Minutes
Total time: 8H5Minutes


INGREDIENTS
( 1 cup - 250ml)

  • Maida/All purpose flour - 1 cup (levelled)
  • Cooking oil - 1/4 cup + Extra while cooking holige ( total 1/3 cup) 
  • Turmeric powder - 1/8 tsp
  • Salt - a pinch
  • Water – to make dough ( I used nearly 1/2 cup + 2 tbsp.But it may vary)
For stuffing
  • Toor dal or chana dal – 1/cup
  • Grated/powdered jaggery – 3/4 - 1 cup
  • Grated coconut - 1/4 cup
  • Cardamom - 2 nos
  • Water - as needed
METHOD

  • Prepare the dough part first. For this, take 1 cup of flour and add turmeric powder and  a pinch of salt to it. Mix well. Make a dent in the center and add water little by little. Make a sticky dough.
Obbattu recipe
  • Take 1/4 cup of oil in a bowl and add 1 tsp of oil to the dough. Start kneading using your palm. Knead it for a minute and add another tsp of oil whenever the dough sticks to your hands. Repeat the same thing until the dough is completely soft. I used nearly 6-7 tsp of oil. Knead the dough for 6-8 minutes. No problem if the dough is loose and sticky. 
Obbattu recipe
  • Now pour the remaining oil over the dough. The dough would be immersed in oil and it will be soaked. So add 1 tbsp more oil if needed. Close the bowl with a lid and leave it for 6-8 hours minimum.
Obbattu recipe
  • Next comes the stuffing part. Boil toor dal in an open bowl or pan adding 4 cups of water. Let the dal cook till it blossoms and not mushy.i e.the dal should be mashable by hands but it should look firm and stay in shape. You can also pressure cook but cook in high flame for one or two whistles. Make sure dal is not mushy. It should blossom and cook. People here don't pressure cook dal for making holige. So I too followed the same. 
Obbattu recipe
  • After the dal is cooked, drain all the water and collect it in a bowl. Use this dal water for making obbattu saaru.
  • Now take the cooked dal, grated coconut, grated jaggery and cardamom in a mixie jar and grind it well to make a paste.
Bele obbattu recipe
  • If you feel the mixture is watery and too wet to handle,saute & cook the mixture in a hot pan till it becomes like a whole non-sticky mass without moisture content. If the mixture is hard and non sticky, cooking the stuffing is not needed. Take the stuffing and make lemon sized balls out of it. Cover the balls and set aside. Reserve 2 balls of stuffing to add in obbattu saaru. 
Bele obbattu recipe
  • After the obbattu dough is rested for 8 hours, take it and pinch a big gooseberry sized ball out of it. The size of dough ball should be half the size of stuffing ball. Stuffing ball should be bigger than dough ball. Keep the ball in a greased obbattu sheet ( U get in shops) and spread it lightly like a poori. Make sure the corners are thinner than the center portion. Now keep the stuffing ball in the middle and cover the stuffing with the dough. You can use banana leaf for rolling holige but obbattu sheet works the best. 
Obbattu recipe
  • Press it using your hands and pat it as much as possible distributing the stuffing evenly all over the holige. Make it medium thin Or thick as you like (If you make polis too thick, it may turn out hard).
Obbattu recipe
Obbattu recipe
  • Heat a dosa tawa (Iron griddle is best) and drizzle few drops of oil. When the pan is heated, take the obbattu sheet and invert it over the tawa. Just drop the holige and remove the sheet. Spread it well. Cook it by adding a tsp of oil. Cook both the sides in medium flame till holige cooks with golden brown spots. Remove in a plate and serve it hot hot adding milk and Ghee generously. Tastes great!!
Obbattu recipe
  • Repeat the same for all the dough and stuffing. Always Stack the holige and store it. It will stay good for a week provided you cook the stuffing part without moisture.

Note

  • Please refer “Points to remember” given above before you start making obbattu. All the best !!

Enjoy making this Karnataka’s most popular Obbattu for Ugadi Habba. 

Wish you all a very happy Ugadi festival celebration !!

Obbattu recipe

Continue Reading...


December 19, 2014

Milk Kesari/Paal Kesari Recipe-Rava Kesari Using Milk


Rava Kesari using milk aka Paal kesari ( in Tamil) is the one which i was struggling for years to make it perfect .Thanks to my MIL for teaching me Rava Kesari recipe using this method for beginners.With the help of that recipe,i tried this milk kesari yesterday.It came out really well and i was 100% happy with the result.Its a very simple recipe without condensed milk but tastes rich n flavourful.I have shared all the tips & tricks for beginners to make it easily.Try it n let me know your feedback friends.Ok,lets see how to prepare milk kesari with stepwise pictures.I wanted my paal kesari to be white in color.So i added less saffron.Please use more saffron threads or yellow food color to make colorful kesari Love Struck.


Milk kesari recipe/Paal kesari


Milk kesari recipe/Paal kesari Rava kesari using milk - Paal kesari recipe
Cuisine: Indian
Category: Sweet
Serves: Serves 4
Prep time: 10 Minutes
Cook time: 20 Minutes
Total time: 30 Minutes


INGREDIENTS

  • Rava/sooji/Semolina - 1/2 cup
  • Milk - 3 cups
  • Sugar - 1 cup
  • Cardamom - 2 nos
  • Saffron threads - 10 nos
  • Cashewnuts - 5 nos
  • Ghee - 2 tbsp
METHOD

  • Heat 2 tsp of ghee in a pan.When it is hot,add the rava.As soon as u add rava,it should sizzle.Keep the flame in medium high and roast the rava for 2 minutes staying nearby.Remove the roasted rava in a plate and set aside.
Milk kesari 1
  • In the same kadai,add milk and saffron threads, allow it to boil. When it starts to roll boil,keep the flame completely low and add the rava in one hand and stir the mixture using a ladle in the other hand.Now take a wire whisk and mix it thoroughly.Make sure there are no lumps.Keep the flame low till u mix it well.After mixing,increase the flame to medium and mix till the rava thickens slightly.
Milk kesari 2
  • Now close the kadai with a lid and cook till rava is done. It takes around 3-4 minutes in medium flame.Stir it once in the middle.
Milk kesari 3
  • After the rava is cooked well,add sugar by keeping the flame low.The mixture will turn slightly thin.
Milk kesari 4
  • Keep mixing till all the sugar is melted completely and the mixture becomes slightly thick.Lastly add the remaining ghee and remove the kadai.Transfer it to a bowl immediately.If u touch the kesari,it will be non-sticky.Do not over do & wait for kesari to leave the sides of kadai.Remove it as soon as all the sugar is mixed with rava and becomes slightly thick.The mixture will fall like a ribbon.Don’t panic.It will become thick once it cools down.So transfer it to a bowl and garnish with roasted cashews.( If u keep mixing till kesari leaves the sides,the sugar will crystallize & kesari becomes hard n chewy after it cools down.So pls be careful).
Milk kesari 5
  • Generally we don’t make pieces for milk kesari.We serve in bowls.If u want to make pieces,transfer the kesari to a ghee greased plate & wait till it becomes warm & thick.Draw lines using a greased knife & make shapes.
  • Keep the flame medium throughout the process.It takes maximum 3 minutes after adding sugar to finish the process.
Enjoy !


Note

  • The ratio of rava & milk should be 1:6.As we are adding more milk,there are less chances of lump formation.But make sure you mix it properly with a whisk.
  • You can add 1.5 cups of sugar if u want mild sweetness.
  • Add more saffron if u want nice yellow color.I wanted my kesari to be white.So i used less.
  • Do not over do & wait for kesari to leave the sides of kadai.Remove it as soon as all the sugar is mixed with rava and becomes slightly thick.The mixture will fall like a ribbon.Don’t panic.It will become thick once it cools down.So transfer it to a bowl and garnish with roasted cashews.


Try this milk kesari recipe for pooja or to celebrate occasions and make it special Smile


Continue Reading...