Bhel puri is one of the easiest , tasty and guilt free snack .. I used to make this very often in my home .. Whenever i have chaat chutneys in my hand , bhel puri is the first snack recipe that hits my mind..I make it very simple by just adding the raw veggies ,sweet & sour chutneys and sev.. I usually don’t add papdi..Of course adding crushed papdi makes this snack more crunchy.. So i add more sev , roasted peanuts , cashews etc to replace papdi .. As u all know , this snack should be served immediately after u mix.. By the time i finished clicking , it became soggy & i ate a soggy bhel ….
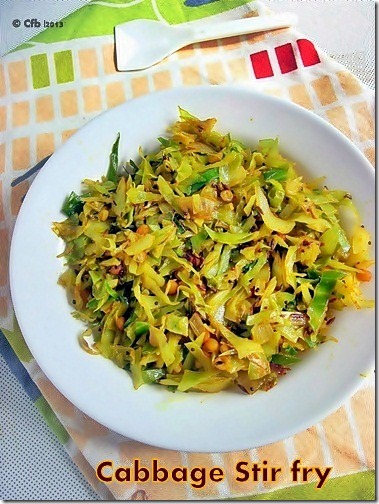
This recipe was lying in my drafts for long time.Its a simple stir fry recipe which u would have tasted in most of the restaurants during lunch closing time i.e around 2.30pm. Whenever i feel lazy to cook for myself , i make this poriyal .It has no grinding or boiling part & no coconut.Its very easy & can be made in jiffy.. Before marriage , when i was working , my colleagues used to bring this poriyal for sambar rice.. I love its taste & simplicity. My husband hates cabbage because of its smell. We can easily remove its smell to some extent by adding finely chopped ginger.It smells great while u saute..I hope most of u know this tip & make this stir fry at home.. Bachelor's , do try this recipe & let me know how u liked it..
INGREDIENTS 1 cup - 200ml
Grated cabbage – 1cup
Big onion – 1no (finely chopped)
Red chilli powder / Sambar powder – 1 tsp (adjust as per ur spice level)
Turmeric powder – 1/4 tsp
Salt – As required
Ginger – 1 inch piece (finely chopped)
Curry leaves – few
Sugar – A pinch
To temper
Oil – 2 tbsp
Mustard seeds – 1/2 tsp
Urad dal – 1tsp
Channa dal – 1 tsp
Cumin seeds / jeera – 1/2 tsp
Coriander leaves – to garnish (optional)
METHOD
In a wide mouthed kadai , heat oil and temper mustard seeds.. After it splutters add urad & channa dal , Curry leaves..
After the dals turn golden brown , add the onions & ginger bits.Mix well and saute till onion turns transparent.
Now add the grated cabbage & the required salt , a pinch of sugar.Then add the sambar powder/Red chilli powder & turmeric powder.. Mix well & saute till cabbage shrinks in quantity.
Keep the flame low & cover the kadai with a lid for few minutes. Stir in between.. Make sure the cabbage doesn’t get burnt..If u feel the mixture is very dry , sprinkle little water , mix well & cover the kadai..
After the cabbage is cooked well , switch off the stove ..
Garnish with chopped coriander leaves if u like..
Enjoy with sambar rice !!
NOTE: Adding ginger is a must to remove the raw smell of cabbage. If u like cabbage smell , u can skip ginger..
Dear friends ,
In this new year , I have taken my blog into a next step as a website in the name of “www.chitrasfoodbook.com” with a hope to give better recipes & pictures.
In this aspect, I have bought a new DSLR to give more realistic images of my recipes. I thank all my friends & readers for your continuous love & encouragement and I hope to get your support & blessings for my website too. I welcome your suggestions for further improvements in this space..
At this moment , I would like to thank Cuponation , a website that has the most comprehensive collection of coupon codes in India which includes deals and offers from all the top online retailers like flipkart, jabong, future bazaar , myntra , home shop 18 , Ekstop , pepperfry and there is a big list goes on.
Recently I bought some home appliances & Bakeware ( which I wanted to buy for long time ) at discounted rates using their coupons. Just go through their website & subscribe for exciting deals !!
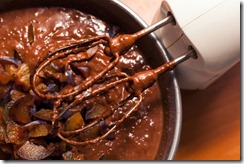
As Valentine’s day is nearing, I thought of posting a cake recipe . My husband loves chocolate cake ..So I baked this cake as Valentine’s day gift ..I got this recipe from marias menu..I have tried this cake twice & I slightly adjusted the recipe to suit our taste.There is no butter or egg used in this recipe..With very simple ingredients which are readily available in our pantry , we can make this cake..I chose this recipe because it had a mild coffee flavour. Its dark color, chocolaty smell & its spongy texture made me felt very happy with the result . As a beginner in baking , I simply loved this cake & I was completely satisfactory with the outcome .
My hubby liked this cake very much and my daughter wanted some icing on it .. So I tried a simple frosting too…
.Here comes the recipe…
INGREDIENTS 1 cup - 200ml
All purpose flour – 1 cup
Sugar – 3/4 cup + 2 tbsp
Cocoa powder or drinking chocolate powder – 5 tbsp
Baking powder – 1/2 tsp
Cooking soda –1 tsp
Vanilla essence – 1 tsp
Cooking oil – 1/2 cup
Beaten curd – 1/4 cup
Milk – 1/4 cup ( at room temp)
Hot coffee – 1/4 cup ( mix 1 tsp coffee powder in 1 cup of hot water.Add 1/4 cup to the mixture. I used BRU. )
For frosting
Unsalted butter – 100 gms (1/2 cup)
Any plain chocolate – 175 gms ( 1.25 cups) ( i used dairy milk , around 15 cubes)
METHOD
Sieve maida , baking powder & cooking soda together in a wide bowl.Then add the sugar , mix well .. Make a dent in the center..Add the wet ingredients one by one & mix well using a whisk or blender. Whisk or beat it gently..
Keep the baking pan ready by greasing with butter & sprinkle maida all over it. Pat it well so that the maida should coat around the sides too..Line the bottom of pan with a butter paper. Preheat the oven in 180c , convection mode for 10 mins.
Now transfer the cake mixture to the pan & bake it for 25-30 mins in 180c till tooth pick inserted should come out clean. Mine got done in 28 mins. Keep an eye after 20 mins.Check with a tooth pick or spoon & then remove the pan.
Let it cool for 15-30 mins. Then invert it in a wire rack or a plate & allow it to cool completely..
In the mean time , make the frosting. Take water in a wide bowl & allow it to boil well. Now place a plate or a shallow bowl on the top of the water bowl.the bowl should not touch the water.. Add the butter & melt it . When the butter is melted half way , add the chocolate cubes & stir it gently. Chocolate cubes will melt & switch off the flame.. Stir until all the chocolate melts. Remove the bowl & allow the mixture to warm..Frosting thickens when it is warm …
After the cake cools down , apply the frosting , cut into pieces & Enjoy !!…
NOTE
When u use unsweetened cocoa powder , add more sugar as mentioned in the recipe.If u use drinking chocolate powder , 3/4 cup sugar is enough..
The cake has a mild bitterness due to the addition of coffee powder. If u want u can skip it…
I got this crispy Gobi 65 / Cauliflower 65 recipe from Aval vikatan’s “ 30 Restaurant style recipes” supplementary. This is a dry version. Before I got this book, I used to try Chef Damodaran’s recipe which is also similar to this. This recipe has dry kasoori methi leaves in addition. I have tried this several times and it comes out super crispy , tasty with nice flavour like hotel style cauliflower 65. We love it a lot. I usually make in weekends with veg pulao or biryani.
Sometimes, I make this cauliflower fry for my daughter after she comes from school. This is one of her favourite snacks. U can prepare this recipe well in advance for parties or get together & fry it when required. The more time the cauliflower marinates, the tastier it would be. You can try without marination as well.. Please go through the Notes section for do’s & dont’s.. Lets see how to make crispy Gobi 65 recipe with step by step photos and video !
Gobi/Cauliflower – medium size flower (20 florets)
All purpose flour / Maida – 1/2 cup
Corn flour – 1/2 cup OR rice flour + corn flour - 1/4 cup each
Red color powder – 1/4 tsp
Red chilli powder or green chilli paste – 2 tsp
Ginger – garlic paste – 1.5 tsp
Garam masala powder – 1 tsp
Crushed fennel seeds - 1 tsp
Lemon juice – Few drops
Dry Kasoori methi leaves – 1.5 tsp (crushed )
Salt & water – As needed
Cooking oil – To deep fry
HOW TO MAKE GOBI 65
Remove florets from cauliflower. Parboil adding salt and turmeric powder.
Take a bowl and mix all the ingredients to make the batter.
Add water to make bajji batter consistency.
Lastly add cauliflower florets. Marinate for 30 minutes to 1 hour.
Heat oil and deep fry the cauliflower pieces. Fry till golden in both the sides.
Remove from oil once its crispy. Drain in a tissue paper. Enjoy with tomato ketchup.
METHOD - STEP BY STEP PICTURES
Remove the florets from the cauliflower & par boil it for 5 minutes adding salt and turmeric powder. Make sure cauliflower florets are small in size.
When the water roll boils, switch off the flame. Leave it for 3 minutes and drain the hot water completely & wash it in cold water immediately to avoid over cooking of cauliflower. Drain all the water completely.
Now in a wide bowl, add all the powders, crushed spices & salt, lemon juice mix well . Add water carefully to make bajji batter consistency. The batter should fall like a ribbon. Now put the florets, mix well & marinate for minimum 30 minutes to 2-3 hours. Please watch video for better understanding. Cauliflower should be well coated with flour.( watery batter absorbs more oil). If you don't have enough time, you can fry it instantly without marination.
Heat oil in a kadai and put the cauliflower florets in a sprinkled way one by one. Deep fry on both the sides till all the bubbles cease. Do it batches in medium flame Deep fry curry leaves in the last batch & decorate it while serving !!
Super crispy gobi 65 is ready !! Enjoy eating hot with tomato sauce !!
NOTES
It will stay crispy for 30 minutes. But for best taste, you should eat it hot hot !!
While you make the batter add less water & bring to bajji batter consistency. If you add more water, gobi 65 may absorb more oil. Adding less water & more flour makes it hard.. Please be careful while adding water. Approximately it takes 3/4 to 1 cup of water I guess. If you add more water, add some more flour to bring the right consistency.
If you feel adding maida is unhealthy , add wheat flour instead of maida.
Adding food color is optional. But it gives a nice look to the fries like we get in restaurants.
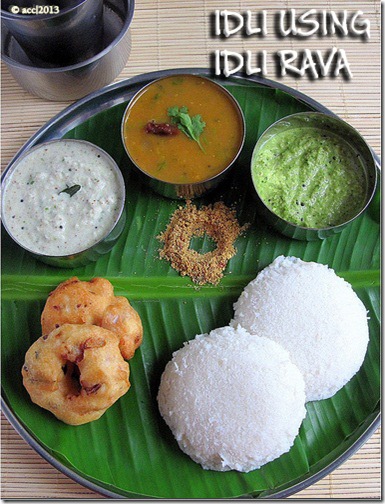
In this post, lets see how to make soft idli and crispy dosa batter using idli rava in mixie with step by step pictures and video. I must thank my neigbour for introducing idli rava to me. I din't know that there is something called idli rava until she told me. She used to tell me to try idli, dosa using idli rava but I was hesitant because idli is our staple food. I dint want to take risk using idli rava. Then she gave me some to taste and after that I started making it in my kitchen. Now I am very much comfortable with this idli rava idli. Not only soft idli, we can make crispy dosas too. U could have tasted this type of idli in Karnataka hotels/ restaurant. But in this method, idli wont be crumbly or coarse like in hotel.
First thing I liked in this method is very less soaking time , just 45 mins is sufficient. It takes the soaking time of urad dal. Total process (soaking + grinding) takes 1 hour. But it needs 8 - 15 hrs of fermentation time depending on the weather in your place. I grind the batter in the afternoon ( around 2 pm) & make idlies the next day morning (7 am).The batter will be fermented well.Second good thing is I grind the batter in mixie ( NO grinder cleaning). I have shared a Full video recipe on how to make these idlis. Please have a look.
People usually don’t grind this idli rava and they add it as it is(after soaking) to the ground urad dal batter. I too tried the same way initially but i felt the idli was very crumbly like rava idli and we dint like that taste. I wanted to bring the same taste as of our normal idli. So I grind the idli rava along with urad dal batter at the end till it becomes slightly coarse. Even then I felt the idli was slightly sticky while eating. I changed the ratio of dal & idli rava, I soaked it together and grind in mixie adding ice cold water. Now Iam getting the best idli out of it. I am very happy with the result.
Earlier my husband used to scold me whenever I prepare idli with idli rava. Nowadays he couldn’t find any difference in the texture and he is eating silently. There is no much difference in the cost of idli rava & idly rice. Friends, try this idli for a change and you’ll start making it often like me.. Lets see how to make soft idli and crispy dosa using Idli Rava.
Idli using Idli Rava - Video Recipe !
Idli using Idli Rava
How to make Idli using Idli rava easily at home. Not just soft idli, you can make crispy dosa too.
Cuisine:Indian
Category:Breakfast recipes
Serves:-
Prep time:15Min+8Hrs
Cook time:10 Minutes
Total time:8hrs25Min
INGREDIENTS
1 cup - 250ml
Idli rava – 2 cups
White round urad dal – 1/2 cup ( If you follow the video recipe, please use 1/3 cup)
Water – 1-1.25 cups ( Use Ice cold water)
Salt – As needed
METHOD
Wash and soak the Idli rava and urad dal together in a bowl for 45 minutes. Drain the soaked water completely before grinding. ( In the video I have mentioned to soak them & grind separately. Add 1/3 cup of urad dal in that case. This method needs less urad dal. )
Grind half of its amount in mixie adding 1/2 cup of ice cold water & the required salt for 3-5 minutes.After 2 mins , open the lid , wipe the sides & grind again. Add little more water if its necessary.
Again grind the remaining mixture adding 1/2 cup of water. ( Note : Batter will be slightly coarse even if you grind for long time , no need to worry) Mix both the batter using your hand. (Mixing by hand helps for fermentation). Keep the bowl closed & allow the batter to ferment for 8- 15 hrs based on the weather in your place.
The next morning, batter would have raised well . Mix it well before making idlies. Pour the batter in idli plate , steam it for 6-8 mins & enjoy with ur favourite chutney !!
Enjoy !
Note
The maximum amount of water it consumes while grinding is 1.25 –1.5 cups. Adjust as per your mixer. I used ice cold water to avoid the mixer getting heated. Plain water can also be used.
Fermentation is very important to get soft, non-sticky idlies.
People suggest idli rava & dal ratio as 3:1. But 4:1 is enough for soft idlies.
If you want, you can add a tsp of soaked fenugreek seeds too to make it healthy.
U can also make crispy dosa using the same batter.
Enjoy this easy Idli recipe for your breakfast !
Here is a picture of Crispy dosa made using the same batter.
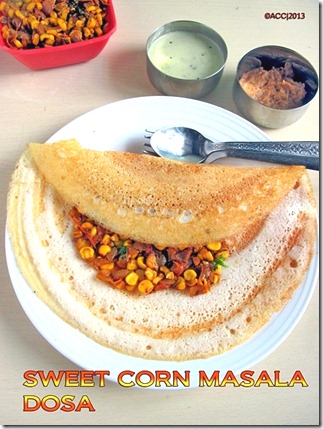
Its been a long time i made dosa varieties at home..I tried this recipe after watching a local telugu channel show in you tube..It was a show about a hotel’s dosa mela . I tried this dosa with the recipe roughly told by the chef to the anchor. I have never eaten or seen this dosa variety in any hotel . I found this recipe new & interesting .I love to try sweet corn recipes as it is our family favourite.It was very tasty and we loved it withcoconut chutney as side..Do try this , i am sure u’ll find it different & tasty . I’ll post some more dosa varieties soon..
Boil the sweet corn adding required salt & water. Remove the corn kennels and set aside.(please refer this post for easy removal of corn kennels)
In a kadai , heat oil and temper the cumin & fennel seeds. Add g&g paste if necessary.Saute till the raw smell emanates.Then add the finely chopped onions , saute till it turns transparent.Now add the tomato pieces & saute till its mushy. Now add the turmeric powder , red chilli powder , dhania powder & garam masala powder , salt & mix well, cook for sometime.Make sure it doesn’t get burnt..
Finally add the corn kennels with little water and mix well and cook for sometime to get all the masala infuse into it & the mixture becomes dry.Switch off the stove & garnish with coriander leaves..
Now heat a dosa tawa, pour a ladle full of batter & spread it nicely.Drizzle oil ,Cover & cook it for sometime in medium flame till u get a nice color. Then keep the masala in the center of the dosa , close it & serve hot with any chutney !!
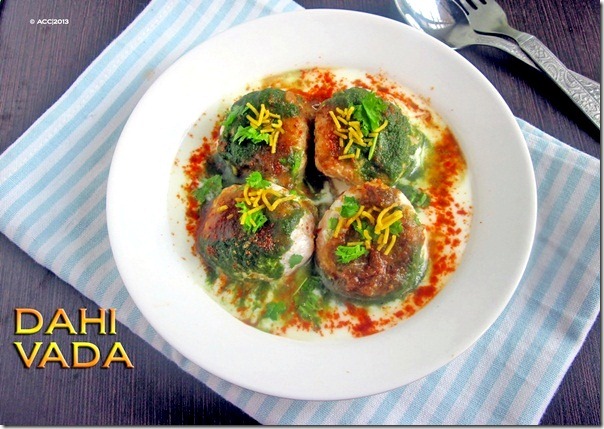
I wanted to try North Indian dahi vada/dahi bhalla , a famous north indian street food for long time. I love South Indian thayir vada. I thought both are same but then I came to know dahi vada is similar to curd vada made with leftover medu vada and in addition they add chaat chutneys, also the shape will be round like bonda. I got North Indian dahi recipe from a chaat book and I tried in a weekend. We all loved it. I made a batch in vada shape for my hubby and the remaining in round shape. So i’ve mentioned both in step by step pictures. Do try any based on your liking. It tastes great !
Chaat masala powder – 1 tsp (to sprinkle- optional)
Warm water – 1 bowl (to dip the vadas)
Coriander leaves – To garnish
METHOD
To make medu vada : Wash and soak the urad dal for 30 mins. Drain all the water and grind it to a smooth paste adding chillies , ginger , salt and 1/4 cup of water. If necessary add 1-2 tbsp of water to make it very smooth.
Keep the warm water ready in a bowl. Heat oil in a kadai and take a tbsp of batter and drop in the oil. OR u can take a small ball shaped batter and drop in the oil. U can make it in vada shape / donut shape too. Deep fry in both sides till golden brown. Remove and add it immediately to the warm water bowl.
Let it soak for 5-10 minutes. Meanwhile beat the curd adding salt & very less water if the curd is too thick. Please do not add water if it is already slightly watery. Take the vada in your palm & squeeze the water without changing its shape and add it to the curd. Let it soak in the curd for 10 minutes. By this time , finish the remaining batches of vada & follow the same procedure.
In a serving plate , arrange 4-5 balls and pour the curd over them.Now put 1/2 tsp of green chutney & 1 tsp of sweet chutney over each ball. Sprinkle the red chilli powder , cumin powder and finally sprinkle the ginger bits,coriander leaves & if desired oma podi..
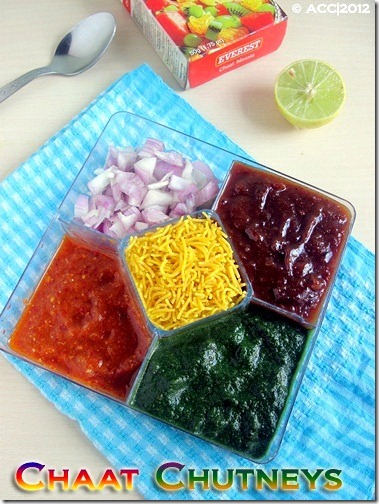
I am a big fan of chaat items .I can live with it.Recently i tried dahi vada( will post next).I made these chaat chutneys & the urad dal batter in large quantities, refrigerated it and prepared it for my daughter as evening snack for 3-4 days ..She loved it a lot.Making varieties of chaat is very easy.If we have these chutneys, oma podi & onions at home , we can make chaat recipes instantly. I used to make a single sweet n sour chutney for chaat which u can find here. But after going through some books and websites , i found there are different varieties of chutneys. So this time i tried all these chutneys.I made them thick & i diluted it while use..I quickly browsed some recipes and i finally settled down with recipes of Few minute wonders..I made some slight changes in the ingredients and the procedure for my comfort ..Do try these chutneys , u’ll love it..
GREEN CHUNTEY
INGREDIENTS
1 cup - 200ml
Coriander leaves – 1 cup
Mint leaves – 1/3 cup
Green chillies – 3-4 nos
Lime juice – 1 tbsp
Jeera / cumin seeds – 1/2 tsp
Turmeric powder – A pinch
Garlic – 2 pods
Ginger – 1/2 inch
Salt & water – As needed
METHOD
Take all the ingredients in the mixer & grind all the ingredients to a smooth paste adding salt & water.
Store in an air-tight box, refrigerate it. Dilute the chutney when use.
RED CHUTNEY/ GARLIC CHUTNEY
INGREDIENTS
Garlic cloves – 7 cloves
Red chillies – 4- 5 nos
Salt & water – As needed
Tamarind – Small piece (optional)
METHOD
Grind all the ingredients to a smooth , thick paste.Store, refrigerate n use!.This chutney can be used as a dip for momos and it can be applied in masala dosa !
SWEET CHUTNEY/DATES CHUTNEY
INGREDIENTS
Dates – 6-8 nos
Grated Jaggery – 1/4 cup
Tamarind – Big gooseberry size
Water – As needed ( 1/2 cup)
Salt – a pinch
Red chilli powder – 1 tsp
Cumin powder – 1/2 tsp
Chaat masala powder – 1/2 tsp
METHOD
In a pan , add water , dates , jaggery , tamarind & allow it to boil.
Close it with lid and allow the dates to cook & jaggery to melt completely. By the time the dates get cooked , the water will be reduced to half..Switch off the flame .Drain the excess water & allow the mixture to cool down.
Grind it to a smooth paste.Again boil the paste adding the drained water. Add the red chilli powder , cumin powder & chaat masala powder. Boil for sometime till the mixture thickens.
Store in an-air tight box , refrigerate and dilute it while use !


 How to make Idli using Idli rava easily at home. Not just soft idli, you can make crispy dosa too.