I am a big fan of pineapple.I love to eat it sprinkling salt& red chilli powder.My in-laws knows it very well.Last week when i went to salem , my FIL bought me a pineapple..I had half of the pineapple ..I made this juice with the remaining half for Sendhil (my husband).He liked it very much. This is a very simple recipe which u may know it.. I wanted to start summer special drinks with this simple recipe.Also i wanted to click (test) liquid pouring effect with my Dslr .. Hope it looks good. Here u go..
INGREDIENTS 1 cup - 200ml
Pineapple cubes – 1.5 cups ( half of medium size pineapple)
Sugar – 1.5 tbsp
Salt – A pinch
Water – 1/2 cup
METHOD
Remove the skin of the pineapple using a sharp serrated knife.
Please click here if u need step by step pictures of how to remove the skin..
Now cut the pineapple into cubes and take them in a mixer.
Add sugar , salt and water and grind it well.
Strain the juice and serve immediately..
NOTE: Please adjust the amount of sugar as per the sweetness of pineapple..
Ven pongal also known as ghee pongal / khara pongal is one of the most popular South Indian breakfast recipes especially in Tamil nadu. My Mom and MIL makes it very well. Though they follow different methods, I like both the versions. I usually follow my MIL’s method as my husband Sendhil is fond of it. She makes it directly using a pressure cooker. Sometimes we make this using leftover cooked rice too. To me, its a very easy one pot meal for breakfast and dinner. So I usually make this pongal in busy mornings & mostly for my guests adding more ghee ;).
The taste and softness of pongal depends not only in the quantity of ghee but also on the quality of rice and quantity of water, rice ratio. In Tamilnadu,we get pongal rice (Raw rice/Pacharisi). We use it for making sakkarai pongal and ven pongal. Here in Bangalore, I buy the costliest, good quality Sona masoori raw rice also known as kolam rice.
In this post, I have shared my MIL’s method. It’s a very easy and quick method using pressure cooker. I have used moderate quantity of ghee in this recipe. If you are planning to try for your guests , add more ghee before serving otherwise just follow this recipe for the first time and adjust the amount of ghee if u wish. Check out my mom's ven pongal recipe too. Do try any method based on your liking. Remember pongal should be served hot to enjoy its best taste. As you all know the best side dish for pongal are coconut chutney, Tiffin Sambar and brinjal gosthu! Ok, Lets see how to make ven pongal / ghee pongal with step by step pictures and a video.
Ven pongal recipe video
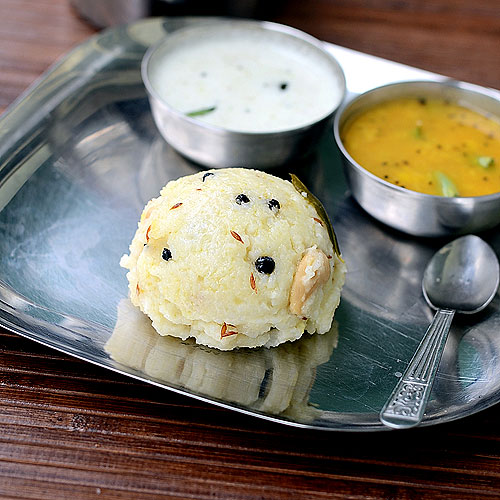
Ven pongal recipe
How to make Ven pongal/Ghee pongal recipe easily using pressure cooker - One pot method
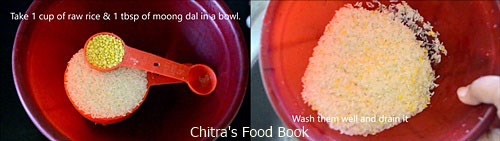
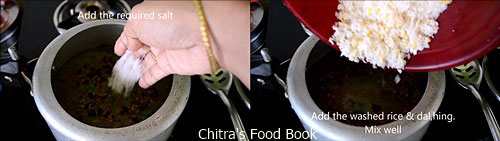
Take raw rice & moong dal in a bowl and wash it twice. Set aside. Chop the ginger and take it along with pepper, cumin seeds & curry leaves.
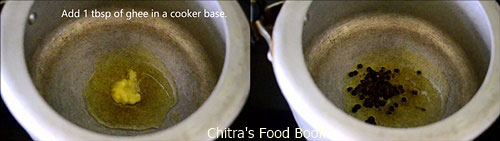
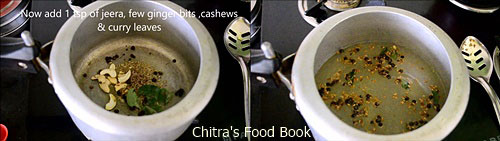
Heat 1 tbsp of ghee in a pressure cooker base. When the ghee starts to heat,add the pepper corns and saute well till it starts to splutter. Keep the flame medium to avoid burning of ghee. As soon as the pepper splutters, add the cumin seeds, curry leaves, cashews and ginger bits. Mix well quickly without changing the color of cumin seeds. Add 4.5-5 cups of water and required salt.
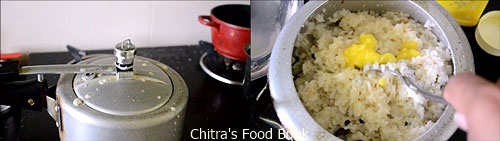
When the water starts to roll boil, add the washed rice+dal mixture. Close the cooker. When the steam comes from the nozzle, put the whistle and simmer the flame. Cook till one whistle. It takes 12-15 minutes. Switch off the flame and let the steam release.
Open the cooker and mash everything well with a ladle. Lastly add 1 to 2 tbsp of ghee, mix well and serve immediately. Enjoy with coconut chutney or gosthu !
Add more ghee if making for guests :))
Note
If you are making for guests, add one more tbsp of ghee at the end before serving.
Usually vanaspati / Dalda is added in restaurants. But we all know its bad for health.. So its better to use ghee or cooking oil & ghee combination as it is low in calories too.
The quantity of water completely depends on the quality of rice.
My mom adds roasted pepper powder on top of pongal along with jeera and other things to get more spicy taste. As we don’t eat whole pepper corns, she follows this way to include pepper in our food.
Adding hing and ginger gives a restaurant touch. U can replace ginger bits with ginger paste or grated ginger too.
Enjoy this easy and yummy South Indian breakfast recipe with your favorite side dish !
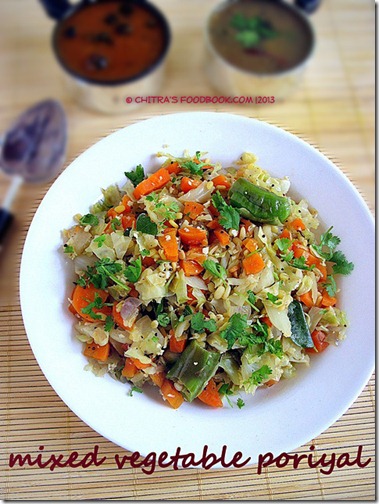
This is a very simple poriyal recipe made with a combination of vegetables..It tastes great with sambar sadam ..We call this as cabbage podimas..I make this podimas mostly during occasions as this recipe don’t have onions.The addition of moong dal & grated coconut gives the taste..Sometimes i make the same adding onions.It tastes good in either way..
INGREDIENTS 1 cup - 200ml
Cabbage – 1 cup (finely chopped)
Carrot , beans, peas - 1 cup (chopped)
Big onion – 1 no (finely chopped) (optional)
Ginger – 1 inch piece (finely chopped)
Moong dal – 3 tbsp
Grated coconut – 1/2 cup
Green chillies – 2- 3 nos (finely chopped)
Curry leaves & coriander leaves – few
Mustard seeds – 1 tsp
Cooking oil – 2 tbsp
Salt & water – As needed
METHOD
In a wide bowl ,cook the finely chopped carrot , beans , peas & cabbage till its half cooked..Pressure cook moong dal separately till it blossoms.
Heat oil in a kadai and temper with mustard seeds , curry leaves , finely chopped green chillies , ginger & onions..Saute till onions turn transparent..
Then add all the half-cooked vegetables , salt and mix well.
Close it with a lid and cover cook for 10 mins in low flame. Mix well in between..
Once all the veggies are completely cooked , add the grated coconut & coriander leaves..Mix well & switch off the flame..
NOTE
Please cook all the vegetables till its half done. Do not over cook them..
I added slit green chilly for my daughter .The original recipe used finely chopped green chillies..
Add the mentioned amount of grated coconut to get the actual taste.
Coriander leaves is also a must..Adding ginger removes the raw smell of cabbage. But its purely optional..
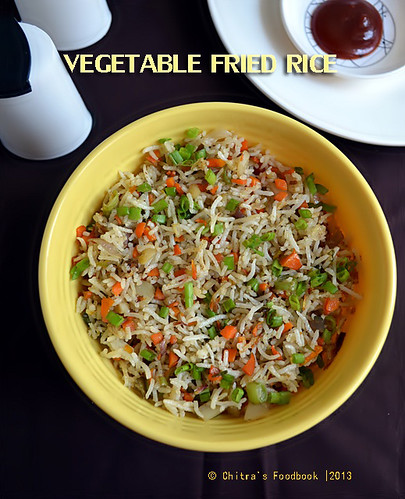
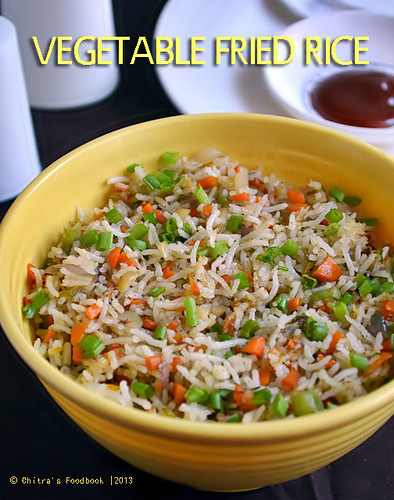
Vegetable fried rice is our favourite Chinese rice recipe. When my husband was in US for a short period , he used to have this rice for lunch in which the quantity of vegetables was more than rice. After he came from the trip, he told me to make fried rice adding more vegetables than rice. I started making the same way and it made the rice more healthy. I used to add ajinomotto but after knowing its ill effects I stopped using it. But It din’t make any difference in taste and flavour. The only part I feel lazy/difficult is to chop the vegetables finely. Otherwise its an easy to make dish. It will come out very flavourful too. Make sure you add all these vegetables to get the exact taste of fried rice.
Wash and soak the rice in water in for 30 minutes. Mean while chop all the vegetables finely.For spring onion , cut the stem part & leaves part separately..
Pressure cook the rice adding a drop of oil .. Rice should be separate & fluffy. Spread the rice in a plate and cool down completely..
In a wide kadai , heat oil till it slightly fumes ..Now add all the finely chopped vegetables including onions ,capsicum, stem of spring onions ,ginger & garlic pieces.. I don’t follow any order..I just add everything together..
Add sugar, salt and toss in high flame for 2-3 minutes by mixing continuously.Keep stirring , adjust the flame to low if necessary..Adding sugar helps to maintain the color of vegetables and salt helps to sauté quickly.
.After the vegetables shrink into half , add soya sauce, rice and mix well.Mix well and add white pepper powder.Toss for few seconds and switch off the flame..Garnish with leaves part of spring onions..
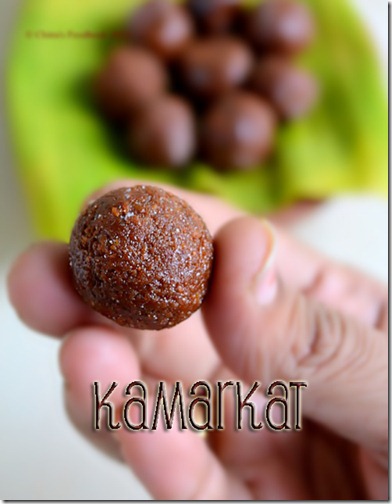
We all would have tasted Kamar kat , thean mittai , javvu mittai , elandha vadai etc in our young age from petty shops and nowadays we don’t find this easily in the market. Our kids don’t have even any idea about it..So to make our kids savour its taste & to satisfy our cravings , i tried this recipe from my MIL’s old cookbook collections.To my surprise , the recipe was given using microwave which made me very happy to try.This is a very simple recipe which has only coconut & jaggery.The consistency of jaggery syrup is very important here.If the consistency is right , u’ll get this color , otherwise u wont.The size of kamar kat is of big gooseberry size.But i made it smaller to get 10 balls. I used microwave high (800w) setting in this recipe. Based on ur oven settings , please change the time.I made this for three times consecutively and i got it right in the third time..I made in very small quantity which yielded around 10 pieces..Try the same quantity (including the water) i mentioned here to get the best result.. I have given the stove top method in the notes section ..But I prefer microwave .. It came out very flavourful & tasty with the smell of coconut & jaggery..Though it gave a good exercise to the jaws , its worthy to taste. Do try n let me know how u liked it..
INGREDIENTS
1 cup - 200ml
Grated coconut – 1/4 cup
Grated jaggery – 3/4 cup
Water – 1/8 cup
Cardamom powder - 1/8 tsp (optional, I dint use)
Ghee – 1 tsp
Rice flour – 1 tbsp (to coat the kamarkat )
METHOD
Grate the coconut and grind in the mixie once to break the small pieces ..
Take the ghee in a microwave safe bowl and melt it by keeping for 20 seconds in microwave high power (800w) ..Remove the bowl and add the coconut gratings.. Mix well and again keep in high power for 1 minute to roast the coconut..Coconut will be turned slightly brown in color..Keep it aside & allow it to cool completely..
Now in a microwave bowl ( choose a big bowl) , take 1/8 cup of water and heat it for 1 min in high power..When the water is boiled , add the grated jagggery , mix well and again keep in microwave for 1 minute for the jaggery to melt completely..Strain the jaggery to remove the impurities..
Again microwave the strained jaggery syrup in high power for 2 minutes & 20 seconds to bring the hard ball consistency.. ( ie , when u drop the syrup in a plate of water , u should be able to roll a hard ball and when u drop the ball , u should get a “tung” sound.. The ball should look glossy.. Usually we make this syrup to make chikkis/kadalai mittai) .. The time i have mentioned here is perfect when u keep in 800w power. If ur microwave has less watts settings , please increase the timing in seconds and check it. This step is very, very important..Please keep an eye after 2 minutes and increase the time by 10 seconds to get the consistency..
Now add the roasted coconut , cardamom powder and keep in microwave high for 1 minute 30 seconds .. Remove the mixture for every 30 seconds , mix well and again keep it..After 1.30 minutes , the mixture will be slightly thick and it will leave the sides and non sticky to touch.U’ll be able to roll it..
Now transfer the entire contents into a plate and make balls , coat in rice flour and keep aside. Allow it to cool completely. It will become hard..
Store in a box n enjoy !!
NOTE
For stove top method , melt a tsp of ghee in a pan and roast the grated coconut till u get a nice aroma & slight brown color..In a bowl, take the grated jaggery along with little water just to cover it..Melt the jaggery and strain to remove the impurities. Again heat the syrup, it will become frothy & thick. After few minutes , pour a drop of syrup in a plateful of water. U should be able to roll a hard ball & makes a tung sound when dropped.. Now add the roasted coconut & again keep the bowl in the flame & keep on mixing it. At one stage , the mixture become thick & it leaves the sides. When the ,mixture is still warm , grease ur hands with oil and make tight balls.Roll in rice flour & set aside.. Follow the same for all the balls. Rolling in rice flour prevents sticking of kamarkat with each other when kept in bottles..
Rolling in rice flour is very important to avoid the sticking of balls with each other..
My MIL told me to use even lesser coconut than the above quantity..U can use 2 tbsp too. It will be enough..
Chilli parotta was in my try list for a long time. My sister told me to try long back but that time i dint have any idea about its taste & look.Recently i tasted this dish in some restaurants , did research & finally i tried at home to match the taste of chilli parotta i had in restaurants.I rarely buy ready made parotas as my hubby is not much fond of them.So far i have bought them only thrice. First two times to try parotta salna recipe & this time to make chilli parotta. We loved it and planning to make this for my guests too . I made it little spicy to suit its name. If u wanna make it less spicy , reduce the quantity of red chilli powder OR add lime juice before serving.. Do try this simple ,colourful , easy dinner recipe & let me know how u liked it …
INGREDIENTS
Parotta – 2 nos
Cooking oil – 2 tbsp
Small Bell pepper – 1/2 no ( cut into small cubes)
Big onion – 2 nos (medium size , slice cut)
Tomato – 1 nos ( finely chopped)
Ginger – Garlic paste – 1/2 tsp
Curry leaves - few
Turmeric powder – 1/4 tsp
Red chilli powder – 1 tsp ( Use 1/2 tsp for less spice)
Coriander powder – 1/2 - 3/4 tsp
Garam masala powder – 1/2 tsp
Tomato ketchup / sauce – 1 tbsp
Salt & water – As needed
Lime juice – few drops (optional)
Coriander leaves – to garnish
METHOD
Cook the frozen parotta as per the directions given in the pack .. Cut into strips & then into square pieces..Keep aside.
In a kadai heat oil , saute the ginger garlic paste ( be careful , it splutters while u saute) till its raw smell leaves.Now add the onions, curry leaves ,bell pepper pieces & saute till it turns transparent.. Then add the tomato pieces & saute till it turns mushy..
Now add all the powders , salt .. Mix well in low flame for few minutes.
Finally add the tomato sauce , mix well , add a tbsp of water (optional) if the mixture is too dry..Then add the parota pieces..Toss it well with a fork like ladle to avoid turning mushy.. Switch off the flame & garnish with coriander leaves..
Add lime juice if desired & serve hot immediately !!
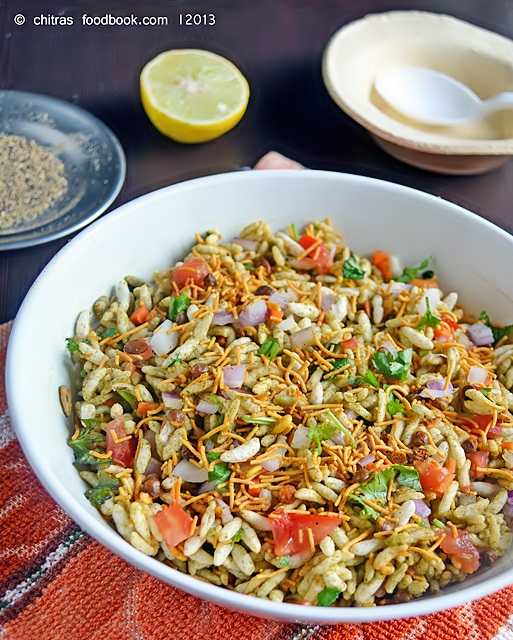
Bhel puri is one of the easiest , tasty and guilt free snack .. I used to make this very often in my home .. Whenever i have chaat chutneys in my hand , bhel puri is the first snack recipe that hits my mind..I make it very simple by just adding the raw veggies ,sweet & sour chutneys and sev.. I usually don’t add papdi..Of course adding crushed papdi makes this snack more crunchy.. So i add more sev , roasted peanuts , cashews etc to replace papdi .. As u all know , this snack should be served immediately after u mix.. By the time i finished clicking , it became soggy & i ate a soggy bhel ….
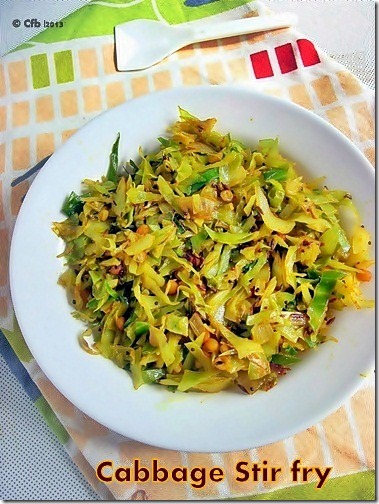
This recipe was lying in my drafts for long time.Its a simple stir fry recipe which u would have tasted in most of the restaurants during lunch closing time i.e around 2.30pm. Whenever i feel lazy to cook for myself , i make this poriyal .It has no grinding or boiling part & no coconut.Its very easy & can be made in jiffy.. Before marriage , when i was working , my colleagues used to bring this poriyal for sambar rice.. I love its taste & simplicity. My husband hates cabbage because of its smell. We can easily remove its smell to some extent by adding finely chopped ginger.It smells great while u saute..I hope most of u know this tip & make this stir fry at home.. Bachelor's , do try this recipe & let me know how u liked it..
INGREDIENTS 1 cup - 200ml
Grated cabbage – 1cup
Big onion – 1no (finely chopped)
Red chilli powder / Sambar powder – 1 tsp (adjust as per ur spice level)
Turmeric powder – 1/4 tsp
Salt – As required
Ginger – 1 inch piece (finely chopped)
Curry leaves – few
Sugar – A pinch
To temper
Oil – 2 tbsp
Mustard seeds – 1/2 tsp
Urad dal – 1tsp
Channa dal – 1 tsp
Cumin seeds / jeera – 1/2 tsp
Coriander leaves – to garnish (optional)
METHOD
In a wide mouthed kadai , heat oil and temper mustard seeds.. After it splutters add urad & channa dal , Curry leaves..
After the dals turn golden brown , add the onions & ginger bits.Mix well and saute till onion turns transparent.
Now add the grated cabbage & the required salt , a pinch of sugar.Then add the sambar powder/Red chilli powder & turmeric powder.. Mix well & saute till cabbage shrinks in quantity.
Keep the flame low & cover the kadai with a lid for few minutes. Stir in between.. Make sure the cabbage doesn’t get burnt..If u feel the mixture is very dry , sprinkle little water , mix well & cover the kadai..
After the cabbage is cooked well , switch off the stove ..
Garnish with chopped coriander leaves if u like..
Enjoy with sambar rice !!
NOTE: Adding ginger is a must to remove the raw smell of cabbage. If u like cabbage smell , u can skip ginger..