Mangalore bonda recipe is a famous Karnataka tea time snacks. It is also known as Goli baje & Mangalore bajji. Yesterday I wanted to try an Instant bonda for my daughter’s evening snacks. As I have already tried aloo bonda and mysore bonda , I thought of trying something different and interesting. So I quickly went through my cook books and tried this mangalore bonda recipe given by Mrs.Mallika badrinath. As the name says, Mangalore bonda is a famous tea time snacks recipe popular in Mangalore, udupi and South Canara region. Authentic Mangalore bonda version calls for resting the batter for 3 to 4 hours for proper fermentation. But I made an instant version by adding sour curd to the dough. It was very nice n crispy. Sendhil and Raksha loved it a lot. One thing you should keep in mind while making this bonda is “It should be served hot” to enjoy its actual taste ..Do try this instant snack in this weekend and let me know how it turned out .
Mix all the ingredients given above except cooking soda. Keep it closed for 30 minutes to 1 hour.. ( actual recipe called for 5 to 6 hours of soaking).. Do not add water while making the dough. If needed add 1 tbsp maximum.. Use only the curd to hold the dough..
After an hour , add cooking soda & mix well.. Heat oil , take a medium sized ball from the dough & deep fry them till golden brown..DO NOT OVER FRY, IT MAY CHANGE THE TASTE..
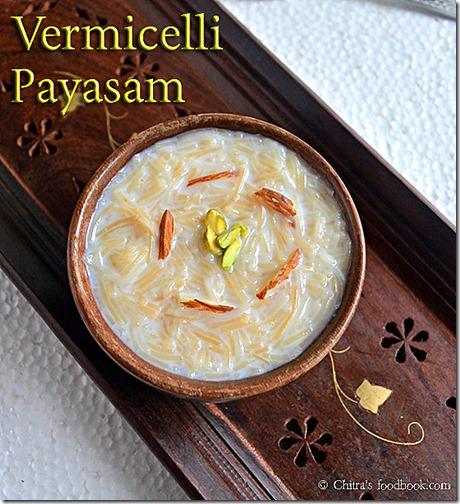
Semiya payasam must be the favourite payasam for most of the people in Tamilnadu. Its our family favorite too. People make it for all the special occasions like birthday, wedding anniversay and other occasions at home. Yesterday I made this semiya payasam without condensed milk (Milk maid) for my birthday and I enjoyed every mouth to the core. Its very easy and can be made in a jiffy. Many variations can be made to this payasam recipe by adding finely chopped nuts or badam powder or saffron milk , condensed milk/ milkmaid, khoya and make it taste more delicious. Its a simple but rich Indian dessert recipe. I have already shared Kerala style semiya payasam recipe in my Kerala Onam sadya post using milk.. Here I have shared the basic method in Tamilnadu style. Do try and let me know your feedback..
Semiya payasam without condensed milk
Semiya javvarisi payasam / sago vermicelli kheer in Tamilnadu style.
Roast cashew nuts and dry grapes till golden. Remove in a plate.
Roast semiya for 2 minutes. Remove in a plate.
Roll Boil 2 cups of water in a vessel. Add the roasted semiya.
Cook in medium flame for 10 to 15 minutes till its soft.
Add sugar, cardamom powder. Mix well and boil till sugar melts.
Switch off the flame once payasam becomes thick.
Add boiled milk at room temperature to the hot payasam. Add half the quantity of milk for thick payasam.
Lastly add the roasted nuts. Mix well and serve!
HOW TO MAKE SEMIYA PAYASAM - METHOD
Roast cashews till golden and dry grapes till bulgy in a tsp of ghee and set aside. Add the remaining 2 tsp ghee in a pan and roast the vermicelli till golden brown. ( I skipped this part as I used MTR Roasted vermicelli)
In a wide bowl , take the water and roasted vermicelli and allow it to cook for 10-15 minutes till it becomes soft to touch and breakable. There should be very little water left with the semiya.
Now add the sugar and mix well till sugar dissolves completely. Let it boil in low flame for few seconds. When the payasam becomes thick, add the elachi powder or rose essence and milk. Stir well, give a boil in low flame and switch off the flame.
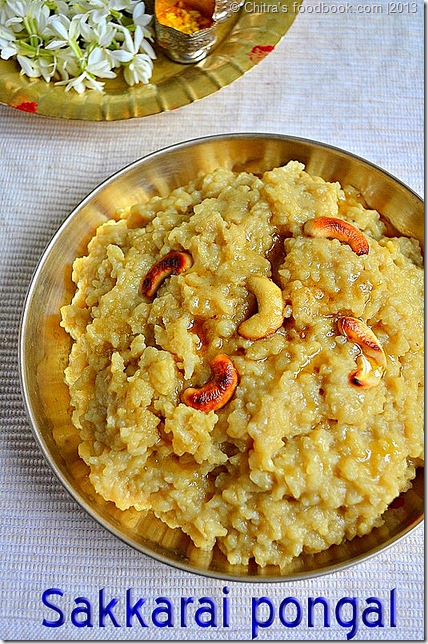
In this post, I have shown how to make sweet pongal in pressure cooker easily. Usually I make aval payasam or moong dal payasam for Friday pooja. Today being Aadi velli, I made this sweet pongal ( Chakkara pongal/sakkarai pongal in Tamil) in a pressure cooker. You can make the same in instant pot too. I usually make sakkarai pongal for aadi velli, aadi perukku & thai pongal. For the other occasions, we make rice payasam mostly.
I have already posted an authentic, traditional sakkarai/ sweet pongal about how to make sakkarai pongal in venkala paanai (pot). In this post, I have mentioned our usual method of making sweet pongal using pressure cooker. To make perfect sweet pongal, always use good quality raw rice & dark colored jaggery ( paagu vellam) to get the best results in color & taste. Its very flavourful , tastes similar to Kovil pongal/temple pongal and you’ll love it for sure. Try this & let me know dearies.
Sweet Pongal Recipe
Sweet Pongal recipe-Sakkarai pongal -How to make Temple style sweet pongal recipe at home using pressure cooker.
Cuisine:South Indian
Category: Sweets
Serves:3
Prep time:10 Minutes
Cook time:20 Minutes
Total time:30 Minutes
INGREDIENTS 1 cup - 200ml OR 240ml
To pressure cook
Raw rice – 1/2 cup
Yellow Moong dal – 1 tbsp ( add 2 tbsp for more dal flavor)
Water – 2.5- 3 cups (varies as per the quality of rice)
Salt – a pinch
For syrup
Jaggery – 3/4 cup ( use 1 cup for more sweetness)
Water – 1/2 cup
For Flavor
Ghee – 3 tbsp
Cardamom – 2 nos
Edible camphor – A pinch
Jathikai / nutmeg – A pinch
Cloves – 2 nos
Cashewnuts – 5-7 nos
Raisins / Dry grapes – 5 nos (optional , I dint use)
HOW TO MAKE SAKKARAI PONGAL IN PRESSURE COOKER - METHOD
In a kadai , heat 2 tsp of ghee and roast the cashews , raisins, cloves & jathikai. Powder the jathikkai and set aside.
In the same ghee , roast the moong dal till golden brown with a nice aroma. Wash the roasted moong dal and set aside.
In a pressure cooker base, take the washed rice & 3 cups of water. Add the roasted moong dal along with a pinch of salt. Pressure cook for 4-5 whistles till rice & dal turns mushy. Open the cooker & mash the rice , dal very well with a ladle..
In the meanwhile , prepare jaggery syrup. In a wide bowl , take the jaggery with 1/2 cup of water and allow the jaggery to melt completely. Strain the impurities and again boil the syrup till it becomes frothy. Remove & add this syrup to the cooker.
Mix well and add 2 tsp of ghee to avoid the pongal sticking to the bottom. Stir very well for 4-5 minutes till all the syrup gets mixed.
Pongal will start to thicken and leave the sides of the cooker . At this stage add the remaining 2 tbsp of ghee and the roasted cloves , cardamom powder, edible camphor powder & roasted jathikai powder.. Mix well & switch off the stove. Initially it will look semi solid in consistency. But it will thicken as time proceeds. Before serving, you can reheat it adding little milk or water.
If your pongal looks dry when warm , add little ghee & milk , reheat it and serve ! It tastes divine !! Enjoy !
Note
Always add more ghee at the end for a nice flavour. It also makes the pongal soft & non sticky.
Use good quality ghee & rice for better flavour n taste. Adding jathikkai & cloves gives a superb smell. Don't skip it
Milk can be added if pongal looks dry or hard. But addition of milk reduces the shelf life, color will slightly change and also the sweetness gets reduced. For the above recipe you can add 1/4 cup of milk.
Use dark colored paagu vellam to get a nice color.
I have already posted urad dal vada with pepper in mixie. In that post I have mentioned the different methods used to shape vadas. By seeing that post many of my reader friends mailed & asked me to post a video on how to grind the vada batter using mixie & how to shape vada using a sheet and some easy tips to identify the consistency of batter. I was hesitant in the beginning whether I could do this and I wanted somebody to help me taking the video.
Recently my in-laws visited my place and with the help of my MIL I took this video by keeping beginners in mind. The batter yield will not be good when we grind in mixie as compared to grinder. But I am sure you’ll get the taste & crispness equal to grinder batter. Please bear the mistakes in this video as this is my first attempt. I hope I can do it better in future & update here. I am also a beginner and Iam still in the learning and experimenting phase. Most of us miss the batter consistency adding more water. So I have tried to give the exact water quantity I used . The quantity of water slightly differs as per the quality of urad dal. So keep this video as reference and adjust the water quantity. I have also given some tips in the “Note” section to adjust the consistency of batter if it is watery. Experts, do share your tips in the comments section.
Recently I had vada for breakfast in Adayar Ananda Bhavan restaurant (A2B). I found jeera, pepper corns, onions and curry leaves. So I too started making in that way as my husband loves pepper more than onions. Here I have mentioned pepper & jeera in the ingredients list. For poojas & festivals we add only pepper. Add onions alone or both onion & pepper as per your wish. But remember to add onions just before frying vada else onions will leave water and make the batter watery.
Always keep the batter refrigerated till use. No problem if one or two tsp of water goes extra. Batter will thicken if u refrigerate it. If you find the batter too watery, add few tsp of rice flour to make it thick & to make a proper shaped vada. But you should serve it hot . Otherwise vadas won’t be crispy in room temperature. Also if you add less water to grind the batter, vada will be hard. If you add the correct water & grind the batter , vadai will stay crispy even after it cools down. Vada won’t drink much of oil if the batter is right. My MIL used to add a tsp of toor dal while soaking urad dal to avoid oil absorption.
Beginners can follow this method. Some people soak little raw rice along with urad dal or add a tsp of rice flour to the batter. All these are not necessary if you grind the batter in right consistency.
Ok friends, let me know your comments if you try this method. Good luck.
Water – 1/3 cup + 1 tsp (adjust as per the quality of urad dal , start with 1/4 cup of water & increase gradually)
Rice flour - 1 tsp
To mix in the batter
Small onion/ Big onion – 15 nos / 2 nos
Curry leaves – Few
Pepper corns – 1 tsp
Jeera – 1/4 tsp
Asafetida / Hing – 2-3 generous pinches
Salt - as needed
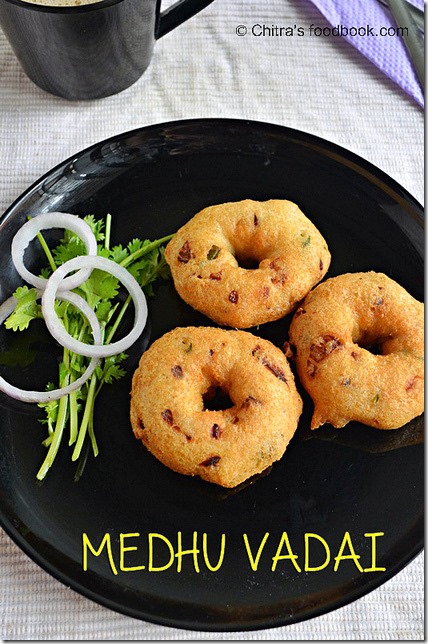
HOW TO MAKE MEDHU VADAI
Wash and soak urad dal for 1 hour minimum. Refrigerate it.
Drain all the water and reserve in a bowl.
Take a big mixie jar and grind the chilli, ginger coarsely without salt, water.
Add the soaked urad dal and grind to the maximum without adding water by wiping the sides.
Add 1/4 cup of water and grind again. If needed add more water in tbsp or tsp.
Make a thick, smooth, fluffy paste and collect in a bowl. Add rice flour and beat the batter well.
Lastly add the chopped onion, curry leaves, hing, pepper, cumin and salt. Mix well.
Heat oil and fry the vada in both the sides till golden in color.
Remove and serve hot with coconut chutney and sambar !
METHOD - STEP BY STEP PICTURES
Wash and soak urad dal for 1 hour to 4 hours (maximum) and keep it inside the fridge( refrigerator). After soaking, drain all the water completely and keep in a bowl. Use this water for grinding the batter. Choose a bigger sized mixie jar to hold the urad dal batter. ( jar should be double the size of batter).
First grind the green chillies, ginger piece without salt. Grind it coarsely without adding water.
Drain the ice water from soaked urad dal. Reserve it for grinding. Then add the urad dal without water and grind for few seconds till it becomes a coarse paste.
Now add 1/4 cup of ice water and grind for a minute till smooth. Open the jar , wipe the sides & check the batter. .
If it is slightly coarse, add 1 more tsp of water. ( Always add in tsp or tbsp further). Again grind & check the consistency. Batter should be thick, fluffy and smooth. When you drop the batter, it will slide slowly & it will form a stiff peak. One more tip is, drop a small quantity of batter in a bowl of water. It will float on top. Remove the batter to a bowl. Add some water to the jar, run the mixie once. Use this water for dipping your hands while you shape vada.
Refrigerate the batter If you fry later. If making vada immediately, add 1/2 tbsp of rice flour and beat the batter well for 5 minutes. Just before frying vadas , add the finely chopped onions , curry leaves and whole pepper corns & 1/2 tsp of jeera, salt. Mix well. Dip your fingers in the urad dal washed water , shape the vadas . Deep fry on both the sides till onion turns golden brown , remove , drain in a tissue paper & enjoy eating hot as evening snack with coffee !
NOTE
Do not add salt while grinding the vada batter. Add salt, onion just before frying else it will make the batter watery.
1/4 cup is the minimum quantity of water needed to grind the batter. It differs based on the urad dal. But after adding 1/3 cup, add water in tsp and check the batter every now & then. Please don’t add too much of water.
If you add more water, vada will drink more oil. To avoid oil absorption, you can add 1/2 tsp of toor dal along with urad dal while soaking.
The quantity of batter may not be more as you get in grinder. In grinder, we get batter for 25 medium sized vadas. In mixie, you can make 10 to 12 vadas.
Vada will absorb more oil if u deep fry in low heat oil.Heat of the oil should be right. It should not be smoky. If u deep fry when the oil is too hot , vada will brown quickly but the inside portion will not be cooked.
For proper cooking, always check the heat of oil by dropping a bit of batter. If it rises immediately, oil is in the correct temperature.
Adjust the flame to high and medium high while deep frying.
Deep fry in medium low flame for long time to get crispier vadas. For onion vada, you should remove the vada when the onions turn golden brown. For pepper vada, remove it when the sound ceases & turns golden brown.
Shaping of vada comes only by practice. Start using a sheet or ladle for shaping. Then you can make it directly using your hands.
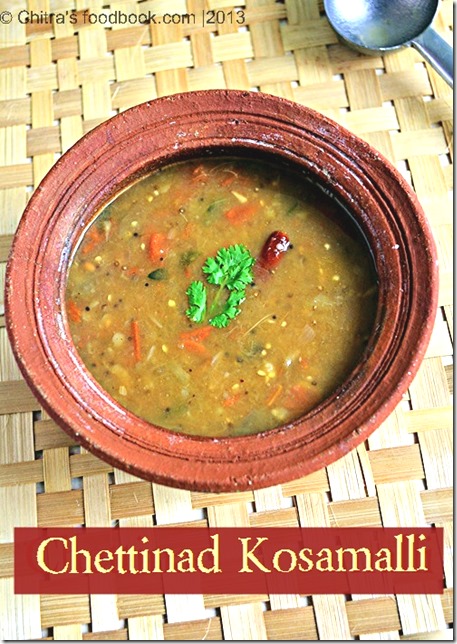
I tried this brinjal kosumalli recipe from kumudham supplementary book. It is a good side dish for idiyappam , idli & dosa. It is one of the traditional Chettinad recipes. We relished with idli rava idlis. It was very tasty. My husband is not fond of brinjal recipes but he loved this kosamalli a lot. . Ok, Lets see how to make Chettinad special Kathirikai Kosumalli recipe with step by step pictures.
INGREDIENTS
Brinjal – 4 nos
Potato – 1 no
Tomato – 2 nos
Small onion – 20 nos
Tamarind – Berry size
Green chillies – 4 - 6 nos
To temper
Mustard seeds – 1/2 tsp
Urad dal – 1 tsp
Curry leaves – few
Red chillies – 2 nos
To garnish
Coriander leaves - few
METHOD
Slit brinjal into 4 pieces & cut the potato into two pieces. Pressure cook brinjal & potato for 2 whistles. Reserve the cooked water. Remove the skin of brinjal & potato and mash them well. Soak tamarind in warm water & take the extract. Set aside.
In a kadai , temper mustard seeds , urad dal , red chillies & curry leaves.Then saute onions , green chillies & tomato pieces. Saute for few minutes. Add the drained water from the vegetables & allow it to boil..
Now add the mashed vegetables & tamarind extract.Allow it to boil for few minutes.This gravy should be slightly watery.Garnish with plenty of coriander leaves.
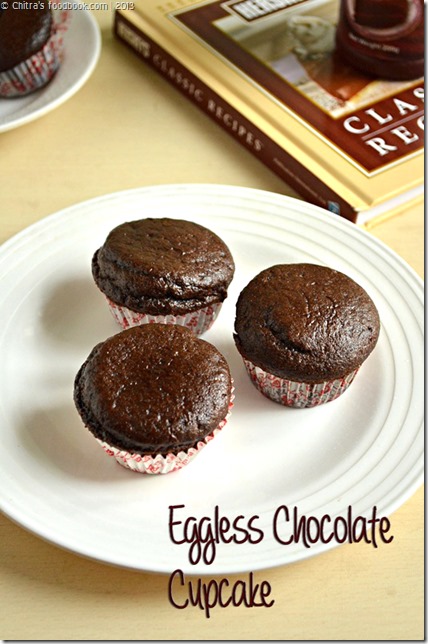
Recently my friend Gayathri gave me “Hershey’s classic recipes” cookbook. I tried this eggless chocolate cupcake without butter, condensed milk from the book. It turned out awesome. I couldn’t believe it is eggless, butter less cake without any milk products. Its a vegan cupcake recipe. It was so soft and moist.
I would say this is the best eggless chocolate cupcake I have ever tasted. We all loved it and it was a big hit in my home. Thank you so much Gayu for the book. The best thing is there is no butter, milk & curd. Instead I have used little vinegar & cooking oil. Try this cake, you’ll love it for sure. It’s a best recipe for beginners to try. You can make this cake without oven in a pressure cooker or in a kadai too.
Eggless chocolate cupcake recipe without condensed milk
Eggless chocolate cupcakes without butter, condensed milk. Its a vegan cupcake
Sugar – 1/2 cup +2 tbsp (for more sweetness, else 1/2 cup will do)
Cocoa powder – 2 tbsp
Baking powder – 1/2 tsp
Cooking soda – A small pinch ( do not add more than a pinch)
Salt – 1/4 tsp
Water – 1/2 cup + (2 tbsp - optional)
Cooking oil – 3 tbsp
White vinegar/Colorless vinegar – 1.5 tsp
Vanilla essence – 1/2 tsp
HOW TO MAKE EGGLESS CHOCOLATE CUPCAKES
Powder 1/2 cup of sugar and set aside.
In a wide bowl sieve the flour , sugar , cocoa powder , baking powder , cooking soda & salt. \
In another bowl mix all the wet ingredients ( oil , vinegar , vanilla essence & water).
Add the dry ingredients little by little to the wet ingredients. Mix in the same direction. Batter should fall like a ribbon. Add little more water if necessary.
Line the muffin tray with muffin cups and fill 3/4th with batter.
Preheat the oven in 200c ( convection mode) & then bake the muffin in 200c for 12- 14 minutes.
Check with a tooth pick, if it comes out clean , cake is done. Let it cool completely , serve !!
HOW TO MAKE EGGLESS CHOCOLATE CUPCAKE - METHOD
Powder 1/2 cup of sugar and set aside. In a wide bowl sieve the flour , sugar , cocoa powder , baking powder , cooking soda & salt.
In another bowl mix all the wet ingredients ( oil , vinegar , vanilla essence & water). Add the dry ingredients little by little to the wet ingredients.
Blend well in the same direction. Batter should fall like a ribbon. Add little more water if necessary. Line the muffin tray with muffin cups and fill 3/4th with batter.
Preheat the oven in 200c ( convection mode) & then bake the muffin in 200c for 12- 14 minutes. Check with a tooth pick, if it comes out clean , cake is done. Let it cool completely , serve !!
To make in a pressure cooker : Spread 1 inch salt in the bottom of a wide pressure cooker. Place a small plate. Heat the salt in high flame for 5 minutes.
Place the cupcakes over the plate inside the cooker. Cover with a lid without gasket or any plate that should be air tight. Let it bake in low flame for 10 to 12 minutes. Open and check with toothpick. If not cooked, cook for 2 more minutes. Timings may vary based on the flame and cooker. Keep an eye !
NOTE
Time varies from 12- 14 minutes. Please adjust as per your oven.
Use convection mode , 200c..
The batter should be of thick ribbon consistency. Add water to adjust it.
No need to add milk or curd. The cake itself comes out really soft.
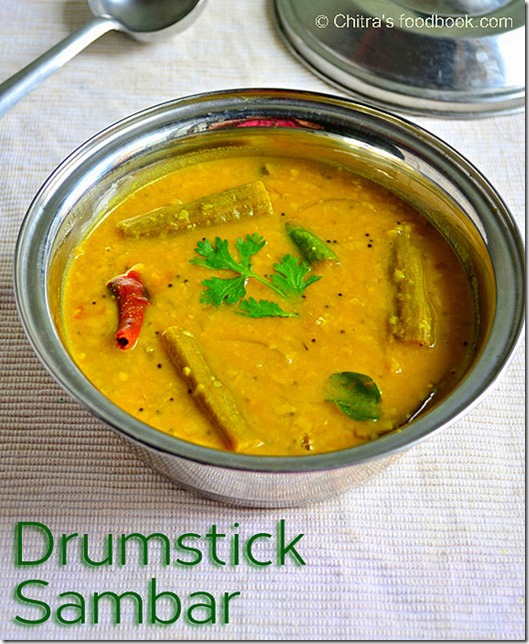
This is my MIL’s method of making Tamilnadu style drumstick sambar/ murungakkai sambar for rice. My MIl’s sambar is very easy when compared with my mom’s version. There is no grinding job. A tsp ofsambar powderis enough to make this yummy sambar. After many attempts , I got hooked to this measurement. I usually add my MIL’s home made sambar powder for this sambar but you can use store bought sambar powder too. My in-laws are here in my place. I made this sambar last week and it was tasting great. My in-laws loved it. Here I have given the measurements for 4 people.
U can either half the quantity for two people or make the same quantity and use it for lunch & dinner. This sambar can be converted to idli sambar by adding a powder which I have given in “notes” section. We usually do this with leftover sambar.
It tastes similar to hotel sambar. Do try this sambar & let me know your feedback friends.
Drumstick sambar / Murungakkai sambar recipe for rice
Drumstick sambar / Murungakkai sambar recipe for rice
Wash and pressure cook toor dal adding hing, turmeric powder and a drop of oil in required water for 2 whistles in low flame. Mash and set aside.
Soak tamarind in warm water, take extract using 3 cups of water.
Add sambar powder, salt, turmeric powder, hing and curry leaves.
Cut drumstick into finger size pieces. Heat oil in a kadai. Add methi seeds, mustard seeds, chilli, onion and curry leaves.
Add drumstick pieces, some water, salt and cook well. Add tamarind extract.
Boil till raw smell goes off. Lastly add the cooked toor dal. Mix well.
Boil for few minutes, switch off the flame.
Garnish with coriander leaves. Enjoy with rice.
HOW TO MAKE DRUMSTICK SAMBAR FOR RICE - METHOD
Pressure cook toor dal adding turmeric powder, required water, hing and a drop of oil. Cook for 1 to 2 whistles in low flame. After the steam is released, open the lid, mash well and set aside.
Soak tamarind in warm water and take the extract using 3 cups of water. To this extract add sambar powder, salt, turmeric powder, hing & raw curry leaves.. Cut the drumstick into finger size pieces. Slit them half the way.
In a wide kadai heat oil and add the methi seeds. When it starts to splutter add the mustard seeds and let it splutter completely. Then add the pinched red chilli, green chilli, sliced big onion and curry leaves. Saute well.
Now add the tamarind extract & drumstick pieces. Cover and cook in medium flame. Allow it to boil till the drumstick is cooked well. To check if it is cooked, take a piece of drumstick, open & remove the seeds. If it comes out easily, it is done.
Finally add the cooked and mashed dal, some water if needed and allow it to roll boil twice. Switch off the flame and garnish with coriander leaves.
Add a tsp of ghee while serving. Mix with plain rice and enjoy !!
NOTE
How to convert this sambar to idli sambar For converting this sambar into idli sambar, add the below powder & allow it to boil. Add lots of coriander leaves & serve hot with idli, dosa. U can also saute & add small / big onions & one tomato to get additional flavour.
For sambar powder:
Methi seeds – 1/2 tsp
Dhania – 1.5 tsp
Chana dal – 2 tsp
Red chilli – 2 nos
Hing – A big pinch
Method:
Roast all the above ingredients in a drop of oil till you get a nice smell. Powder them nicely and add this to sambar. In a kadai, add a tsp of oil and saute the onions & tomatoes. Add 1/2 cup of water and cook them. Then add the sambar. Allow it boil. Garnish with coriander leaves & serve hot adding a tsp of ghee !!
Try this easy, yummy Murungakkai sambar for rice and enjoy !

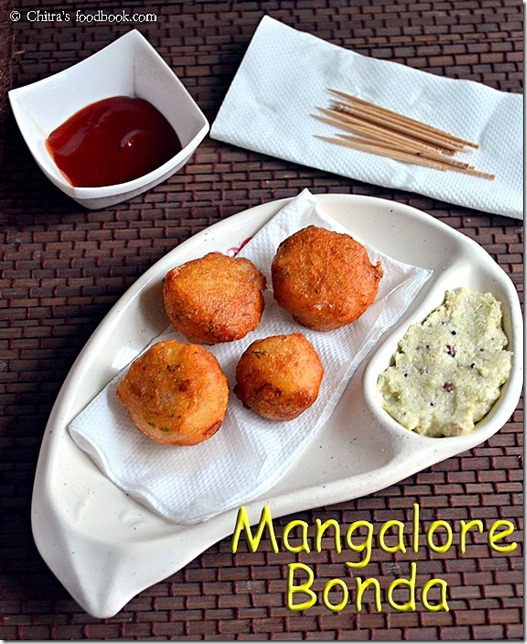


 Instant mangalore bonda recipe -Yummy evening snacks recipe.Kids would love it!!