Search Chitra's Food Book

November 16, 2021

Paneer Pulao Recipe In Pressure Cooker

Paneer pulao

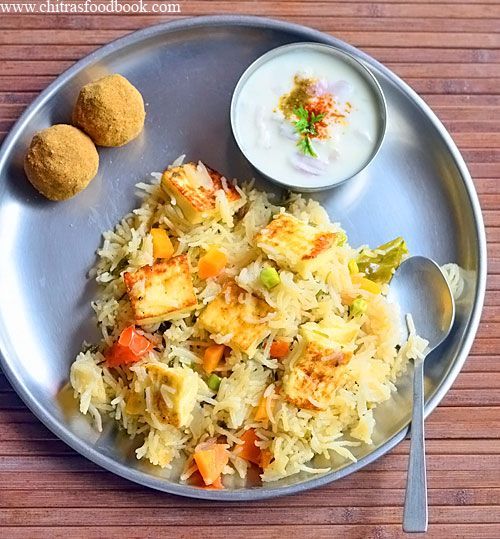
Paneer pulao is a popular, kids friendly lunch box and weekend special recipe for lunch. Its so easy to make directly in a pressure cooker. There is no grinding job. So it can be prepared quickly under 15 minutes. I added mixed vegetables to make it more colorful and healthy. You can make this rice with paneer alone and make mixed vegetable sabzi for side dish.

Actually I served this paneer pulao with onion raita as side dish. But I felt some tangy and spicy tomato based gravy would have made a best side dish for this pulao as its mildly spiced. You can make some mixed vegetable sabzi or dal makhani.  Friends, do try this healthy and easy paneer pulao recipe for your weekend lunch. It tastes yummy.


 paneer pulao

Paneer pulao recipe


Paneer pulao recipe

Paneer pulao recipe in pressure cooker


Cuisine: North Indian
Category: Main course
Serves: 3
Prep time: 10 Minutes
Cook time: 20 Minutes
Total time: 30 Minutes


INGREDIENTS
1 cup = 250ml
  • Paneer / Cottage cheese - 200gms
  • Basmati rice - 1 cup
  • Cooking oil - 2 tbsp
  • Ghee - 2 tsp + 1 tsp
  • Cinnamon - 1 inch
  • Cloves - 2
  • Cardamom - 1
  • Black stone flower - 1
  • Bay leaf - 1
  • Big onion - 1
  • Ginger garlic paste - 1 tsp
  • Green chilli – 2
  • Carrot – 1 ( finely chopped)
  • Frozen Green peas – a handful
  • Garam masala powder - 1/2 tsp
  • Mint + Coriander leaves - a handful
  • Water - 1.5 cups
  • Crushed Kasoori Methi - 1 tsp
HOW TO MAKE PANEER PULAO IN PRESSURE COOKER
  1. Wash and peel carrot, chop finely.
  2. Chop paneer into small square pieces.
  3. Chop vegetables into small cubes.
  4. Heat oil + ghee in a pressure cooker base.
  5. Saute whole spices, onion, gg paste, green chilli.
  6. Add tomato and saute for a minute.
  7. Add carrot, green peas and saute for a minute.
  8. Add soaked basmati rice, water and salt.
  9. Add garam masala powder, finely chopped mint and coriander leaves, crushed kasoori methi.
  10. Mix well and lastly add the toasted paneer pieces.
  11. Close the cooker and pressure cook in low flame for one whistle.
  12. Open the cooker after the steam is released.
  13. Fluff the rice gently and serve with any gravy or raita.
METHOD - STEP BY STEP PICTURES
  • Wash and peel carrot. Chop finely. Chop paneer into small squares. Heat oil in a dosa tawa.
  • Toast the paneer pieces on both the sides till golden in color. Remove in a plate.
  • Heat oil + ghee in pressure cooker base. Saute cinnamon, cloves, cardamom, black stone flower and bay leaf. 
  • Paneer pulao
  • Add onion, ginger garlic paste, green chilli and saute till onion turns transparent.
  • Paneer pulao recipe
  • Add tomato and saute till mushy. Add carrot, green peas and saute for a minute. Add soaked basmati rice, water, salt and garam masala powder. Paneer pulao recipe
  • Lastly add the chopped mint+ coriander leaves and crushed Kasoori methi. Mix well and cover the cooker. Pressure cook in low flame for one whistle. Open the cooker after the steam is released. Fluff the rice gently and serve hot with some tomato based gravy. I served with onion raita but some gravy would be a better side dish.
  • Paneer pulao recipe
    Enjoy !

Note

  • For variations, you can add red chilli powder instead of green chilli. But pulao looks red in color.
  • You can also add garam masala powder for more flavor.


Tasty Paneer pulao is ready to serve ! Enjoy !

paneer pulao


Continue Reading...


November 10, 2021

Drumstick Leaves Soup – Murungai Keerai Soup Recipe

murungai keerai soup
Drumstick leaves is a super healthy green variety. Its called as Murungai keerai in Tamil, Nugge soppu in Kannada, Moringa leaves in English, Sahajan ke patte in Hindi, Murinna ila in Malayalam. It has amazing health benefits. So I wish to include in our diet at least once in a week. Usually we make sambar, poriyal or adai with murungai keerai.

Recently I tried Murungai keerai kootu and this soup recipe. Both came out very well and tasty. In fact we loved this soup more than kootu and poriyal as it tastes tangy and spicy like rasam. More than soup, you can call it as murungai keerai rasam. Murungai keerai soup has lots of health benefits. It is easily digestible when compared with cooked whole greens. This soup is rich in Calcium, Iron, Pottasium and Vitamin A.

For healthy variations, people add boiled moong dal, coconut milk etc. But I made a simple version as suggested by my neighbor. I also referred Sharmis passions. For some people, drumstick leaves may be hard to digest. It increases the Pitta of our body and leads to vomiting and diarrhea. Even I have this issue. So for people like me, this soup is a boon. Its easy to digest and you can reap all the benefits of drumstick leaves.

Check out my Drumstick leaves sambar recipe

Drumstick leaves poriyal

Drumstick leaves soup recipe

The best time to consume this soup is around 11 am or in the early evening around 3pm. It helps for easy digestion and absorption. You can take this soup twice in a week or in alternate days if you like.

Friends, do try this easy and yummy Drumstick leaves soup recipe. I am sure you will love it !

 drumstick leaves soup recipe

Drumstick leaves recipe - Murungai keerai soup recipe


Drumstick leaves recipe - Murungai keerai soup recipe

Drumstick leaves recipe - Murungai keerai soup recipe


Cuisine: South Indian
Category: Soup
Serves: 2
Prep time: 10 Minutes
Cook time: 20 Minutes
Total time: 30 Minutes


INGREDIENTS

  • Drumstick leaves - 2 cups
  • Ghee - 2 tsp
  • Cumin seeds - 1/2 tsp
  • Crushed garlic - 10 cloves
  • Small onion - 10
  • Tomato - 1
  • Pepper powder - 1/2 tsp ( as needed)
  • Salt & water - as needed
HOW TO MAKE DRUMSTICK LEAVES SOUP
  1. Clean the drumstick leaves by removing its stem. Wash it thrice. 
  2. Heat ghee and splutter cumin seeds, crushed garlic.
  3. Saute finely chopped onion till transparent. Add tomato and saute till mushy.
  4. Now add the washed and squeezed drumstick leaves. Mix well for a minute.
  5. It shrinks in size. Add little turmeric powder and sugar to maintain its green color.
  6. Add 3 cups of water and let everything boil till leaves are cooked and water reduces to 1 cup.
  7. Remove and add pepper powder. Serve hot. You can also filter the soup through metal strainer and enjoy the stock.
  8. Healthy and tasty Drumstick leaves soup is ready.
METHOD - STEP BY STEP PICTURES
  • Clean the drumstick leaves by removing its stem. Wash it thrice and set aside. Wash and chop onion, tomato finely and crush garlic.
  • murungai keerai soup
  • In a kadai or bowl, heat ghee. Splutter cumin seeds and crushed garlic. Add chopped onion and saute till transparent.
  • murungai keerai soup
  • Add tomato and saute till mushy. Now add the washed and squeezed drumstick leaves. Mix well for a minute till it shrinks in size. Add a pinch of turmeric powder and sugar to maintain its green color if you like.

  • Lastly add 3 cups of water and allow everything to boil in medium flame and cook together till water reduces to 1 cup. By this time, keerai will be cooked soft too.
  • murungai keerai soup

  • Switch off the flame and serve as such adding some pepper powder OR you can strain the soup in a steel filter and serve the stock adding pepper powder. Healthy and tasty drumstick leaves soup is ready.
  • murungai keerai soup

Note

  • Adjust the quantity of pepper powder as per your taste.
Try this easy, yummy Drumstick leaves soup recipe. You will love it !

murungai keerai soup


Continue Reading...


November 2, 2021

Burfi Recipes | Barfi Recipes – Burfi Varieties |15 types of Burfi recipes

burfi recipes

Here is a collection of popular, Indian sweet recipe named barfi / Burfi.  Barfi, Barfee, Burfi or borfi is basically a milk based sweet of India. Barfi is a derivative of Persian word Barf which means ‘snow’. As the name suggest, burfi has a cool, melt in mouth texture.

Plain white barfi is prepared with milk powder and sugar. It is cooked until the mixture solidifies and its allowed to set for few hours to make perfect shapes. It can be cut into square, rectangle or diamond shapes. Some of the popular burfi varieties are besan burfi, Mawa barfi / Khoya burfi, Kaju burfi, Almond burfi, Pista barfi, coconut burfi and Peanut burfi. 

In this post, I have shared the different types of burfi recipes in my blog under one page for easy reference. As Diwali festival is coming up, you must be making at least one burfi recipe in your sweets list. I hope this collection of barfi recipes would be helpful to choose and try one.

Making and trouble shooting burfi recipes is hassle free. Even a beginner can make it easily. In each recipe, I have shared all the tips and tricks to make a perfect burfi even if you are a first timer in making sweets. Ok, lets see the burfi varieties | 15 types of burfi recipes below.

MAIDA BURFI / MAIDA BARFI WITHOUT MILK POWDER | MAIDA CAKE

MAIDA BURFI WITH MILK POWDER

CASHEW BADAM BURFI

ALMOND BARFI / BADAM BURFI

EASY KALAKAND WITH CONDENSED MILK

INSTANT DOODH PEDA / MILK POWDER BURFI

COCONUT BARFI / THENGAI BURFI

SEVEN CUP CAKE / SEVEN CUP BURFI

CHOCOLATE KHOYA BURFI

KESAR BURFI

KAJU KATLI  / CASHEW BURFI

DATES AND NUTS ROLL / KHAJUR KATRI

90’S KIDS SHOP STYLE BURFI / HALKOVA

COCONUT KHOYA BURFI

MICROWAVE MYSORE PAK


SOFT MYSORE PAK

Hope you will love this collection. Please share your feedback if you try any !


Continue Reading...


October 25, 2021

Instant Doodh Peda With Milk Powder, Condensed Milk

doodh peda

Basically I love milk sweets especially milk halwa and doodh peda are my favorites. I love Nandini Doodh peda very much and tried to recreate it at home several times but I couldn’t get it perfect. Then I came across this Instant doodh peda with milk powder and condensed milk in a YouTube channel.

Usually Doodh peda is prepared by boiling and reducing the milk till thick. It takes more time to prepare. But this is a short cut version which gives the end result equal to the shop ones. To shape this peda just like Nandini ones, I bought peda maker from Amazon and tried it. It came out perfect in shape. I loved it and became very happy to see my doodh peda just like store bought ones.

Friends, if you are looking for easy Diwali sweets to prepare under 20 minutes, this is one recipe. Even though it takes less time to cook, you need to wait atleast for one day to get the perfect sweet stall taste because doodh peda takes more time to set. It stays good for a week with refrigeration and two days without refrigeration.

Do try this easy, yummy instant doodh peda recipe with milk powder and condensed milk. You will love it like me. Lets move on to the recipe with step by step pictures and a video. 

doodh peda


Doodh peda recipe with milk powder and condensed milk


Doodh peda recipe with milk powder and condensed milk

Doodh peda recipe with milk powder and condensed milk - Easy Diwali Sweet with milk powder.


Cuisine: Indian
Category: Sweet
Serves: 8
Prep time: 5 Minutes
Cook time: 20 Minutes
Total time: 25 Minutes


INGREDIENTS
1 cup = 250ml
  • Milk powder - 1 cup
  • Boiled milk - 1/2 cup ( at room temperature)
  • Condensed milk - 1/2 cup
  • Cardamom powder - 1/2 tsp
  • Ghee - 2 tbsp
  • Peda maker / Peda mould
HOW TO MAKE DOODH PEDA WITH MILK POWDER
  1. In a wide bowl, mix the milk powder and milk to a smooth paste.
  2. Heat ghee and add the condensed milk. Mix well.
  3. Add the milk powder paste and mix well.
  4. Cook till the mixture becomes thick and leaves the sides of pan.
  5. To check the doneness, take a pinch and roll it. It will be non sticky.
  6. Switch off the flame and transfer to a greased plate immediately.
  7. Let it become warm. Make shapes with peda mould and enjoy !

METHOD - STEP BY STEP PICTURES
  • In a wide bowl, take the milk powder and add the boiled milk at room temperature. Milk should not be hot or warm.

  • Mix with a whisk till no lumps and becomes smooth paste. Set aside.
  • instant doodh peda recipe
  • Heat ghee in a non stick kadai. Add the condensed milk and mix well. Add milk powder paste and mix well.
  • instant doodh peda recipe
  • Cook in low to medium flame till it becomes thick and leaves the sides of pan. It becomes a whole mass.
  • instant doodh peda recipe
  • When you take a pinch and roll it, it will be non sticky. Now switch off the flame and transfer to a ghee greased plate. 
  • instant doodh peda recipe
  • Let it become warm. Now take a tbsp full of dough and press it. Make round shape and press the peda mould on it. Peda is ready. Let it rest over night. It tastes best the next day.
  • instant doodh peda recipe
        instant doodh peda recipe

            Enjoy !

          Note

          • You can add powdered sugar instead of condensed milk. You can add 1/3 cup of powdered sugar in that case. Check for taste and add more if needed.
          • Make sure you cook the peda mixture till it becomes a whole mass.
          • Do not cook in high flame. It may burn in the sides or it becomes hard and chewy.

          Easy, yummy Doodh peda is ready to enjoy ! Stays good for 2 to 3 days in room temperature.

          Instant doodh peda


          Continue Reading...


          October 12, 2021

          Sweet Aval Mixture | Sweet Poha Chivda With Jaggery

          sweet poha chivda

          Every Thursday and Friday, we do Guru pooja and Lakshmi pooja at home in a simple manner. Thinking about what to make as prasadam / neivedyam every week is a big task for me. Even though I know many prasadam recipes like sweet pongal, Kesari, Payasam etc, I always look for simple and healthy naivedyam recipes that can be prepared easily.

          For this year Navarathri, I have come to Salem and spending some good time with my in-laws as we don’t have Golu celebration this year. Still we make some sweets and sundal varieties on all these 9 days and offer God. Today my MIL prepared this easy sweet aval mixture for Thursday guru pooja neivedyam.

          Its a very simple sweet mixture recipe. There is no deep frying and my MIL had used jaggery instead of sugar. So this is a super quick and super healthy recipe you can munch on for your evening snacks. I am sure kids will love it a lot.

          All you need is Poha / Aval, Sesame seeds, Roasted chana dal and jaggery for this recipe. Its so tasty and crunchy to eat. Friends, If you are looking to make some simple sweet mixture along with sundal for this Navratri and Diwali, you must try this recipe. Even bachelors can make this easily. Everyone will love it.

          Ok friends, lets jump on to this easy sweet poha chivda / Aval mixture with jaggery in simple steps.

          sweet aval mixture

          Sweet aval mixture / Sweet Poha chivda


          Sweet aval mixture / Sweet Poha chivda

          Sweet aval mixture / Sweet Poha chivda recipe for Pooja prasad / Neivedyam


          Cuisine: Indian
          Category: Sweet
          Serves: 4
          Prep time: 10 Minutes
          Cook time: 10 Minutes
          Total time: 20 Minutes


          INGREDIENTS
          1 cup = 250ml
          • Thick Aval / Poha / Pressed rice - 1/2 cup
          • Black or white sesame seeds - 1 tbsp
          • Roasted chana dal / Gram dal / Pottukadalai - 2 tbsp
          • Grated or powdered jaggery - 1/4 cup ( adjust as per you need)
          • Ghee - 1 tbsp
          • Cardamom - 2 (crushed or powdered)
          HOW TO MAKE SWEET AVAL MIXTURE
          1. Heat a kadai and dry roast the sesame seeds till it splutters.
          2. Collect in a plate. Add a tsp of ghee and roast a fistful of poha till it puffs up and become crispy. Remove in the plate.
          3. Repeat the same procedure for 1/2 cup of poha. Collect in the plate.
          4. Switch off the flame and add in the roasted gram dal. Let it roast in the heat of kadai. Collect in the plate.
          5. Let everything cool down. Lastly add grated jaggery and crushed cardamom.
          6. Mix well and serve immediately for best taste. Store in an air tight box and consume within a day.
          METHOD - STEP BY STEP PICTURES
          • Heat a kadai and dry roast the sesame seeds till it splutters. Remove in a plate.

          • Heat 1 tsp of ghee. Add a fistful of poha / thick aval and roast patiently it turns white and puffs up well. If you try to break it, it will be crunchy. Remove in the sesame seeds plate. 

          • Again add 1 tsp of ghee. Add fistful of poha and roast till crispy and puffy. Remove in the plate. Repeat the procedure until all the poha is roasted.

          • Switch off the flame and add the roasted chana dal. Mix well. Let it roast in the heat of kadai. Remove in the plate.

          • Let everything cool down. Lastly add the crushed cardamom and grated jaggery. Mix well and serve immediately for best taste.

          Note

          • For variations, you can add powdered sugar instead of jaggery.
          • You can also add some ghee roasted cashews.
          • I have not deep fried the poha to make a low calorie version. You can also deep fry in oil and ghee mixture to make it rich.
          • As it is not deep fried, this mixture turns soggy soon. So store it in an air tight box and consume within a day.


          Try this easy sweet aval mixture and enjoy at home.

          Sweet aval mixture


          Continue Reading...


          October 5, 2021

          Sorakkai Kurma | Bottle Gourd Kurma Recipe

          Bottle gourd kurma

          I never imagined a kurma recipe with Bottle gourd (Sorakkai in Tamil, Lauki in Hindi) until I came across a YouTube video. In Bangalore hotels, I have tasted vegetable sagu for poori and set dosa with chow chow or turnip but I have never tasted kurma with bottle gourd.

          Basically Bottle gourd is a bland vegetable with rich water content. So it can easily absorb the taste of the dish we add in. This kurma recipe I shared here is an easy, yummy South Indian style recipe that can be prepared directly in a pressure cooker just like my other Kurma varieties. It came out so well and tasty. We all loved it with soft chapathi. I am sure it will taste great with poori and dosa.

          Friends, do try this Bottle gourd kurma / Tamil nadu style Sorakkai kurma for a healthy variation from usual kurma recipes. You will love it. 

          Check out my

          Sorakkai dosa

          Sorakkai kootu

          Sorakkai poriyal

          Sorakkai sambar

          Sorakkai paal kootu


          Sorakkai kurma


          Sorakkai kurma / Bottle gourd kurma recipe


          Sorakkai kurma / Bottle gourd kurma recipe

          Sorakkai kurma / Bottle gourd kurma recipe for chapathi, poori and dosa


          Cuisine: South Indian
          Category: Side dish
          Serves: 4
          Prep time: 10 Minutes
          Cook time: 20 Minutes
          Total time: 30 Minutes


          INGREDIENTS
          1 cup = 250ml
          • Bottle gourd – 1
          • Big onion – 1
          • Tomato – 1
          • Cinnamon – 1 inch
          • Cloves – 2
          • Cardamom – 1
          • Black stone flower – 1
          • Bay leaf – 1
          • Cumin seeds - 1/2 tsp
          • Red chilli powder – 1/2 tsp
          • Garam masala powder – 1/2 tsp
          • Salt and water - as needed
          • Coriander leaves - to garnish
          To grind
          • Grated coconut – 1/4 cup
          • Fennel seeds – 1/2 tsp
          • Pottukadalai / roasted chana dal – 1 tbsp
          HOW TO MAKE SORAKKAI KURMA
          1. Wash and peel the skin of bottle gourd. Cut and remove the center soft portion. Chop into small cubes.
          2. Grind coconut, fennel and gram dal into smooth paste.
          3. Heat oil in a pressure cooker base. Saute the whole spices.
          4. Now add the onion and saute till transparent.
          5. Add ginger garlic paste and saute for a minute.
          6. Add tomato and bottle gourd. Mix well.
          7. Add the ground coconut paste, red chilli powder and garam masala powder.
          8. Mix well and add little water. Pressure cook in low flame for one whistle.
          9. Open the cooker after the steam is released. Serve hot with chapathi, poori and dosa.
          METHOD - STEP BY STEP PICTURES
          • Wash and peel the skin of Bottle gourd. Chop into small cubes.

          • Heat oil in a pressure cooker. Saute cinnamon, cloves, bayleaf, black stone flower and cardamom. Add cumin seeds.

          • Add onion and saute till transparent. Add ginger garlic paste and saute until raw smell goes off.
            • Sorakkai kurma
          • Add tomato and saute till mushy. Now add turmeric powder, red chilli powder, salt and garam masala powder. Mix for a minute.
          • Sorakkai kurma
          • Lastly add the chopped bottle gourd pieces. Saute for a minute. Grind coconut, fennel seeds and gram dal to a smooth paste.
          • Sorakkai kurma
          • Add the paste to the cooker. Mix well and add little water. Do not add more water as bottle gourd itself leaves water while cooking. So adding more water makes the kurma watery. Pressure cook in low flame for one whistle. Open the cooker after the steam is released. Garnish with coriander leaves. Serve hot with chapathi. Enjoy !Sorakkai kurma

          Note

          • For variations, you can grind green chilli instead of red chilli powder.
          • You can add ginger garlic while grinding instead of sauting ginger garlic paste.
          • Do not add more water while pressure cooking. Around 1/2 cup is enough.

          Try this easy, yummy Bottle gourd kurma and enjoy with chapathi.

          Sorakkai kurma recipe


          Continue Reading...