Search Chitra's Food Book

Showing posts with label BREAKFAST RECIPES. Show all posts

July 5, 2021

Avocado sandwich | Avocado toast Indian Vegetarian

Avocado sandwich

Here is my second version of Indian vegetarian Avocado sandwich / Avocado toast (Butter fruit) for a healthy breakfast. Its been long time I bought avocado. Recently when I was talking to my friend, she told Avocado is in season now. So I bought one and tried this sandwich. It was good with the slight bitter taste of avocado as mine was not fully ripen. We relished it for our weekend breakfast.

For variations and to make it more interesting and tasty, you can apply green chutney on one side of sandwich. Here I used butter. You can also make it as an open toast. Friends, do try this easy and yummy avocado sandwich recipe.

Check out my another version of Avocado sandwich 

Avocado milkshake

Guacamole

Avocado paratha

Indian vegetarian avocado sandwich

Avocado sandwich / Avocado toast recipe


Avocado sandwich / Avocado toast recipe

Indian vegetarian Avocado sandwich / Avocado toast recipe


Cuisine: Indian
Category: Main course
Serves: 4
Prep time: 10 Minutes
Cook time: 20 Minutes
Total time: 30 Minutes


INGREDIENTS

  • Avocado - 1
  • Big onion - 1 (finely chopped)
  • Pepper powder - 1/2 tsp
  • Coriander leaves - 1/4 cup (finely chopped)
  • Green chilli - 1 (finely chopped, optional)
  • Lemon - 1
  • Salt - as needed
HOW TO MAKE AVOCADO SANDWICH / AVOCADO TOAST
  1. Wash and cut avocado into two. Remove the seed and scoop the pulp from the fruit.
  2. Mash the pulp and add finely chopped onion, coriander leaves, lemon, green chilli and salt. Mix well.
  3. Take 2 bread slices, apply butter on one and spread avocado mixture in the next slice.
  4. Cover and toast in the sandwich maker or cook in dosa tawa greased with butter.
  5. Cook both the sides. Remove and serve with tomato ketchup.
METHOD - STEP BY STEP PICTURES
  • Wash and cut the avocado into two. Remove the seed and scoop the pulp from the fruit. Discard the skin.

  • Mash the pulp and add finely chopped onion, coriander leaves, green chilli, salt and mix well. Sandwich stuffing is ready.
  • Indian vegetarian avocado sandwich
  • Take 2 bread slices. Apply butter on one slice. Spread the avocado mixture in the second slice. Cover it. To make avocado toast, grease the bread with butter and spread the avocado mixture in one slice of bread. Cook the toast for a minute and remove.
  • Indian vegetarian avocado sandwich   
  • Heat a sandwich maker or dosa tawa. Spread butter on it. Place the sandwich and cook both the sides till it turns golden in color.
  • Indian vegetarian avocado sandwich
  • Remove and serve hot with tomato ketchup. Enjoy !

Note

  • For variations, you can add one finely chopped tomato.
  • You can spread the avocado mixture in one slice and make it as open toast.

Try this easy, Indian vegetarian avocado sandwich and enjoy for your breakfast or snack !

Avocado toast recipe

Continue Reading...


June 18, 2021

Sabudana Idli | Sago Idli Recipe | Javvarisi Idli | Sabakki Idli Recipe

sabudana idli

I make Sago recipes / Sabudana recipes (Javvarisi in Tamil) very rarely in my kitchen as my family is not fond of it. Even If I make it, I usually make javvarisi upma or add it while making Kushboo idli. Recently I came across this Instant sago idli recipe. I used white, big sago in this recipe. So I soaked it for nearly 5 hours to make this idli. 

Unlike our regular idli recipe, this idli batter doesn’t need overnight fermentation. You can make idli instantly as soon as you make the batter. If you have pre soaked sabudana in hand, this sabudana idli can be prepared under 10 minutes. Though its my first attempt, It came out so well. You can use Nylon javvarisi instead of big ones. 

I served it with Karnataka style Kempu chutney / Red coconut chutney by following the recipe from Sudha’s kitchen YouTube channel. Surprisingly Raksha and Sendhil loved it very much. Friends, do try this instant sabudana idli / Javvarisi idli at home and enjoy !


sago idli


Sabudana idli recipe / Sago idli / Javvarisi idli recipe


Instant sabudana idli recipe / Sago idli / Javvarisi idli recipe

Instant sabudana idli recipe / Sago idli / Javvarisi idli recipe


Cuisine: Indian
Category: Main course
Serves: 20
Prep time: 10 Minutes
Cook time: 20 Minutes
Total time: 30 Minutes


INGREDIENTS
1 cup = 250ml
  • Sabudana – 1 cup (white, round)
  • Sooji /Rava – 1.5 cups
  • Curd – 1.5 cups
  • Baking soda OR ENO – 1/2 tsp
  • Water – 1/2 cup
  • Salt – as needed
  • Dill leaves or coriander leaves – 1/4 cup
Karnataka Red chutney / Kempu chutney
  • Grated coconut – 1/3 cup
  • Roasted gram dal – 1/2 cup
  • Soaked red chilli – 2 to 4 (Use byadgi chilli for bright red color)
  • Tamarind – small piece
  • Garlic – 5
  • Ginger – small piece
  • Curry leaves – 5
  • Cumin seeds- 1/4 tsp
  • Salt & water – as needed
To temper the chutney
  • Cooking oil - 2 tsp
  • Mustard seeds - 1/2 tsp
  • Urad dal – 1/2 tsp
  • Curry leaves - few
HOW TO MAKE SABUDANA IDLI
  1. Wash and soak sabudana / sago in enough water for 4 hours.
  2. Mash it well and add rava, curd, salt, chopped coriander leaves and water.
  3. Mix well. Lastly add baking soda or ENO. Mix well and rest for 10 minutes.
  4. Fill the idli mould with batter.
  5. Boil water in idli pot. Steam idli for 20 minutes.
  6. Remove the idli plate and rest for 5 minutes.
  7. Remove the idli and serve with chutney.
METHOD - STEP BY STEP PICTURES
  • Wash and soak sabudana/ sago in enough water for 4 hours. Mash it.
  • sabakki idli
  • Add the rava / Sooji, curd, salt, chopped coriander leaves and water. Mix well. Lastly add baking soda or ENO and mix well. Rest the batter for 10 minutes.
  • sabudana idli
  • Boil water in idli pot. Take a greased idli plate. Pour the batter and fill the mould till 3/4th.
  • sabudana idli
  • Steam it for 20 minutes. Open the lid and check if the idli is done. Remove the idli plate and rest it for 5 minutes.
  • sabudana idli
  • Remove the idli and serve hot with red coconut chutney or tomato chutney. Enjoy !

Note

  • You can use nylon javvarisi instead of white, big ones. In that case, you can soak it for 1 to 2 hours. Soak in hot water for quick soaking.


Try this easy, instant sabudana idli and enjoy ! 

Instant sabudana idli

Continue Reading...


May 4, 2021

Veg Kizhi Parotta recipe–Kerala Kizhi Parotta In Banana leaf (Vegetarian)

Veg Kizhi Parotta recipe

I am a big big fan of Parotta based recipes. Recently I came across this Kerala special Kizhi parotta recipe in my Instagram feed. It was chicken kizhi parotta recipe from a Kerala hotel. I got tempted to try and looking for a vegetarian version. Then I found this veg kizhi parotta recipe in a YouTube channel where the host showed the making of vegetarian kizhi parotta with mushroom and paneer from a small hotel in Chennai.

I was so happy to see that video and tried it immediately with some store bought parotta. To layer this kizhi parotta, I made my hotel style plain salna, a dry curry with mushroom and paneer, some grated paneer and coriander leaves to garnish. I layered everything over the roasted banana leaf and cooked in a dosa tawa. You can also steam it for few minutes just like podhi soru.

The flavor of banana leaf over the cooked parotta was awesome. Moreover the parotta was so soft to eat. So you don’t have to tear it and soak in salna to eat. This kizhi parotta is already soaked and cooked in salna. So it was so soft and yummy. We all loved it.

Friends, if you are a parotta lover like me, you must try this kizhi parotta. You will love it for sure. You can also use mixed vegetables or cauliflower in salna for variations. Non-vegetarians, you can make it with chicken salna and chicken curry or prawns masala just like the one I saw in the video.

Ok, lets see how to make veg kizhi parotta recipe with step by step pictures and video !

Check out my Veg Kothu parotta recipe 

Chilli parotta 

Veg kizhi parotta

Veg Kizhi Parotta Recipe


Veg Kizhi Parotta Recipe

Veg Kizhi Parotta Recipe - Kerala style kizhi parotta in vegetarian version using mushroom and paneer.


Cuisine: South Indian
Category: Main course
Serves: 2
Prep time: 10 Minutes
Cook time: 20 Minutes
Total time: 30 Minutes


INGREDIENTS
For layering kizhi parotta
  • Parotta - 4 ( Homemade or readymade)
  • Plain salna / Empty salna or Veg salna - 3 cups
  • Mushroom, paneer dry curry
  • Grated paneer - 1/2 cup
  • Coriander leaves - to garnish
  • Banana leaf - 3
  • Cooking oil - to drizzle
For dry curry
  • Mushroom - 10 (Slice thinly)
  • Paneer - 20 small cubes
  • Red chilli powder - 1/2 tsp
  • Garam masala powder - 1/2 tsp
  • Turmeric powder - 1/4 tsp
  • Salt - as needed
  • Cooking oil - 2 tbsp
HOW TO MAKE VEG KIZHI PAROTTA RECIPE
  1. Wash and slice mushroom. Chop paneer, soak in hot water and set aside.
  2. Make Salna and keep it ready.
  3. Heat oil in a kadai. Add mushroom and paneer pieces. Saute for a minute.
  4. Lower the flame. Add salt, chilli powder, turmeric and garam masala powder.
  5. Mix well and cook till mushroom becomes soft. Switch off the flame. Keep in a bowl.
  6. Now take the parotta and cook both sides in dosa tawa drizzling oil. Remove and press it to form layers. Cook 4 parotta and set aside.
  7. Now take the cooked parotta, salna, mushroom masala, grated paneer and coriander leaves.
  8. Heat a banana leaf in low flame for few seconds.
  9. Add a tsp of ghee. Place one parotta, pour salna to cover it.
  10. Spread the mushroom masala. Now layer it another parotta, pour salna.
  11. Spread the grated paneer and garnish with coriander leaves.
  12. Fold the banana leaf all the sides and tie it with the thread.
  13. Heat dosa tawa and drizzle oil. Place the folded banana leaf.
  14. Cook in low flame for a minute. Flip and cook the other side too.
  15. Remove and serve with onion raita and salna. Enjoy !
METHOD - STEP BY STEP PICTURES
  • Wash and slice mushroom. Chop paneer into small pieces. Soak in hot water till use. Wash and chop onion, tomato for making salna. Grind coconut + poppy seeds for salna.

  • Make salna following THIS RECIPE. You can make it plain or add vegetables like cauliflower, carrot, beans, peas and potato. Keep the salna ready.

  • Now lets make the mushroom masala. Heat oil in a kadai. Add sliced mushroom, paneer cubes. Mix in low flame for few minutes till mushroom turns soft. Add red chilli powder, salt, turmeric powder and garam masala powder. Mix gently to coat the mushroom and paneer pieces. Switch off the flame and remove in a bowl.

  • I used readymade frozen parotta. You can use homemade or store bought parotta too. Cook the parotta drizzling oil in both the sides. Remove in a plate and separate the layers by patting the parotta between your hands. Cook 4 parotta and keep it ready in a plate.
  • Veg kizhi parotta recipeVeg kizhi parotta recipe
  • Grate paneer and finely chop coriander leaves. Keep it ready. Take banana leaf and roast in low flame in both the sides. Roasting the leaf makes it soft and easily foldable.
  • Veg kizhi parotta recipe
  • Place a full banana leaf over the table. Place a small leaf in the middle. Drop a tsp of ghee. Keep one parotta in the center of leaf. Pour salna to cover the parotta.
  • Spread the mushroom, paneer masala. Cover it with another parotta and pour salna again. Spread the grated paneer and garnish with coriander leaves. Fold the banana leaf in both the sides. Tie with a thread or with the fiber part of banana leaf. 
  • Veg kizhi parotta recipeVeg kizhi parotta recipe
  • Heat a dosa tawa. Pour 2 tsp of oil. Place the banana leaf and cook in low flame for few minutes. Flip the other side and cook it. Remove and enjoy the super soft and flavorful Veg kizhi parotta with onion raita, salna ! Enjoy !Veg kizhi parotta recipe

Note

  • You can make plain salna or vegetable salna as per your choice.
  • I made dry mushroom masala. You can saute onion, tomato, ginger garlic paste and make it like a thick curry too.
  • Procedure seems to be lengthy. But it took just 15 minutes to prepare the salna and mushroom masala. If you have readymade parotta, you can make it easily.
  • Instead of mushroom and paneer, you can use cauliflower.


Easy and yummy, hotel style Veg kizhi parotta is ready to enjoy with onion raita and salna !

Kerala Kizhi parotta

Continue Reading...


January 23, 2021

Vazhaithandu dosai – How to make Banana stem dosa / Plantain stem dosa

Vazhaithandu dosai recipe

I started making vazhaithandu dosai/ banana stem dosa / plantain stem dosa after tasting in a restaurant.  I make it by stuffing vazhaithandu masala in the center of dosa like our regular masala dosa. But Raksha is not a big fan of it. She doesn’t like to eat banana stem as poriyal, pachadi too. So I was thinking on how to include this healthy vegetable in her regular diet.

Suddenly this vazhaithandu dosai recipe by grinding and adding banana stem paste to regular idli batter flashed in my mind. I googled and found an easy and yummy dosa recipe in Chettinad samayal YouTube channel. It was an instant hit at home. As I expected, Raksha loved it very much and had more dosa. I am so happy that I got a perfect dish to make my daughter eat Vazhaithandu.

Friends, do try this version of vazhaithandu dosai. I am sure its a great way to make the fussy eaters consume this healthy vegetable. Ok, lets see how to make banana stem dosa with step by step pictures and video.


Check out my other vazhaithandu recipes too


Vazhaithandu dosai recipe

Vazhaithandu dosai - Banana stem dosa recipe


Vazhaithandu dosai - Banana stem dosa recipe

Vazhaithandu dosai - Banana stem dosa recipe


Cuisine: Tamil nadu
Category: Main course
Serves: 15
Prep time: 10 Minutes
Cook time: 5 Minutes
Total time: 15 Minutes


INGREDIENTS
1 up = 250ml
  • Idli batter – 4 cups (5 cups idli rice, 1 cup urad dal)
  • Raw banana stem – 1
  • Big onion – 1 OR Small onion - 6
  • Green chilli – 2
  • Ginger – 1/2 inch piece
  • Cumin seeds – 1/2 tsp
  • Curry leaves – Few
  • Salt – 1/4 tsp (If required)
  • Cooking Oil - To drizzle over dosa
  • Water - to grind banana stem
HOW TO MAKE BANANA STEM DOSA / VAZHAITHANDU DOSAI
  1. Wash and slice the banana stem into rings. Immerse in buttermilk till use.
  2. Grind onion, green chilli, ginger, curry leaves and cumin seeds coarsely.
  3. Add chopped banana stem, add little water and grind to smooth paste.
  4. Do not add more water. Grind to a thick but smooth paste.
  5. Take thick idli batter and add this paste. Mix well and check for salt.
  6. Add water to adjust consistency. Heat dosa tawa. Pour a ladleful of batter.
  7. Spread it thin or thick. Drizzle oil around the dosa. Flip and cook the other side too.
  8. Serve hot with coconut chutney, tomato chutney or sambar !
METHOD - STEP BY STEP PICTURES
  • Peel the outer stem part/ bark part and wash the inner ring. Chop into thin slices and keep immersed in buttermilk till use.
  • Vazhaithandu dosai recipe
      Vazhaithandu dosai recipe

  • Take a big mixie jar. Add onion, green chilli, ginger, cumin seeds and curry leaves. Grind coarsely without water.

  • Now add in the batch of chopped banana stem slices by squeezing the buttermilk. Grind coarsely without adding water. Then add little water and grind to a smooth paste. Do not add more water. Firstly add 1/4 cup water. Try to grind to smooth paste by wiping the sides.

  • Open the mixie jar and add the remaining banana stem pieces too. Now grind again to a smooth paste. Add little water if required. As banana stem is a watery vegetable, it doesn’t need more water to grind. After grinding, paste looks dark grey or black in color. Its completely normal. Don’t panic. 

  • Take 4 cups of our regular idli batter in a wide bowl. Add this banana stem paste to the batter and mix well. Batter turns light grey in color after mixing. Check for taste and add salt if required. Add some water if required. Addition of water depends on the consistency of idli batter and the paste. So use water carefully.
  • Vazhaithandu dosai recipe

  • Heat a dosa tawa. Spread a ladleful of batter to make a thin or thick dosa. Let it cook in medium flame till 50%. Now drizzle oil all over the dosa. Flip and cook the other side OR remove once the bottom turns golden and top looks completely cooked. Fold and remove. Serve hot with chutney or sambar !
  • Vazhaithandu dosai recipe

    Enjoy !

Note

  • For variations, you can use red chilli instead of green chilli while grinding.
  • You can make this dosa thin or thick as you like.
  • No fermentation is required as we are using fermented idli dosa batter.
  • Make sure idli batter is not too thin or watery. After adding paste, the batter will become even more thin.
  • You can refrigerate this batter and use it for one day.


Try this healthy banana stem dosa/ vazhaithandu dosai for a change.

I am sure everyone will love it ! I made uthappam kind for me. 

Banana stem dosa


Continue Reading...


January 6, 2021

Jowar Idli recipe without rice / Cholam Idli Recipe / Sorghum Idli Recipe

Cholam idli recipe

After a long time, I started making millet recipes in my kitchen. My recent try was this jowar idli recipe/ Sorghum idli dosa batter without rice. Jowar is a healthy gluten free millet which is high in fiber, protein and packed with essential minerals and vitamins. Its a great alternative for atta/ wheat flour and all purpose flour / maida. It is good to control diabetics, thyroid and aids weight loss. Sorghum is known as Cholam in Tamil, Jonnalu in Telugu, Jola in Kannada, Jowar in Hindi.

There are two varieties of Jowar in India. One is white in color and other one is red jowar which is called as Irumbu cholam/ Irungu cholam in Tamil and Malayalam. I have used white variety in this recipe.

For all millet idli recipes, I use a combination of millet, urad dal and poha / aval / pressed rice to replace rice. It comes out well and soft every time. Not only idli, you can also make crispy dosa with the same batter. But the only problem I face with all the millet idli batter is, you cannot refrigerate and store the batter for more days like our regular idli dosa batter. Millet idli dosa batter should be used within 2 days for best taste. 

This Jowar idli dosa batter is also the same like other millet idli batter recipes. You have to consume it within a day or two even under refrigeration. Other than this factor, you will not find much difference in taste, flavor from our regular idli dosa. I am sure you will love its spongy and soft texture. 

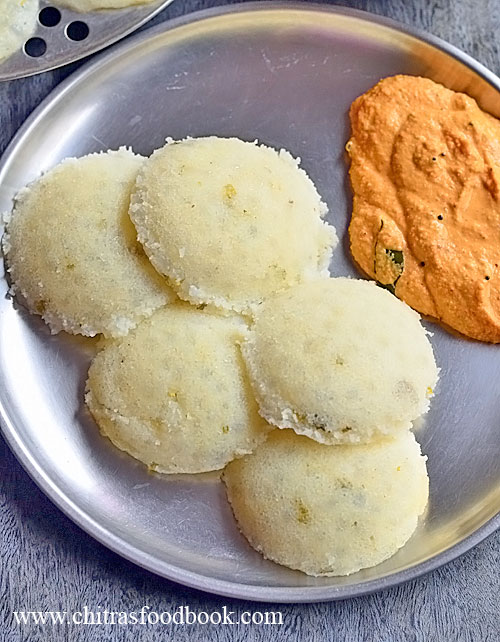
Jowar idli tastes the best with coconut chutney, tomato and onion based chutneys or tomato thokku. I served it with tomato thokku and idli podi. We loved it. I am happy that I can include this recipe in our regular diet too. Friends, do try this easy and yummy jowar idli / Sorghum idli and enjoy for your breakfast and dinner !

Check out my foxtail millet idli

Kodo millet idli

Ragi idli 

Pearl millet idli

Pearl millet dosa

Jowar idli without rice

Jowar idli / Sorghum idli/ Jonna idli without rice


Jowar idli / Sorghum idli/ Jonna idli without rice

Jowar idli / Sorghum idli/ Jonna idli dosa batter recipe without rice


Cuisine: Indian
Category: Main course
Serves: 15
Prep time:5Hours
Cook time:10Minutes
Total time:5 Hours 10 Minutes


INGREDIENTS
1 cup = 250ml
  • Jowar / Sorghum / Cholam - 2 cups
  • White, round urad dal - 1/2 cup
  • Poha / Pressed rice / Aval - 1/2 cup
  • Methi seeds / Fenugreek seeds - 1/2 tsp
  • Salt & Water - as needed
HOW TO MAKE JOWAR IDLI
  1. Wash the jowar and poha till you get clear water.
  2. Soak in enough water for 5 hours.
  3. Wash and soak urad dal and methi seeds for 2 hours.
  4. First grind urad dal to a smooth, thick batter. Transfer to a big bowl.
  5. Then grind soaked jowar to a smooth paste. Add to urad dal batter.
  6. Mix well with hands. Cover and ferment the batter over night or 12 hours.
  7. The next morning, add salt and mix the batter with a ladle.
  8. Pour in a greased idli plate and steam in a pot for 10 minutes.
  9. Remove and rest for a minute. Then scoop out and enjoy with chutney, sambar !
METHOD - STEP BY STEP PICTURES
  • Wash the jowar, poha together for 3 to 4 times to remove the dust. Wash till you see clear water. Add enough water and soak it for 5 hours.

  • Wash the urad dal + methi seeds together for 2 times and enough water to soak it for 2 hours.
  • Jowar idli without rice
  • First grind urad dal to a smooth, thick batter adding required water. If you are grinding the batter in wet grinder, add water gradually and grind to a smooth, thick paste like butter. If you are using mixie, use ice water to grind the batter. Collect the urad dal batter in a big, wide bowl with space for fermentation. 

  • Now grind the soaked jowar + poha to a smooth, thick paste adding required water. Add the jowar batter to urad dal batter and mix well with your hands to aid fermentation. Cover the batter and ferment it overnight or 12 hours based on the weather in your place. 
  • Jowar idli recipe without rice
  • The next morning, batter would have raised well. Add required salt and mix well. Take idli plate and grease with gingely oil.

  • Roll boil water in an idli pot. Place the idli plate and steam cook for 10 minutes. Check with a tooth pick or with a wet finger. If it comes out clean, idli is done. Remove the idli plate and wait for 2 minutes. Then scoop it with a flat spoon and serve in a plate. Enjoy with sambar or chutney !Jowar idli recipe without rice 

Note

  • You can use cooked rice instead of poha.
  • You can use thick or thin poha/aval for this idli
  • If you are using mixie, use ice cold water for grinding the batter to avoid heating of mixie jar.
  • Soak jowar and dal separately and grind them separately.
  • If you want to soak and grind everything together, use 3:1 ratio of jowar and urad dal. i.e use 1.5 cups jowar and 1/2 cup urad dal. 


Try this easy, yummy and healthy Jowar idli for your breakfast / dinner !

I served it with tomato thokku and idli podi. 

 Jowar idli recipe


Continue Reading...


December 6, 2020

Set Dosa Without Curd–Sponge Dosa Recipe

Set dosa recipe

Set dosa is one of my most favorite dosa recipes. Most of the time this would be my order in restaurants here. Set dosa served with sagu and coconut chutney tastes absolutely delicious.

Set dosa can be prepared in two ways. One with rice, urad dal, poha and methi seeds without using curd and another version without urad dal where poha and curd is used with rice. Both of them comes out super soft and tastes good. So it is also called as sponge dosa.

Long back I have shared a sponge dosa recipe without urad dal adding curd. Recently I tried this version without curd. It came out so well. I served it with potato kurma and kara chutney as side dish. We all loved it.

I won’t say this recipe makes Karnataka hotel style set dosa. Hotel style dosa batter has rice flour, maida, dals in it. I am still working on it to get the exact taste and texture. This one is just home style set dosa that comes out soft and spongy.

It tastes similar to the one you get in road side small eateries. To make Tamil nadu style set dosa, you can add some turmeric powder in the batter and serve with vada curry.

Friends, do try this yummy, soft and spongy dosa recipe. You will also love it like us ! Lets see how to make spongy dosa recipe without curd with step by step pictures and video. 

Check out my another version of soft dosa recipe if interested !

sponge dosa

Set dosa / sponge dosa recipe without curd


Set dosa / sponge dosa recipe without curd

Set dosa / sponge dosa recipe without curd


Cuisine: Indian
Category: Main course
Serves: 15
Prep time: 16 Hours
Cook time: 5 Minutes
Total time: 16 Hours 5 Minutes


INGREDIENTS
1 cup = 250ml
  • Dosa rice or idli rice - 2 cups (Low quality Raw rice / maavu arisi or parboiled rice)
  • Urad dal - 1/2 cup
  • Poha / Aval / Pressed rice - 1/2 cup (Thin or thick)
  • Methi seeds / fenugreek seeds - 1/2 tsp
  • Salt & water - as needed
  • Cooking oil or sesame oil - to drizzle around dosa
HOW TO MAKE SET DOSA/SPONGE DOSA
  1. Wash and soak rice, urad dal, methi seeds together for 4 hours.
  2. Wash and soak poha separately for 30 minutes till soft.
  3. Take a mixie jar and grind the rice to a smooth paste.
  4. Transfer the batter to a vessel. Grind poha to a smooth paste and add to rice batter.
  5. Mix both the batter with your hands. Ferment overnight or 12 hours.
  6. The next morning, add salt and mix the batter.
  7. Heat dosa tawa, pour a ladleful of batter. Spread slightly.
  8. Cook till porous in medium flame. Drizzle oil and flip the dosa.
  9. Cook the other side too. Remove it. Make 2 or 3 dosa and serve as set.
  10. Serve hot with kurma/sagu and chutney!
METHOD - STEP BY STEP PICTURES
  • Wash and soak the rice, urad dal and methi seeds together for 4 hours. Wash the poha and soak it separately for an hour. Use drinking water for soaking so that you can use the same soaked water for grinding. It helps for fermentation.

  • Take a mixie jar and add the soaked rice along with required soaked water. Grind to a smooth paste and transfer to a big vessel with room for fermentation. You can grind in two batches.
  • set dosa recipe
  • Grind the soaked poha along with the water to a smooth paste. Add to the rice batter and mix well with your hands. Mixing with your hands aids fermentation. Do not add salt while grinding as it delays fermentation during winter.
  • set dosa recipe
  • After mixing the batter, close the vessel with a lid. Ferment it overnight or minimum 12 hours based on the weather in your place. Proper fermentation is the key to make perfect, spongy dosa with more holes. 

  • The next morning, add required salt in the batter. Mix well and check the consistency of batter. If its too thick, add little water. Batter should be like regular dosa batter in consistency.
    • set dosa recipe
  • Heat a dosa tawa, lower the flame. Pour 1/4 cup of water. Wipe with a cloth and pour a big ladleful of batter. Spread it slightly. Keep the flame medium. Pores/ holes will appear all over the dosa. The drizzle with oil all over the dosa. Flip over and cook the other side. Remove when golden. Alternately you can cover and cook the dosa. Remove when its cooked. No need to flip it.
  • set dosa recipeset dosa recipe

  • Serve hot with vegetable kurma or saagu and coconut chutney. Enjoy !

Note

  • Do not reduce the quantity of poha or urad dal. Dosa won’t be soft.
  • For variations, you can use idli rice instead of dosa rice.
  • My dosas were even more good the second day with lots of holes. Please refer the above pictures. The more fermented batter, greater the results would be.
  • You can refrigerate this batter up to 2 days and use it.
  • You can flip and cook the dosa on both the sides as I did OR cover and cook the dosa till holes appear and then remove it.
  • To resemble like Tamil nadu style set dosa, you can add some turmeric powder in the batter. Flip and cook both the sides.

  
Try this easy, yummy set dosa recipe without using curd. You will love it !

Below picture is the dosa made with second day batter !

sponge dosa


Continue Reading...


October 9, 2020

Pirandai Dosai –Pirandai Recipes - Adamant Creeper Dosa Recipe

Pirandai dosai

I have an adamant creeper plant in my balcony garden. Adamant creeper is called as Pirandai in Tamil. I have given its name in all the languages and its amazing health benefits below. Please check it. As its rich in Vitamin C and Calcium which is good for bones, I try to include pirandai in my cooking atleast once in a month. Usually I make pirandai thogayal for rice. But this time, I wanted to try some other recipes with it. So as usual, I started my experiments with this healthy and yummy pirandai dosai recipe. As I expected, it came out very well in the first attempt itself.

Actually no one in my family was able to find that pirandai is added in this dosa recipe. It was tasting like usual dosas. To make it more flavorful with a green look, I added some coriander leaves, green chilli and ginger. But you can skip all these ingredients and make a plain piranadi dosai too. So friends, if you are looking for some healthy pirandai recipes apart from chutney and thogayal, do try this pirandai dosa recipe. I am sure you will love it like us. This pirandai dosa batter can be refrigerated and used for 2 days.

Lets see how to make this healthy adamant creeper dosa/ Pirandai dosai recipe with step by step pictures along with its health benefits and names in different languages.

Also check out my Pirandai kuzhambu if interested !


Name of Adamant creeper in different languages


  • English: Adamant creeper, Bonesetter, Devil's Backbone, Veldt Grape.
  • Hindi: Hadjod, Hadjor, Asthisrumgala
  • Malayalam: Changalamparanda-ചങ്ങലംപരണ്ട
  • Sanskrit: Vajravalli, Asthisrinkhala, Kulisa, Asthisamharaka.
  • Tamil: Pirandai-பிரண்டை
  • Telugu: Nalleru, Gudametige, Kokkitaya-ralu

  • Health benefits of Pirandai / Adamant creeper

    As pirandai has amazing health benefits, I wanted to share it with you all !


  • Cissus Quadrangularis is the biological name of pirandai. It has high vitamin C and calcium.
  • Pirandai is helpful to cure knee problems and its juice mixed with sesame oil is used in the treatment of fracture and sprain.
  • Pirandai recipes are useful for people with indigestion issues, flatulence, nausea, cough and piles.
  • Always grease your hands with sesame oil to avoid your hands from itching.
  • Use tamarind in all pirandai recipes else it will make your tongue itchy.

  • Pirandai dosa

    Pirandai dosai recipe / Adamant creeper dosa


    Pirandai dosai recipe / Adamant creeper dosa

    Pirandai dosai recipe / Adamant creeper dosa for breakfast and dinner. Its a healthy dosa recipe !


    Cuisine: South Indian
    Category: Main course
    Serves: 10
    Prep time: 16 Hours
    Cook time: 10 Minutes
    Total time: 16H10 Minutes
     
    1 cup = 250ml
    • Idli rice - 1.5 cups
    • Urad dal - 1/4 cup
    • Methi seeds - 1/2 tsp
    • Pirandai / adamant creeper - 1/4 cup
    • Coriander leaves - 1/4 cup
    • Green chilli - 2
    • Ginger - 1 inch piece
    • Salt & water - as needed
    HOW TO MAKE PIRANDAI DOSAI
    1. Grease your hands with sesame oil generously and clean the pirandai.
    2. Chop the nodes, head and tail portion. Discard it. Now remove the ridges using a knife or peeler.
    3. Wash it well and chop into 1 inch pieces.
    4. Wash and soak rice, urad dal and methi seeds for 4 hours.
    5. In a mixie jar, grind pirandai, coriander leaves, green chilli, ginger to a coarse paste.
    6. Add the soaked rice and dal. Grind to a smooth paste and collect in a vessel.
    7. Cover and ferment it overnight or minimum 12 hours.
    8. The next day, add salt and mix the batter well.
    9. Make thin or thick dosa as per your liking. Enjoy with coconut or tomato chutney !
    METHOD - STEP BY STEP PICTURES
    • To clean pirandai / adamant creeper, apply sesame oil/ gingely oil all over your hands and palm generously to avoid itching. Alternately you can wear some thick gloves and clean it.
      • You should apply sesame oil in your hands else your hands will be itching for one day after cleaning the pirandai. I have experienced this. So do not skip or forget this step.
      Pirandai dosai

    • Take the pirandai and break the nodes. Chop the head and tail portion. Remove the fibers if any. Now remove the ridges of pirandai using a knife or peeler. Discard it.
    • Pirandai dosai

    • Wash it well and chop into small pieces of 1 inch length. Measure 1/4 cup from it and set aside. Set aside.
    • Pirandai dosai

    • Take a bowl and add rice, urad dal, methi seeds. Wash it well and soak it for 4 hours.
    • Pirandai dosai

    • Wash and take the chopped pirandai, coriander leaves, ginger and green chilli in a mixie jar. Grind coarsely adding little water.


    • Now add the soaked rice, urad dal and methi seeds. Grind everything to a smooth paste adding required water. Make the batter thick. Do not make it too watery.
    • Pirandai dosai


    • Transfer the batter to a bowl. Cover and let it ferment for 12 hours or overnight based on the weather conditions in your place. I kept it for 16 hours.


    • The next day, batter would have been raised. Now add required salt and mix well. Adjust the consistency of batter by adding little water if needed.
    • Pirandai dosai

    • Heat a dosa tawa and pour 1/4 cup of water, lower the flame and wipe the dosa tawa completely. Now pour a ladleful of dosa and spread it thin or thick as you like. Cook till 3/4th and then drizzle with sesame oil/ gingely oil or ghee all over the dosa. Flip and cook both the sides and remove in a plate.Pirandai dosai
    • Pirandai dosai

    • Enjoy with coconut chutney or tomato chutney. I liked it with  raw onion chutney !


    Note

    • I used coriander leaves, green chilli and ginger to give a nice flavor and color. You can add a small piece of tamarind if you like but I din't use it. You can skip all the other ingredients and use pirandai alone to make this dosa batter.
    • There is no need to saute the pirandai in oil before grinding. As we are fermenting the batter, it doesn’t have the itchy feeling while you eat.
    • Make sure the batter is well fermented. Leave it for 12 to 16 hours based on the weather. 
    • People living in cold countries can keep the batter inside the oven with lights on or cover the batter bowl with a blanket and keep it over the gas burner after switching it off. Keep it over night. It helps to ferment the batter well.
    • You should apply sesame oil in your hands else your hands will be itching for one day after cleaning the pirandai. I have experienced this. So do not skip or forget this step.
    • While making dosa, drizzle it with sesame oil or ghee as pirandai generates body heat. Oil or ghee helps to balance it. Use ghee if giving for kids. 


    Yummy, healthy pirandai dosai is ready to relish. Make it thick or thin and enjoy !

    Pirandai dosai


    Continue Reading...