Search Chitra's Food Book

Showing posts with label DOSA VARIETY. Show all posts

January 18, 2016

Paneer Dosa Recipe – Paneer Masala Dosa - Dosa Varieties

Paneer dosa recipe
Paneer dosa was in my try list since I had this in a 101 dosa corner. We ordered Paneer cheese dosa for Raksha, Pav bhaji masala dosa for me and Spring dosa for Sendhil. Raksha couldn’t complete the dosa as it was really big. So myself & Sendhil had the remaining. 

I loved the paneer masala stuffing of the dosa &I could guess the ingredients easily. It was more like paneer bhurji. So I tried to recreate the same at home and succeeded in my attempt too. This is so easy to make and tastes yummy with coconut chutney as side dish. You can try this for breakfast and dinner as well . Lets see how to prepare this yummy, kids friendly dosa with paneer masala stuffing !!

Paneer masala dosa

Paneer dosa recipe


Paneer dosa recipe Paneer dosa recipe - How to make dosa with paneer masala stuffing
Cuisine: Indian
Category: Breakfast
Serves: 4-5 dosa
Prep time: 10 Minutes
Cook time: 20 Minutes
Total time: 30 Minutes
INGREDIENTS

  • Paneer - 150 gms ( 1 cup grated)
  • Big onion - 1 no
  • G&G paste - 1/2 tsp
  • Tomato – 1 no
  • Turmeric powder - 1/4 tsp
  • Red chilli powder - 1 tsp
  • Dhania powder - 1 tsp
  • Garam masala powder - 1/4 tsp
  • Mint leaves - few ( optional)
  • Cooking oil – 1 tbsp
  • Fennel seeds/Saunf – 1/4 tsp
  • Salt & water - as needed
  • Dosa batter – 1 cup
  • Cooking oil – as needed
METHOD

  • Boil water in a pan and keep the paneer block inside the water for 5 minutes. It helps to make the paneer soft. Grate the paneer. Chop onion, tomato, green chillies & mint leaves.
Paneer dosa recipe
  • Heat oil in a kadai and splutter fennel seeds. Add chopped onions and saute until transparent. Add g&g paste and saute till raw smell goes off.
Paneer dosa recipe
  • Now add tomato pieces.Saute until mushy. Add turmeric powder,red chilli pwd, dhania pwd & garam masala powder. Mix well. Add the required salt.
Paneer dosa recipe
  • Lastly add the grated paneer. Mix well.Check for taste. Garnish with mint leaves and coriander leaves, switch off the flame.
Paneer dosa recipe
  • Heat a dosa pan and pour a ladleful of batter. Spread it well and make it thin. Drizzle a tsp of oil and cook well in medium to high flame till the sides become crisp and center becomes golden brown.
Paneer dosa recipe
  • Do not flip the dosa. Keep the paneer masala inside the dosa.You can either spread it over the dosa or keep a ladleful of masala in the middle. Fold the dosa and serve hot with chutney !
Paneer dosa recipe


Note
  • Adjust the quantity of chilli powder & garam masala powder as per your taste.
  • You can skip g&g paste if you don’t like over powering of masala flavor.
  • Use few drops of lemon juice instead of tomato. But adding tomato gives a base to the masala. So its your choice.
Enjoy this yummy paneer dosa for breakfast or dinner !!
Paneer dosa
Continue Reading...


August 18, 2015

Easy Dosa Batter Recipe With Rice Flour and Urad dal - Dosa batter in mixie

Dosa batter recipe with rice flour

Here is the recipe for crispy dosa batter with video - Easy dosa batter recipe with rice flour and urad dal in mixie. Generally South Indians especially Tamil people make dosa using Idli batter by diluting it. We make dosa for breakfast and dinner as well. Few months back, I got a request to share restaurant style golden colored, crispy dosa recipe. Even though I am happy with my dosa using idli batter, I wanted to have a separate dosa batter recipe in my blog. So I started searching for the same.

I tried many dosa batter recipes with various combinations and by changing the ratio of rice & dal. At last I was satisfied only with two recipes.This is one among them. I will share the other one soon. I referred this blog for the recipe. This dosa batter recipe is very easy to make as it uses rice flour. We need very less soaking & preparation time for the batter and we don’t need to use grinder for grinding the batter. An Indian mixie/mixer would do. It ferments beautifully and this batter yields crispy, golden colored dosa as you see in the pictures. 

I made plain dosa adding less oil for Sendhil, Cone/Roast dosa adding ghee for my daughter and thick uttapam kind of Set dosa for me. Everything came out very well and I was absolutely happy with this batter recipe. Not just that, you can keep this recipe as a base and make many dosa varieties as you like. Friends, do try this recipe if you are looking for an easy and quick dosa batter version. You will love it like me. Don't forget to see the full video recipe.

Lets check out how to make this easy homemade dosa batter recipe using rice flour and urad dal. 

Check out my 35 chutney recipes to make varieties of side dish for dosa. People in cold countries, please check this post for fermentation process.


Dosa recipe-Video

Cone dosa

Dosa recipe with rice flour -Easy dosa batter recipe


Dosa recipe-Easy dosa batter recipe How to make easy dosa batter recipe at home using rice flour and urad dal in a mixie
Cuisine: Indian
Category: Breakfast
Serves: 12
Prep time: 13 hours
Cook time: 2 Minutes
Total time: 13H2Minutes


INGREDIENTS
1 cup = 240 ml or 250ml or 200ml
  • Rice flour - 1.5 cups (any rice flour. you can use idiyappam flour too)
  • White round urad dal - 1/2 cup
  • Salt & Water - as needed
  • Cooking oil/gingely oil/ghee - as needed to make dosa
HOW TO MAKE DOSA BATTER WITH RICE FLOUR - METHOD
  • Wash the urad dal once and add soak it by adding enough water. Take the rice flour in a wide bowl and add 2 cups of water. Whisk it well and make sure the water level is 1 inch above the flour. Add more if  needed. Let it soak well for 1 hour at least. No issues even if you soak them for 4-5 hours. (Suppose if you want to use methi seeds, add with urad dal and soak for minimum 2 hours)
dosa batter recipe with rice flour and urad dal

  • Now drain the excess water from urad dal and grind it in a big mixie jar. Grind them without using water. Then add water and grind it to a smooth batter. I used nearly 3/4-1 cup of water. Add the soaked rice flour along with water and salt. Grind the batter again for even mixing. Add some water if you feel the batter is too thick.
  • Transfer the batter to bowl. Wash the mixie jar by adding little water and add to the batter. Mix the batter well with your hands. It helps proper and quick fermentation. Leave the batter overnight or at least for 12 hours based on the weather conditions in your place.
dosa batter recipe with rice flour and urad dal

  • The next morning, batter would have raised well. Mix the batter well and add some water if it is too thick.
dosa batter recipe with rice flour and urad dal
  • Heat a dosa pan and pour a ladleful of batter in the tawa. Spread it well.thinly & uniformly. Keep the flame medium and let the dosa cook till you see the dosa turning golden brown in the bottom. Do not cook this dosa in high flame. By this time, the top portion would have been cooked. You can also cover the tawa with a lid. Do not flip the dosa. As soon as the dosa starts to turn golden brown, drizzle one or two tsp of oil or ghee all over the dosa. Let the dosa turn completely golden and crispy. Fold the dosa and serve hot with your favorite chutney or sambar ! Enjoy !
dosa batter recipe with rice flour and urad dal

Note
  • Use the same cup for measuring dal and rice flour.
  • For variations, you can use split urad dal instead of round ones.
  • You can add 1/4 tsp of methi seeds to get nice flavored dosa.
  • Do not make the batter too thick or too thin.The consistency should be like our regular idli, dosa batter.
  • You can also use urad dal flour instead of grinding urad dal. Use the same ratio.
  • Add oil or ghee generously to get a shiny look in the dosa.
  • Do not cook the dosa in very high flame. It will burn quickly. Cook the dosa in medium flame patiently. Adjust the flame whenever needed.

Dosa batter recipe with rice flour

Enjoy Crispy dosa with chutney and sambar for your breakfast or dinner !
dosa batter recipe
Continue Reading...


August 6, 2015

South Indian Masala Dosa Recipe - Tamil nadu Style Masala Dosa

Masala dosa –Needless to say its one of the most popular South Indian Special dosa varieties. My daughter Raksha is a big fan of this dosa. Recently when we went to a restaurant for breakfast,I saw a foreigner ordering Masala dosa and Filter coffee. I felt so happy & proud that the taste of our masala dosa has reached people all over the world. I also realized that I did not post this most wanted dosa recipe in my blog yet. Masala dosa is very popular in Karnataka & Tamil nadu hotels. In Karnataka, a special dosa batter is made using rice, dals and poha. Check out my Karnataka masala dosa recipe with red chutney and potato palya. Today I have shared Tamil nadu style potato masala dosa using the regular idli,dosa batter. I have shared the urulaikizhangu masala recipe based on the ones I have tasted in hotels. I hope u will like this recipe & give a try. Ok, lets see how to make South Indian masal dosa /Tamil nadu restaurant style masala dosa at home.

Do check out my potato masala for poori !

Continue Reading...


February 9, 2015

Rava Dosa Recipe(Instant Version) - Crispy Rava Dosa Recipe

Instant Rava dosa recipe
Rava Dosa is one of the most popular South Indian breakfast recipes . Crispy, hotel style Rava dosa recipe is Sendhil’s most favourite dosa varieties. This dosa is very popular in Karnataka and Tamil nadu. Whenever we go to restaurant, I order plain uttapam for myself & his choice would be mostly rava dosa or onion rava dosa .As it is my man’s favourite, I have tried making this dosa many times in my kitchen to impress him. But most of my attempts were flop shows. It may be due to the wrong proportions of rava, rice flour, maida or the consistency of  rava dosa batter might not be right. 

 When I told this to my friend Shalini, she suggested her fail proof, instant rava dosa recipe which she has been successfully making it for years. I tried it yesterday for our Sunday breakfast.It came out unbelievably great! It looked and tasted like restaurant style rava dosa. Sendhil loved it a lot and had more dosa. I became very happy, excited and I immediately called my dear Shalu to thank her. I must also thank Vahchef for some additional tips I learnt by watching his video.Friends, do try this recipe. I am sure you won’t be disappointed with the results even if you are beginner. 

Also don’t forget to follow the tips I have shared in this post which helps you to make perfect crispy rava dosa. I always feel coconut chutney is the best side dish for rava dosa. Some people love to have it with tomato chutney and sambar. Serve it with your choice :) Some of my readers are asking me to post rava dosa recipe without rice flour and maida. I am working on it. Once I make it right, I will post it here.  Ok, lets see how to make crispy rava dosa recipe with step by step photos. 

Check out my other Rava Recipes : Rava Kesari,  Rava idli,  Rava Kichadi,  Rava Upma,  Masala rava kichadi,  Rava Payasam,  Rava Ladoo,  Rava roti,  Microwave rava kesari,  Milk kesari recipes.
Crispy Rava Dosa Recipe

Rava dosa recipe-Instant Version


Rava dosa recipe Crispy, hotel style Instant rava dosa recipe for breakfast
Cuisine: Indian
Category: Breakfast
Serves: 12 
Prep time: 15 Minutes
Cook time: 3 Minutes
Total time: 18 Minutes


INGREDIENTS

 1 cup = 250 ml

  • Rice flour – 1 cup
  • Unroasted Rava – 1/2 cup
  • Maida / all purpose flour – 1/4 cup
  • Water – 3 cups + 1/4 cup( add 2 tbsp more in the middle)
  • Curd – 1/4 cup ( semi solid)
  • Salt – as needed
  • Cumin seeds/Jeera – 1/2 tsp
  • Pepper – 1 tsp (crushed)
  • Green chilli – 1no ( finely chopped)
  • Coriander leaves  & curry leaves – Few ( finely chopped)
  • Asafetida/Hing – as needed
  • Ghee or cooking oil - as needed to drizzle dosas

HOW TO MAKE RAVA DOSA - METHOD

  • In a wide bowl, take the curd and rava. To this add rice flour, maida & salt. Add 3 cups of water & mix well with a whisk. Now add the cumin seeds, crushed pepper, finely chopped green chillies, coriander leaves, hing & curry leaves. Mix well without lumps. Check for batter consistency. Leave it for 10 to 15 minutes.
  • In the mean time, you can grind coconut chutney for side dish. After 10 minutes, check the batter, it would be thick slightly. So add 1/4 cup of water. Mix well & check whether the batter is right. I have given the water quantity I used for this recipe.Take it as a reference & adjust the quantity. The consistency of batter may not be correct in the first attempt.You will come to know the right consistency only after making the first dosa.( The first dosa may not come out perfectly crispy. 
  • Based on the texture of dosa,add little more water & make the second dosa. So it comes by trial & error only. You should get the perfect one at least for 3 rd dosa if you are a beginner.)
  • Heat a dosa pan.I used iron pan here. Non-stick also works fine. Dosa pan should be well heated but not smoky. Grease the pan with oil. 
  • Hold the ladle 15cms away from the pan & pour a ladleful of batter around the corner of dosa pan. Make a circle. Again take some little batter & fill the inner portions.i.e. you should pour the batter in a circular motion from outer to inner portion of pan.Do not fill the holes. Instead drizzle some ghee in the holes.
Instant Rava Dosa Recipe
  • Keep the flame medium to medium high. Drizzle a tsp of ghee all over the dosa. Cover the pan with a lid & cook for sometime till you see the dosa turning crispy & golden brown. I covered the pan with my idli pot lid. 
Instant Rava Dosa Recipe
  • Do not flip the dosa. Just fold it & serve immediately with coconut chutney & sambar. Before making the next dosa, mix the batter very well because Rava may settle down in the bottom of bowl. If you feel the batter is thickened, add 2 tbsp of water. Mix well & make dosa. Keep the flame high till you pour the batter & as soon as you pour the batter, reduce the flame to medium & cover cook as mentioned above. Repeat the same procedure for all dosas.
Instant rava dosa
  • Here is a rava dosa picture I made using non-stick dosa pan.

Enjoy !


Note

  • For variations & for health reasons, you can follow the same recipe without maida. It comes out well.
  • The consistency of rava dosa batter is very important to make crispy, lacy dosas. So add water as needed.
  • Cooking in medium flame for more time gives you crispy dosa. Cooking in high flame makes the dosa brown & uncooked in the middle.
  • Covering the pan while cooking helps to cook the dosa quick & gives you nice uniform golden color.
  • you should mix the batter really well every time before making dosa. The batter may thicken after you make 3-4 dosas. So add 2 tbsp water & thin down the batter.
  • Adding ghee while making dosas gives nice flavor & restaurant touch. So use it as per your wish.
  • For making onion rava dosa,sprinkle finely chopped onions in greased tawa. Then pour the batter. Onions will be cooked well.
  • To make fruit and nut rava dosa, sprinkle finely chopped cashews, badam & tutti frutti over the pan and pour the batter. Cook in medium flame.

Check out my other Rava Recipes :  Rava Kesari,  Rava idliRava Kichadi,  Rava Upma,  Masala rava kichadi,  Rava Payasam,  Rava Ladoo,  Rava roti,  Microwave rava kesari,  Milk kesari recipes.

Rava Dosa Using Non-stick Pan.
Instant Rava Dosa recipe

Enjoy this crispy,lacy rava dosa with your favourite chutney & sambar!!
Rava Dosa Recipe


Continue Reading...


November 12, 2014

KAMBU DOSAI-BAJRA DOSA /PEARL MILLET DOSA RECIPE

Kambu-dosai

Last week i shared instant millet dosa using mixed millets energy mix powder.Though i make it very often,i wanted to try a dosa recipe with kambu (in tamil)/Pearl millet ( in English)/Bajra(in Hindi) as i got tempted by seeing my fellow bloggers post.Recently my friend Shalini was telling me about kambu dosai which she has been making for her breakfast regularly.So I took this recipe from her and tried today for the first time.She told me to use brown rice and pearl millet but i used raw rice as i din’t have brown rice in stock.So feel free to use brown rice instead of raw rice in this recipe.You will get good results and its a healthier option too.I will try to post kambu adai and kambu koozh recipes soon.Lets see how to prepare this kambu dosai for breakfast/dinner.This dosa tastes the best when it is served hot.It becomes slightly chewy when its cooled down but overall its a very flavorful and healthy breakfast recipe.Check out my other millet recipes below.

Millet energy mix powder

Millet ladoo

Instant millet dosa recipe

Thinai idli,dosa recipe

Saamai sweet pongal/Little millet pongal recipe

Types of millets with health benefits,other names,where to buy etc.


A small update : I made this dosa for dinner with raw onion-garlic chutney as side dish.I felt this combo was awesome than coconut chutney.Even my daughter told the same.This chutney pairs very well for kambu dosa.Try this combo ! U will like it ;)


Kambu dosai

Kambu dosai/Pearl millet dosa


Kambu dosai/Pearl millet dosa Pearl millet dosa/Kambu dosai recipe - Healthy millet recipe for breakfast/dinner
Cuisine: Indian
Category: Millet recipe
Serves: 15 nos
Prep time: 3 Hours
Cook time: 2 Minutes
Total time: 3H2Min
INGREDIENTS


  • Kambu/Pearl millet - 1.5 cups
  • Raw rice or brown rice - 1/2 cup
  • Round Urad dal - 1/2 cup
  • Methi seeds - 1 tsp
  • Salt & water - as needed
  • Cooking oil – to drizzle ( while making dosa)

  • METHOD

  • Wash and soak the kambu,rice,urad dal and methi seeds together for 2-3 hours.In a big mixie jar,take half of the quantity of soaked grains and grind it adding ice cold water(It helps the mixie jar to prevent heating). Grind it to a smooth paste adding enough water and salt.(I used the soaked water itself).Transfer the batter to a vessel. Kambu-dosai-step1

  • Let the batter ferment over night or for 10-12 hours.The next day morning batter would have raise well.Mix it well and check the consistency.If it is too thick,add little water say 1/4 cup and mix well.Heat dosa pan and pour a ladleful of batter.Spread it well if u want to make thin,lacy dosas OR spread it little if u want thick soft dosas.Make it as per your wish.Drizzle a tsp of oil and cook for a minute.Cover it with a lid and cook the dosa if u want crispy ones.Do not flip the dosa.If u want thick dosas like utappam,flip the dosa and cook for a while.Remove and serve hot. Kambu-dosai-2


    Enjoy with your favourite chutney.I served it with coconut chutney and idli podi !


  • Note


  • Use enough water while grinding the batter.Batter has to ferment for 10 hours minimum in cold weather.If the climate is hot,this batter will ferment quickly and it will become sour.So keep an eye.
  • Use brown rice instead of raw rice.U can use idli rice too.
  • If u don’t want to use rice at all,just follow 2:1 ratio of kambu & urad dal and grind the batter as mentioned above.
  • This dosa becomes soft when its cooled down.So serve n eat hot !


  • Have this healthy millet dosa for your breakfast/dinner.I enjoyed it with coconut chutney,idli podi and had milk with Lion dates syrup.

    A small update : I made this dosa for dinner with raw onion-garlic chutney as side dish.I felt this combo was awesome than coconut chutney.Even my daughter told the same.This chutney pairs very well for kambu dosa.Try this combo ! U will like it ;)

    Kambu-dosai-recipe

    Continue Reading...


    November 3, 2014

    NEER DOSA RECIPE - NEER DOSA WITH COCONUT CHUTNEY- KARNATAKA BREAKFAST RECIPES

    neer dosa

    Neer dosa recipe / neer dose in Kannada must be familiar to many of you. Literally it means water dosa and is a crepe made out of rice flour & coconut. Its one of the most popular dosa varieties of Karnataka's Udupi & Mangalore regions. It tastes the best with coconut chutney or veg curry. In Tamil nadu, we prepare a similar dosa called rice flour dosa(arisi maavu dosa in Tamil) which needs over night fermentation. But this neer dosa can be done instantly after grinding the batter. It was in my try list for long time but I got tempted to try this out when I watched Vijay Tv’s Samayal Samayal with Chef Venkatesh bhat. When he showed this neer dosa paired with onion tomato chutney, I started drooling like anything. But I followed neer dosa recipe from Veggie belly

    This neer dosa is Sendhil’s favourite too. He used to have this dosa with kaju curry in restaurants here when he was new to Bangalore.But I have not tasted this dosa in hotels so far. Recently we went to VV puram’s food street and tasted akki roti, thatte idli, brinjal gravy, kulfi etc from roadside hotels. There I asked in many stalls for neer dosa but it was not there and I came off disappointed. Then Sendhil enquired his colleagues and told me about a small hotel in Malleshwaram which is famous for Neer dosas. I must pay a visit soon.The ones I made yesterday in my kitchen was awesome. It was so lacy and very soft. I tried it for the first time and I was completely satisfied with the result. Sendhil told it tastes the same like hotel ones. What else, this recipe was a grand hit in my house. 

    When I asked my kannadiga friends( school moms) here, they told me an Instant neer dosa recipe which they mentioned as “thideer dosa” using rice flour and coconut. They also suggested coconut chutney and vegetable sagu as the best side dish for neer dosa. Neer dosa & chutney is the simple & best combination they added. So I prepared spicy, watery coconut chutney and it was tasting great. But one thing I have to admit is, this dosa won’t be filling even after having 5-6 nos if you are a good eater. So make sagu or any vegetable kurma if you want to have a tummy filling breakfast or dinner. Else make it as brunch or snacks;)

    There are certain techniques to be followed to make a perfect neer dosa. Based on my observation and the tips from veggie belly, I have shared some points in my “Note”section. Do read it before making this dosa. U will get it perfect even if you are a first timer . Lets see how to make this karnataka style neer dosa !
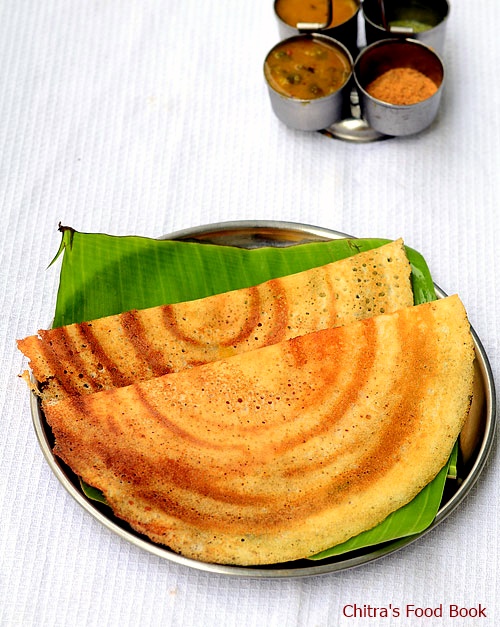
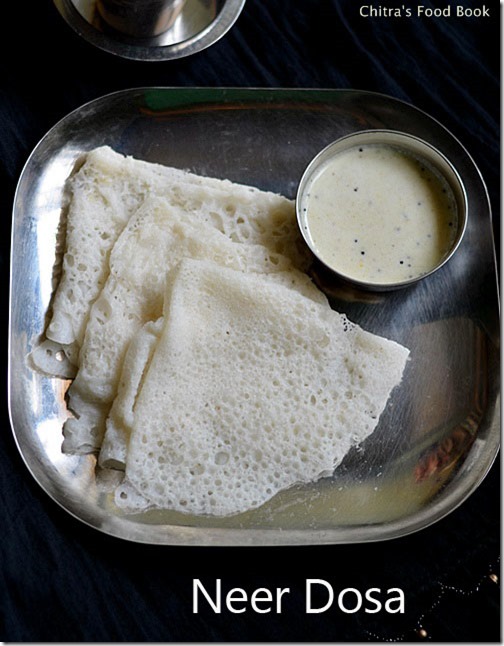
    Neer-dosa-recipe

    Neer dosa recipe


    Neer dosa recipe Neer dosa recipe - Karnataka's popular breakfast recipe
    Cuisine: Indian
    Category: Breakfast
    Serves: 15-20 nos
    Prep time: 8 Hours
    Cook time: 2 Minutes
    Total time: 8H2 Minutes


    INGREDIENTS


    • Good quality sona masoori Raw rice - 2 cups
    • Grated coconut - 1/4 cup
    • Water & salt - as needed ( i used nearly 4-5 cups of water)

    Side Dish - Coconut chutney

    • Grated coconut - 1/2 cup
    • Fried gram dal/Hurikadale/Pottukadalai - 1/4 cup
    • Green chillies - 5-6 nos 
    • Curry leaves - few ( optional)
    • Garlic cloves - 2nos ( optional)
    • Tamarind -a small pinch
    • Salt & water - as needed
    To temper
    • Cooking oil – 1 tsp
    • Mustard seeds – 1/2 tsp
    • Urad dal – 1/2 tsp
    • Curry leaves - few

    METHOD


    • Wash and soak the raw rice in enough water for 4-6 hours or over night. Drain all the water and grind it along with grated coconut and little salt.This dosa batter takes less salt so add it carefully. If you feel salt is less after grinding, you can add it later. But do not add more salt while grinding. First grind the rice & coconut to a coarse paste without adding water and then add 1 cup of water to  make a smooth paste.Wipe the sides & the jar while grinding. I used my bigger sized mixie jar to grind the batter.
    • Check the batter and grind it again adding required water till u get a very smooth paste without any grits. I used nearly 2 cups of water while grinding. Do not run the mixie for longer time. Give some time gap between successive grinding so that your jar won’t get heated up soon.
    Neer dosa step1
    • After grinding the batter smoothly,remove the batter in a bowl and wash the jar with 1/2 cup of clean water. Add this to the batter and check for its smoothness by taking the batter between your thumb finger & fore finger.It should be very smooth without any grits or rice particles. Then add more water( around 1.5-2 cups) to make a watery batter. Its consistency should be like low fat milk or buttermilk. So add water accordingly. Check for salt.
    • To check the right consistency of batter, dip the back of spoon into the batter. If the batter coats very lightly, it is correct. Else add little more water. U can also check its consistency by making a dosa. If dosa comes out very thick and if the batter doesn’t spread on its own, add more water. So you have to adjust the consistency only by some trial & error. After adding all the water, you may get around 6-7 cups of batter I guess.
    Neer dosa step2

    • To make dosas, a good conditioned non-stick dosa pan or frying pan with handle is needed. Heat the dosa pan well. Sprinkle few drops of water and if water droplets go off within few seconds, heat is just right. Then dip a cloth or tissue paper in oil and grease the pan well. Proper heating of pan and good greasing is very important. Keep the flame high.
    • Season/grease the pan and mix the batter thoroughly well every time before making dosa. Don’t forget !
    Neer dosa step3
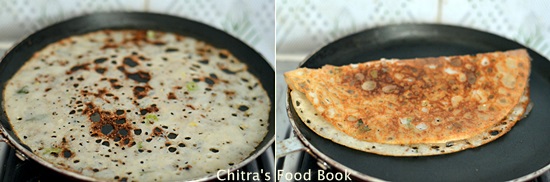
    • Now take 1/2 ladle of batter and pour it from 1/2 feet above the dosa pan. As soon as you pour the dosa batter using your right hand, the batter will spread on its own to some extent. Immediately swirl the dosa pan with your left hand and try to make it round. Fill the holes with little batter if you need.
    Neer dosa step4
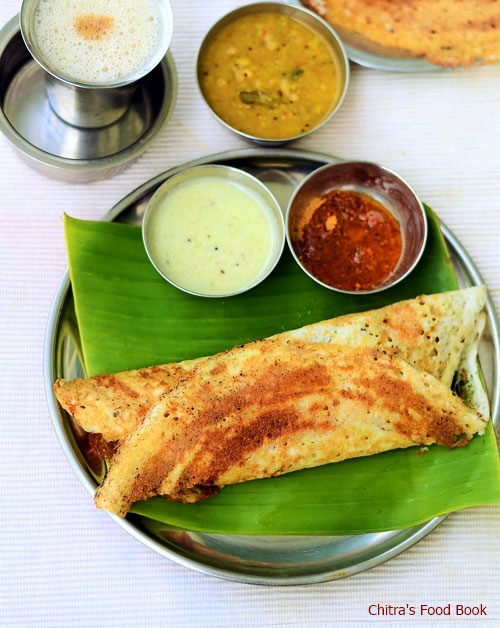
    • Now simmer the flame completely and close the dosa with a lid. Let it cook for 30 seconds. Then remove the lid and again cook in open pan for another 30 seconds. Sides of the dosa may lift slightly. That’s it. No need to flip the dosa and do not brown the dosa. It should be super white in color. Carefully fold the dosa into half and fold again to make a triangle shape. Serve with chutney or sagu !
    Neer dosa step5
    Neer dosa step6
    • For the next dosa, before pouring the batter,keep the flame high, grease the pan with oil, mix the batter thoroughly and then make dosa. Repeat this procedure till the end.
    • Do not stack the dosa one above the other when it is hot because they will stick to each other easily. Serve in two plates.
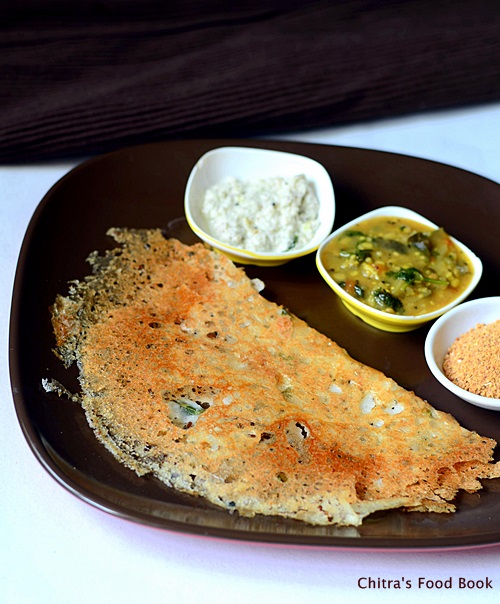
    • Grind all the ingredients given under " For coconut chutney" to a smooth paste. Adding garlic & curry leaves gives hotel taste. Use it as per your choice. Do the tempering & enjoy with neer dosa.

    Enjoy !

    Points to Note

    • The batter should be ground smooth. So add water accordingly. Choose a bigger sized jar if you are using mixie to grind the batter. U can use little more coconut if you want more flavourful dosa. But I was happy with this quantity. Adding more coconut makes the dosa too soft n it may break.
    • The consistency of batter should be very important. If its thick, dosa will crack. It should be thin like low fat milk or buttermilk. Even if it is slightly thick, you won’t get lacy dosas and your dosas wont be soft too.The batter should spread on its own till half of the pan as soon as you pour the batter. So adjust the consistency.
    • The temperature of dosa pan is very important. Do the water sprinkling test as I mentioned above before pouring the batter.
    • Season/grease the pan and mix the batter thoroughly well every time before making dosa.
    • If the pan is not heated properly, dosas will crack and it won’t spread on its own. So keep the flame high when you pour the batter. Pour the batter from 1/2 feet distant from the pan. Rotate/swirl the pan as soon as you pour the batter and make a round dosa. There will be holes on it. U can fill the bigger holes with batter if needed..
    • Cook the dosa in low flame with a lid for 30 seconds and without lid for 30 seconds. Do not brown the dosa. It should be white. No need to flip the dosa.
    • Do not stack the dosa one above the other when it is hot because they will stick to each other easily.
    TO SUM UP
    1. Rice should be soaked well for minimum of 4-6 hours to make a smooth batter. It should be ground well with coconut to a very smooth batter without any grits.
    2. The consistency of batter is very important. It should be watery like milk.
    3. Heat of the dosa pan is also very important here. It should be high but not smoky. Use a non-stick pan. Iron griddle wont be helpful.
    4. Season/grease the pan and mix the batter thoroughly well every time before making dosa.
    5. Do not cook the dosa in high flame, it should be cooked in very low flame for 1 minute to maintain its white color. This dosa cooks super fast. So remove after a minute without browning them.
    6. This dosa tastes great even after it cools down. So you can make it advance before serving. But you should not stack them one above the other when it is hot. They will stick to each other. Hence stack them after they are cooled down completely.

    Enjoy this super soft n lacy neer dosas with coconut chutney,onion tomato chutney OR vegetable sagu. Tastes great with anything and everything ! 
    Neer dosa recipe


    Continue Reading...


    October 28, 2014

    ADAI RECIPE-SOUTH INDIAN TIFFIN RECIPES


    adai recipe
    Adai is one of the most special & healthy breakfast/dinner recipes for South Indians especially for people in Tamil nadu & Kerala.Both mom & MIL usually make adai for dinner & especially for guests.Few years back i shared my mom’s crispy adai version.Today i have shared my MIL’s recipe here which she has been following for years.It comes out soft as well as crispy.Adai avial is the most famous combo everywhere.But i have not tasted it so far.We personally like adai with sugar & coconut chutney.Lets see how to make our family’s traditional adai recipe.
    adai

    Adai recipe


    Adai recipe Adai recipe - South indian breakfast recipe using rice & lentils
    Cuisine: Indian
    Category: Breakfast
    Serves: 15 nos
    Prep time: 2 Hours
    Cook time: 10 Minutes
    Total time: 2H10M


    INGREDIENTS

    • Boiled rice/Idli rice - 2 cups
    • Chana dal - 1/2 cup
    • Toor dal - 2 tbsp
    • Urad dal - 2 tbsp
    • Red chillies - 7-8 nos ( i used byadgi,if using spicy chillies add 5 nos)
    • Salt & water - as needed
    To add in the batter
    • Small onions - 20 nos
    • Curry leaves - 2 sprigs
    • Finely chopped ginger - 1 tsp
    • Finely chopped coconut bits - 1 tbsp ( optional)
    • Asafetida/Hing - 1/4 tsp
    METHOD

    • Wash and soak the rice for 2 hours.Wash & soak the dals together for 2 hours minimum.
    • While grinding,drain all the water.In a big mixie jar,take the red chillies,salt and hing.
    adai recipe 1
    • Grind it coarsely without adding water.Then add the drained rice and grind it like rava adding required water.Remove the batter.Add the drained dals and grind it coarsely adding less water.
    adai recipe 2
    • Remove and mix with rice batter.Add 1/4 tsp of hing.Mix well.Let the batter ferment for 3-4 hours as we want mild sourness.We usually soak rice n dal around 10 am & grind the batter at 12 pm.We make adai for dinner around 7 pm.So ferment the batter based on the weather in your place.U can also make this adai instantly without fermenting the batter if u don’t want sourness in the batter.

    adai recipe 3
    • Before making dosa,add finely chopped onions,ginger,coconut bits,curry leaves and mix well.Adjust the consistency of batter adding 1/4 cup of water if it is very thick.Heat dosa pan and pour a ladle ful of batter.Spread it & make it thick or thin as per your wish.I always make it thin as my family likes that way.After making dosa,keep the flame medium high and drizzle a tsp of oil over the adai.Close it with a lid & cook for a minute.Then flip the dosa,add little oil if necessary & cook for a minute again.
    adai recipe 4

    Remove the dosa and Enjoy with avial/sugar or coconut chutney !


    Note

    • For variations,u can add a tbsp of moong dal along with other dals.
    • To make crispy adai,grind the batter slightly coarse & make it thin adding little more water.
    • You can also add more toor dal to get crispier adai.


    adai-recipe-1

    Enjoy this healthy,yummy rice & lentil adai dosa with chutney & sugar.Sugar is my fav side dish for adai Winking smile
    adai-with-sugar


    Continue Reading...