Search Chitra's Food Book

Showing posts with label KIDS RECIPES. Show all posts

May 12, 2017

Mango Frooti Recipe – How To Make Frooti At Home

Mango frooti recipe
Homemade mango frooti recipe with video and step by step pictures. Frooti is my most favorite mango drink since childhood. I guess most of you are like me. On those days, for any small functions at home like birthday party or guest visits, Frooti bottle makes its presence without fail. My mom used to serve it as a welcome drink. Even though there are many soft drinks available in the market, the craze for this store bought mango drinks like Frooti, Maaza or Slice never goes away. But once my family had a bad experience after drinking Frooti in a tetra pack. It must be an old stock I guess. So we stopped buying it and started running miles away whenever I see it in functions or parties. I restrict Raksha & Sendhil too. 

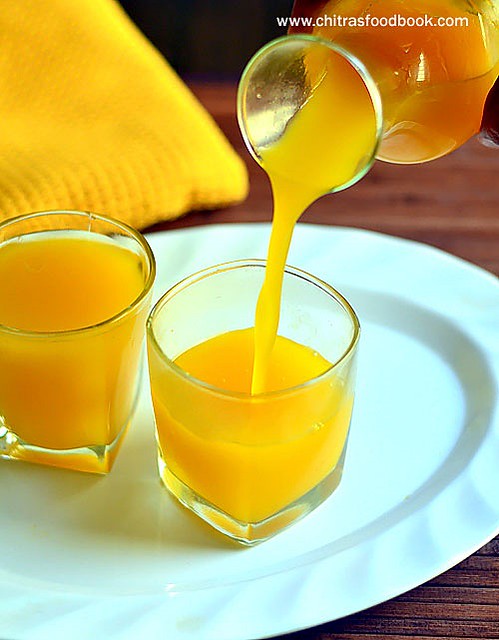
Last week I bought few alphonso mangoes and a raw mango to try some interesting recipes with it. When I was browsing for it, I saw few homemade Frooti recipe. I never imagined Frooti making process at home would be so easy with very less ingredients and that too without any preservatives. What else I need to try this !. I became very happy and tried it immediately with an over ripen mango which I wanted to finish off. This juice came out yummilicious in taste. It tasted very close to Frooti, Maaza or any store bought mango drink. 

Sendhil & Raksha loved it and gave a big thumbs up. You can make this as concentrate, refrigerate & store it, add ice cold water to dilute it and drink chilled anytime.The best part is we didn’t get any stomach pain, loose stools, cold/throat infection or fever.

 As everyone says, homemade is always the best !! Now I don’t have to buy the highly priced mango drink from shops anymore. I have tried this drink thrice so far with different mangoes and observed few points.

To make a perfect homemade Frooti recipe, you must follow this.

1. Use only Alphonso mangoes. It works the best ! Taste differs for Badami, malgova or Banganapalli mangoes. 2. Mango should be over ripen. Make sure it doesn’t have sour taste. You can clear off the over ripen ( about to decay) mangoes by making this drink. 3. The ratio of ripe mango & raw mango should be 2:1 based on the size of raw mango. Raw mango is just to give mild tanginess. 4. Quantity of sugar differs as per the sweetness of mango. 5. Color of the juice also varies based on the color of mango.

Now I can confidently prepare this mango juice for my guests.  You too try this recipe in this summer vacation for your kids and family. I am sure your kids will sing  “ Mango Frooti Fresh and Juicy”.

Ok, Lets see how to make Homemade mango Frooti recipe with step by step pictures and a video !


Mango Frooti Recipe

Homemade Mango Frooti Recipe - How to make Frooti drink at home


Homemade Mango Frooti Recipe - How to make Frooti drink at home Mango Frooti Recipe - How to make mango frooti drink at home without any preservatives and very less ingredients !
Cuisine: Indian
Category: Drinks
Serves: 4 glasses
Prep time: 10 Minutes
Cook time: 20 Minutes
Total time: 30 Minutes


INGREDIENTS
1 cup - 250ml
  • Over ripen Alphonso mango - 1 no  (1 cup chopped)
  • Raw mango - 1/2 no (If small sized mango or 1/4 part of big mango) (1/2 cup chopped) 
  • Sugar - 1/4 to 1/2 cup (Adjust)
  • Water - 3 to 4 cups
  • Ice cubes – while serving
METHOD

  • Wash and peel the skin of raw mango & ripe mango. Chop into pieces.
    Homemade Frooti Recipe
  • In a pressure cooker, take the chopped mango pieces, add 1/3 cup sugar and 2 cups of water ( If you want to make thick concentrate, add 1 cup of  water). Pressure cook in very low flame for 2 whistles or till mango cooks soft.
    Homemade Frooti Recipe
    Homemade Frooti Recipe
  • Open the cooker after the steam is released.Strain it and filter the cooked water. Keep it aside till use.

    Homemade Frooti Recipe 
  • Grind the cooked mango to a pulp without adding water. Mix this pulp with the cooked mango water. Mix well and strain it again to remove the fiber part of mango. Discard the fiber part.
    Homemade Frooti Recipe - How to make mango frooti at home
    Homemade Frooti Recipe
  • Mix the mango juice well and check for taste and thickness. If you want to store as concentrate, pour in a glass bottle and refrigerate it. If serving immediately, add 1/2 to 1 cup water and adjust the consistency. If sugar is less, add little more sugar and mix well. Refrigerate for 3-4 hours till chilled.
    Homemade Frooti Recipe -How to make mango frooti at home
  • Put some ice cubes in a glass and pour the drink. Serve immediately ! This drink stays good for 3 days if refrigerated !

    Enjoy !
Note
  • Use over ripen alphonso mango for best taste.
  • Adjust the quantity of sugar and water as per taste and desired consistency.
  • Some recipes suggested equal quantity of ripe mango and raw mango. But I feel 2:1 ratio would be fine.

Enjoy yummy, juicy homemade Mango Frooti !
Continue Reading...


May 9, 2017

Simple Potato Poriyal Recipe – Boiled Potato Curry For Rice - Urulai Kizhangu Poriyal

Potato poriyal
Potato curry ( Urulai Kizhangu poriyal in Tamil) is known to be one of the best side dish recipes for sambar rice, rasam rice, Dal rice or even curd rice for many South Indians. Sometimes I love to have it rolled in chapathi as its a dry curry.Indian style potato roast or potato fry ( Aloo curry in Hindi) can be done in ‘N’ number of ways. People prepare it with their own variations and style. Most of us have adopted our mom’s recipe when we were beginners in cooking. Yes, I too learnt this way of making boiled potato curry from my mom. She makes it for rasam rice. Every Thursday Dal/Paruppu,Tamarind pachadi/ Puli pachadi, Rasam, Potato curry and Papad would be our lunch menu before my marriageWinking
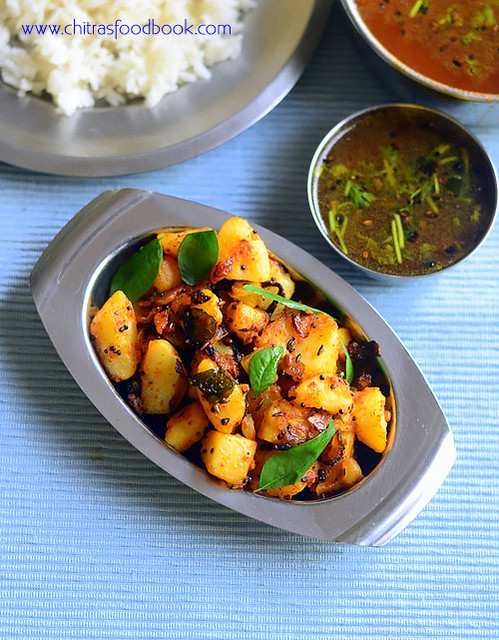
. But amma makes spicy potato curry whereas I prepare a less spicy version. So adjust the quantity of chilli powder according to your taste.  In most of our houses, potato curry makes it appearance once in a week at least for our kids sake as this would be the favorite side dish for many. In my house too, I make this potato poriyal mainly for Raksha’s lunch box as she loves to take it without any complaints and brings back empty lunch box in the eveningHappy.So I pack Dal rice( Paruppu sadham) and Potato curry (Urulai kizhangu poriyal in Tamil) at least once in a week for her lunch box.Its also an easy side dish to prepare during busy morning hours.When you have boiled potato ready in hand, this poriyal can be done under 10 minutes.I am sure bachelors and working women find this recipe useful. Do try this easy and simple boiled potato fry and let me know your feedbackHappy. I love it with Sambar & Rasam sadam. Lets see how to prepare South Indian style Potato poriyal with step by step pictures and a video !
Check out my MIL’s Potato poriyal version which I make it specially for my guests Winking.Also check out my no onion no garlic Brahmin style potato curry !

Continue Reading...


April 18, 2017

Elai Vadam Recipe – Ilai Vadam – Easy Rice Appalam In Banana Leaf

Elai vadam
Elai Vadam / Exhibition appalam – Rice papad / Arisi appalam made in banana leaf ( Vazhai ilai) was in my try list for the past few years. Whenever my fellow bloggers post this elai vadam recipe, I get tempted to try but I never got the confidence to try on my own. Recently my MIL prepared this ilai vadam using idli rice after watching Revathy Shanmugam mam’s cookery show in Jaya TV. Last week when she came to Bangalore, she brought some vadam to taste. She said its a time consuming process but the end result is worthy.Its taste reminded Delhi appalam we get in exhibition.We had this rice papad sprinkled with red chilli powder and we loved it very much.  

My MIL told me the tradition behind this appalam making process.On those days, people in Tamilnadu villages used to make this rice vadam using Vadham ilai or Poovarasan ilai. This vadam is usually given for ladies after delivery ( Postpartum diet) as urad dal papad creates gas problem.This vadam is roasted in direct fire ( Sutta appalam) instead of deep frying in oil as deep frying makes it difficult to digest.The best thing about this vadam is it dries up quickly even under the shade. It takes one to two days to get ready based on the weather in your place. Overnight drying under the fan would be enough. I felt this vadam is ideal for places where there is lack of sunlight. 

With the help of my MIL, I prepared this easy arisi appalam in Bangalore using raw rice. This vadam can be prepared with raw rice, idli rice or both in equal quantity. If you make it with raw rice, vadam comes out super light, airy and crispy whereas vadam made with idli rice comes out crunchy and very flavorful like store bought arisi appalam but slightly dense in texture. 

In that case, you can add little sago( javvarisi) to bring the light texture. As I have thatte idli stand, this vadam process was completed within one hour. If you don’t have this plate it may take more time. You can buy thatte idli stand or elai vadam stand in the market if you are really interested to try this one. Now lets see how to make elai vadam recipe with step by step pictures and VIDEO !

Delhi appalam

Elai vadam recipe- Ilai vadam - Easy rice appalam in banana leaf


Elai vadam recipe- Ilai vadam - Easy rice appalam in banana leaf How to make elai vadam - Easy rice appalam n banana leaf - Summer special recipes
Cuisine: South Indian
Category: Snacks
Serves: 24 
Prep time: 120 Minutes
Cook time: 60 Minutes
Total time: 180 Minutes


INGREDIENTS
1 cup - 250ml
  • Raw rice - 1 cup ( I used Maavu arisi/dosa rice)
  • Salt - as needed
  • Cumin seeds - 1/2 tsp
  • Water - As needed (I used 1/2 cup for grinding, 3/4 cup for mixing)
HOW TO MAKE ILAI VADAM / RICE APPALAM - METHOD

  • Wash and soak the raw rice in enough water for 2 hours. Drain the excess soaked water completely and grind the rice coarsely without adding water. Then wipe the sides and add 1/2 cup water, required salt. Grind to smooth paste like maida. Please note there should not be any grits in the batter. It should be completely smooth. So grind patiently for long time. I used my Indian mixie for grinding the batter and it took 5 minutes. Grind in two batches.
    Elai vadam
    Elai vadam
  • Remove the batter in a bowl.Add cumin seeds. The consistency of batter should be slightly thinner than dosa batter.
  • Now take a banana leaf and spread the leaf inside the plate according to its shape.Add 1/2 ladle of batter and swirl the plate. Batter spreads all over the plate. If you don’t have banana leaf, just spread the batter directly in the plate & swirl/rotate it.It also works but its difficult to peel once its cooked. If you have 3 plate or 6 plate ilai vadam stand, follow the same and spread the batter in all the plates.
    Elai vadam
    Elai vadam
  • Heat water in an idli pot. When the water comes to roll boil, place the idli plate. Let it steam for 5 minutes. The color of batter changes to pale white & transparent after cooking. Remove the leaf from the plate and let it become warm. Peel the cooked vadam and spread in a cotton cloth( Dhoti) or in a polythene sheet. Do not put in newspaper. It will stick with it.
     Elai vadam
    Elai vadam
  • Let it dry in balcony or under the sun for one day. If you don’t have this option, dry it under the fan wind. When it dries up, it shrinks in size & changes in color slightly.
    After one day drying, it would have dried up to 75%. During night, keep it under the fan. If its crispy all over, its ready. If its soft in the middle, it needs more time to dry. So the next day, keep it under the sun & repeat the same till its completely moisture free. Store it in a box & use it for months. Stays good even for an year if prepared properly.
    Elai vadam
  • Heat required oil in a kadai to deep fry. Break the vadam into half & deep fry in oil. Flip & cook both the sides. Remove & drain in a tissue. Sprinkle red chilli powder on top & serve as an evening snack or with any variety rice !
    Elai vadam
Enjoy !

Note
  • The consistency of batter is very important. Do not make it too watery or thick.
  • You can make this vadam with idli rice instead of raw rice.
  • Steaming takes maximum 5 minutes.
  • Try to peel the vadam after its cooled down.
  • If the vadam turns golden brown after frying, it may be due to the quality of rice. In that case, you can try adding few drops of lemon juice in the batter and make it next time. 
ilai vadam
Enjoy this crispy, yummy arisi appalam with rice or as an evening snack !
Easy arisi appalam
Continue Reading...


April 4, 2017

Pazham Pori Recipe – Ethakka Appam - Kerala Nendram Pazham Bajji

Pazham Pori recipe
Pazham pori @ Ethakka appam – Kerala special Nendram pazham bajji ( Ripe banana fritters in English) was in my try list for years. Crispy and hot Pazham pori with tea/Chai is one of the most popular and classic combo in Kerala. People love to have this pazham pori with hot tea as an evening snack. I have tasted this bajji only once in Bangalore - Ernakulum intercity express train pantry car. I loved it very much and I decided to blog this recipe at that instance. But I couldn’t find nendram pazham/etha pazham in my area. 

Recently I got few ripen nendram pazham from my neighbor. My neighbors from Kerala used to buy this nendram pazham regularly and feed their toddlers for breakfast as it has lots of health benefits. As soon as I got the ripen banana, this pazham pori recipe flashed in my mind. I browsed for few recipes and videos to make a crispy pazham pori just like the ones I tasted in train. I came across many pazham pori recipes with eggs, besan flour and even with wheat flour. But I wanted to try the traditional, authentic ones with Maida and rice flour.

Finally I got this recipe from my neighbor and tried it for our evening snacks. This sweet bajji is of my kind. I loved it a lot more than Raksha & Sendhil. We are planning to visit Kerala during this summer vacation. I have a big list of dishes to taste in Kerala hotels. This pazham pori is also one among them. I will try to update this post and share a picture in my Instagram feed from Kerala tea shop. Now lets see how to make Kerala special Pazham pori recipe with step by step pictures and video !


Kerala Pazham pori

Pazham Pori Recipe - Kerala Ethakka Appam


Pazham Pori Recipe - Kerala Ethakka Appam Pazham Pori Recipe - Kerala Ethakka Appam - Kerala Nendram Pazham Bajji Recipe
Cuisine: Kerala
Category: Snacks
Serves: 12 nos
Prep time: 10 Minutes
Cook time: 5 Minutes
Total time: 15 Minutes


INGREDIENTS
1 cup - 250ml
  • Nendram banana / Kerala ripen banana - 3 to 4 nos
  • Maida / All purpose flour – 1 cup
  • Rice flour – 3 tbsp
  • Sugar – 1 to 2 tbsp ( based on the sweetness of banana)
  • Turmeric powder – 1/8 tsp
  • Cooking Soda – a pinch (optional)
  • Jeera / Cumin seeds – 1/4 tsp
  • Crushed Cardamom seeds – 1 no ( optional)
  • Water – 1 cup ( approx)
  • Cooking oil or coconut oil - to deep fry
HOW TO MAKE PAZHAM PORI - METHOD

  • Take the ripen banana and peel the skin. Cut into long, thin or thick strips as you wish. Set aside. Taste a small piece of banana to know the sweetness. Mine looked over ripen and black as u see in the picture. But It was mildly sweet. So I had to add more sugar in the batter. The quantity of sugar in the batter depends on the sweetness of banana.
    Pazham pori recipe
  • In a wide bowl,take the maida, rice flour, sugar, turmeric powder, cumin seeds, cardamom powder and a small pinch of cooking soda.  Adding soda is optional. Mix well.
    Pazham pori recipe
  • Add water little by little and make a smooth, lump free batter. Batter should not be too thin or too thick. Its consistency should be like bajji batter.It should fall like a thin ribbon. Batter should coat the banana well. So make it accordingly. Please watch the video for reference. I used approx 1 to 1.25 cups of water.
    Pazham pori recipe
  • Heat oil in a kadai and when it gets heated ,drop a pinch of batter to check oil temperature. If it rises to the top immediately, oil heat is just right.
  • Now take one banana strip and coat well on both the sides in the batter. Drop in hot oil. Deep fry 2-3 pazham pori for one batch. Flip & Cook in medium flame on fry both the sides till golden. Remove in a tissue paper. Serve hot  to enjoy its best taste.Tea with pazham pori is a classic combo in Kerala. You too give a try and enjoy !
    Pazham pori recipe
    Pazham pori recipe

Note
  • Rice flour is not used in many recipes. But I added it to make crispy pazham pori.
  • Cardamom powder is also optional. If you want the flavor of banana to be dominant, skip it.
  • Adjust the quantity of sugar based on the sweetness of banana.
  • Adding cooking soda is optional. If you don’t add pazham pori looks flat and thin. But mine looked slightly bulgy because of soda. Its your choice of how you want it.

Try this Kerala special snack – Pazham pori at home for your tea time  and enjoy !!
Kerala Nendram pazham bajji - ethakka appam
Continue Reading...


April 1, 2017

Indian Style Tomato Spaghetti Recipe – Vegetarian Spaghetti Recipe With Video

Indian vegetarian spaghetti recipe
This is my second post on vegetarian spaghetti recipe. I started trying out spaghetti based recipes recently and my first recipe was easy garlic spaghetti. We loved that a lot. So Raksha & Sendhil asked me to try some varieties of spaghetti recipes for breakfast. Last Sunday I made this easy, Indian style tomato spaghetti recipe with very simple ingredients. I browsed many vegetarian spaghetti recipes and tried it finally with my own twist. It came out really well and we all loved it. 

Raksha took 2 servings which made me very happy. For Raksha, I used red chilli flakes, pepper powder in little quantity for less spicy taste and added more cheese whereas for myself & Sendhil, I added more spices, used Italian seasoning and made it without cheese. It was tasting great and packed with full flavor. 

Friends, do try this easy, yummy tomato spaghetti recipe for your kids and family.Adjust the spice level based on their taste buds. I am sure they will love it. Lets see how to make this easy, Indian vegetarian tomato spaghetti recipe with step by step photos and video !


Indian spaghetti recipe

Tomato spaghetti recipe - Indian vegetarian spaghetti recipe


Tomato spaghetti recipe - Indian vegetarian spaghetti recipe Easy tomato spaghetti recipe - Indian vegetarian style recipe for breakfast & dinner !
Cuisine: Indian
Category: Spaghetti recipes
Serves: 3
Prep time: 20 Minutes
Cook time: 15 Minutes
Total time: 35 Minutes


INGREDIENTS
1 cup - 250ml
  • Spaghetti -  150 gms
  • Water - 8 cups
  • Cooking oil - 1 tsp
  • Salt - 1 tsp
To Saute
  • Cooking oil or olive oil - 2 tbsp
  • Garlic cloves - 7 nos ( Finely chopped)
  • Big onion – 2 nos ( Finely chopped)
  • Grated Cheese – 2 tbsp ( I used Mozzarella)
  • Capsicum - 2 tbsp ( Finely chopped)
  • Ripe Tomato - 5 nos ( small)
  • Red chilli flakes - 1 tsp
  • Pepper powder - 1 tsp
  • Salt & water - as needed
  • Italian seasoning - 1 tsp ( optional)
  • Sugar - 1/2 tsp
METHOD


  • Boil 8 cups of water in a wide bowl. Add 1 tsp of cooking oil or olive oil, add 1 tsp salt. Put the spaghetti and let it cook till half done. Now add the whole tomato in spaghetti water and let it cook. Remove the tomato to a plate after its skin gets cracked ( blanched) .
  • But keep cooking the spaghetti in medium flame for 20 minutes till it turns soft yet firm. i.e Cook Al dente.  If you cover & cook, water may spill. So cook it in medium flame till 3/4 th of the water is absorbed.Then cover & cook for 10 minutes to become soft. Take one spaghetti and check it. Break it with your fingers. Taste one. If  its soft and slightly chewy,  spaghetti is done.  Please check THIS LINK for cooking spaghetti in detail !
    Tomato spaghetti recipe - Indian vegetarianTomato spaghetti recipe - Indian vegetarian
    Tomato spaghetti recipe - Indian vegetarian
  • Peel the skin of tomato and grind it to a puree. Set aside.Transfer the cooked spaghetti to a colander and drain the excess water. Wash the spaghetti in the running tap water so that it remains firm. Keep aside.
      Tomato spaghetti recipe - Indian vegetarian
  • Heat oil in a kadai and saute the finely chopped garlic cloves. When it starts to turn golden, add the finely chopped onion and capsicum. Saute till onion turns transparent.
    Tomato spaghetti recipe - Indian vegetarian
  • Now add the tomato puree, salt,  red chilli flakes, pepper powder , sugar and Italian seasoning ( If  using). Mix for a minute and then add the cooked spaghetti. Toss well till the spaghetti is evenly coated with the sauce.Switch off the flame and add the grated cheese. Mix well, remove and serve hot !
    Tomato spaghetti recipe - Indian vegetarianTomato spaghetti recipe - Indian vegetarian
      Enjoy !

    • Note
      • Spaghetti takes more time to cook. It took nearly 25 minutes in medium to high flame. I covered & cooked it for the last 5 minutes.
      • Washing the cooked spaghetti in running water helps to keep the spaghetti stay firm.
      • You can cook the spaghetti and keep in advance if making for guests or parties.
      • You can add canned tomato puree too.
      • Adding Italian seasoning is purely optional. But it gives a nice flavor to the dish.
      • If you have fresh or dried basil, you can add that too.
      Try this yummy, tomato spaghetti recipe at home for breakfast/dinner !
      Indian vegetarian spaghetti recipe
      Continue Reading...


      March 30, 2017

      Paneer Puri Recipe – Stuffed Paneer Poori - Poori Varieties

      Paneer poori recipe
      During weekends, I am making varieties of poori for our breakfast and I have been sharing the same in my blog. Last Sunday I prepared this paneer poori (Indian cottage cheese in English) for our breakfast with the leftover paneer cubes. Its a stuffed paneer puri recipe. So you just have to add grated paneer to the wheat flour and make dough with it. Its so simple. 

      When I was searching for different types of puri recipes, I saw this one in Ramki’s one page cookbook. I liked the idea of paneer stuffed poori and tried this recipe in my own way. It came out really well, puffy and soft. Even though it tastes like masala poori, Paneer gives an additional softness to it and make it healthy too. Semolina/ Rava helps to keep the poori puffy and hold its shape for long time. So kids would love it for sure. 

      Do try this different type of poori during this vacation for your kids and family. Enjoy the breakfast ! I made masala raita and onion masala as side dish for this poori. It was a good combination. You can make tomato bhaji, potato masala or even chana masala as a side dish.  Ok, Lets see how to make yummy, soft paneer poori with step by step photos and a video !


      Paneer puri

      Paneer Poori Recipe - Poori varieties


      Paneer Poori Recipe - Poori varieties How to make masala poori with paneer - Paneer puri recipe
      Cuisine: Indian
      Category: Paneer Recipes
      Serves: 12 nos
      Prep time: 10 Minutes
      Cook time: 2 Minutes
      Total time: 12 Minutes


      INGREDIENTS
      1 cup - 250ml
      • Grated paneer - 3/4 cup
      • Atta/Whole wheat flour - 1.5 cups
      • Besan flour - 1 tbsp
      • Rava/Semolina - 1 tsp
      • Red chilli powder - 1 tsp
      • Garam masala powder - 1 tsp
      • Ajwain or cumin seeds - 1/2tsp
      • Coriander leaves - 1 tbsp( finely chopped, optional)
      • Salt & water - as needed
      • Cooking oil - to deep fry
      HOW TO MAKE PANEER PURI - METHOD

      • Grate the paneer using a grater and measure 3/4 cup from it. Keep it aside.
      • In a wide bowl or plate, take the wheat flour, besan flour, rava, salt, red chilli powder, garam masala powder, ajwain/Omam OR cumin seeds and grated paneer. Mix everything well without adding water. Mixture looks crumbly.
        Paneer poori recipe
      • Now add water gradually and make a smooth dough. Dough should not be too hard or too sticky. Knead it for 5 minutes. Make poori immediately. Keep the remaining dough covered while rolling the poori. Take a portion of dough and make uniform sized balls.
        Paneer poori recipe
      • Dust the ball in wheat flour and roll into small thick poori. Remember thin poori won’t puff up. So roll it thick. Refer picture below for thickness. 
        Paneer poori
        Paneer poori
      • Heat oil in a kadai to deep fry. Check its temperature by dropping a pinch of dough. If it rises to the top immediately, oil heat is just right. If the heat of oil is less, poori won’t puff up. So check it before deep frying. Reduce the flame to medium and take one rolled poori. Pat it between your palm to remove the excess flour.  Drop the poori in oil. When it starts to come up, press the poori with a ladle gently. It puffs up well. Now flip the poori and cook for a minute till bubbles cease. Remove & drain in a tissue paper. Serve hot with masala raita and some bhaji/Poori masala.
      • TIPS:  Increase the flame to high till you drop the next poori. Reduce the flame to medium as soon as u drop it. You can follow this to maintain the heat throughout deep frying. If oil becomes smoky hot, switch off the flame for few minutes. After the oil comes to desired temperature, fry the poori.
        Paneer poori
      Enjoy !


      Note

      • Do not make the dough too sticky or soft. No need to rest the dough. Make poori immediately to prevent oil absorption.
      • Thickness of poori is very important to puff up. So roll it small and thick.
      • Heat of oil is also an important factor for puffy poori. Check its temperature.
      • Oil should not be smoky hot.
      Try this yummy paneer poori at home for your weekend breakfast and enjoy !
      stuffed paneer poori recipe
      Continue Reading...