Bitter gourd biryani/Pavakkai masala rice -Yeah, you heard it right. Its an easy, yummy biryani recipe using bitter gourd. If you love bitter gourd like me, you must try this rice. It tastes super flavorful with mild bitter taste. When I was looking for this week’s Sunday Biryani Recipes, my MIL suggested me to try this biryani by reading this recipe from a Tamil Magazine.
Initially I was hesitant to try this worrying about its bitter taste but she also told suggested me a method to remove its bitterness. So I tried it confidently & the result was unbelievably great with a very mild bitter taste only in pavakkai pieces and not in rice at all. Raksha took two servings of this rice without knowing it had pavakkai.
U can make it very easily in busy morning hours as it has no grinding job and pack it for your lunch box too. But soak the bitter gourd pieces in curd+salt mixture and refrigerate it overnight so that you can prepare this biryani instantly in the morning. You can also use vinegar as suggested in the original recipe. But squeeze and rinse the bitter gourd thoroughly to remove vinegar smell.
Bachelors & working women can try this biryani if you love bitter gourd recipes. Try and share your feedack with me. Lets see how to make this yummy bitter gourd biryani.
Bitter gourd biryani recipe
Bitter gourd biryani/Pavakkai Masala rice- Easy n delicious rice variety
Cuisine:Indian
Category:Lunch
Serves:2
Prep time:30 Minutes
Cook time:15 Minutes
Total time:45 Minutes
INGREDIENTS
Basmati rice - 1 cup
Milk - 1 cup
Water - 0.75 cups
Salt - as needed
Oil - 1 drop
To soak for 30 minutes ( helps to remove bitterness)
Bittergourd – 1 no ( medium size)
Sour curd – 1/2 cup
Salt – little(u can use vinegar in place of curd)
To saute
Cooking oil - 1.5 tbsp
Cinnamon - 1 inch piece
Cloves - 3nos
Biryani leaf- 1 no
Kalpasi/Black stone flower - 1 no
Big onion - 1 no ( sliced)
Turmeric powder - 1/4 tsp
Red chilli powder - 1 tsp ( use more for extra spicy taste)
Wash and slice the bitter gourd pieces thinly as possible. Remove the seeds if any OR If you like the crunchy taste of seeds,retain it. Take half cup of sour curd. Add some salt, mix well and soak bittergourd for 30 minutes. Similarly wash and soak the basmati rice in water for minimum 30 minutes. Chop the onions,coriander & mint leaves and set aside.
After 30 minutes, squeeze the bitter gourd pieces very well using your hands and discard the curd mixture. Take the bitter gourd pieces alone in a plate.
Heat oil in a pressure cooker base and put the cinnamon, cloves, biryani leaf, kalpasi. Add onions and saute for a minute and then add the ginger, garlic paste.
Mix well for few seconds and add the mint+coriander leaves. Mix it. Now add the turmeric powder & red chilli powder, salt. Lastly add the squeezed bitter gourd pieces and saute well for a minute till it shrinks a bit. Add little more oil if needed.
Now add the soaked basmati rice without water. Add 1 cup of milk and 0.75 cups of water. Add 1/2 tbsp of ghee & 2 tsp of lemon juice in water. Check for salt & spiciness.
Pressure cook in low flame till one whistle. It takes 8-10 minutes. Remove & fluff with a fork after the steam is released. Serve it hot with onion raita.
Enjoy !
Note
Add more chilli powder if you want extra spicy taste.The quantity I have mentioned here would be just right.
U can also add 1/2 tsp of biryani masala powder or garam masala powder for more spicy flavor.
I have used milk + Water. U can also use coconut milk for more richness.
Do not skip mint & coriander leaves as they lend a special fragrance.
I din’t use biryani leaf here.
I used freshly ground ginger, garlic paste. U can use store bought too.
Soak basmati rice for minimum 30 minutes to get lengthy rice after cooking.
Try this unique and healthy bitter gourd biryani. It tastes yum with simple onion raita !
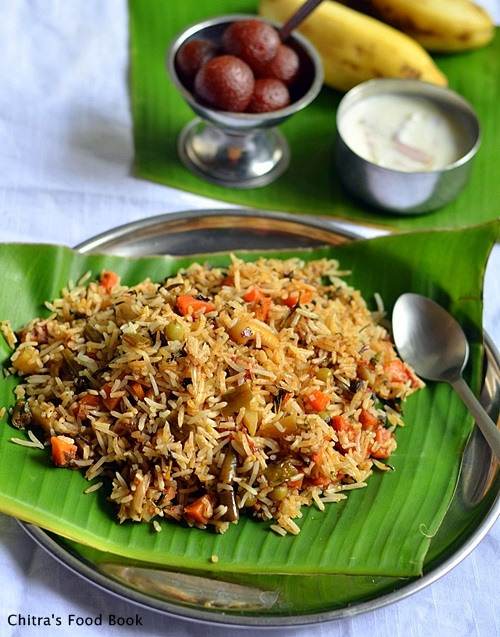
Sorry friends.I was not able to post this recipe last Sunday as I travelled to Palani, Tamil nadu. It was an unexpected trip. So I am posting this yummy Kerala style Vegetable layered biryani recipe for this week’s Sunday Lunch Recipes series-5.
Generally Kerala biryani / Malabar biryani is mostly done with chicken or mutton. But when I saw this Kerala style veg biryani recipe in this and this blogs, I became very happy and bookmarked them immediately. I was expecting coconut in the recipe but to my surprise the recipe and making is very similar to Hyderabad DUM biryani sans saffron. I just combined both the blog recipes and it came out awesome. I was happy with this Kerala style Veg DUM biryani recipe. Everyone loved its taste & flavor.
If you don’t want to follow DUM method, you can make it simple by just sauting everything in cooker base as we do for our normal biryani. I had tried this in either ways. It tastes good. So try this biryani for your family, friends & relatives and take the credits!! Lets see how to make this Kerala Vegetable biryani recipe !
Kerala vegetable biryani - Malabar style
Malabar style vegetable biryani - Kerala Veg biryani recipe
Cuisine:Indian
Category:Lunch
Serves:3
Prep time:60 Minutes
Cook time:20 Minutes
Total time:80 Minutes
INGREDIENTS
Basmati rice - 1 Cup (I used India gate)
Cloves – 3 nos
Cinnamon – 1 inch piece
Cardamom – 2 nos
Water – 1.5 cups
Ghee – 1 tsp
For Gravy
Ghee – 3 tbsp (OR use oil + ghee in equal measure)
Bayleaf – 1 no
Kalpasi/Black stone flower – 2 nos
Big onion - 2 nos
Ginger & Garlic Paste – 2tsp
Green chilli paste – 1 tsp( grind 3-4 nos)
Tomato – 1 no ( finely chopped)
Garam masala powder or Biryani masala powder - 1/2 tbsp
Chilli powder/Pepper powder – 1/2 tsp ( optional)
Yogurt - 2 tbsp
Mixed vegetables - 1/2 cup ( 1 carrot, 5 beans, handful of peas, 1 big potato)
To roast & garnish
Ghee- 1 tbsp
Big onion - 1 no
Cashews - few
Coriander & mint leaves – few
Lemon juice – as needed
HOW TO MAKE KERALA VEG BIRYANI - METHOD
Wash and soak the basmati rice for 30 minutes to 1 hour. Cook the rice in a pot or kadai adding 1.5 cups of water by adding cinnamon, cardamom, cloves. Cover cook in medium flame till rice is cooked 3/4th. Remove the rice once all the water is absorbed by it. Spread it in a plate and fluff it with a fork. Set aside.
Wash and chop all the vegetables.
In a pressure cooker base, heat ghee, saute bayleaf and kalpasi. Add the gg paste and green chilli paste. Saute till raw smell emanates completely. Now add the onion slices.
Now add the finely chopped tomato pieces. Saute till it turns mushy. Now add the garam masala or biryani masala powder. Mix well. Check for taste and add chilli powder or pepper powder if needed. Lastly add the vegetables, salt and curd. Mix well. Add little water(say 1/2 cup) & pressure cook in high flame for one whistle.( Do not over cook the veggies.One whistle in high flame would do).
After the steam is released, open the cooker & mix the masala. Make sure the masala is not too dry. If it looks dry, add 1/4 cup of water, give a boil & make it wet with some moisture content.
Heat 1 tbsp of ghee in a kadai & roast onions & cashews till golden brown. Set aside.
HOW TO LAYER THE RICE FOR BIRYANI : Now take a kadai or a pot with flat bottom. Spread one layer of rice & sprinkle few drops of lemon juice. Now spread a layer of cooked vegetable masala over the rice. Sprinkle some finely chopped mint and coriander leaves. Again spread the rice, then masala and mint leaves. Repeat the same until all the rice and masala are over. Lastly add the fried onions, cashews. Cover the kadai with a suitable tight flat lid.
HOW TO PUT IN DUM : Heat a dosa pan in high flame for 3 minutes & after the pan is heated well, simmer the flame completely. Keep the biryani pot/Kadai. Boil water in a bowl and keep the boiled water above the biryani pot/kadai. Let it sit for 10 minutes in very low flame.
If you feel, vapour comes out of the kadai, wrap the mouth of kadai/Pot with thermal foil before you put in dum. If you have a tight lid, then you don’t have to wrap the pan. After 10 minutes, remove the pan and fluff the rice with a fork. Serve hot with raita.
Enjoy !
Note
Adjust the quantity of spices as per your taste.
U can also add saffron soaked milk while layering.
U can put the dum using pressure cooker but keep the cooker directly over very low flame for 5-10 minutes.
Have this yummy Kerala Malabar Vegetable biryani recipe. I served it with onion raita and made Gulab Jamun for dessert !
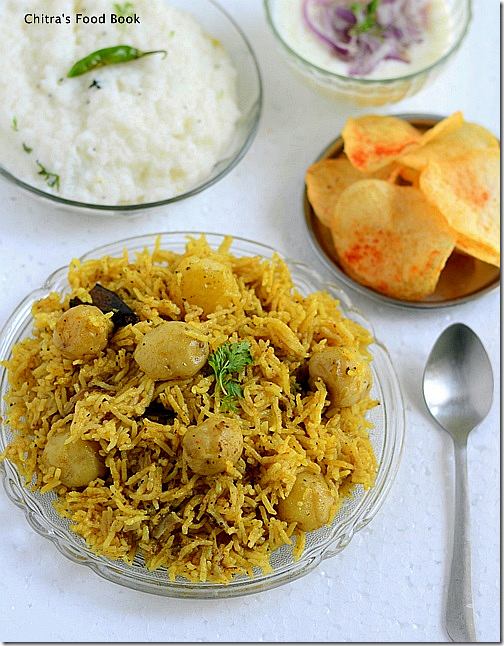
Actually i wanted to try some Chettinad biryani recipe for Sunday's lunch recipes & browsed for Anjappar Hotel style biryani to try with vegetables.But ended up making this chettinad baby potato/Kutti Urulai kilangu(in Tamil) biryani recipe.This is the first time i made a biryani using baby potatoes.I referred Jeyashri’s blog for the recipe but modified it slightly to suit our taste buds.I am very happy & completely satisfied with its flavor & taste.Now i can confidently try this recipe for my guests too.Lets see how to make this yummy potato biryani recipe in my Sunday Special Lunch Recipes Series-4.
Baby Potato Biryani Recipe
Baby Potato Biryani Recipe - Chettinad style
Cuisine:Indian
Category:Lunch
Serves:Serves 3
Prep time:60 Minutes
Cook time:15 Minutes
Total time:75 Minutes
INGREDIENTS
Basmati rice - 1 cup ( I used India Gate)
Water - 1.5 cups(I used 1.75 cups )
Salt - as needed
To grind & Marinate
Boiled & Peeled Baby potatoes/small potato - 15 nos
Cooking oil - 1 tsp
Big onion - 1no
Green chillies - 3 nos
Mint leaves - 1/4 cup
Curd/Yogurt - 1tbsp
Cashewnuts - 5 nos
Soambu/Fennel seeds - 1/2 tsp
Ginger - 1 inch piece
Garlic cloves - 5 nos
Cloves/Krambu - 2 nos
Cardamom - 2 nos
Kalpasi/Black stone flower/Kallu hoova - 4 nos( small)
To saute in oil
Cooking oil - 2tbsp
Ghee - 1 tbsp
Biryani leaf - 1 no
Cinnamon/Pattai - 1 no
Big onion - 1 no
Tomato - 1 no ( optional,i dint use)
Red chilli powder - 1/4 tsp
Coriander powder/Dhania powder - 1/4 tsp
Turmeric powder - 1/4 tsp
METHOD
Wash the rice well & drain the water.Add 1.75 cups of water to it & soak the rice for 1 hour.
In the mean time,wash & pressure cook the baby potatoes in high flame for 3 whistles.Peel the skin and set aside.
Heat a kadai with 1 tsp of oil and saute the big onion slices.Remove & take this in a mixie jar.Add green chillies and other ingredients given under “ To grind & marinate” & grind everything to a smooth paste adding enough water.
Take the peeled potatoes & add the ground paste to it.Prick the potatoes with a fork & mix well.Let it marinate for 20 minutes.
Heat oil + ghee in a pressure cooker base and saute the biryani leaf & cinnamon.Then add the onion slices.Saute well till it turns transparent.Then add the finely chopped tomatoes if using.Saute well till mushy.Now add the marinated potatoes along with masala.Add chilli powder,dhania pwd & turmeric pwd.Saute well till raw smell goes off.
Now add the soaked rice along with water & required salt.Mix well & cover cook in low flame for one whistle.It takes 10-12 minutes.Remove the lid after the steam is released.Fluff it with a fork.
Enjoy !
Note
If u don’t have small potatoes in hand,use big potatoes but cook it & chop them into bite sized pieces before marination.
You can also add the combination of coriander & mint leaves in equal ratio while grinding.
Skip adding kal pasi if u don’t have in hand.But please use it if u have because it gives a great smell to the biryani.
You can also sprinkle some lemon juice at the end before closing the cooker.Its optional.
Try this Chettinad baby potato biryani for this weekend ! I served with homemade potato chips.It was yummy to tummy
I am glad i have successfully reached the 3rd post in my Sunday lunch Recipes Series.I have been sharing biryani,pulao & other rice varieties that i make in weekends.This week,i have blogged my vegetable fried rice recipe in Indian style using electric rice cooker.I know most of u make veg biryani & veg pulao in rice cooker.But making a fried rice in rice cooker may be new to some of u.Not just this,the method i have shared here may also be new & it is somehow different from our usual fried rice recipe.A very big thanks to my dear friend Shalini for teaching me this easy,hassle free,wonderful ,Indian style fried rice recipe.Whenever i go out for shopping in weekends with my family,i make this rice recipe along with curd rice.It stays warm & as soon as we reach home,i just saute the required amount in ghee & serve it hot hot.As we love to have fried rice with tomato sauce as side dish,i don’t make any specifically.But my friend suggested peas butter masala& paneer butter masalaas the best side dish for fried rice.So make it as per your choice.Ok,Lets see how to make fried rice recipe in electric rice cooker.
Check out my tomato rice recipe using rice cooker & Chinese veg fried rice recipe
Veg fried rice recipe in rice cooker
Indian style Vegetable fried rice recipe using Rice cooker
Wash the rice twice & drain the water.Soak it adding 2.25 cups of water,lemon juice & oil for 1 hour.Rice will be soaked well.In the mean time,finely chop the vegetables,onion,capsicum & spring onion.Keep it ready.
Switch on the rice cooker,keep in cooking mode & allow it to heat for sometime. As soon as the plate is heated,add the soaked rice along with water,finely chopped carrot,beans & potato.Add the required salt,mix well & cover the rice cooker.Let the rice cook well.Open it once in the middle & fluff it with a fork.Once its cooked,rice cooker will switch to Keep Warm mode automatically.
Finely chop the cabbage,onions,garlic cloves,bottom part of spring onion & capsicum. Heat oil in a kadai & saute them well adding little salt( remember we have added salt in rice) Add this to the cooked rice.Add pepper powder & keep it closed till use.Now the rice cooker will be in”Keep warm” mode.
Just before serving,heat ghee in a kadai and add the required amount of fried rice.Saute well in high flame for a minute,Keep tossing & serve hot immediately.Enjoy with any side dish or tomato sauce.
Note
I have not used soya sauce here.You can use it if u need.
Adding onions & garlic is purely optional.My friend doesn’t add it.
Adding lemon juice in rice helps to give u white colored rice after cooking.But do not add more.
I don’t add ajinomotto as it is not good for health.
Try this easy veg fried rice recipe using rice cooker & enjoy ur weekend lunch
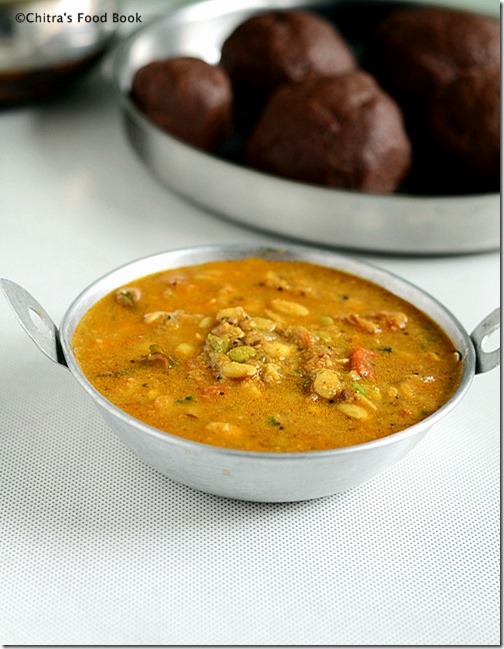
Hitikida avarekalu saaru is an easy, yummy, flavorful gravy prepared using freshly peeled hyacinth beans. It is also known as hitikida avarekalu masala saaru or hitikida bele saaru in Kannada. It is the best side dish for rice and ragi mudde. But people here love to have it with idli, dosa, akki roti, ragi roti and even with uppittu. Avarekalu is a winter season vegetable that is available all over Karnataka during december to february. I was waiting for Avarekalu season to start just to post this gravy recipe in my blog.
Now the season is started and you can see avarekalu ( Flat beans/Hyacinth beans/Indian lilva beans in English, Mochakottai in Tamil, Surti papdi in Hindi) everywhere in Bangalore. My apartment residents buy in kgs almost everyday and add them in almost all the dishes like uppittu/upma, pulao, sagu/kurma and even sambar.
Thanks a ton to my friend Megha for teaching me this wonderful Karnataka style hitikida avarekalu saaru recipe. Myself & Sendhil started liking Ragi Mudde only after having it with this gravy as side dish. Not only ragi mudde, this avarkalu saaru tastes great with rice, idli , dosa and chapathi too. Last year this time, I went to Megha’s house to learn making ragi mudde At that time, she gave me this gravy to taste with mudde. I loved it very much and noted down the recipe. She immediately packed some and told me to give Sendhil too. He liked it a lot. He also appreciated me that I have learnt 2 healthy and yummy authentic Karnataka dishes from my friend. I started making this gravy with ragi mudde regularly in weekends. I am yet to perfect ragi mudde recipe. I will try to post with a video soon after I get it right.
This particular gravy tastes more like kurma/Saagu and this has no tamarind/Huli. Coconut masala & tomato makes the base for this gravy. It can be done very easily in one pot / pressure cooker and its one of the best side dish for Ragi mudde. Scroll below to see how to make this yummy hitikida avarekalu saaru recipe with step by step pictures and video.
Hitikida avarekalu saaru recipe
Hitikida avarekalu saaru recipe for rice !
Cuisine:Indian
Category:Gravies
Serves:2
Prep time:10 Minutes
Cook time:15 Minutes
Total time:25 Minutes
INGREDIENTS
1 cup - 250ml
Avarekalu/Flat beans - 1 cup ( add more if you like)
Remove the seeds ( avarekalu ) and soak it in water over night or for 4 hours. Peel the skin by pressing it between your thumb finger & fore finger. It will come off easily. After removing the skin, wash the seeds & set aside. This is called as Hitikida avarekalu (avare bele).
Grind all the ingredients given under ”To grind " to a smooth paste adding enough water. Remove in a bowl. ( You can use Karnataka sambar powder in place of red chilli powder and dhania powder).
Heat oil in the kadai OR pressure cooker and splutter mustard seeds, cumin seeds. Now add chopped onions & tomatoes. Saute till tomato turns mushy ( this step is optional). Then add the hitikida avarekalu / chilkavare ( peeled seeds) and curry leaves, mix well. Now add the ground masala paste. Saute till its raw smell leaves it. Add a cup of water. Cover & pressure cook it in low flame for one whistle.
Open the cooker after the steam is released completely. Mix well & allow it to boil for sometime if you feel there is excess water. Else remove in a bowl & garnish with coriander leaves. Serve with ragi mudde, rice, idli, dosa or roti.
Enjoy !
Note
For variations, you can add avarekalu ( whole hyacinth beans) instead of peeled hyacinth beans.
Adjust the quantity of red chilli powder / sambar powder as per your spice level.
You can use coriander leaves for garnish. But use less for grinding. Adding more may change the flavor.
Enjoy this hitikida bele saaru with ragi mudde. Tastes yum !!
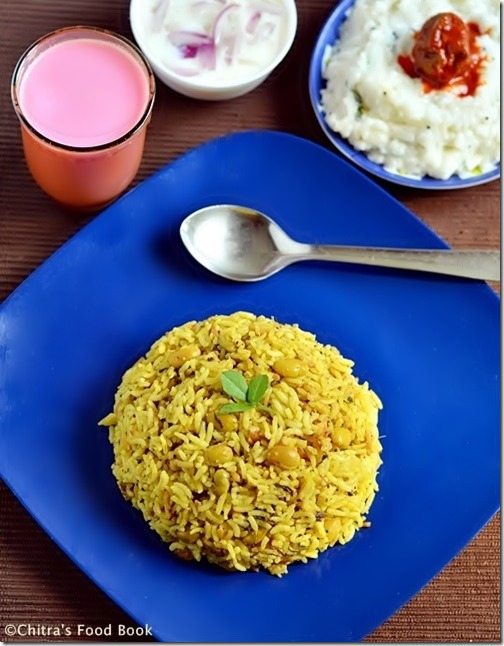
Today I have shared a simple Karnataka special avarekalu rice bath / avarekalu pulao with methi leaves (menthya soppu). Its Avarekalu (Hyacinth beans / Flat beans / Indian liva beans in English, Surti papdi in Hindi, Chikudukaya/Anapakayalu in Telugu and avarekai/Mochakottai in Tamil) season in Bangalore. Here people buy them in Kgs and make avarekalu pulao / rice bath, avarekalu saaru/sambar, uppittu/upma, avarekalu sagu etc with it. You can find avarekalu recipes in all the houses, hotels and even in marriage feast in this season. I too learnt few yummy recipes with avarekalu from my School moms friends.
Yesterday we had a small get together at Tara’s house to celebrate this new year and we all prepared a quick and yummy lunch menu. I madeeggless chocolate cake. Megha made this avarekalu-methi pulao also known as avarekalu bath and Tara made Karnataka’s one of the most popular masoppu saaru recipe along with white rice, onion raita and gram flour bonda. It was a simple yet very filling, delicious and healthy lunch menu. I learnt this pulao from Megha and clicked the stepwise pictures too for my reference.
Today I made it in my house for our lunch and for the sake of my Sunday special lunch recipe series too. So here you go my second recipe in this series, Avarekalu Methi Pulao. Its a very yummy, flavourful one pot meal which can be made under 15 minutes. You can prepare this pulao easily for your lunch box during busy morning hours easily in a pressure cooker if you have avarekalu ready in hand.
For variations, you can skip methi leaves and make it with avarekalu alone. Very less chopping works and moreover this recipe would be apt for avarekalu sesaon. I used sona masoori raw rice instead of basmati rice as I felt this recipe tasted yummy with raw rice. Finally the choice of rice is yours ! Do try this easy and yummy avarekalu methi pulao recipe with simple onion raita as side dish for your Sunday lunch menu, enjoy and spend time with your family.
Avarekalu methi pulao recipe / avarekalu bath recipe - Easy rice recipe to prepare in weekend & lunch box !
Cuisine:Indian
Category:Lunch
Serves:Serves 3
Prep time:10 Minutes
Cook time:15 Minutes
Total time:25 Minutes
INGREDIENTS 1 cup= 250ml
Avarekalu/Flat beans/Mochakottai - 1/2 cup
Methi leaves/Fenugreek leaves - 1/4 cup
Good quality sona masoori raw rice - 1 cup ( soak for 15 minutes)
Cooking oil + Ghee - 2 tbsp + 1 tsp
Bay leaf - 1 no
Big onion - 1 no
Water - 2 cups
Salt - as needed
To grind
Grated coconut - 2 tbsp
Green chillies – 3-4 nos (medium)
Cinnamon - 2 inch stick
Cloves - 3 nos
Cardamom - 2 nos
Big onion - 1/2 no
Coriander leaves - 3 sprigs
Turmeric powder - 1/8 tsp
Ginger – A small finger size
Garlic cloves - 5 nos
HOW TO MAKE AVAREKALU PULAO - METHOD
Wash and chop methi leaves. Keep avarekalu ready. For avarekalu, you don’t need to remove the skin. Just wash and keep aside. Wash and Soak rice in water for 15 minutes.
Grind all the ingredients given under “to grind” to a smooth paste adding water. Set aside.
In a pressure cooker base, heat oil+ghee. Add the bay leaf, saute for a while. Now add the chopped onions and saute till transparent. Add methi leaves & avarekalu.
Mix well for a minute and add the ground masala paste. Saute till its raw smell goes off. Now add the soaked rice with the required water and salt. Cook in low flame for one whistle. Remove and serve hot with raita !
Enjoy !
Note
For variations, you can use only methi leaves & make this pulao.
You can replace methi leaves with mint leaves along with avarekalu. But use mint leaves in very small quantity.
Adding more oil+ ghee makes this rice taste yummy. So use accordingly.
Use less coconut and onions for grinding else coconut make the rice look dry.
U should use more spices to get a nice aroma. So I used 3 cloves, 2 cardamom and 1 big stick cinnamon.
My friend used 1.75 cups of water for fluffy rice.
Enjoy this yummy averakalu pulao recipe with simple onion raita & curd rice !


 Bitter gourd biryani/Pavakkai Masala rice- Easy n delicious rice variety