Search Chitra's Food Book

Showing posts with label MICROWAVE. Show all posts

November 11, 2014

EGGLESS BROWNIE RECIPE IN MICROWAVE IN A MUG - ONE MINUTE RECIPE

eggless-brownie
Nowadays I have become crazy to try 1 minute microwave cakes and cookies recipes in a mug. After making my one minute microwave mug cake and 5 minutes eggless oreo cake successfully, I have become more confident in trying out recipes under few minutes using microwave. Somehow my daughter Raksha is also fond of these instant recipes because she loves to help me in making them. Here is a one minute microwave, eggless brownie in a mug. 

Recently we tasted brownie with ice cream in KFC and loved it a lot. Raksha was asking me to prepare the same at home. Basically I was not aware of the difference between a cake and brownie. When I googled for it, I found few differences from here that the texture of cake should be spongy & fluffy. So it needs a leavening agent like baking powder & soda whereas the texture of brownie is dense and chewy. So it doesn’t require all these. Also a brownie tastes more chocolaty than a cake.

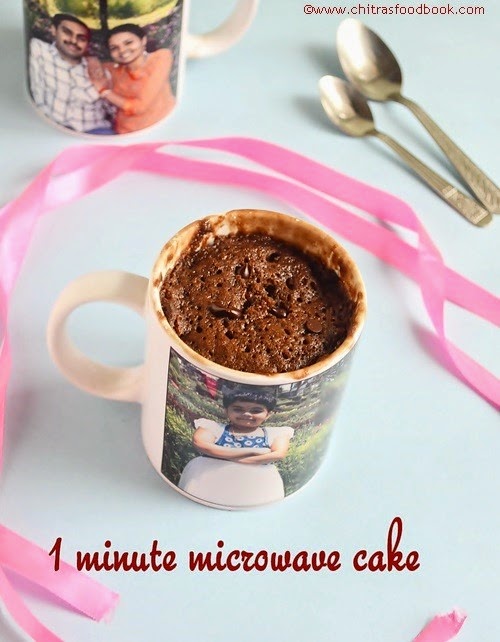
When I tried this one minute brownie recipe in a mug from here using cocoa powder, it tasted perfect. As I defined above, it was more chocolaty, mildly sweet, dense and slightly chewy too. I can name it as “perfect brownie in a mug” and that too under 2 minutes. Moreover this brownie tasted the best when we had with vanilla ice cream. You know what my daughter told after tasting this brownie, she told ”mom, this is the world’s best eggless brownie” as if she had tasted all brownies in the world. But still, as a mom, I was very happy with her feedback. So what are you waiting for, surprise your kids with this perfect brownie & ice cream this evening. I am sure they will be super excited to taste this. And don’t forget to leave your feedback here.

brownie-recipe

Microwave eggless brownie in a mug


Microwave eggless brownie in a mug 
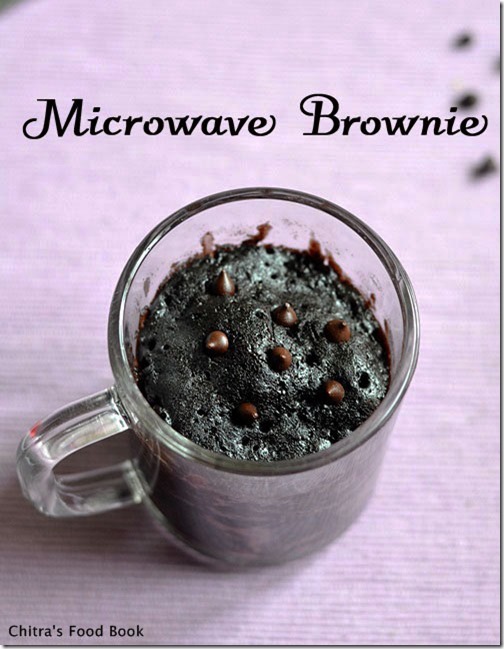
Eggless brownie in a mug using microwave under 2 minutes !
Cuisine: Indian
Category: Brownie
Serves: Serves1-2
Prep time: 5 Minutes
Cook time: 1 Minute
Total time: 6 Minutes


INGREDIENTS

  • All purpose flour/maida - 1/4 cup (30g)
  • Sugar - 1/4 cup (50g)
  • Unsweetened cocoa powder - 2 tbsp ( any brand is fine)
  • Melted butter - 2 tbsp
  • Milk at room temperature - 1/4 cup + 1/2 tbsp (60ml)
  • Vanilla essence - 1/4 tsp
HOW TO MAKE EGGLESS BROWNIE IN MICROWAVE - METHOD

  • In a wide bowl, take all the dry ingredients. Mix well without lumps.
Eggless-brownie-1
  • Then add the melted butter, milk and vanilla essence. Mix well for a minute in one direction. Sugar should be dissolved in the mixture. The consistency of batter should be slightly thin and not too thick. It should fall like a ribbon. Transfer the mixture to a microwave safe mug or bake in the same bowl if it is microwave safe.
Eggless-brownie-2
Eggless-brownie-3
  • Microwave in high power ( mine is 800w) for one minute. Take it out and check for its texture. If you find any fluid on top, microwave it again for 10 seconds. Now remove and insert a tooth pick or back of a spoon. If it comes out clean, brownie is done. Else keep it for 10 seconds. Mine got done in 1 minute 20 seconds. ( Never over bake. Brownie will become hard. Keep it only for 10 seconds & check it ). Brownies won’t double in size after baking. It will raise slightly as you see in the picture.
Eggless-brownie-4

Serve it warm with your favourite ice cream.
Enjoy !


Note

Color of brownie may slightly vary as per the color of cocoa powder. I used weikfield cocoa powder which was dark in color.
While mixing the dry ingredients, make sure there are no lumps. Add the wet ingredients and mix in one direction always. Never over bake it. Keep it for a minute first. Remove and check its texture. If you find any fluid on top, keep it for 10 seconds again and check. Repeat the same until a toothpick or back of spoon comes out clean. Over baking makes the brownie hard and chewy.


eggless-brownie-recipe


Enjoy this hot one minute brownie with your favorite ice cream. It tastes heavenly !!

brownie with ice cream
Continue Reading...


September 9, 2014

5 MINUTES MICROWAVE EGGLESS OREO BISCUIT CAKE RECIPE

oreo-cake-recipe
This is my first recipe using Oreo biscuits. After I tried my one minute eggless microwave chocolate mug cake successfully, I kept hunting for some easy microwave cake recipes that can make wonders in few minutes. This is one such recipe & I got it from here. All you need is just 3 major ingredients and 5 minutes. Your cake is done, Cool right ?

The highlight of this eggless oreo cake is, its butterless, eggless, no oil and no curd too. Oreo biscuits & Eno fruit salt will do the magic here. Even your kids can do it by themselves and Iam sure they will enjoy both the cooking process as well as its taste. You can very well replace Oreo biscuit with bourbon or hide n seek biscuits and Eno with baking powder.

I won’t say this cake will double while cooking OR it comes out super soft. It does rise & comes out soft & not as the ones you bake in convection mode. But this recipe really  made wonders in few minutes i should say!  Last year I shared a fool proof, eggless, no oil, no butter Orange biscuit cake recipe using convection microwave oven. Do check it if interested. 

Friends, go ahead and try this cake now. Surprise your kids while they come back from the school.
microwave oreo cake

5 Min Eggless microwave oreo biscuit cake


5 Min Eggless microwave oreo biscuit cake Microwave oreo biscuit cake recipe in just 5 minutes - There is no oil, no butter & no egg !!
Cuisine: Indian
Category: Cake
Serves: 4-5
Prep time: 2 Minutes
Cook time: 5 Minutes
Total time: 7 Minutes


INGREDIENTS

  • Oreo biscuit – 20 nos (any flavor)
  • Milk – 1 cup ( 240 ml)
  • Plain Eno or baking powder – 3/4 tsp
  • Sugar – 2-3 tbsp
HOW TO MAKE MICROWAVE EGGLESS OREO BISCUIT CAKE - METHOD

  • In a big mixie jar, take all the biscuits with cream & sugar.Grind it coarsely. Now add milk & Eno. Grind to a smooth paste.
oreo biscuit cake 1
  • Grease a microwave safe bowl with butter or oil generously (I used oil for greasing the pan and the cake got a shine as you see in the first picture, in stepwise I shown the one in which I used butter paper for lining.) OR line the bowl with parchment paper or butter paper. Pour the cake batter to the bowl. Batter should fall like a ribbon. It should not be too watery or too thick.
oreo biscuit cake 2
  • Pat the bowl in the bottom to spread the batter evenly. Microwave it in high power ( I used 800W) for 3-5 minutes.Check at 3 minutes. If not done, keep it for more time. Mine took 4 minutes. Check it with the back of spoon or tooth pick.
  • If it comes out clean, cake is done. Else keep it for one more minute. Cake will rise but wont double. Remove & keep it outside. Let it cool down. Then invert the cake, cut into pieces and enjoy ! If you try to remove the cake before it cools down, cake will crack. If you use butter paper, you can remove it easily.
oreo biscuit cake 3
Enjoy !


Note

  • You can use either butter paper or grease with oil. But when u use oil, you should wait till the cake cools down completely & the upper part of cake will get a shine as you see in the picture. U won’t get this shine if you use butter paper.
  • U can decorate this cake by sprinkling some icing sugar on top OR apply Instant whipped cream over it. I kept an edible sugar flower.
  • For variations, you can use bourbon OR hide n seek biscuits too. Adjust the quantity of sugar as per your taste.
  • Add plain ENO salt ( blue colored sachet) OR 3/4 tsp of baking powder.
  • Use a butter paper or grease the bowl with butter for easy removal of cake.
Do check out my One minute eggless mug cake and Orange biscuit cake recipes too !


Serve this cake with a glass of milk! Kids would love it & even you can have a bite. 
Oreo-cake
Continue Reading...


August 10, 2014

EASY MYSORE PAK RECIPE- 3 MINUTES MICROWAVE SWEET RECIPES

Mysore pak recipe

Wishing u all a very happy Raksha Bandhan. On this Rakhi festival day, I am here with an easy, peasy 
3 minutes microwave sweet recipe, Mysore pak.

Thanks a ton Aarthi ( yummytummy) for sharing this wonderful recipe with us. I tried Mysore pak for the first time in my life and it was a huge hit among my family and friends. My family members are not a big fan of mysorepak. So I never got an idea to try this sweet recipe by seeing the time consuming procedure and the gallons of ghee. But I know my Sister is a die hard fan of mysore pak especially from Sri Krishna sweets and Salem Lakshmi sweets. She loves the soft, melt in mouth texture and she never minds about emptying one full box of it in one day. So just for her sake, I wanted to try Mysore pak recipe for this year’s Diwali. 

When I saw this super easy, Instant microwave mysore pak recipe & that too in less than 5 minutes, I got tempted like anything and bookmarked it immediately. In this method, you don’t have to worry about sugar syrup consistency,no stirring job, less ghee comparitively & moreover it gets ready in 5 minutes. Its really a great sweet for beginners to try.

In Facebook’s Bombatt bhojana group, few people had tried the same and shared their pictures too. This gave me double assurance for this recipe to try. So what else, I tried this yummy mysore pak recipe for 3 times since yesterday & passed some of them to my friends too.They all loved it very much, took the recipe, tried it immediately & shared their pictures with me. I was so happy because this is the first recipe which became a super hit even before I blog it here. 

I have shared all the possible tips in “Note” section. This mysore pak won't come out so porous and not so soft like SKC's mysore pak. Its texture would be in the middle. But this recipe really makes wonders in less than 5 minutes I should say!. Try this, you will come to know. I was very much satisfied with my first attempt. I will try to share the stove top authentic mysore pak recipe for this Diwali.

Friends, do prepare this easy, yummy mysore pak recipe for Raksha bandhan celebration & treat your brothers. Lets see how to make this mysorepak at home using microwave instantly !!

Easy mysorepak recipe


Easy microwave mysore pak recipe


Easy microwave mysore pak recipe Easy,instant mysore pak recipe using microwave in less than 5 minutes
Cuisine: Indian
Category: Sweet
Serves: 6-8nos
Prep time: 5 Minutes
Cook time: 3 Minutes
Total time: 8 Minutes


INGREDIENTS
1 cup - 250ml
  • Besan flour - 1/2 cup
  • Powdered sugar or icing sugar - 1 cup
  • Melted ghee - 1/2 cup + 1 tbsp
  • Boiled & cooled milk - 2 tsp ( at room temp,not hot)
METHOD

  • Powder 1/2 cup of crystal sugar to a fine powder. U will get around 1 cup.Set aside. Melt ghee & measure it. Set aside.Keep a plate ready greased with ghee.( I used my aluminium burfi plate which i bought from Salem) . In a wide bowl, sieve the gram flour. Keep aside.
Mysore pak 1
  • In a microwave safe bowl (preferably glass bowl), take 1 tbsp of melted ghee & add the sieved gram flour. Mix well and keep it in microwave high power ( mine is 800w) for 1 minute. It will get roasted well.
How to make mysore pak
  • Now remove the roasted gram flour in a bowl and set aside. In the same microwave bowl, take 1/2cup of melted ghee, add the powdered sugar or icing sugar & 2 tsp of milk. Mix well.
How to make mysore pak 1
  • To this, add the roasted gram flour without any lumps( this is more important to get a soft, non-crumbly mysore pak).
How to make mysore pak 2
  • Mix well and microwave in high power for 1 minute. U can see the ghee completely melted and floating on top. Remove and stir it well.
How to make mysore pak recipe
  • Again microwave for 1 minute in high power. Take it out, you can see foamy texture with bubbles in it. If its not foamy, mix well & keep it again for 20 seconds. ( You can increase the timing to 30 seconds based on the texture)
How to make mysore pak 4
  • After 20 seconds, remove & just pour it in the greased plate, press it very well with the back of spatula and smoothen it. The mixture will be slightly crumbly. Don’t worry.
  • Leave it aside for 10-15 minutes. Once it becomes warm, draw shapes. Remove once its cooled down completely.
How to make mysore pak 5
How to make mysore pak 6
Serve n enjoy it ! Tastes yummy.Initially you may feel it little hard but as the time proceeds, it will become soft. It tastes best the next day. But everything will be vanished within NO time!!


Note

  • Cooking time depends on the heat & power of microwave. But don’t worry, even if you keep it for 30secs extra by mistake, it comes out well. But at any cost, do not keep it more than 2 mins 30 seconds excluding roasting time.
  • I used melted ghee in this recipe. If you use frozen ghee, take the required ghee & melt in microwave for 1 minute each time and then use. Do not use frozen ghee as it is. It won’t work.
  • Don’t worry if the mixture becomes crumbly because of over cooking. Just spread the mixture in greased plate and press it very well with a spatula or with your hands covering the mixture with sheet.Careful,it would be very hot. It will set when it turns warm. Tastes good too. Second time, I over cooked it slightly & color became dark but still the taste was great.
  • Make sure there are no lumps in besan flour before & after roasting because lumps results in uneven cooking and crumbly mysore pak. So better break it well with your hands or sieve it well.
  • As I said, it tastes the best as time proceeds. So reserve few pieces to check its actual taste the next day.
  • U can also use icing sugar instead of powdered sugar.
  • If using crystal sugar,powder 1/2 cup of it. U will get little less than 1 cup. But that’s enough for this sweet.


Don’t forget to check out my Easy coconut ladoo recipe too


Enjoy Rakhi festival with this easy, yummy sweet !! Once again I wish you all a very happy
Raksha Bandhan..

mysore pak recipe


Continue Reading...


June 5, 2014

ONE MINUTE EGGLESS CHOCOLATE MUG CAKE RECIPE IN MICROWAVE

Eggless chocolate mug cake
I never thought one minute eggless chocolate mug cake in microwave comes out super spongy and soft. It can be made instantly within no time.Its really a one minute magic or wonder I would say. I tried this for the first time from this spaceI did some changes in the actual recipe based on the ingredients I had in hand & gave it to Raksha as an evening snack as she loves to have muffins and cakes more than deep fried snacks. When I made this cake in one minute, she was very much surprised and happy to see a cake inside a mug which was new to her. She enjoyed it saying “Mumma its very soft & chocolatey”. I immediately made another batch for myself and Sendhil. We too loved it a lot.

To make this picture interesting, I prepared this cake in our personalised mug printed with our photographs . How is it ??. We took this snap last year during our kodaikanal trip. Do try this cake for your kids and you can make them do it by themselves. Its so easy that anyone can bake it. I hope u can try in pressure cooker too. What are you waiting for?? Rush into your kitchen and make this one minute wonder. Please check out the full video recipe below for easier understanding :)

One minute microwave mug cake - Video

One minute microwave mug cake

Eggless chocolate cake in microwave


Eggless chocolate cake in microwave Eggless one minute chocolate mug cake in microwave - Very easy n super tasty cake!!
Cuisine: Indian
Category: Baking
Serves: 1
Prep time: 2 Minutes
Cook time: 1 Minutes
Total time: 3 Minutes


INGREDIENTS

  • Maida/All purpose flour - 2 tbsp
  • Sugar – 2 tbsp  OR sugar –2-3 tsp + Nutella / jam/Peanut butter – 1 tbsp
  • Cooking oil - 1 tbsp ( i used refined oil)
  • Milk – 2.5 tbsp
  • Cocoa powder – 1.5 tsp ( i used weikfield)
  • Baking powder – 1/4 tsp
  • Salt - a pinch
  • Vanilla essence- few drops
  • Choco chips - few
HOW TO MAKE EGGLESS CHOCOLATE MUG CAKE - METHOD

    In a mug,take all the dry ingredients. Mix well. Then add oil, milk & essence. Mix thoroughly without lumps & sugar should dissolve completely. Check for taste and add more sugar if needed.

    one minute microwave cake

    Microwave in 800w power for 1 minute. Cake will raise to the top and it may deflate. Check with a tooth pick .If it comes out clean,ur cake is ready. Else keep it for another 10-20 seconds. Mine took 1 minute 20 seconds.
    After taking out, stud in few choco chips & enjoy !!.

    one minute microwave cake1


Note

  • Adjust sugar as per the taste of cocoa powder else it may taste slightly bitter.
  • As it is an instant cake, serve immediately when warm.
  • As given in the original recipe, you can add a tbsp of nutella,peanut butter or jam. In that case, reduce the sugar to 1.5 tsp and adjust the chocolate powder to 1 tsp.
  • I used canola oil. U can replace with olive oil or any cooking oil.
  • Make sure you mix the batter well without lumps.

One minute microwave chocolate mug cake

One minute eggless chocolate mug cake is ready to enjoy with super soft texture and taste !

 One minute microwave chocolate mug cake

Do check out
Continue Reading...


March 13, 2014

Cornflakes Mixture in Microwave | Cornflakes Chivda in microwave

Here comes an easy, low fat, crunchy cornflakes mixture/chivda or namkeen recipe using microwave. I should have tried and posted this during Diwali but I din’t. Last week my in laws were with me. We all have a habit of munching some savouries immediately after lunch.

Every time my FIL used to buy a mixture packet from Haldirams or Maiyaa’s. This time I wanted to try the same but I wanted it light to tummy as well as tasty. Suddenly this cornflakes mixture recipe using microwave flashed in my mind. 

As I can get raw cornflakes in all the shops here, I immediately bought some and tried this recipe for the first time. U can also try this with Kellogg’s cornflakes. It makes your job much easier. We all liked its crunchiness very much inspite of the fact that it is not deep fried. I never expected a mixture without deep frying tastes this good. It is an yummy,  guilt free, best evening snacks recipe for all the elders in your family. Do try this easy,  low fat cornflakes chivda recipe. Everybody will like it for sure! Please go through “Note” for variations.


Cornflakes mixture


Cornflakes mixture Low calorie cornflakes mixture recipe using microwave !
Cuisine: Indian
Category: Snacks
Serves: 4.5 cups
Prep time: 5 Minutes
Cook time: 20 Minutes
Total time: 25 Minutes


INGREDIENTS

  • Plain raw cornflakes - 3 cups
  • Poha/Thin rice flakes – 1/4 cup (optional)
  • Raw, dry Peanuts - 1/4 cup
  • Dalia/Fried gram dal/Pottukadalai -1/4 cup
  • Cashew nuts - a handful
  • Curry leaves - few
To temper
  • Cooking oil - 1 tbsp
  • Red chilli powder -2 tsp
  • Turmeric powder - 1/4 tsp
  • Salt - as needed
  • Chaat masala – 1/4 tsp(optional)
  • Sugar – 1 tsp
  • Dry grapes/Raisins – 1 tbsp
HOW TO MAKE CORNFLAKES MIXTURE IN MICROWAVE - METHOD

  • Microwave raw cornflakes in batches in high power (800w) for 1 minute. I kept for 1 minute 10 seconds. Time varies based on the microwave. For one batch, you can keep 3/4 cup of cornflakes. Spread in the turn table and microwave it. Please keep an eye that it is not getting burnt.
corn flakes mixture step1
  • Remove and proceed the same for all batches. Keep it in a wide bowl & let it cool down.
  • Next,microwave thin poha for a minute and check whether it becomes crispy. If not, keep for another minute. Remove and add to cornflakes.
  • Then keep dalia and microwave for 1minute 30 seconds. Remove and mix.
corn flakes mixture step3
  • Spread the peanuts and microwave for 2 minutes. Mine took 2 minutes 30 seconds. Remove and keep in a separate plate. Initially it tastes soggy, but it becomes super crispy when it cools down completely. After it becomes crispy, add it to the above mixture.
corn flakes mixture step2
  • Next microwave cashews for a minute and remove.
  • Lastly microwave the curry leaves for a minute. Remove and add them.
  • Mix everything adding the required salt and set aside.
  • In a kadai, heat oil and add the raisins. Roast for a minute till raisins bulge. Add red chilli powder, turmeric powder & chaat masala powder or aamchur powder, sugar. Switch off the flame and add this to mixture. Mix everything together very well.
corn flakes mixture step4
  • Check for taste. Store in a box and enjoy. It stays crispy for more than a week.


Note


  • I din’t use raisins as my husband in not fond of sweet taste. But I strongly recommend you to add to get a nice taste. 
  • I microwaved all the ingredients in high power (800w). Please adjust the timing based on yours. The timings I have given above is to give you an idea.
  • When you microwave, make sure everything comes out crispy. Otherwise the whole mixture will become soggy in a day or two.
  • Check its crunchiness by tasting it and then add to the mixture. U can check whether the peanuts are roasted by its smell.
  • If you are using kellogs cornflakes, no need to microwave it. Just mix with other ingredients and proceed.
  • If you don’t want to microwave dalia, cashews and peanuts. U can roast them in little oil or ghee and add to mixture. But make sure everything is crispy. 
  • If you don’t want to go for microwave option, you can either use deep frying or baking in convection mode. For baking in convection mode, preheat oven in 180c for 10 minutes. Then spread the cornflakes and bake for 4 minutes. Make sure you mix it once in a while and also it should not be burnt. Keep an eye after 2 minutes.
Enjoy with coffee or tea ! Tastes great !!


Continue Reading...


February 20, 2013

KAMARKAT | கமர் கட்டு

Kamar kat piece

We all would have tasted  Kamar kat , thean mittai , javvu mittai , elandha vadai etc in our young age from petty shops and nowadays we don’t find this easily in the market. Our kids don’t have even any idea about it..So to make our kids savour its taste & to satisfy our cravings , i tried this recipe from my MIL’s old cookbook collections.To my surprise , the recipe was given using microwave which made me very happy to try.This is a very simple recipe which has only coconut & jaggery.The consistency of jaggery syrup is very important here.If the consistency is right , u’ll get this color , otherwise u wont.The size of kamar kat is of big gooseberry size.But i made it smaller to get 10 balls. I used microwave high (800w) setting in this recipe. Based on ur oven settings , please change the time.I made this for three times consecutively and i got it right in the third time..I made in very small quantity which yielded around 10 pieces..Try the same quantity (including the water) i mentioned here to get the best result.. I have given the stove top method in the notes section ..But I prefer microwave .. It came out very flavourful & tasty with the smell of coconut & jaggery..Though it gave a good exercise to the jaws , its worthy to taste. Do try n let me know how u liked it..
kamar kat in bottle

INGREDIENTS
 1 cup - 200ml
  • Grated coconut – 1/4 cup
  • Grated jaggery – 3/4 cup
  • Water – 1/8 cup
  • Cardamom powder -  1/8 tsp (optional, I dint use)
  • Ghee – 1 tsp
  • Rice flour – 1 tbsp (to coat the kamarkat )
METHOD
  • Grate the coconut and grind in the mixie once to break the small pieces ..
kamar kat tile 1
  • Take the ghee in a microwave safe bowl and melt it by keeping for 20 seconds in microwave high power (800w) ..Remove the bowl and add the coconut gratings.. Mix well and again keep in high power for 1 minute to roast the coconut..Coconut will be turned slightly brown in color..Keep it aside & allow it to cool completely..
kamar kat tile 2
  • Now in a microwave bowl ( choose a big bowl) , take 1/8 cup of water  and heat it for 1 min in high power..When the water is boiled , add the grated jagggery , mix well and again keep in microwave for 1 minute for the jaggery to melt completely..Strain the jaggery to remove the impurities..
kamar kat tile 3
  • Again microwave the strained jaggery syrup in high power for 2 minutes & 20 seconds to bring the hard ball consistency.. ( ie , when u drop the syrup in a plate of water , u should be able to roll a hard ball and when u drop the ball , u should get a “tung” sound.. The ball should look glossy.. Usually we make this syrup to make chikkis/kadalai mittai) .. The time i have mentioned here is perfect when u keep in 800w power. If ur microwave has less watts settings , please increase the timing in seconds and check it. This step is very, very important..Please keep an eye after 2 minutes and increase the time by 10 seconds to get the consistency..
kamar kat tile 4
  • Now add the roasted coconut , cardamom powder and keep in microwave high for 1 minute 30 seconds .. Remove the mixture for every 30 seconds , mix well and again keep it..After 1.30 minutes , the mixture will be slightly thick and it will leave the sides and non sticky to touch.U’ll be able to roll it..
kamar kat tile 5
  • Now transfer the entire contents into a plate and make balls , coat in rice flour and keep aside. Allow it to cool completely. It will become hard..
kamar kat tile 6
Store in a box n enjoy  !!

kamar kat bottle 1

NOTE
  • For stove top method , melt a tsp of ghee in  a pan and roast the grated coconut till u get a nice aroma & slight brown color..In a bowl, take the grated jaggery along with little water just to cover it..Melt the jaggery and strain to remove the impurities. Again heat the syrup, it will become frothy & thick. After few minutes , pour a drop of syrup in a plateful of water. U should be able to roll a hard ball & makes a tung sound when dropped.. Now add the roasted coconut & again keep the bowl in the flame & keep on mixing it. At one stage , the mixture become thick & it leaves the sides. When the ,mixture is still warm , grease ur hands with oil and make tight balls.Roll in rice flour & set aside.. Follow the same for all the balls. Rolling in rice flour prevents sticking of kamarkat with each other when kept in bottles..
  • Rolling in rice flour is very important to avoid the sticking of balls with each other..
  • My MIL told me to use even lesser coconut than the above quantity..U can use 2 tbsp too. It will be enough..
  
kamar kat bite
Continue Reading...