Search Chitra's Food Book

Showing posts with label MURUKKU VARIETIES. Show all posts

August 14, 2014

KAI MURUKKU RECIPE | HOW TO MAKE SUTHU MURUKKU | KRISHNA JAYANTHI RECIPES

Kai murukku recipe

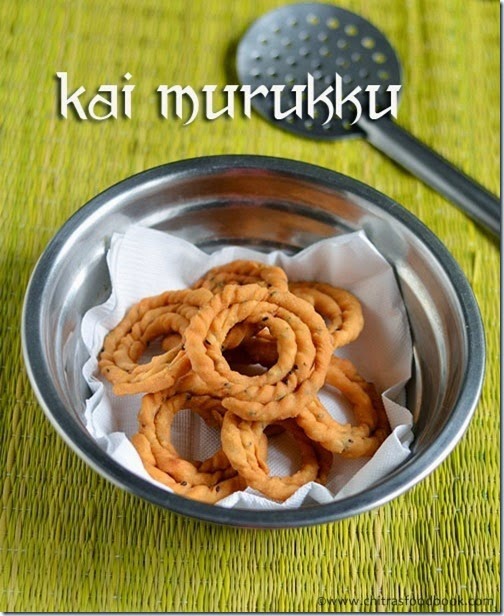
My MIL has the practice of making Kai murukku for Gokulashtami festival. People in Tamil nadu make this murukku generally for festivals and occasions like Seemandham & marriage as seer murukku. My MIL usually says my husband’s grandmom ( ie My mil’s MIL) is an expert in making perfect swirls. My MIL also makes it very fastly & iam still learning from her. Of course swirls come only by practice.

Last year I tried kai murukku using idli rice following my friend Shalini’s recipe. It came out very well & I found it easy for twisting too. I will try to post that recipe very soon. But for festivals, we are supposed to use only raw rice/Pacharisi. So this time I wanted to try this raw rice kai murukku for krishna jayanthi. I got this recipe from my MIL and tried it for the first time. I also referred “Ammavin samayal” kai murukku video for making twists. My twists/swirls din’t come out perfect but the taste was great. Sendhil liked it very much. As every beginner’s hope, I too believe I can make perfect suthu murukku at least by next year.


There are some points to be noted to make a perfect kai murukku. First & foremost thing is “You should use only homemade processed rice flour and roasted urad dal flour”. Store bought rice flour never works.The flour should be very smooth in texture. Also, you should start making this murukku as soon as u grind the rice flour.ie, processed rice flour should be wet. If you allow the homemade flour to dry for long time,u won’t be able to make swirls properly. It will get cut. We should not add too much of butter because murkku will drink oil.

The ratio of Rice flour & urad dal flour should be 8:1.  I have shared some of the remaining tips & tricks in “Notes” section. Do have a look before you start making. Ok, Lets see how to make Kai murukku at home with step by step pictures.

kai-murukku


Kai murukku recipe


Kai murukku recipe How to make kai murukku for Gokulashtami/Krishna jayanthi
Cuisine: Indian
Category: Snacks
Serves: 10
Prep time: 2 Hours
Cook time: 10 Minutes
Total time: 2H10 Minutes


INGREDIENTS

METHOD

  • Take the homemade processed wet rice flour, urad dal flour, sesame seeds, salt and hing. Mix well. Now add soft butter and mix well with the flour. Butter should be well mixed with the flour. Lastly add water little by little and make a non-sticky dough.
Kai murukku 1
Kai murukku 2
  • Take a small lemon sized ball and try to make swirls using your fingers. If you are able to make it, proceed further. If u find the thread getting cut, dough must be dry. So sprinkle little more water in the dough and knead it well. Apply little oil on your hands if the dough is sticky.
Kai murukku 3
  • Spread a cotton cloth or butter paper and place a small bottle lid. Keep a small bowl of water & a bowl of oil nearby. Take a small lemon sized ball from the dough.
  • Make the swirls/murukku around the lid. While making the swirls,keep your hand a little higher from the lid.The dough will stretch easily if u made it perfect. When u hold ur hand higher in length, u can make the twist easily.
  • U can dip ur hands in water whenever needed. It helps u to make twists neatly.
  • Use ur first three fingers ( ie thumb, fore finger & big finger) and press the dough with ur thumb, make a twist and keep doing it to form a circle shape. It sounds bit difficult but it will come by practice for sure. Keep the remaining dough closed with a wet cloth to prevent drying.
  • Make some 10 murukkus & heat oil in a pan for deep frying. Drop a small piece of dough. If it rises immediately, oil temperature is correct. Now remove the murukku using ur hand or dosa flipper and drop in oil carefully. U can slide it in the sides. It will move to the center. Add 3-4 murukku per batch and deep fry.
Kai murukku 4
  • Cook till the bubbles and sshhh sound ceases completely. Flip it once in the middle. Remove the murukku, drain in a tissue paper. Allow it to cool & Enjoy !
Kai murukku 5
  • For storage,keep a tissue paper in a box and arrange the murukku after it cools down completely. The original flavour of murukku can be felt only by next day.U can store it for months too.It tastes crunchy and yummy.


Note

  • You should use only homemade processed rice flour and roasted urad dal flour”. Never roast the rice flour. It should be wet. Store bought rice flour never works. The flour should be very smooth in texture. Also you should start making this murukku as soon as you grind the rice flour. i e, processed rice flour should be wet. 
  • If u allow the homemade flour to dry for long time, you won’t be able to make swirls properly. It will get cut. We should not add too much of butter because murkku will drink oil. The ratio of Rice flour & urad dal flour should be 8:1
  • Grease your fingers with oil whenever needed while making twists.
  • For trouble shooting : If u find the thread getting cut while making twists, dip ur hand with murukku dough in water slightly and press the dough. Dough will become slightly wet. Now u can make twists easily.
  • Never use store bought rice flour for making dough.
  • Homemade rice flour should be slightly wet while making dough. U can use oil for greasing ur hands if u feel the dough is sticky.
  • Less butter should be added. Adding more butter makes the murukku absorb more oil.
  • Here Urad dal flour gives the stretchable tendency to the flour. So never skip or replace it.
  • Some people also use gram dal flour but it works well with idli rice kai murukku & not with raw rice murukku.

Is my kai murukku looks somewhat OK ?? 
I will try to make it perfect in future by practice and update the pictures for sure. 

kai-murukku-recipe

Continue Reading...


November 9, 2013

MURUKKU PODI – KIDS SNACK RECIPES


Murukku powder
Murukku podi/Powder is a very easy and tasty snacks recipe which can attract ur kids easily. Its just a single step process..This recipe may be known to most of u but u might have forgotten about it.This post is to refresh ur memories :)..We all would have made thenkuzhal or mullu muruuku for Diwali and i hope u have some murukku leftover in ur pantry. Some kids hesitate/don’t like to eat mullu murukku as it pricks the jaws.I have seen toothless old people getting mouth ulcers by eating murukku.So,for those people, u can try this way. They’ll love it for sure. When i was young , kittu aachi( my dad’s periamma) used to come to our house to help my mom for making thenkuzhal murukku.She was a very old toothless lady. As she couldn’t eat murukku as such , my mom make this murukku podi for her and store in a box.She used to enjoy it a lot ..As kids , we too( me & my sis) used to take it in a bowl and have it after coming from school.A glass of milk and this murukku podi was our evening snacks those days during DiwaliSmile
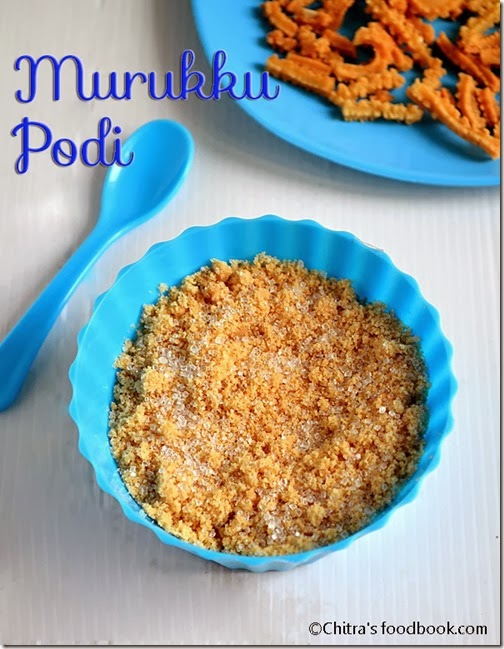
. Yesterday i tried this with leftover magizhampoo murukku for Raksha & she loved it. More than Raksha , myself and Sendhil relished a lot and we finished the bowl very quickly .Thenkuzhal murukku podi tastes the best according to me. Do try this murukku podi for a change if u have not attempted so far..U may love it like me Open-mouthed.

murukku podi recipe

Murukku podi


Murukku podi Murukku podi/powder is a very easy kids snack recipe which can be made in minutes using leftover murukku..
Cuisine: Indian Category: Sweet Yields: Serves 2
Prep Time: 1 Minute Cook Time: 2 Minutes Total Time: 3 Minutes


INGREDIENTS
To grind
  • Leftover plain murukku (thenkuzhal or mullu murukku) - 5 nos
  • Sugar –2-3 tsp (increase as per ur need)
METHOD

  • Break the murukku into pieces..In a dry mixie jar , take the murukku pieces.Grind  till it becomes a nice powder..Remove it in a bowl , add sugar. Mix well and enjoy !
Murukku podi recipe
Enjoy !


Note

  • For sugar patients , please avoid adding sugar. Just powder and give ..
  • If u have spicy murukku in hand , u can powder and have it as such.  
  • I made this recipe using leftover magizhampoo murukku. Thenkuzhal murukku tastes the best :)
My daughter had this murukku podi with complan Smile 
Murukku podi
Continue Reading...


December 2, 2011

Thenkuzhal Murukku Step By Step Recipe With Video - Diwali Snacks Recipes

Thenkuzhal recipe

Mostly we all make thenkuzhal murukku for diwali or some special occasions. I love this murukku since my childhood days. I used to do all the pre preparatory works for making homemade murukku maavu like buying rice and urad dal, grinding it in flour mill, sieving etc. I sit with my mom & aachi when they make this for diwali especially to get the last batch of murukku. My mom make a batch of half cooked murukku ( we call it “arai vekkaadu” in tamil) for me. I love this murukku more than the crispy ones. I eat it hot immediately after taking out from the oil. 

Even today, my MIL make this specially for me. How sweet !!. I saw so many thenkuzhal recipes in blogosphere with different proportions of rice and urad dal. I wanted to share my version too. Hope this post helps beginners. Please go through the Notes section too. Now coming to my version with step by step pictures and video.


“””PLEASE HAVE A LOOK AT THE “POINTS TO REMEMBER” BEFORE STARTING..”””Thenkuzhal

Thenkuzhal murukku


Thenkuzhal murukku White thenkuzhal murukku for Diwali !
Cuisine: Indian
Category: Snacks
Serves: 25 nos
Prep time: 15 Minutes
Cook time: 20 Minutes
Total time: 35 Minutes


INGREDIENTS
1 cup - 250ml
  • Raw rice/Maavu arisi - 5 cups
  • Round urad dal - 3/4 cup
  • Fried gram dal/Pottukadalai - 1/4 cup
  • Butter – 4-5 tbsp (1/4 cup)
  • Asafetida / hing – 1/2 tsp
  • Jeera / cumin seeds or Black sesame seeds – 2 tbsp
  • Salt & water – As needed.
  • Cooking oil – for deep frying.
For small quantity : 1 cup = 250ml
  • Rice flour - 1 cup ( Storebought dry rice flour)
  • Roasted urad dal flour - 2 tbsp
  • Melted Butter - 1 tbsp
  • Hot oil - 1/2 tbsp
  • Hing - 2 pinches
  • Cumin seeds or sesame seeds - 1 tsp
  • Salt & water - as needed
  • Cooking oil - to deep fry
METHOD

  • Heat a kadai and dry roast urad dal slightly without changing its colour. Roast till nice aroma comes from urad dal. Switch off the flame and add the fried gram dal. Now mix the rice, roasted urad dal and fried gram dal. Grind in flour mill or powder it in mixie. If you use mixie to grind the mixture, please don’t forget to sieve the flour. Flour should be very fine in texture. This is called “murukku maavu”. If you have store bought readymade murukku maavu, you can use it. OR you can use store bought dry rice flour and make urad dal flour at home. 
  • Melt butter and set aside. You can add soft butter at room temperature as well. 
thenkuzhal
  • To this murukku maavu, add salt, melted butter, hot oil, hing, jeera or sesame seeds and water to make a non sticky dough. Take the murukku press and mould with one whole. Fill the dough and set aside..
thenkuzhal-recipe
  • Heat the oil in a broad kadai and and press the murukku in circular motion directly in oil or press the murukku in a polythene sheet or in the back of ladle separately and then drop in hot oil. This way you get a nice shape. If the string gets cut while pressing, either urad dal flour is less or water is less. So add 1 tsp more urad dal flour and drizzle some water, mix well and try it.  After you press the murukku , please stand a few feet away from the kadai. Sometimes, very rarely murukku may burst like seedai . If it doesn’t burst, then proceed.
thenkuzhal-recipe-1
  • Cook for sometime. Flip and cook for some more time till the hiss sound and bubbles ceases. Do it in medium flame. Adjust the flame whenever needed. Remove and drain in a paper towel.. Store in an air tight container after it cools down.

thenkuzhal-recipe-2

Don’t forget to try the half cooked murukku in the last batch. For this, after you press the murukku in oil, just flip immediately and remove in 10 secs.. Eat it hot !!
White colored, crispy thenkuzhal is ready to enjoy !!

Note
  • When you make murukku in large quantities , make the dough in batches to avoid the dough from drying. Also cover the dough with a damp cloth or a lid while cooking murukku. This helps in getting white colored murukku for all the batches. Otherwise color may vary for the last batches.
  • If murukku breaks while pressing, there may be less water in the dough or urad dal flour is coarse. In that case, you can sprinkle some water to the dough and mix well OR add little hot oil and try pressing. It may come out well. 
  • We have added fried gram dal and butter to get the crispness & white color . But usually fried gram dal is not added in thenkuzhal. Its purely optional.
  • Adding too much of butter makes the murukku look oily and becomes soggy very soon. Shelf life gets reduced.
  • Adding more urad dal flour or too much of roasting the urad dal results in dark colored murukku.So make sure u roast the urad dal without changing the color..
  • The murukku flour should be very fine in texture otherwise it may burst while cooking. So I always sieve the flour for safer side. 
  • Use enough oil for deep frying. Add more oil after few batches if necessary.
  • Drop or press the murukku only when the oil becomes hot. U can find this by dropping a pinch of flour. It rises up quickly. This is the correct heating point. Do not let the oil fume. Always keep the flame in medium for even cooking.
  • Instead of pressing in oil directly, you can try pressing it in the back of ladle greased with oil or greased polythene sheets. This way you’ll get nice shape.  
  • After cooking when you break the murukku, you can see a hole in the middle of the murukku like  funnel. This denotes the murukku is perfect !!
Thenkuzhal murukku

Perfect thenkuzhal must form a hole. Can you see the hole in the broken murukku piece ? :))
Thenkuzhal-murukku
Catch you all in my next post. Bye. Have a gr8 weekend.

Continue Reading...


May 30, 2009

Thattai, Thool Murukku Recipe - Easy Diwali Snacks


I got this thattai and thool murukku recipes from a Tamil magazine. I actually wanted to make small ones like nippattu which I had in my school days.. But I couldn’t make even sized ones as I am bad in making shapes ;) To make even shapes, you can try cutting with small round shaped moulds. It was crispy & tasty..I gave some to my neighbor and the next day she asked the recipe ..She told it was too good and her sons liked it very much. I was very happy because this is the first complement I am getting from a person other than my husband:)

Ok ,coming to the ingredients required:

Ingredients for thattai 
  • Processed Rice flour  - 2 cups Or Idiyappam flour
  • Roasted & ground urad dal flour OR Fried gram dal powder/ Pottukadalai powder –  2 tbsp
  • Fried gram dal/Pottukadalai – 2 tbsp 
  • Hot Cooking oil /Butter – 2 tbsp
  • Pepper powder OR Red chilli powder – 1 tsp
  • Salt & water – as needed.
  • Chopped curry leaves – a few
  • Oil – for deep frying..
Method:
  • Take a wide mouthed bowl and Mix all the items with little water & required salt to make a dough ..
  • Take a polythene sheet greased with oil.Make small balls with the dough.
  • Pat it to make a round shaped thattu vadai on the sheet...(Its better to use a round shaped mould for proper size & shape ).
  • Heat Oil in a wok and deep fry on both the sides in medium flame till hiss sound ceases...
  • Store in an air tight container and enjoy munching !!


Note
Instead of adding fried gram dal , u can also use 1 hour soaked chana dal..
U can also prick the thatti using a fork before frying to ensure proper cooking.


THOOL MURUKKU
Ingredients:
  • Processed Rice flour OR Idiyappam flour  – 1 cup 
  • Dry roast & Ground Urad dal powder – 2 tbsp
  • Butter / Hot cooking oil – 1 tbsp
  • Omam / Ajwain OR Black sesame seeds  – 1 tsp
  • Salt & Water – as needed
Method:
  • Mix everything in a bowl with required water &salt to make a dough.
  • Take the dough in the murukku maker with single star mould in it and press in the hot oil .
  • Deep fry on both the sides and store it in an air-tight container.

Note : The color of murukku depends on the roasted urad dal flour. If you roast urad dal till golden brown , the murukku color may be turn brown. So please roast urad dal in very low flame without changing its color.
Continue Reading...


April 24, 2009

Sunnundalu, Corn Flour Murukku - Diwali Recipes


urad dal ladoo

I saw this sunnundalu & corn flour murukku recipe in a cookery show (Vijay tv – samayal  samayal kitchen killaadigal ).As u all know sunnundalu is a famous traditional sweet in Andhra which is made using urad dal flour with jaggery.It is called as Minapa sunnundalu in Telugu.It is very easy to make at the same time tasty & healthy too.Last time when i went to my mom’s place, she gave me **roasted and ground urad dal for making murukku/Thenkuzhal.I prepared this urad dal ladoo & cornflour murukku with the leftover urad dal flour.Both came out very well.Everyone loved it.Cornflour murukku was very crunchy and flavorful.Its a great tea time snack for elders as well as kids.Apt for festivals like Diwali,Gokulashtami and Ganesh chaturthi.Do try these yummy sweet n snacks recipes & let me know your feedback.

cornflour-murukku-recipe

Sunnundalu/Urad dal ladoo recipe


Sunnundalu/Urad dal ladoo recipe Sunnundalu - Traditional Andhra sweet recipe made using Urad dal flour & jaggery | Corn flour murukku - Crunchy snack for tea time !
Cuisine: Indian
Category: Sweet,Snacks
Serves: 10 nos
Prep time: 10 Minutes
Cook time: 10 Minutes
Total time: 20 Minutes


INGREDIENTS
1 cup - 200ml
For urad dal ladoo
  • **Roasted Urad dal flour - 1/2 cup
  • Grated jaggery - 1/3-1/2 cup
  • Melted ghee - 3-4 tbsp
  • Cardamom - 2 nos
  • Raw rice - 1 tsp ( optional.i dint use)
For corn flour murukku
  • Corn flour - 1/4 cup
  • Rice flour - 1/2 cup
  • Besan flour - 1/4 cup
  • Softened butter - 1 tbsp
  • Hot cooking oil - 1/2 tbsp
  • Cumin seeds - 1/2 tsp
  • Hing/Asafetida - 1/4 tsp
  • Salt & water - as needed
  • Cooking oil - to deep fry

METHOD

  • FOR URAD DAL LADOO : Dry 1/2 cup of roast urad dal in low to medium flame till you get nice roasted smell.Make sure you don’t change the color of urad dal.After it cools down,grind it to a fine powder.Sieve it and again grind the coarse particles.Sieve again.Measure 1/2 cup of flour and take it in a bowl.Add grated jaggery,melted ghee,cardamom powder & roasted cashews, mix well.Make small balls out of it.Arrange in a box and enjoy eating ! It stays well for a week.( Urad dal should be roasted well else u will get raw smell of dal in ladoo.So take care).
Sunnundalu
  • FOR CORN FLOUR MURUKKU: Sieve and take all the flours together.Add chilli powder,hing,salt n cumin seeds.Mix well.Add the softened butter and spread it well with the flour.Heat oil required for deep frying.Add 1/2 tbsp of hot oil to the murukku flour.Mix well.Add the required water and make a non-sticky,soft dough.
Corn flour murukku
  • Take a star shaped mould and keep a ball of dough in the murukku press.Press the murukku in the back of ladle.After the oil is heated,drop a pinch of dough in the oil.If it rises immediately,simmer the flame & put the murukku.U can drop 3-4 murukkus in the kadai based on its size.Cook till the bubbles cease completely.Flip it once in the middle.Cook till it turns golden brown.Remove in a tissue and stack it in a box after they cool down.It tastes & flavours the best the next day.
Corn flour murukku 1

    Enjoy !
Note

  • For variations,u can replace jaggery with powdered sugar in urad dal ladoo.Some poeple also add a tsp of raw rice while roasting urad dal.Its completely optional though.
  • For murukku,u can use fried gram flour instead of urad dal flour but i feel urad dal flour is more flavorful.And u can use ghee instead of butter.
  • Add more red chilli powder if u want spicy murukku.


Try this yummy,healthy ladoo n murukku recipes Smile Enjoy your festival !
Cornflour-murukku


Continue Reading...