Hi friends, I hope you all had a great new year celebration. I had a wonderful day with morning darshan at a nearby perumal temple for vaikundha ekadesi, breakfast with this
rava kesari, lunch at Rajdhani Restaurant and above all I bought my favourite red color Handbag in JP nagar central mall as New year gift. The day went on really well more than I expected but we missed our daughter Raksha as she is in Salem for vacation. Tomorrow we are going there & spend this weekend with my in-laws.
Coming to this recipe, I must thank my friend Sudha for insisting me to try rava kesari recipe using microwave. She gave me a recipe too. I made some modifications & tried it yesterday for New year celebration.We loved it a lot.
I have used oil & ghee after watching Revathy shanmugam mam’s recipe in youtube video and I also referred Mrs.Mallika Badrinath’s Microwave recipes book for the timing and method. I added yellow food color and pineapple essence. So its flavor was very similar to pineapple kesari. But I tell you its not the authentic pineapple kesari version. So you can follow this recipe in my way using pineapple essence or just add cardamom powder with kesari color.It tastes great in either ways!
Try this easy, hassle free microwave rava kesari for poojas,special occasions and for your guests. I am sure it will come out great !!

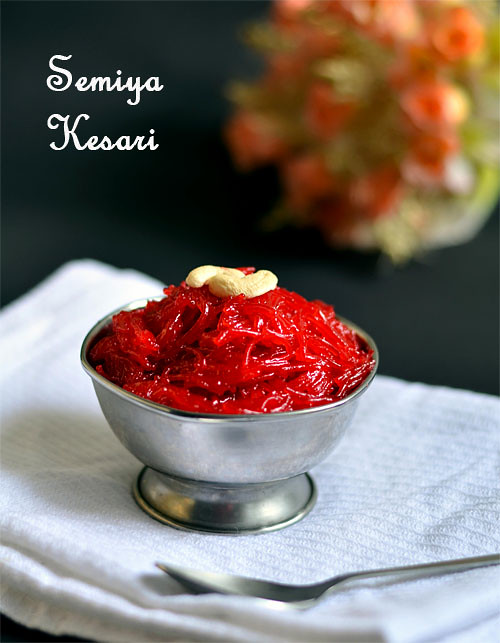
Rava kesari - Microwave version
 Rava kesari recipe using microwave !
Cuisine: Indian
Category: Sweet
Serves: Serves 2
Prep time: 4 Minutes
Cook time: 4 Minutes
Total time: 8 Minutes
INGREDIENTS
- Rava/sooji/Bombay rava - 1/4 cup
- Sugar – 1/2 cup
- Water – 1.5 cups
- Ghee - 1 tbsp + 2 tsp
- Oil - 1 tbsp
- Yellow food color - 2 pinches
- Pineapple essence or cardamom powder - little ( as needed)
- Cashew nuts – few ( to garnish)
|
METHOD
- Take a big microwave safe bowl & add oil + ghee.Choose a big bowl because rava will rise well while cooking & it may spill.
- Add cashews & roast it for 2 minutes in high power(mine is 800w power). Keep an eye after 1 minute.If cashews turn golden brown quickly,remove it.No need to keep it for 2 minutes.Remove cashews alone & add rava to the oil+ghee mixture,mix well so that rava is well coated without any lumps.

- Roast the rava in high power for ONE minute.Open the microwave,mix well & again roast it for a minute.So roasting takes TWO minutes here.Take care that rava doesn’t get burnt.So stand nearby and watch carefully.Remove the rava bowl and keep aside.

- In a vessel,heat water in gas stove till it starts to roll boil and add it to the roasted rava.Take care,it splashes.After adding water,add food color.Mix well without lumps.

- Cook the rava for TWO minutes in high power covering with a lid. Choose a big bowl because rava will rise well while cooking & it may spill.After 2 minutes,remove the bowl,mix well, cover it with the lid & cook again for ONE minute.Rava will thicken and gets cooked very well.Now remove the bowl.
- Add sugar,essence & mix well without lumps.


- The mixture will turn watery & small lumps may form.Mix quickly and break the lumps.As u mix,mixture will thicken slightly due to the heat of glass bowl & lumps will break.Make sure u break all the lumps.If u touch the mixture,it will be slightly sticking to the fingers.

- Keep it in high power for 30 seconds,remove & mix well. U will see the rava leaving the sides of bowl.Immediately add 2 tsp of ghee.Mix well & transfer to a plate or bowl.Do this process quickly else kesari may turn hard because of the heat of glass.If u touch,mixture will be non-sticky.
- Mixture will be semi solid initially. But it becomes thick & well set as it cools down.So don’t panic.


- Serve in a bowl by garnishing with roasted cashews.U can also reheat the kesari for one minute in high power before serving ! But this step is optional.
NOTE : Timings may differ based on the power of your microwave.If its more than 800w,the entire process needs lesser time than mentioned and if the power is less than 700w,time taken may be more.So keep an eye and do it carefully if making for first time.
|
Note
- Rava has to be cooked well else kesari turns chewy n hard.
- Adding right amount of sugar also helps to give u soft kesari.
- Adding oil helps to retain the moisture & prevents the kesari turning hard even after it cools down.Skip it & add ghee alone if u wish.
- Adding pineapple essence is completely optional.U can add cardamom powder or saffron as u wish.
- Here i used more water than mentioned in the original recipe.It helps to make lump free and perfectly cooked kesari.
|

Try this easy microwave rava kesari and enjoy your day !
Technorati Tags:
Microwave rava kesari recipe,
rava kesari recipe,
rava kesari,
kesari recipe,
easy sweet recipes,
easy sweets,
sweet,
rava kesari stepwise pictures,
tips to make kesari without lumps,
How to make kesari,
south indian recipes,
sooji halwa,
rava recipes,
sooji recipes,
easy rava kesari,
easy rava kesari recipe,
how to prepare rava kesari,
how to make rava kesari sweet in tamil,
how to make rava kesari bath
Very good recipes Tags:
Microwave rava kesari recipe,
rava kesari recipe,
rava kesari,
kesari recipe,
easy sweet recipes,
easy sweets,
sweet,
rava kesari stepwise pictures,
tips to make kesari without lumps,
How to make kesari,
south indian recipes,
sooji halwa,
rava recipes,
sooji recipes,
easy rava kesari,
easy rava kesari recipe,
how to prepare rava kesari,
how to make rava kesari sweet in tamil,
how to make rava kesari bath
Continue Reading...


 .I struggled to retrieve it but i couldn’t
 .I became very much disappointed but still i don’t want to give up making a sweet post on this festival day.Suddenly I remembered about this Paneer kheer recipe which i had tried for my last year’s Holi lunch menu.It was a super hit recipe in my house.So i prepared the same and refrigerated it to serve chill for my daughter and husband this evening.I am sure they will love it.Friends,if u have not planned anything for today’s celebration and if u wish to make something special and rich,this paneer kheer is a wise choice.You can make it in the next 15 minutes if u have store bought paneer ready in hand.Of course,freshly made chenna/Paneer tastes the best but still store bought paneer works fine.Its one of the best ways to make our kid consume paneer and as u all know,its a protein rich, healthy recipe for them.Try this easy paneer payasam for this festival of colors & have a fun filled,colorful celebration
  !!
!!
 Paneer kheer/Paneer payasam recipe-Easy n delicious dessert recipe for celebrations.