When we think about thirst quenchers for summer, the simple and the best coolant that strikes our mind is buttermilk. Its an awesome summer drink that provides lots of health benefits to our body. In South India, Tamil nadu we never fail to make neer mor during summer. Sendhil & Raksha likes to have spiced buttermilk instead of taking curd rice. But I love to eat
creamy curd rice with
raw mango or
baby mango ( Vadu mangai) pickle. So I make
South Indian neer mor almost everyday in summer just for them.
Recently I tasted this North Indian style spiced buttermilk (“Chaas/Masala Chaas” or masala taak in Hindi ) in a restaurant lunch buffet. As it was kept in a mud pot and served chilled, I loved it very much and had 3 servings even after having a tummy full lunch. I wanted to try this simple and yummy chaas at home for a change. I browsed for the recipe and tried at home. Roasted cumin seeds powder( Bhuna jeera powder) and black salt are the star ingredients of this basic plain chaas recipe apart from fresh yogurt/curd.
To make a spicy masala chaas, green chilli, ginger, coriander leaves can also be used along with cumin powder and black salt. For variations, mint leaves/Pudina, hing and even black pepper powder can be used. A pinch of chaat masala can also be added for that extra punch. Ok, lets see how to make this North Indian special summer drink, Masala chaas recipe with step by step photos !
Check out my Summer Recipes in
THIS LINK !
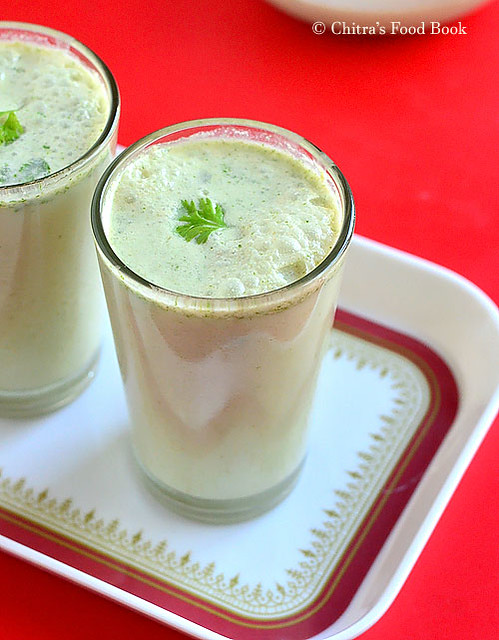
Masala chaas Recipe - North Indian Chaas recipe
 How to make North Indian special summer drink - Masala chaas/ Chaas recipe
Cuisine: North Indian
Category: Beverages
Serves: 2-3
Prep time: 5 Minutes
Cook time: 2 Minutes
Total time: 7 Minutes
1 cup - 250ml
- Fresh Curd / yogurt - 1 cup
- Small green chilli – 1 no
- Roasted cumin seeds powder/Bhuna Jeera powder - 1 tsp
- Black salt - 1 tsp OR Regular salt - as needed
- Coriander leaves - 1 tbsp + to garnish
- Sugar - a pinch
- Ice cubes - Few
- Ice water or plain water – 2 to 3 cups
Optional ( to grind)
- Ginger - 1/2 inch piece
- Mint leaves - 1/2 tbsp
|
HOW TO MAKE MASALA CHAAS RECIPE - METHOD
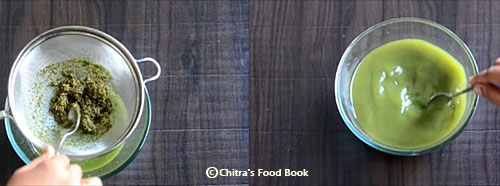
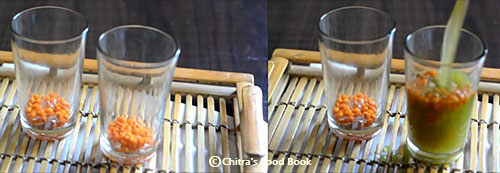
- In a mixie jar, take the green chilli, washed coriander leaves, roasted cumin powder, black salt and curd. If you wish, u can add 1/2 inch ginger piece, 1/2tbsp mint leaves while grinding. Grind it to a smooth paste. If you don’t have mixie, use a whisk and beat well.

- Transfer the ground paste to a bowl. Add 2.5 to 3 cups of ice cold water.Mix well. Check for taste and add more salt and cumin powder if needed. Garnish with finely chopped coriander leaves and sprinkle a pinch of cumin powder.

- Serve immediately or refrigerate it till use and serve chilled. Enjoy !

|
Note
- Adjust the quantity of cumin powder and black salt as per taste.
- Adjust the quantity of water based on the consistency and taste.
- You can skip grinding coriander leaves ad use it just for garnishing
- For variations, you can grind a small piece of ginger too.
- You can also add a pinch of chaat masala at the end before serving.
- Always serve it chilled to enjoy its best taste.
|
Try this easy, North Indian style masala chaas at home and enjoy after a heavy meal. It helps in quick digestion !
Technorati Tags:
Masala chaas recipe,
chaas recipe,
how to make masala chaas,
masala buttermilk,
North Indian buttermilk,
North Indian spiced buttermilk,
North Indian masala buttermilk recipe,
how to make chaas at home,
how to make masala chaas at home,
masala taak recipe,
spiced buttermilk recipe
Continue Reading...


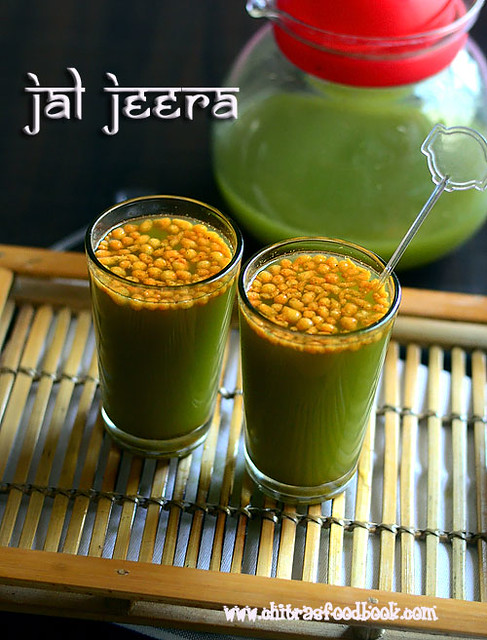
 . So I bought a packet of jaljeera powder from the shop and prepared this drink at home for the first time. We loved it very much. Then I started serving this to my guests as a welcome drink. Everybody liked it so much and asked me the recipe too
 . Yesterday I was thinking to start summer recipes in my blog. The most refreshing summer drink jaljeera flashed in my mind. I tried it this morning by watching Sanjeev Kapoor’s YouTube video and made it from scratch. I altered the recipe slightly by looking at the ingredients list of store bought jaljira packet. It came out very well and tasty. Traditionally tamarind is used in jaljeera but have used lemon juice instead. So lets check how to make this refreshing, fresh, yummy, healthy, easy Indian drink for this summer – Jal jeera recipe with step by step pictures and a video. Do try it and enjoy !


 . Do try this homemade easy popsicle recipe during this summer vacation for yourself & your kids and enjoy !! Lets see how to make rose milk popsicle at home.