Search Chitra's Food Book

Showing posts with label SWEETS RECIPES. Show all posts

October 4, 2016

Badam Burfi Recipe With Milk - Almond Burfi Recipe With Video

Badam barfi
Yesterday I made badam burfi recipe with milk for Navratri neivedyam and distributed it to my guests. Everybody loved it very much. Badam burfi (Almond burfi in English) is an easy, healthy, melt in mouth burfi recipe. It is known as Badam katli in Hindi. Its Ingredients and the method of preparation is very similar to Kaju katli.  

Last year I had shared Kaju badam burfi ( Almond cashew burfi) during Diwali for beginners. Procedure of making this badam barfi is slightly different. But its a very easy and fool proof recipe just like kaju badam burfi. Even though it takes time to prepare this burfi, its really worthy. Mixing and stirring is the major work here. I have used milk for grinding badam. You can use water too. No need to worry about sugar syrup consistency and no need to use more ghee. Its totally a beginners recipe. However we should be conscious towards the end of cooking to avoid mistakes. 

I adapted this recipe from Nisha madhuilka ji's website and used more sugar and milk than the mentioned quantity.  Just follow the steps, video, tips & tricks I have shared in this post. I am sure you can make a perfect melt in mouth badam burfi. If you are a beginner, try half the quantity given in the recipe. 

For variations, you can use almond powder ( Almond flour/Almond meal), coconut, cashews and even carrot. Diwali is not too far. Do bookmark this easy sweet recipe and try it out. Ok, Lets see how to prepare badam barfi at home easily with step by step photos and a video !

Badam burfi - Full video !

Badam barfi recipe

Badam burfi recipe


Badam burfi recipe Badam burfi recipe - Easy badam katli for beginners
Cuisine: Indian
Category: Sweet
Serves: 20 
Prep time: 10 Minutes
Cook time: 30 Minutes
Total time: 40 Minutes


INGREDIENTS
1 cup - 250ml
  • Almond/Badam - 1 cup
  • Sugar - 1.5 cups
  • Boiled Milk - 3/4 cup ( at room temperature)
  • Water - 3 cups ( to blanch almonds)
  • Cardamom powder - 1/2 tsp Or saffron threads - few
  • Ghee - 1 tbsp + few drops for greasing the plate
HOW TO MAKE BADAM BURFI - METHOD

  • Take a plate and grease it with ghee. To blanch badam quickly, boil 3 cups of water. When the water roll boils, add the badam. Let it boil for a minute. Switch off the flame and cover it with a lid.  Let it sit for 5 minutes.
    badam burfi recipe
  • Drain the badam and add to the cold water. Skin will come off easily. Keep all the blanched badam in the plate. Grind Sugar to fine powder and set aside. In the same jar, grind badam to a coarse paste without adding milk. Wipe the sides of jar and add 1/2 cup of milk. Grind to a paste.Wipe the sides of mixer. 
  • Check if the badam paste is smooth without any grits. If not, add 1/4 cup more milk and grind it well. Remember adding more milk while grinding takes ling time to make burfi. So add milk little by little while grinding.
    badam burfi recipe
    badam burfi recipe
  • Heat 1 tbsp ghee in a good non-stick kadai. Add the ground badam paste and powdered sugar. Mix well in medium flame. Stay nearby and keep mixing. Flame should be low to medium. Initially, the mixture will become thin as the sugar melts. Add the cardamom powder & keep stirring. The mixture will start to thicken. Mixture will bubble vigorously. It may splash. So please be careful. Keep the flame low if it splashes. Keep stirring because the bottom layer may burn quickly.
    badam burfi recipe
    badam burfi recipe
  • Keep mixing till the mixture becomes thick.Wipe the sides of the pan every time while u mix.It will take nearly 10-20 minutes to start thickening. Small bubbles will appear in the corners. When you keep on mixing, mixture turns thicker and it will start to leave the sides of pan. Wipe the sides & again mix it. At one stage, the mixture will become really thick and resembles a soft dough.
  • At that time, switch off the flame and mix for few seconds. Grease your fingers with ghee and take a pinch from the dough.Try to make a small ball. If you are able to make a soft, round ball, your burfi is done. Give a quick stir and make it even more slightly thick. The heat of kadai is sufficient to make your mixture thick.
    • Do not stir for more time. Mixture will become crumbly and you will not be able to shape it properly. If you remove it before the correct stage, it will taste like halwa. So try to make a small ball and then remove it at the right time.
  • badam burfi recipe
  • Transfer the burfi mixture to the greased plate. If you wish, you can knead it using your hands after it turns slightly warm. But I directly made the shape by levelling it with rolling pin. For this, Cover the dough with a butter paper and level the mixture using a rolling pin.Roll it according to the thickness you need. 
  • Remove the butter paper and cut the burfi into pieces using a ghee greased knife, when the mixture is warm. But do not try to remove the pieces when the mixture is warm. It may break. Take it after the burfi cools down completely. Store in a box. Stays good for 2 days at room temperature.

    badam burfi recipe
    badam burfi recipe

Enjoy !

Note
  • To find out whether the burfi is well set, after You levelled the burfi in tray with butter paper,try to remove the butter paper after 5 minutes.If it comes out clean,your burfi is perfect and you can make pieces & enjoy .If the butter paper doesn’t come out clean or if it sticks to the burfi mixture, then the right consistency is not reached and it becomes halwa. So transfer the  mixture to the kadai, add little water, melt the mixture and again start mixing till you get it right ! 
  • Suppose if you over do the mixing and if burfi becomes crumbly, take the crumbled burfi in a mixie jar, add milk and make a smooth paste. Again keep it in flame and mix well till it reaches the right consistency...
  • Color of this burfi will improve over time.
  • Adding more sugar makes the burfi even more soft. I used 1:1.5 ratio of badam n sugar which is perfect for me.  U can use 1:2 ratio too.
  • U can skip cardamom powder and use saffron soaked milk. But colour of burfi would change to yellow. This is known as kesar badam burfi.


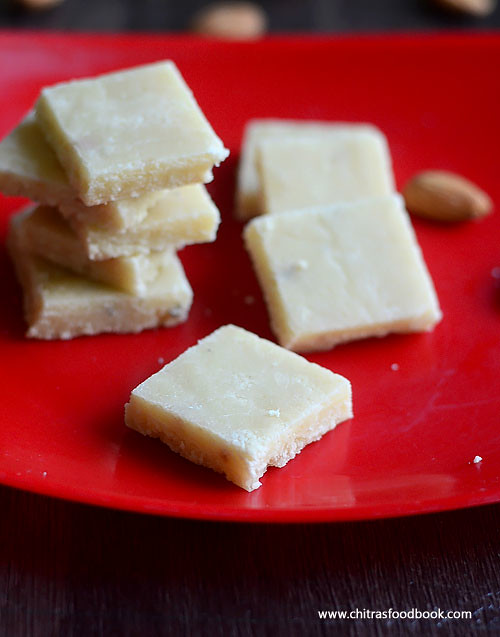
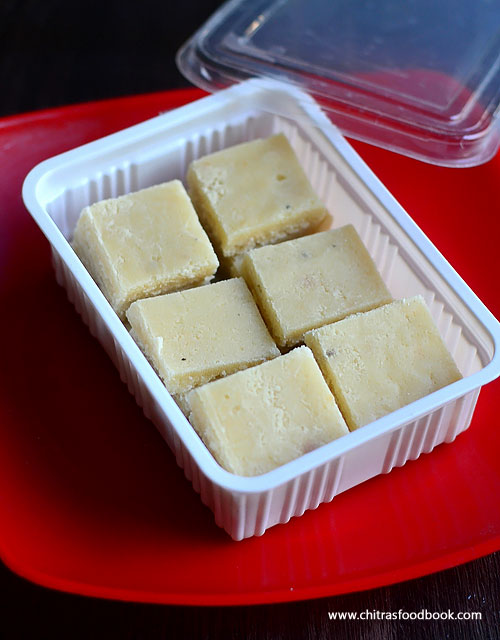
Make & Enjoy this healthy, melt in mouth burfi at home !

Continue Reading...


September 28, 2016

Bread Halwa Recipe – How To Make Bread Ka Halwa

Bread halwa recipe
Bread halwa came to my mind when I saw few leftover bread slices in my kitchen.I am making this easy halwa recipe for the second time. First time I tried bread halwa without milk by adding sugar syrup and ghee.It was good in taste but not so rich. Then I watched few bread halwa video recipes where they added khoya or condensed milk instead of milk. I felt that If I had added Khova/mawa, the taste would have been much better. But this time I prepared bread halwa with milk and followed a different procedure as Khoya is not easily available in my place. I will make a post adding khoya soon. 

For this recipe, I followed Tarla Dalal and used less milk & ghee when compared to other bread halwa recipes on net.It came out really well and satisfied my expectancy. Its process and making is so easy. I am sure its a rich, quick, Indian style dessert recipe made with easily available ingredients to serve your surprise guests and a good choice to use leftover dried bread slices. Kids would love it for sure. You should eat it hot or warm to enjoy its real taste. 

If you want to make a super rich and tasty bread halwa, you can deep fry the bread pieces in ghee just like double ka meetha or add ground cashew+ badam paste to the halwa. For variations, you can try this halwa with rusk and bread crumbs too. But adjust the quantity of milk and sugar. Ok, Lets see how to make bread halwa recipe with step by step images and a video.

Bread halwa - Video recipe

Bread halwa recipe

Bread halwa recipe


Bread halwa recipe How to make bread halwa - Easy version !
Cuisine: Indian
Category: Dessert recipes
Serves: Serves 2
Prep time: 5 Minutes
Cook time: 10 Minutes
Total time: 15 Minutes


INGREDIENTS
1 cup - 250ml
  • Milk bread slices – 6 nos ( I used Spencers bread)
  • Sugar – 4 tbsp
  • Milk – 1/2 cup
  • Cashews and badam - a fistful ( chopped)
  • Melted Ghee – 1/4 cup
  • Cardamom powder – 1/4 tsp
METHOD

  • Take 6 slices of milk bread ( I used 3 days old bread) and chop into small pieces roughly. Grind to a fine powder. Set aside in a bowl. ( Do not use too soft n fresh bread. You can't powder it.In that case, microwave it for a minute and then powder it.)
    Bread halwa recipe
  • Heat 1/4 cup of ghee in a kadai. Roast sliced cashews and badam till golden brown. Remove in a plate.
    Bread halwa recipe
  • To the remaining ghee, add the powdered bread.Roast well for 2-3 minutes till you get roasted aroma. To this, add 1/2 cup of milk and 4 tbsp of sugar. Mix well till sugar melts and milk is absorbed by the bread. Mixture will become thick and wet. ( If you feel the mixture is too dry, add little more milk Say 2 tbsp) Cover and cook the mixture for 2 minutes.
    Bread halwa recipe
    Bread halwa recipe
  • After 2-3 minutes, open the lid.Mix well and add cardamom powder, roasted nuts. Keep mixing till the mixture becomes thick, shiny and starts to leave traces of ghee in the sides of pan. It will be non-sticky to touch. Transfer to a bowl and serve hot OR press the halwa to make shape. Invert in a plate and serve warm or cold. Remember, this halwa tastes the best when served hot /warm.
    Bread halwa recipe
    Bread halwa
Enjoy !

Note
  • No need to remove the sides of bread.The color of this halwa looks brown as I din’t remove the sides. If you remove the sides, the color of halwa may slightly change.
  • Add more sugar according to your taste buds.
  • Do not reduce the quantity of ghee. It may change the flavor and consistency.
  • Instead of adding roasted nuts, you can try adding cashew + badam paste along with sugar to get more richness.
Do try this easy, yummy bread halwa and enjoy !
Bread halwa
Continue Reading...


July 1, 2016

Pineapple Kesari Recipe – Pineapple Kesari Bath

Pineapple kesari bath recipe
Usually I make Pineapple Kesari just by adding Pineapple essence and yellow food color to the normal rava kesari. I have never tried it with Pineapple chunks. Yesterday I bought a small pineapple to try this authentic pineapple kesari served in weddings, functions and Karnataka special Pineapple Gojju recipes.So this morning I made kesari bath for my Thursday Guru pooja. 

I followed my microwave rava kesari procedure and ingredients which I adapted from Revathy Shanmugam mam’s recipe. It came out very well, soft and flavorful. Being a Pineapple lover, I loved each and every bite of it in the kesari. But the only thing I felt was, I chopped Pineapple into big chunks thinking it would mash up in the kesari but it remained as it is. So please chop the pieces very finely or make it a coarse paste to avoiding biting chunks in between the super soft Kesari. 

Friends, do try this different type of kesari using pineapple for your friends & family, Enjoy!! Lets see how to make pineapple kesari recipe with step by step photos.

Check out my basic rava kesari recipe, Karnataka kesari bath recipe, Milk kesari, Semiya Kesari, Microwave rava kesari & mango kesari recipes

Check out the health benefits and more details about Pineapple HERE

Pineapple kesari

Pineapple Kesari Recipe


Pineapple Kesari Recipe Pineapple Kesari Recipe - An easy, Indian dessert recipe !
Cuisine: Indian
Category: Sweet
Serves: Serves 3-4
Prep time: 10 Minutes
Cook time: 15 Minutes
Total time: 25 Minutes


INGREDIENTS
1 cup - 200ml
  • Rava/ Bombay Sooji - 1/2 cup
  • Sugar - 1 cup
  • Small Pineapple pieces - 1/2 cup
  • Pineapple essence - few drops
  • Yellow food color - 2 pinches
  • Water - 2.5 cups
  • Ghee - 2 tbsp + 2 tsp
  • Cooking oil - 2 tbsp ( No flavored oils)
  • Cashews and raisins – few ( optional)
METHOD

  • Wash and chop the pineapple into very small pieces or coarsely grind the pieces ( I chopped it big by mistake). Take them in a bowl and add 2 tbsp of sugar from 1 cup of sugar. Mix well and cover the bowl. Let the pineapple pieces soak in sugar for 20 minutes and becomes soft.
  • Take a wide plate and grease it with ghee.Set aside. In a kadai , heat 2 tbsp ghee + 2 tbsp oil.
Pineapple kesari recipe
  • After its heated, reduce the flame to medium and roast the cashews & raisins.Remove it in a plate after cashews turn golden and raisins bloat. Now add the rava. Rava should sizzle as soon as you add it. Roast the rava well for 2-3 minutes by staying nearby. Make sure you don’t burn the rava or change its color.Switch off the flame and let the rava be in the same kadai.
Pineapple kesari recipe
  • In a bowl, roll boil 2.5 cups of water adding yellow food color and soaked pineapple pieces. Do not add the sugar water in the pineapple pieces. Add the fruit alone. Cover & cook the pineapple pieces. Add this water to the roasted rava. Take care, water will splash. Now switch on the flame and keep stirring. As soon as rava becomes thick, close the kadai with a lid & simmer the flame completely. Cook the rava for 3-4 minutes.
Pineapple kesari recipe
  • Open the lid and mix the cooked rava. Add sugar and stir it without lumps. Do it fast, Sugar will melt, mixture will become thin and watery. Add pineapple essence.
Pineapple kesari recipe
  • Keep stirring till the kesari starts to leave the sides of pan. As soon as kesari starts to leave the sides of pan, add 2 tsp pf ghee, mix well & switch off the flame. Transfer to the ghee greased plate. No problem if the kesari is not thick, it will thicken as it turns warm.
Pineapple kesari recipe
    Enjoy !
Note
  • I used rava and sugar in the ratio of 1:2. You can reduce to 1.5 cups if you want mild sweetness.
  • Adding more water makes the kesari soft. So I used 1:5 rava and water.
  • Oil helps to maintain the texture of kesari and prevent its from hardening. So do not skip it. Use unflavored oils like refined oil or olive oil. Never use groundnut oil/Kadalai ennai.
  • If you don’t like eating pineapple pieces in the kesari, chop it very finely so that it will mash up while cooking and you won’t get pieces in your mouth. You can also try grinding them coarsely.
  • If you don’t have pineapple essence, skip it or add cardamom crushed seeds if you like.

  Yummy , flavorful kesari is ready to enjoy !
Pineapple kesari recipe
Continue Reading...


April 29, 2016

Mango Kesari Recipe – Mango Sheera – Kesari Varieties

Mango kesari recipe
Mango season has started. Last year I shared few ripe mango recipes like Mango ice cream, Mango sago and Aamras. This year I wanted to start my mango recipes with this easy and yummy mango kesari as I love to make different varieties of kesari at home. 

Mango kesari is nothing but our usual rava kesari cooked with mango pulp. It is known as Aam ka sheera in Hindi, Ambyacha sheera in Marathi and Mambazha kesari in Tamil. Yesterday I tried it for the first time I followed the procedure of my rava kesari recipe and prepared this. It came out so well with the awesome flavor of ripe mango. Do try this kesari recipe for a change. You will love it for sure. Lets see how to make this easy, delicious mango kesari. Even beginners & bachelors can make a perfect kesari by following this recipe.
 
Check out my Semiya kesari, Karnataka Kesari bath, Milk kesari, Microwave Rava Kesari recipes too.
Mango sheera recipe

Mango kesari recipe


Mango kesari recipe How to make rava kesari with mango pulp - Mango sheera / Mango kesari recipe
Cuisine: Indian
Category: Sweet
Serves: Serves 4
Prep time: 10 Minutes
Cook time: 10 Minutes
Total time: 20 Minutes


INGREDIENTS
1 cup = 250ml
  • Rava/Sooji - 1/2 cup
  • Mango Pulp - 1/4 cup ( Use 1/2 of ripe mango or readymade mango pulp)
  • Sugar - 3/4 cup
  • Cardamom powder - 1/2 tsp
  • Ghee - 3 tbsp
  • Cashews - few
  • Water - 2.5 cups
  • Lemon yellow food color – a pinch ( Optional)
METHOD

  • Take the ripe mango, peel the skin. Remove the pulp and grind it to a smooth paste without adding water. Measure 1/4 cup of it and set aside.I used readymade mango pulp here.
  • Heat 1 tbsp of ghee in a kadai. Roast the cashews till golden and remove in  a plate leaving the ghee in the kadai. Add the rava. It should sizzle in the sides as you see in the picture. Roast it in medium flame for 3-4 minutes. Remove in a plate.
Mango kesari
Mango kesari
  • In the same kadai add 2.5 cups of water and 1/4 cup of mango pulp ( you can add 1/2 cup of mango pulp if you want more mango flavor) I din’t want dominating mango flavor in my kesari, so I added the pulp half the quantity of rava.
Mango kesari
  • When the water comes to roll boil,lower the flame completely and add the roasted rava. Mix it well using a whisk. Make sure there are no lumps in it. Rava splashes, be careful while mixing. After all the water is absorbed by the rava, close the kadai with a lid and keep the flame medium. Let the rava cook well for 2-3 minutes.
Mango kesari
Mango kesari
  • Open the kadai and add sugar. Mix well with a whisk without lumps. It will become watery. So mix well till the kesari becomes slightly thicker.
Mango kesari
  • Add the remaining 2 tbsp of ghee and cardamom powder. Mix till the ghee is absorbed by the kesari. Don’t wait for the kesari to leave the sides of kadai. Remove it as soon as the ghee is absorbed by the kesari.
Mango kesari
  • If you keep on stirring after this stage, kesari will become hard and chewy.So remove the kesari in a ghee greased bowl or plate. Don’t worry, Kesari will be very slightly watery, sticky and it falls like a ribbon as shown in the picture. It will thicken and tastes soft when it becomes warm. You can make them into pieces if you spread the kesari in a plate OR serve it as a scoop in bowls. Enjoy !
Mango kesari


Note
  • Add 1 cup of sugar if you want more sweetness in your kesari. As we are adding mango pulp, the quantity of sugar I mentioned here is enough.
  • You can add more mango pulp if you like dominating mango flavor.
  • I have used readymade mango pulp here. You can take the pulp from the ripe mangoes, grind to a puree and use it.
Enjoy this easy, yummy mango flavored kesari at home with your loved ones Happy
Mango kesari recipe
Continue Reading...


March 21, 2016

Gujiya Recipe With Mawa, Suji - How To Make Gujiya With Step by Step Pictures

Gujiya recipe
Holi festival is around the corner.When I was looking for Holi special recipes, I found Gujiya is a must to do recipe for this festival. When I browsed for the recipe, I found it was very similar to Sweet samosa/Karanji , Chandrakala and Suryakala sweet recipes. Of course there are some slight variations between each of them. So this time I tried an Authentic North Indian style Gujiya recipe using mawa and suji by following the recipe shared by Sandhya Soni, a member of Facebook’s Chef at large group. Here is the link. It came out very well.

 I was very happy & satisfied with the result. Sendhil & Raksha loved it too. So I thought of sharing this wonderful recipe as my contribution to Holi festival recipes. I used khoya/mawa for gujiya filling as mentioned in the original recipe. If you wish to try without khoya, you can replace it with dessicated coconut and powdered nuts. Please refer my Sweet samosa recipe to know its procedure. Try it and share with your friends and relatives on HOLI day !! Have a colorful celebration. Lets see how to make Gujiya recipe with mawa and sooji stuffing with step by step pictures.

Gujiya recipe

Gujiya recipe


Gujiya recipe How to make gujiya with khoya/mawa filling - Holi festival recipes
Cuisine: Indian
Category: Sweet
Serves: 8-10 
Prep time: 30 Minutes
Cook time: 20 Minutes
Total time: 50 Minutes


INGREDIENTS
1 cup = 240ml
  • Maida - 1 cup
  • Melted ghee - 1.5 tbsp ( at room temp)
  • Water - as needed
For filling
  • Unsweetened khoya - 1/2 cup  ( I used Amul)
  • Powdered sugar - 1/2 - 3/4 cup ( based on taste)
  • Chopped nuts - 2 tbsp ( badam, cashew,pista)
  • Roasted sooji - 3 tbsp
  • Cardamom powder - 1/8 tsp
  • Cooking oil - to deep fry
HOW TO MAKE GUJIYA - METHOD

  • Take a wide bowl and add the flour. Add the melted ghee at room temperature and mix the flour. After the ghee is well mixed with the flour, add water little by little and make a smooth dough. Knead the dough for 5 minutes and rest it for 30 minutes. Cover the dough with a wet cloth.
Gujiya recipe
Gujiya recipe
  • In the mean time,make the filling. Take the unsweetened khoya in a non-stick kadai. Heat the khoya in medium flame and mix until it leaves the pan and starts to rotate with the ladle. The color of khoya will turn golden brown. This process takes around 10 minutes or more. So do it patiently in low to medium flame. Remove in a plate. Dry roast the sooji well. Collect in another plate.
  • Gujiya recipe
  • Let the cooked khoya  & roasted rava cool down completely. Now mix the finely chopped nuts, powdered sugar, khoya and rava very well till the mixture looks crumbly. Add cardamom powder, mix well. Stuffing is ready.
Gujiya recipe
Gujiya recipe
  • Now take the dough and roll it to a cylinder.Make balls of equal size. Roll the ball into small poori and keep a tbsp of stuffing in the center. Apply water on the corners and fold the poori into a half moon shape. Now fold the edges as shown in the pic OR press the corners with a fork.
Gujiya recipe
Gujiya recipe
Gujiya recipe
  • Heat oil and drop a pinch of batter. If it rises to the top and does not brown, oil heat is just right. Now keep the flame low to medium and drop the gujiya. Deep frying the gujiya patiently in low to medium flame give you really crispy gujiyas. So do not  hurry up while frying. Do not over crowd the kadai. Fry 2-3 gujiyas based on the size of kadai. Deep fry them in batches.
Gujiya recipe
  • Cook the gujiya patiently on both sides by flipping now and then. Once the bubbles cease and gujiya turn golden brown, remove them in a tissue. Drain the excess oil and serve hot OR store them in an air tight box after it comes to room temperature. It stays good for a week !! But to enjoy its best taste, eat it on the same day of preparation. Enjoy !
Gujiya recipe


Note

  • Adjust the quantity of powdered sugar based on your taste buds.
  • Deep frying in medium flame for long time gives a crispy gujiya.
  • For best taste, serve gujiya as soon as you prepare them.
  • Another important point is “Rolling” . Roll the dough like a thick poori. It should be thick in the centre and slightly thin in the corners. If you make it very thin , stuffing will ooze out in the oil while deep frying and the oil becomes a waste . Please be careful. I had experienced this. 
  • If you make it too thick , it takes more time to cook and spiral corners may not be cooked properly.To avoid this disaster , first make one , deep fry in little oil. If you get it right , proceed making the remaining ones. Else adjust the rolling and try again.This will surely help.
  • Suppose if the stuffing ooze out in oil , immediately switch off the stove and remove the sweet. Strain the oil and reuse it.
Enjoy these yummy Gujiya & Thandai on HOLI Day and have a great celebration !
Gujiya recipe
Continue Reading...