Search Chitra's Food Book

Showing posts with label TIFFIN RECIPES. Show all posts

May 16, 2017

Ragi Poori Recipe – Finger Millet Poori – Ragi Recipes

Ragi Poori Recipe
I am happy to share a millet recipe after a long time in my space. As you all know, I have been trying varieties of Poori recipes during weekends and sharing the same in my web page. Soon I will make a collection of them in my page for quick reference. 

Last weekend I tried ragi poori for our Sunday breakfast. Ragi (Finger millet in English, Kezhvaragu in Tamil, Mandua in Hindi, Ragi in Kannada, Koovaragu in Malayalam, Ragulu in Telugu) is a very healthy millet that is rich in calcium & iron.Usually I make recipes with ragi flour at least once in a week to include it in our regular diet.  Most of the time I prepare ragi dosa as its a quick, easy and instant dosa recipe. Sometimes Ragi porridge/Ragi kanji and ragi idli. 

Recently I came across this finger millet puri in some websites. I quickly browsed for the recipe, made some changes and tried it. It came out really well and soft.Though it looks hard & dry in the picture, the actual texture and taste was really nice. We are adding equal quantity of wheat flour to the ragi flour to give a binding to the poori dough. Rava is used to maintain the puffiness of poori for long time. Ghee is to give softness.

Do try this poori  for a change with a healthy addition of Ragi.You will like it I think :). Lets move on to the recipe of how to make Ragi poori with step by step pictures ! Please watch my basic Poori video for reference as the ingredients and the method of making this ragi poori is almost the same.


Finger millet poori

Ragi Poori - Finger Millet Poori Recipe


Ragi Poori - Finger Millet Poori Recipe How to make Ragi Poori/Finger millet poori recipe for breakfast - Basic poori recipe with a healthy addition !
Cuisine: Indian
Category: Breakfast Recipes
Serves: 9
Prep time: 20 Minutes
Cook time: 2 Minutes
Total time: 22 Minutes


INGREDIENTS
1 cup - 250ml
  • Ragi flour / Finger millet flour - 1/2 cup
  • Wheat flour / Atta - 1/2 cup
  • Ghee - 1/2 tsp
  • Rava/Sooji - 1 tsp ( I used upma rava,coarse ones)
  • Salt & water - as needed
  • Cooking oil - to deep fry poori
HOW TO MAKE RAGI POORI - METHOD

  • In a wide bowl, take the ragi flour, wheat flour, required salt, rava, ghee and mix well. Now add water gradually and make a thick dough.No problem if the dough is slightly sticky and have cracks.
    Ragi Poori recipe
  • Now grease your hands with oil lightly.Knead the dough very well for 5 minutes.Dough will become smooth and non-sticky. Do not rest the dough. Make poori immediately else it may drink oil.
    Ragi Poori recipe
  • Make small balls from the dough and set aside.Keep it covered with a plate. Take one ball, dust in wheat flour and roll into small, thick poori. Poori won’t puff up if rolled thin.
    Ragi Poori recipe
    Ragi Poori recipe
  • Heat oil in a kadai and when it gets heated , drop a pinch of dough.If it rises to the top immediately, oil temperature is right.Oil should not be smoky hot.Drop one poori and when it starts to float on top, press it with a ladle gently. Poori puff up well. Flip the poori and lower the flame to medium.
    Ragi Poori recipe
  • Cook the other side and remove in a tissue paper. Again increase the flame and drop another poori. Repeat this and make all the puri. Serve hot with kurma! I made Karnataka style vegetable sagu as side dish.
    Ragi Poori recipe
  • Enjoy !


Note

  • Do not add more ghee. Poori won’t puff up.
  • Poori should be rolled thick to puff up well.
  • Adding Rava is also optional.
  • Do not rest the dough for long time. Poori may absorb more oil.
  • Poori won’t puff up if oil temperature is less. So maintain proper heat.
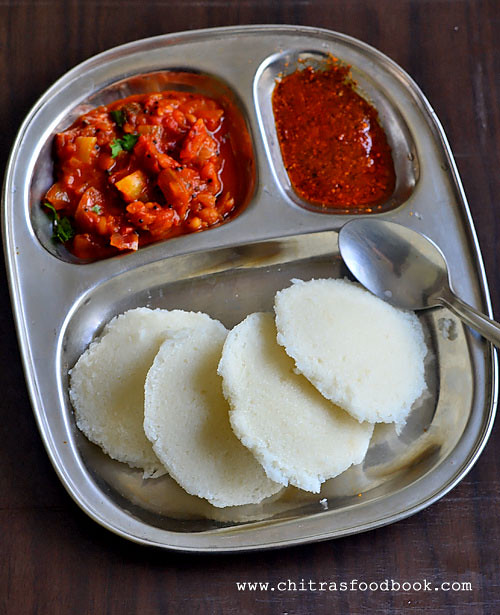
Ragi Poori with mixed vegetable kurma is an yummy combination. Do try it !
Ragi Poori - Finger millet puri
Continue Reading...


May 14, 2017

Veg Mayonnaise Sandwich Recipe – How To Make Mayo Sandwich Recipe Indian

Mayonnaise Veg Sandwich
Vegetable Mayonnaise sandwich was in my try list for long time. I make sandwich recipes only during weekends if I have less time to prepare breakfastWinking. Most of the time I make vegetable sandwich in this way. Recent days I started looking for varieties of Indian vegetarian sandwich ideas. One such recipe is this Veg Mayo sandwich. In fact my friend Shalini told this recipe long back but couldn’t try it. Last week I bought a box of Fun Foods Veg Mayonnaise ( eggless mayonnaise) to slather in Veg burger for my daughter. Suddenly I reminded about this sandwich and tried it with few leftover bread slices at home. As the sandwich filling/spread is a no cook recipe,I felt it very easy to make.The only time consuming part is to grate or chop the vegetables finelyTongue. When you make it for just two people, its not that difficult too. I have toasted the bread with butter before filling with the mayonnaise spread. But toasting the bread is completely optional. If you want to prepare a quick and simple sandwich, you can just smear butter in the fresh, plain bread slice and enjoy it. If your kids like this sandwich, you can pack this for their snack box. Overall, this sandwich is a good choice for Indian vegetarians to make a quick breakfast or dinner. Ideal for bachelors and working women. Lets see how to make Vegetable mayo sandwich recipe with step by step pictures. I will upload the video soon.

Check out my Grilled Cheese sandwich and paneer sandwich recipes too !


Mayo sandwich recipe

Vegetable Mayonnaise Sandwich Recipe - How to make Indian Veg Mayo Sandwich


Vegetable Mayonnaise Sandwich Recipe - How to make Indian Veg Mayo Sandwich Easy, quick Vegetable mayonnaise sandwich recipe for breakfast or dinner !
Cuisine: Indian
Category: Sandwich recipes
Serves: Serves 2
Prep time: 10 Minutes
Cook time: 10 Minutes
Total time: 20 Minutes


INGREDIENTS
1 cup - 250ml
  • Bread slices – 6 nos ( I used white bread, U can use whole wheat bread too)
  • Eggless Mayonnaise – 1/2 cup ( I used Fun Foods brand)
  • Grated carrot – 1/4 cup
  • Capsicum – 2 tbsp ( Chopped finely)
  • Big onion – 1/4 cup ( chopped finely)
  • Boiled Sweet corn – 1/4 cup
  • Chopped Tomato - 1 tbsp
  • Black Pepper powder – 1 tsp
  • Red Chilli flakes – 1 tsp
  • Chat masala powder - 1/2 tsp ( optional)
  • Salt – as needed
  • Grated Cheese  or cheese slices – 2 tbsp /  3 slices (Optional)
  • Butter or ghee - As needed ( to toast the bread)
METHOD

  • Take a bowl and mix all the ingredients except bread slices. Make the filling and keep it ready.
    Vegetable mayonnaise sandwich
  • Heat a dosa pan and melt a tsp of butter. Toast a bread slice till golden brown on both the sides. Toast all the slices similarly.
    Vegetable mayonnaise sandwich
  • Take a toasted slice and spread the mayonnaise stuffing.Cover it with another slice of bread. Cut it diagonally and serve immediately.
    Vegetable mayonnaise sandwich
    Vegetable mayonnaise sandwich
  • For variations, you can skip the toasting part and make it in raw bread to make your job simple. If you use fresh bread, this sandwich would be very tasty. For this, apply butter on one side of bread, spread the filling and cover with the another buttered bread slice. You can also grill this sandwich if you wish.Enjoy !

Note
  • Adjust the quantity of pepper powder as per your taste.
  • You can add grated cheese in the filling if making for kids.
  • You can make this sandwich using fresh, raw bread slices without toasting them.
  • For variations, you can keep slices of onion, tomato, cucumber instead of making filling with mayonnaise.
Try this easy, yummy veg mayo sandwich for your kids. They will love it.
Veg mayonnaise sandwich
Continue Reading...


May 2, 2017

Instant Poha Idli Recipe - Aval Idli – Instant Idli Recipe Without Urad dal

Instant poha idli
Instant poha idli with idli rava or upma rava (Semolina, sooji) / aval idli without urad dal is a quick fix, instant recipe for my idli cravings. After a long time, I am sharing an instant Idli recipe in my blog. Being a South Indian, Idli dosa batter is a must in my home. So I grind the idli batter at least once in a week and use it for 3 to 4 days. I used to explore varieties of idli recipes as a result of which you could find 15+ idli varieties in my blog. Myself & Sendhil can manage food without idli dosa for one to two weeks. But Raksha can’t. As she is in Salem, I did not make idli,dosa batter for the past two weeks and managing our breakfast & dinner with upma, instant dosa varieties, paratha recipes etc.

 Yesterday all of a sudden I got the craving to have idli for our dinner. As I had bookmarked this Instant, no fermentation poha idli recipe from Smitha’s blog years ago, I thought of trying it. It came out really well. I relished it with easy tomato thokku. Yes, I made an easy tomato thokku recipe in pressure cooker. It was tasting great for this idli. Recipe posted HERE.

Even though this aval idli came out very soft, I won’t say it tastes equally well to our usual fermented, soft and spongy idli made with rice & urad dal.As this is an instant version, the natural sour taste & flavor from fermented idli batter would be missing in this idli. So I feel only a tangy side dish like tomato thokku or tomato chutney would be the best side dish for this idli. But this is sure a keeper recipe for people who wants to make quick yet healthy steamed food using poha (Flattened rice/Pressed rice in English, Aval in tamil, Avalakki in Kannada). Its ideal for bachelors and working women. Its good for our tummy as well because curd, poha and idli rava are the major ingredients for this idli recipe. 

Cooking soda is not essential for this recipe still I used meagre quantity. If you like this idli recipe, you can make many variations like adding grated vegetables, season it like rava idli.  Do try this easy, quick instant idli recipe if you run short of our usual idli batter. You will like it for sure. I have shared all the possible tips for making this idli perfect. So lets check out how to make super soft, instant poha idli with step by step pictures and a video !

UPDATE : THIS IDLI CAN BE MADE WITH RAVA/SOOJI/SEMOLINA ( COARSE VARIETY) INSTEAD OF IDLI RAVA. BUT ADD ROASTED SOOJI AT ROOM TEMPERATURE. IT SHOULD NOT BE HOT. ADD 1/2 TSP ENO JUST BEFORE MAKING IDLI.


Instant poha idli

Poha Idli - Instant Poha Idli Recipe - Easy Aval Idli


Poha Idli - Instant Poha Idli Recipe - Easy Aval Idli How to make instant idli recipe using poha & idli rava
Cuisine: Indian
Category: Breakfast
Serves: 15 to 20nos
Prep time: 20 Minutes
Cook time: 15 Minutes
Total time: 35 Minutes


INGREDIENTS
1 cup - 250ml
  • Thin Poha/ Paper Aval - 1 cup (Thin Pressed rice/ Flattened rice)
  • Idli Rava / Idli Sooji OR Roasted semolina/sooji - 1.5 cups
  • Sour Curd - 1 cup 
  • Water - 1.5 to 1.75 cups in total
  • Salt - as needed
  • Baking soda - 1/4 tsp . Add 1/2 tsp ENO if using semolina
HOW TO MAKE INSTANT POHA IDLI - METHOD

  • Wash the poha once or twice in water. Drain it. It will be soft. Now add 1 cup of curd to it. Mix well and soak for 10 minutes.
    poha idli recipe - Instant idli recipe
  • Mash the poha after soaking. Add 1.5 cups of idli rava or roasted semolina (upma rava) and mix well. Idli rava absorbs all the water content. So add 1 cup water, mix well and let the mixture soak for 10 minutes. ( Update : You can also use roasted upma rava/sooji at room temperature instead of idli rava.)
    poha idli recipe - Instant idli recipe
    poha idli recipe - Instant idli recipe
  • After soaking, mix well and add 1/2 to 3/4 cup water. Mix well to bring thick idli batter consistency. Add water carefully, make thick, pourable batter. Thin batter makes flat, sticky idli. Add salt & baking soda, mix well. Make idli immediately. (Update: If using semolina, add 1/2 tsp ENO or 1/4 tsp baking soda. )
    poha idli recipe - Instant idli recipe
  • Grease idli plates with oil. Pour the batter. Roll boil water in an idli pot. Keep the idli plates only after the water starts to roll boil. Close & steam it for 12 to 15 minutes. You will get nice cooked smell of idli. It looks slightly flat after steaming. Don’t worry.
    poha idli recipe - Instant idli recipe
    poha idli recipe - Instant idli recipe
  • Remove the idli plate and rest it for 5 minutes. Unmold it with a small flat ladle or spoon.This idli may be sticky, very soft & breaks when removed hot. So remove it after the idli becomes warm to get the perfect shape.It stays soft for few hours.
    poha idli recipe - Instant idli recipe
  • Enjoy with some tangy side dishes. I personally liked with tangy tomato thokkku & tomato chutney more than coconut chutney or sambar. Choice is yours !
  • Note : If you make the batter in the morning, you can use the leftover batter for making idli in dinner. You can refrigerate the leftover batter or keep it outside which helps for fermentation.

Note
  • Most important point to note is idli batter consistency. It should not be thin. No problem even if its too thick. You can add little more water anytime, mix and make idli. So add water carefully while mixing.
  • Cooking soda is not essential if you leave the batter for 30 minutes to 1 hour resting time.
  • Unmold the idli only after 5 minutes of steaming. Idli may break when you unmold it immediately. Give a resting time of 5 minutes.
  • If you are using thick poha, grind to a coarse powder in a mixie. Then wash and soak it. I hope it works.
  • ENO can be used in place of soda but use only 1/8 tsp if making with idli rava. If you use upma rava, you should add 1/2 tsp of ENO or 1/4 tsp of cooking soda. 

Enjoy this instant poha idli with tangy side dish like tomato thokku or tomato chutney ! You will love it for sure !
Aval idli recipe
Continue Reading...


April 1, 2017

Indian Style Tomato Spaghetti Recipe – Vegetarian Spaghetti Recipe With Video

Indian vegetarian spaghetti recipe
This is my second post on vegetarian spaghetti recipe. I started trying out spaghetti based recipes recently and my first recipe was easy garlic spaghetti. We loved that a lot. So Raksha & Sendhil asked me to try some varieties of spaghetti recipes for breakfast. Last Sunday I made this easy, Indian style tomato spaghetti recipe with very simple ingredients. I browsed many vegetarian spaghetti recipes and tried it finally with my own twist. It came out really well and we all loved it. 

Raksha took 2 servings which made me very happy. For Raksha, I used red chilli flakes, pepper powder in little quantity for less spicy taste and added more cheese whereas for myself & Sendhil, I added more spices, used Italian seasoning and made it without cheese. It was tasting great and packed with full flavor. 

Friends, do try this easy, yummy tomato spaghetti recipe for your kids and family.Adjust the spice level based on their taste buds. I am sure they will love it. Lets see how to make this easy, Indian vegetarian tomato spaghetti recipe with step by step photos and video !


Indian spaghetti recipe

Tomato spaghetti recipe - Indian vegetarian spaghetti recipe


Tomato spaghetti recipe - Indian vegetarian spaghetti recipe Easy tomato spaghetti recipe - Indian vegetarian style recipe for breakfast & dinner !
Cuisine: Indian
Category: Spaghetti recipes
Serves: 3
Prep time: 20 Minutes
Cook time: 15 Minutes
Total time: 35 Minutes


INGREDIENTS
1 cup - 250ml
  • Spaghetti -  150 gms
  • Water - 8 cups
  • Cooking oil - 1 tsp
  • Salt - 1 tsp
To Saute
  • Cooking oil or olive oil - 2 tbsp
  • Garlic cloves - 7 nos ( Finely chopped)
  • Big onion – 2 nos ( Finely chopped)
  • Grated Cheese – 2 tbsp ( I used Mozzarella)
  • Capsicum - 2 tbsp ( Finely chopped)
  • Ripe Tomato - 5 nos ( small)
  • Red chilli flakes - 1 tsp
  • Pepper powder - 1 tsp
  • Salt & water - as needed
  • Italian seasoning - 1 tsp ( optional)
  • Sugar - 1/2 tsp
METHOD


  • Boil 8 cups of water in a wide bowl. Add 1 tsp of cooking oil or olive oil, add 1 tsp salt. Put the spaghetti and let it cook till half done. Now add the whole tomato in spaghetti water and let it cook. Remove the tomato to a plate after its skin gets cracked ( blanched) .
  • But keep cooking the spaghetti in medium flame for 20 minutes till it turns soft yet firm. i.e Cook Al dente.  If you cover & cook, water may spill. So cook it in medium flame till 3/4 th of the water is absorbed.Then cover & cook for 10 minutes to become soft. Take one spaghetti and check it. Break it with your fingers. Taste one. If  its soft and slightly chewy,  spaghetti is done.  Please check THIS LINK for cooking spaghetti in detail !
    Tomato spaghetti recipe - Indian vegetarianTomato spaghetti recipe - Indian vegetarian
    Tomato spaghetti recipe - Indian vegetarian
  • Peel the skin of tomato and grind it to a puree. Set aside.Transfer the cooked spaghetti to a colander and drain the excess water. Wash the spaghetti in the running tap water so that it remains firm. Keep aside.
      Tomato spaghetti recipe - Indian vegetarian
  • Heat oil in a kadai and saute the finely chopped garlic cloves. When it starts to turn golden, add the finely chopped onion and capsicum. Saute till onion turns transparent.
    Tomato spaghetti recipe - Indian vegetarian
  • Now add the tomato puree, salt,  red chilli flakes, pepper powder , sugar and Italian seasoning ( If  using). Mix for a minute and then add the cooked spaghetti. Toss well till the spaghetti is evenly coated with the sauce.Switch off the flame and add the grated cheese. Mix well, remove and serve hot !
    Tomato spaghetti recipe - Indian vegetarianTomato spaghetti recipe - Indian vegetarian
      Enjoy !

    • Note
      • Spaghetti takes more time to cook. It took nearly 25 minutes in medium to high flame. I covered & cooked it for the last 5 minutes.
      • Washing the cooked spaghetti in running water helps to keep the spaghetti stay firm.
      • You can cook the spaghetti and keep in advance if making for guests or parties.
      • You can add canned tomato puree too.
      • Adding Italian seasoning is purely optional. But it gives a nice flavor to the dish.
      • If you have fresh or dried basil, you can add that too.
      Try this yummy, tomato spaghetti recipe at home for breakfast/dinner !
      Indian vegetarian spaghetti recipe
      Continue Reading...


      March 30, 2017

      Paneer Puri Recipe – Stuffed Paneer Poori - Poori Varieties

      Paneer poori recipe
      During weekends, I am making varieties of poori for our breakfast and I have been sharing the same in my blog. Last Sunday I prepared this paneer poori (Indian cottage cheese in English) for our breakfast with the leftover paneer cubes. Its a stuffed paneer puri recipe. So you just have to add grated paneer to the wheat flour and make dough with it. Its so simple. 

      When I was searching for different types of puri recipes, I saw this one in Ramki’s one page cookbook. I liked the idea of paneer stuffed poori and tried this recipe in my own way. It came out really well, puffy and soft. Even though it tastes like masala poori, Paneer gives an additional softness to it and make it healthy too. Semolina/ Rava helps to keep the poori puffy and hold its shape for long time. So kids would love it for sure. 

      Do try this different type of poori during this vacation for your kids and family. Enjoy the breakfast ! I made masala raita and onion masala as side dish for this poori. It was a good combination. You can make tomato bhaji, potato masala or even chana masala as a side dish.  Ok, Lets see how to make yummy, soft paneer poori with step by step photos and a video !


      Paneer puri

      Paneer Poori Recipe - Poori varieties


      Paneer Poori Recipe - Poori varieties How to make masala poori with paneer - Paneer puri recipe
      Cuisine: Indian
      Category: Paneer Recipes
      Serves: 12 nos
      Prep time: 10 Minutes
      Cook time: 2 Minutes
      Total time: 12 Minutes


      INGREDIENTS
      1 cup - 250ml
      • Grated paneer - 3/4 cup
      • Atta/Whole wheat flour - 1.5 cups
      • Besan flour - 1 tbsp
      • Rava/Semolina - 1 tsp
      • Red chilli powder - 1 tsp
      • Garam masala powder - 1 tsp
      • Ajwain or cumin seeds - 1/2tsp
      • Coriander leaves - 1 tbsp( finely chopped, optional)
      • Salt & water - as needed
      • Cooking oil - to deep fry
      HOW TO MAKE PANEER PURI - METHOD

      • Grate the paneer using a grater and measure 3/4 cup from it. Keep it aside.
      • In a wide bowl or plate, take the wheat flour, besan flour, rava, salt, red chilli powder, garam masala powder, ajwain/Omam OR cumin seeds and grated paneer. Mix everything well without adding water. Mixture looks crumbly.
        Paneer poori recipe
      • Now add water gradually and make a smooth dough. Dough should not be too hard or too sticky. Knead it for 5 minutes. Make poori immediately. Keep the remaining dough covered while rolling the poori. Take a portion of dough and make uniform sized balls.
        Paneer poori recipe
      • Dust the ball in wheat flour and roll into small thick poori. Remember thin poori won’t puff up. So roll it thick. Refer picture below for thickness. 
        Paneer poori
        Paneer poori
      • Heat oil in a kadai to deep fry. Check its temperature by dropping a pinch of dough. If it rises to the top immediately, oil heat is just right. If the heat of oil is less, poori won’t puff up. So check it before deep frying. Reduce the flame to medium and take one rolled poori. Pat it between your palm to remove the excess flour.  Drop the poori in oil. When it starts to come up, press the poori with a ladle gently. It puffs up well. Now flip the poori and cook for a minute till bubbles cease. Remove & drain in a tissue paper. Serve hot with masala raita and some bhaji/Poori masala.
      • TIPS:  Increase the flame to high till you drop the next poori. Reduce the flame to medium as soon as u drop it. You can follow this to maintain the heat throughout deep frying. If oil becomes smoky hot, switch off the flame for few minutes. After the oil comes to desired temperature, fry the poori.
        Paneer poori
      Enjoy !


      Note

      • Do not make the dough too sticky or soft. No need to rest the dough. Make poori immediately to prevent oil absorption.
      • Thickness of poori is very important to puff up. So roll it small and thick.
      • Heat of oil is also an important factor for puffy poori. Check its temperature.
      • Oil should not be smoky hot.
      Try this yummy paneer poori at home for your weekend breakfast and enjoy !
      stuffed paneer poori recipe
      Continue Reading...