Chana sundal / Chickpeas sundal / Vella Kondakadalai sundal in Tamil is one of the most important sundal varieties for Navratri. I usually make it plain and simple without adding any sundal podi or additional masala.
We usually make this chana sundal for Navratri & Ganesh chaturthi. Recently I tasted this kondakadalai sundal in my neighbor's house during navaratri. I loved it very much. It had a nice flavour & mildly tangy taste. I asked her for the recipe. She told lemon juice & coriander leaves as secret ingredients.
Actually my neighbour used black chana. But I used white ones which I had in hand. If you are planning to make with black chana , do roast the chana in little oil before pressure cooking it. It gives a nice smell and taste. In the below picture , you couldn’t see coriander leaves because I dint use as it was out of stock. But do add them and try. It tastes good. Do try this sundal recipe for Navratri neivedyam !
Here is a picture of our house’s last year navaratri golu/kolu. Last year we kept golu with some old idols and mostly with my daughter’s toys . This year we bought some new idols & kept it. I’ll try to post this year golu pictures in my next post.
Chana sundal/Chickpeas sundal
How to make white chana sundal/ Kondakadalai sundal recipe for Navratri !
Cuisine:Indian
Category:Snacks
Serves:2
Prep time:8 Hours
Cook time:20 Minutes
Total time:8H20Minutes
INGREDIENTS
1 cup - 250ml
White chana / Konda kadalai – 1/2 cup
Salt & water – as needed
To temper:
Mustard seeds – 1 tsp
Urad dal – 1 tsp
Hing – 3-4 generous pinches
Red chillies – 2 – 3 nos (pinched)
Ginger – small piece ( grated)
Curry leaves – few
Grated coconut – 3 - 4 tbsp
Lemon juice – few drops ( as per taste)
Coriander leaves – few ( finely chopped)
HOW TO MAKE CHANA SUNDAL - METHOD
Wash and soak white channa overnight or 6 –8 hrs ( add a pinch of cooking soda while soaking which makes the channa soft ). Drain the soaked water completely and wash again to remove the soda completely.
Pressure cook it adding the required water and salt. Drain the excess water .
In a kadai , heat oil and temper all the items given above in the same order.
Add the cooked channa and mix well. Finally add the grated coconut, toss well.
Garnish with coriander leaves and add lemon juice as per need.
Enjoy !
Note
Adding cooking soda while soaking chana is purely optional. But it makes the chana soft after cooking.
If you add cooking soda, drain the soaked water and wash again before cooking it. Add salt while cooking. Suppose if you forget to add salt, add it immediately after you pressure cook keeping little water. Salt gets absorbed by chana.
Adding grated ginger is also optional but it helps for digestion of sundal. Add hing generously.
U can add more coconut to make the sundal tastier.
Add lemon juice & coriander leaves as per your need.
If you use black chana, replace red chillies by green chillies. Roast chana in little oil till you get nice aroma & cracking sound. Pressure cook it immediately. No need of soaking.
But the channa will not be much soft. If you want it soft, add a pinch of cooking soda while you pressure cook it.
For variations , you can coarse grind the grated coconut , chillies and add to channa.Saute for few minutes and add lime juice and coriander leaves at the end..
As navarathri is nearing, I thought of posting 2 green gram sundal / pachai payaru sundal recipes. Yes, itssweet sundal with jaggery and masala sundal,we call as kara sundal/spicy sundal. My MIL make it without soaking green gram. But I soaked the green moong dal for few hours.Basically I love navarathri festival a lot. My mom doesn’t have a practice of keeping kolu at home. But my MIL has this practice..
When I was with my parents, I used to see all the neighbour house’s golu. I love all the idols especially chettiar bommai and thalai aatti boomai very much. I used to get the thaamboolam with vethalai paaku , mirror, comb , blouse bit and enjoy eating sundal prasadam. Some how I developed a passion in this 9 days festival. I wished to keep kolu in our house too. But couldn’t..
Luckily, after marriage as my MIL has this practice. I was very happy and I got a chance of helping her in all the activities. My MIL is very creative . Apart from arranging dolls, she makes park , railway station & even forest by just using the toys we have at home. I amaze to see all and this year too Iam waiting for what she is going to make innovatively. As I am ZERO in creative ideas, Iam learning and taking golu pics for my future reference. I wish I keep golu on my own very soon learning from her.
I know making sundal is not a tough job. Its just a 3 step process namely soaking , cooking & tempering. I too posted the same but with little variations . Do check out the ingredients and proceed reading if it is new to you. Do leave your suggestions on how differently you make them .. It will be helpful for me to try varieties.
SWEET SUNDAL / VELLA SUNDAL
INGREDIENTS
Green gram / Pacha payaru – 1/2 cup
Salt – A pinch
Water – as needed
Powdered jaggery – 1/4 cup
Water – 2 - 3 tbsp
Grated coconut – 3 tbsp
Cardamom (powdered) – 1/4 tsp or 3 nos
To roast :
Cooking Oil – 2 tsp
METHOD
Heat oil in a kadai and roast the green gram till it starts to splutter with nice aroma. It takes 5-7 mins in high flame. Keep on mixing otherwise it would burn. After roasting , soak them in water for 1-2 hours. But soaking is optional. You can pressure cook it instantly too.
Then in a pressure cooker , take the soaked dal with water just to cover them . Add a drop of oil and a pinch of salt .
Pressure cook them . The dal should not be mushy. It should be separate.
After the steam goes, open the cooker & transfer the dal to a colander to drain the excess water.
In the mean time, take the powdered jaggery covered with little water and make a syrup. After the jaggery is melted, strain it to remove the impurities. Then heat it till it becomes frothy, thick and the raw smell of jaggery gets removed. At this stage , switch of the flame and add the cardamom powder .
Add the cooked dal to the jaggery syrup and mix well with a fork like ladle to avoid dals turning mushy..
Finally add the grated coconut and mix well.
Initially you may find this sundal mushy & together. After it completely cools down , it will be separate & very tasty.
Do try this friends. U’ll love it for sure.
MASALA SUNDAL / KARA SUNDAL
This masala sundal is different from the usual kara sundal. Try this one for a change.. U’ll like it !
INGREDIENTS
Green gram – 1/2 CUP
Water – as needed
Salt – as needed
To grind:
Grated coconut – 3 tbsp
Green chilli – 1 - 2 ( adjust)
Soambu / Saunf / Fennel seeds – 3/4 tsp
Ginger – 1 inch piece
To temper
Cooking oil – 1 tbsp
Mustard seeds – 1 tsp
Urad dal – 1 tsp
Curry leaves – few
Hing – 2 – 3 generous pinches
Lemon juice - few drops ( as per need)
METHOD
Soak the green gram for 4 – 6 hrs OR you can roast in 2 tsp of oil for few minutes and pressure cook it instantly.
Drain all the water and pressure cook them adding salt , water & a drop of oil..
Cook for 1 whistle.. Drain all the excess water.
Grind all the ingredients given under “ grind” to a dry powder without adding water.
Now in a kadai, do the tempering and add the cooked dal.
Toss well and add the ground masala. Mix well and keep in low flame till raw smell vanishes.
Mix with a fork like ladle every now & then..
Switch off the flame , add lime juice and your masala sundal is ready..
As i said for sweet sundal , it looks mushy but it will separate as it cools down.
Last weekend I was searching for Tamil brahmins recipes in some blogs and websites, I found arachuvitta sambar and urulaikilangu curry ( potato curry) as the simple sunday lunch menu mentioned by many of them. So I prepared the same at home for our lunch.
Actually my MOM & MIL makes a similar kind of idli sambar. Keeping that recipe in my mind , I prepared this araichuvitta sambar for lunch. One of my brahmin friends told me about this recipe long back which I noted down in my diary.
By referring that recipe and the other recipes which I came across , I prepared this sambar. It was too good , fresh and flavourful. We loved it a lot. My friend told this sambar is usually made with small onions. I used drumstick and sambar onions. Do try this version for your sunday lunch & let me know friends !
INGREDIENTS
For 4 people ( 1 cup - 250ml)
Tamarind – Big gooseberry size
Turmeric powder – 1/4 tsp
Salt & water – as needed
Drumstick – 1 no (chopped length wise of pointer finger size)
To pressure cook:
Toor dal – 1/3 cup
Turmeric powder – 1/4 tsp
Cooking Oil – a drop
Hing – 1/4 tsp
Water – As needed
To roast & grind:
Cooking oil – 2 tsp
Fenugreek seeds – 1/8 tsp
Dhania / coriander seeds - 1 tbsp
Chana dal – 1/2 tbsp
Urad dal - 1 tsp
Red chillies - 5 nos (adjust as per your taste. Use upto 7 )
Raw Rice – 1/4 tsp
Hing – 1/4 tsp
Grated coconut – 1 tbsp
To saute:
Cooking oil – 2 tbsp
Small onions/ sambar onion – 1/2 cup ( 10 - 15 nos)
Tomato – 1 no (optional) ( I dint use)
Curry leaves – a few
Sambar powder - 1/2 tsp (optional, its not used in Brahmin style)
To temper:
Ghee – 1 tsp
Mustard seeds – 1 tsp
Jeera / cumin seeds – 1/2 tsp
Red chillies – 2 no (pinched into two)
Curry leaves - few
To garnish:
Coriander leaves – few chopped finely.
METHOD
Pressure cook toor dal adding turmeric powder , hing and a drop of oil.
In a kadai , add 2 tsp of oil and roast all the ingredients given under “ to roast n grind” in the same order. Make sure nothing gets burnt.. Roast under medium flame till nice aroma rises.
Add grated coconut at the end , mix well and switch off the flame.It will get roasted in that heat itself. Grind to a paste in a mixie. Set aside.
In a wide mouthed kadai, heat oil, saute the small onions, curry leaves .. Onions should be sauteed very well with a nice aroma. ( you can also add a tomato & saute with onion if you like)
After it is sautéed , add the tamarind extract, drumstick pieces , turmeric powder & salt.. Add some raw curry leaves & a pinch of hing when it boils.
Cover & cook till the drumstick is done.
Now open the pressure cooked dal and mash it well. It should be well mashed. After adding the dal, add the freshly ground paste. Mix well without forming lumps. Let it boil for few minutes. Sambar thickens. So add more water if necessary. Check for salt.
Switch off the flame and garnish with coriander leaves.
Last but not the least , temper all the ingredients given under “ to temper” in ghee & add to sambar. Cover it with a lid to retain the aroma. Serve after 15 – 30 mins..
Enjoy with rice , potato curry and papad !!
Note : You can use vegetables like chow chow, radish, brinjal, potato, carrot, beans, turnip to make this sambar. You can also make it with small onions alone which is known as Vengaya arachuvitta sambar.
Some people add 2 small onions while sauting the masala. But I din't use it.
NOTES
Please check this link for Brahmin style potato curry recipe.
Chopped tomato can be used along with onions. Saute it till its mushy and then add tamarind extract.
Instead of adding the spices along with dal, you can saute the ground spices before adding tamarind extract which gives additional flavour.
Adjust the red chillies according to your taste.
Dal should be mashed well.
U can also use vegetables like carrots, potatoes, chow chow, brinjal along with drumstick.
Do try this and let me know ur comments..Catch u all in my next post ..
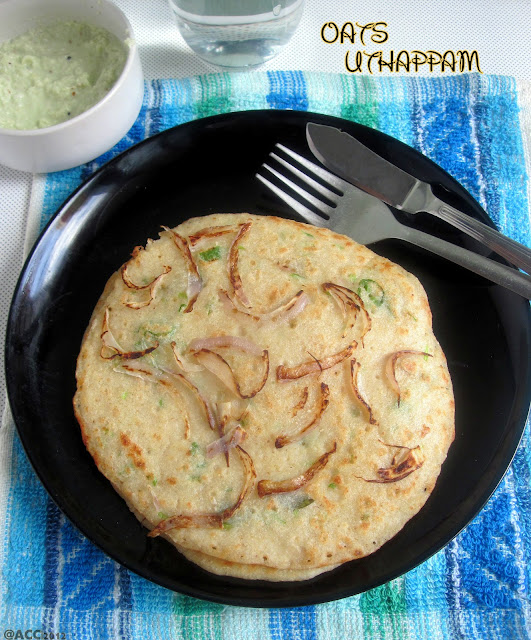
I prepared this instant oats uthappam for the first time. We loved it a lot. So I thought of posting here. I got the recipe from Sailu’s food. I made little changes to the original recipe. I did not add eno salt. Still it was so soft & tasty Try this, you’ll love it for sure. We relished with coconut chutney !
INGREDIENTS
1 cup - 250ml
Powdered oats – 1 cup
Bread slices – 4 nos ( 3 days old bread – I used white bread. Whole wheat bread is preferred)
Rice flour – 1/4 cup
Rava/ semolina – 1/4 cup
Sour curd – 2 – 3 tbsp
Eno fruit salt – 1/2 tsp or cooking soda – 1/2 tsp ( I dint use)
Ginger – 1 inch ( finely chopped)
Green chillies – 2 nos ( finely chopped)
Curry leaves – a few
Coriander leaves – a few
Water – as needed ( around 1/2 cup)
Salt – as needed
For topping :
Big onion – 2 nos ( sliced)
Carrot – 1 no (grated)
Cashews – a few
METHOD
Remove the sides of bread slices.
Powder the oats and bread slices together.
Take this powder in a wide bowl and add the rice flour, semolina, sour curd or buttermilk, salt, ginger pieces, green chillies, coriander & curry leaves.
Add water and bring it to dosa batter consistency.
Take the dosa tawa, heat it and add a ladleful of batter. Do not spread it. make it like a pancake.
Drizzle little oil around the sides. Now spread the onion slices as topping. Cover it with a lid for few minutes.
Then open the lid and carefully flip the dosa.
Keep the flame high and cover cook for few more minutes.
The onions will turn brownish with a nice smell.
Now remove the uttapam and serve hot with coconut chutney.
NOTES
I din’t use eno fruit salt or soda. It was still soft. Add it to get spongy soft uthappam.
There are numerous choices for topping. U can add all the vegetables along with onions too.cashews and other nuts can be added for nutty uthappam.
I mixed ginger , chillies and coriander leaves in the batter itself. U can add it as topping separately.
If you don’t have sour curd, add 1/2 cup buttermilk or fresh curd.
One more easy way of making uthappam with left over dosa batter is below.
Add 1 cup of powdered oats to 1 cup of left over dosa batter and mix ginger , green chillies , finely chopped onions, curry & coriander leaves. Add little water if needed. It will also taste the best. U may feel its sticky & uncooked but it is not so. Its softness makes you feel like that. If you want, you can reduce the amount of oats and try !!
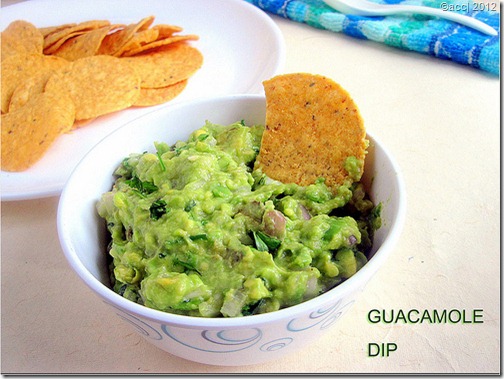
I wanted to try Mexican style avocado dip also known as Guacamole for long time. I was looking for tortilla chips & nachos to try this guacamole dip recipe. Last week I got a pack of nachos and I immediately tried this dip.
This homemade guacamole is easy to make, healthy and tasty too. I referred this perfect guacamole recipe from Simply Recipes. Use ripe avocado for best taste. Raw avocado tastes bitter. Now, without this dip, we are not able to eat nachos. I’ve given few tips at the end on how to buy good avocado if you are buying for the first time. Its for beginners. Please go through it.
Guacamole Dip Recipe - Mexican Avocado dip
Guacamole - Mexican Avocado dip recipe for Nachos and Tortilla
There are varieties of avocado available in the market. They are Hass, Lamb Hass, Gwen, Reed, or Sharwil , Bacon and Zutano.
Bacon and Zutano varieties are light in flavor.
Others have a nutty taste.
Good avocado can be first identified by its color.Ripe avocado looks dark green to black in color. Some varieties look light green in color.
When you want to examine them. Take an avocado and keep it in ur palm. Just press it lightly. Do not use your finger tips as it may bruise them.
If it gives slightly, it is ready to eat. If it is over ripe, pressing them gives a mushy feeling and your finger may sink into the skin. If the skin is hard to touch and if it doesn’t give, avocado is not ripe yet.
If you planning to keep it for some days, you can buy the unripe avocado , wrap it in a paper and keep it for 4-5 days to ripen. It can be kept in room temperature.
Avocado can be stored in a refrigerator until eaten to slow the ripening process.
Avocado with the highest oil content are the Hass, Pinkerton, Sharwil and Fuerte varieties.
This buying method may be useful for people who plan to use avocado oil for health and diet or skin and beauty purposes.
This is a simple stir fry which goes well for rice n roti. I got this idea from my neighbour. I have given two versions .. One is my version in which I followed the method of potato curry and the second one is my neighbours' version which is purely a south Indian style .
Based on your liking, try any. Both tastes good. I pressure cooked the baby corn to ensure proper cooking but that step is purely optional. We can just saute the baby corns, cover and cook by sprinkling little water as my neighbour suggested.
INGREDIENTS
Baby corn – 8-10 nos
Big onion – 1 no (finely chopped)
Ginger – 1 inch (-do-)
Garlic cloves – 6 nos ( –do-)
Red chilly powder / Sambhar powder –3/4 - 1 tsp
Garam masala powder - 1/2 tsp
Salt & water – as needed
Lemon juice – 1/2 tsp ( adjust)
Curry leaves – few
Coriander leaves – few
To Temper:
Olive oil / cooking oil – 1 tbsp
Mustard seeds – 1/2 tsp
Jeera – 1/2 tsp
METHOD
Pressure cook baby corn for 1 whistle. Set aside.
In a kadai , heat oil and add the mustard seeds & jeera, once they start to splutter , add onions,ginger & garlic pieces,curry leaves.
Saute well. Add little turmeric powder, salt and mix well.
Now add the sambhar/ red chilly powder. Mix well.
Finally add the cut baby corn slices. Saute well for few minutes.
Add coriander leaves, lemon juice and remove it.
Serve hot with rice and roti!!
NOTE
Ginger&garlic paste can be used instead of ginger , garlic pieces.
Baby corn need not be pressure cooked. Instead it can be sauteed in oil & cooked by covering it in the kadai sprinkling little water in between..
Tomatoes can be used instead of lemon juice..
BABY CORN STIR FRY – VERSION 2
INGREDIENTS
Baby corn – 8-10 nos
Big onion – 1 no (finely chopped ) (optional)
Salt – as needed
Turmeric powder – 1/4 tsp
To grind:
Grated coconut – 1/4 cup
Green or Red chillies – 3 nos
Jeera – 1/2 tsp
To temper:
Oil – 1 tbsp
Mustard seeds – 1/2 tsp
Urad dal – 1/2 tsp
Curry leaves - few
METHOD
Grind the items given under “to grind” without adding water.
Cut the baby corn into lengthy 1 inch strips.
In a kadai , heat oil and splutter mustard seeds, jeera & curry leaves. Saute onions if you use them..
Add the baby corn and saute well.
Now add the ground coconut , turmeric powder & salt.
Saute till the raw smell emanates.
sprinkle little water , mix well.
Cover & cook till the baby corn is done.
Add water whenever necessary. Always keep the flame in medium & stir well every now & then to avoid burning.
After the baby corn is cooked well, add fresh coriander leaves & remove.
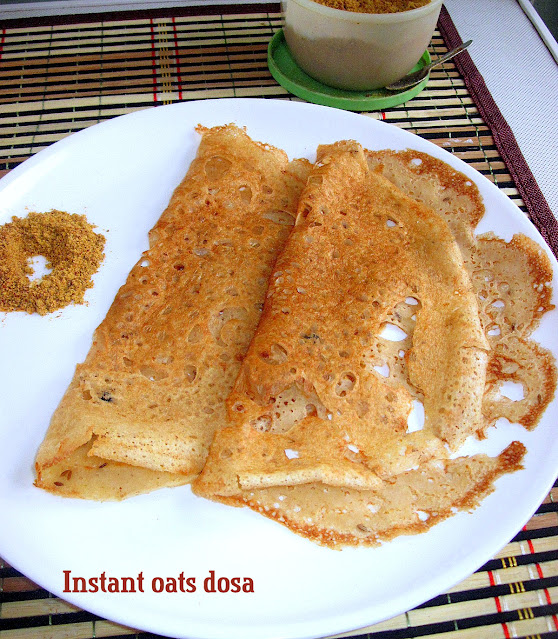
I make this oats dosa once in a week This dosa will be crispy in the edges and soft in the middle. The crispness of this dosa lies in the consistency of batter like rava dosa. Adding more water makes it look dry. So add the water correctly. Wheat flour & oats gives the softness.
Do try this healthy dosa for breakfast or dinner. It tastes great with coconut chutney. I tried idli podi using horse gram as an accompaniment for this dosa which i’ll post soon. Make this dosa & serve immediately for better taste. Oats tastes the best when it is eaten hot ;) Lets see how to make Instant oats dosa with Indian oats !
INGREDIENTS
1 cup - 200ml
Powdered oats – 1/4 cup ( I used quaker quick oats)
Wheat flour – 1/4 cup
Rice flour – 1/8 cup
Sooji/rava – 3 tbsp
Pepper corns – 1 tsp
Jeera – 1.5 tsp
Ginger – 1 inch (chop finely)
Curry leaves – few
Coriander leaves – few
Sour buttermilk – 1/4 cup OR sour curd - 2 tbsp
Salt & water – as needed.
Big onion – 1 no (finely chopped – optional) ( i don’t use)
METHOD
Powder the oats and mix with all other flours together adding the required salt .. (Dry roast the oats before powdering them is optional)
Add the pepper corns, jeera, chopped ginger, curry leaves and coriander leaves.
Add the sour butter milk, salt and mix well. Add the required water to adjust the batter consistency.
Heat the dosa tawa and sprinkle little oil.
Then pour the batter in a circular motion from the corner towards the center. Fill the gaps by sprinkling more batter.
Drizzle little oil around the dosa and keep the flame high for few secs.
The corners of dosa will lift automatically. Now flip the dosa and reduce the flame. Cook for sometime and remove.
Enjoy with any chutney or podi !!
NOTE
I usually dry roast the oats for few mins and then powder it. This time I powdered without roasting which also tasted good. So roasting is optional but it gives an additional flavour.
Adding finely chopped onions is purely optional. I don’t add it.
U can also add crushed pepper corns instead of adding whole ones.
U can make this dosa by adding rice flour & sooji along with oats.
Ragi flour can also be added instead of sooji to get the crispness. This makes the dosa healthier but the color of the dosa will be black.
Batter should be watery. If you make the first dosa, you’ll get to know how much water has to be added to get crispy dosas. Add water and adjust the salt .
Every year we make 3 kozhukattai varieties for Ganesh chaturthi prasadam. In this post, I’ve given how to make kozhukattai dough/Kolukattai maavu along with the recipes of ellu pooranam , sweet pooranam and ulundhu kozhukattai which we make every year. I learnt all these recipes from my MIL.
Usually we make processed rice flour at home for the outer covering. This time I made the job easier with store bought idiyappam flour / kozhukattai flour . I have given some tips at the end of the post to get crack free, soft kozhukattai . Hope it will be useful for beginners. Do try these recipes , enjoy and get the blessings from Lord Ganesh !!
Ok, lets see how to make varieties of kozhukattai recipe with step by step pictures below. Before that, Happy Ganesh chathurthi to all my blogger friends and readers. Hope you all had a great celebration.. For the past one week I have seen all the blogs filled with kozhukattai recipes. I was not able to do it. And now not too late, Iam posting the recipes of kozhukattai with a picture of celebration at our home.
Do check out this video of making Kozhukattai varieties !
Now coming to recipes with the required ingredients picture,
INGREDIENTS FOR KOZHUKATTAI DOUGH 1 cup - 250ml
Processed Rice flour or Idiyappam flour or kozhuakttai flour – 1 cup
Water – 1.5 cups ( Quantity varies, so keep some excess hot water ready in hand)
Oil – 1 tsp
Salt – 1/2 tsp
METHOD
In a broad bowl , take the flour and add the salt. Mix well and set aside.
Now in a bowl, take the required water and add a tsp of sesame oil.
Let it boil for few seconds in high flame.When it starts to roll boil, switch off the flame and add the water to the flour little by little. Mix the flour with a wooden ladle.
Add more water if required. Mix well and make a whole mass like chapatti dough. (initially you need a ladle to mix but when the dough becomes warm, mix it well with ur hands to make a soft , non- sticky dough..)
Apply a tsp of sesame oil over the dough to cover it. ( this prevents the dough from drying) .Cover it with wet cloth and lid , set aside. Have a look at this VIDEO for more details
Always make the pooranam first & then make the outer covering..
In a kadai , dry roast the sesame seeds till it splutter with a nice smell.
In a bowl, take the powdered jaggery and cover it with little water.
After it melts , strain the impurities and then add the grated coconut, cardamom powder and roasted sesame seeds.
Mix till it starts to leave the sides of pan and becomes thick. Do not mix for long time. It will become hard and difficult to roll balls. Remove in a plate and divide into small portions.
After it turns warm, roll into tight balls by greasing your hands with sesame oil. If the sesame seeds crumble while rolling, add 2 tsp water, mix well and again heat for a minute. Start rolling balls when warm. It will work.
HOW TO MAKE ELLU POORANAM KOZHUKATTAI
Take a big gooseberry sized ball from the dough and roll it by greasing ur hands.
Pat it with ur palm and make it flat like a thattuvadai.
Keep the ellu poorana ball in the center and bring all the corners towards the center and make a coconut shape.( Grease ur hands with oil whenever required)
Follow the same for all the sesame seeds balls.
SWEET POORANAM | KADALAI PARUPPU POORANAM |
DAL POORANAM | THENGAI POORANAM
INGREDIENTS 1 CUP - 250ML
To make 15 to 20 kozhukattai
Chana dal \ Kadalai paruppu – 1/2 cup
Powdered jaggery – 3/4 cup
Grated coconut – 1/4 cup
Cardamom – 3 nos (powdered)
Water – 1/4 cup
Salt – a pinch (optional)
HOW TO MAKE SWEET POORANAM - METHOD
Pressure cook chana dal by adding the required water and a drop of oil. Drain the water. Grind or mix well it to make a paste without adding water and set aside.
In a bowl, take the powdered jaggery and add little water to cover it.When its melted , strain to remove impurities OR if the jaggery is pure, add it directly to the mashed dal along with grated coconut.
If using syrup, strain it. Wash the kadai and add the syrup, grated coconut and cooked dal, cardamom powder( please do not add water, the coconut itself leaves water which will be enough.)
Mix well until the mixture leaves the sides and becomes a thick whole mass. ( Do not add water while adding the dal paste because the lesser you add the water, sooner the pooranam will start to leave the sides and becomes thick.. Stuffing will be ready)
Make small balls out of the stuffing and keep ready.
The unused stuffing can be refrigerated and used for 10 to 15 days.
TO MAKE SWEET POORANAM KOZHUKATTAI
I Used a ready made kozhukattai mould to make a good shape.
U can also try the shape which i mentioned under ellu kozhukattai to make coconut shape. I’ve explained using mould here. Take the mould, open it and grease it with gingely oil. Take a small ball from the Kozhukattai dough and keep it inside the mould. Just spread it all the sides till 3/4 of the mould by keeping the center empty. Now close the mould and press it with your left hand fingers.
Now place the dal pooran ball in the center. Take a small berry sized ball and place it on the top of the dal pooranam and close it well.
Now open the mould , you’ll get a nicely shaped kozhukattai.
Follow the same for the remaining .. Steam it in idly pot for 10 mins and enjoy !!
NOTE:
The same pooranam can be done using coconut alone. For that, chana dal is not needed. Just make the jaggery syrup , add the grated coconut , cardamom powder & mix till it leaves the sides.
Remove & stuff it using the above said procedure.
For thengai pooranam , jaggery can be less. i.e 1:1 would be enough.
ULUNDU KOZHUKATTAI / SPICY URAD DAL KOZHUKATTAI/UPPU KOZHUKATTAI
Ulundu pooranam
INGREDIENTS 1 cup - 250ml
Urad dal – 1/2 cup
Green chillies – 2-3 nos
Ginger – 1/2 inch piece
Grated coconut - 1/4 cup
Asafetida / hing – 1/4 tsp
Salt – as needed
to temper
Mustard seeds – 1/2 tsp
Urad dal – 1/2 tsp
Curry leaves – few
Hing –1/4 tsp
METHOD
Soak urad dal in water for 30 mins . Drain the water and grind it along with green chillies , hing , ginger and salt to a coarse paste without adding water. (just run the mixie once or twice)
In a idli pot , grease the idli plate and spread the ground urad dal mixture. Make a hole in the center for uniform cooking.. Steam it for 15 mins.
After it cools down , crumble the mixture using ur hands and run it in the mixie once or twice for easy perfect crumbling and keep it ready.
In a kadai, temper the mustard seeds, urad dal and curry leave with a pinch of hing. Then add the crumbled urad dal mixture and mix well.
Finally add the grated coconut, mix well and switch off the flame.
TO MAKE ULUNDU KOZHUKATTAI
Take a big gooseberry sized ball of outer covering and press it with your palm to flatten it.
Keep the filling in the center and fold one side to make a semi circle.
Fold the edges towards inside to decorate it or leave it as it is !
Steam in idly pot for 10 mins and remove.
TIPS FOR MAKING KOZHUKATTAI WITHOUT CRACKS
Use good quality rice flour. If you are planning to make by grinding rice, buy raw rice ( in tamil nadu we call as “maavu arisi) i.e. the rice used for making rice flour..Its a different quality , not the one we use for pongal. It is cheaper in cost too.
I use store bought rice flour - Idiyappam flour or Anil kozhukattai maavu. I always add 1.5 cups of water adding a tsp of oil for making dough. For home made rice flour , more water may be needed. i.e around 1.5-2 cups..
Always add the required water while making the dough.If the dough becomes sticky or dry , you’ll get crack.
Keep the unused dough covered with a wet cloth and then with a lid while you make modakam.
Its always better to prepare the outer covering after making pooranams/ stuffings to prevent the dough sitting for long time.
U can refrigerate the unused dough covered by wet cloth be keeping in an air tight box & use the next day or the same evening.
Pooranam can be prepared the previous day and refrigerated.
Apply sesame/gingely oil in ur hands every time when you make the shape.
Last but not the least , do not cook the kozhukattai in idli pot for long time which may lead to cracks.( maximum of 8-10 mins is enough)
Always place the idli plate filled with kozhukattai after the water in the idli pot starts roll boiling.. This helps for quick cooking and also the kozhukattai remains white in color and crack free.
U can identify the cooked kozhukattai by its shining look..
Always remove the kozhukattai after it becomes warm. Do not remove when it is hot. Kozhukattai may break.
Wish you all a very happy Ganesh Chaturthi :)
Here is the picture of our Ganesh Chaturthi celebration at home :)


 How to make white chana sundal/ Kondakadalai sundal recipe for Navratri !


.jpg)
.jpg "Green gram sundal")


