Search Chitra's Food Book

April 24, 2014

KADAI ONION UTTAPAM RECIPE/VENGAYA DOSAI-DOSA RECIPES


Onion uttapam recipe

Kadai onion uttapam is my MIL’s special way of making onion dosa.This is Sendhil’s favourite breakfast recipe.I call this dosa as South Indian pancake Smile with tongue out .My in-laws are here in my place and we are having a good time together.Whenever my MIL visits us,i tell her to make some of her special recipes.This time she prepared paal kozhukattai & onion uthappam recipe.I will share paal kozhukattai in my next post.I usually make onion uthappam or tomato onion uttapam with leftover idli,dosa batter after it becomes too sour.I follow my mom’s method & make in open dosa pan.But my MIL always makes oothappam in kadai(irumbu chatti).With the smell of roasted onions,it gives a nice taste & flavour.So i thought of sharing this method which may be new to some of u.Friends,If u are bored of making oothappam in dosa pan,do try this method for a change.U’ll love it Smile.Bachelor’s can also give this a try.U can make it easily in a non-stick kadai.

Onion uttapam recipe

Kadai onion uttapam recipe


Kadai onion uttapam recipe Onion uttapam recipe in an interesting way !
Cuisine: Indian
Category: Breakfast
Serves: 5
Prep time: 5 Minutes
Cook time: 5 Minutes
Total time: 10 Minutes


INGREDIENTS

  • Idli,dosa batter -1 cup
  • Big onion -2 nos
  • Water - very little
  • Gingely Oil or cooking oil – as required
METHOD

  • Wash and peel the big onions.Slice it using a chips slicer.By this way,u will get thin strands.
onion-uttapam-step1
  • In a bowl,take the batter and dilute it slightly adding 1-2 tbsp of water if the batter is very thick.
  • Heat kadai and add 2 tsp of oil.Put some onion slices.Pour a ladle full of batter covering the onions.Sprinkle some more onions generously over the batter.Make a small dent in the center using the ladle and drizzle 2 tsp of oil in the sides and middle(refer picture).
onion-uttapam-step2
  • Keep the flame medium and cover the kadai for 2 minutes.Open the kadai and flip the uttapam using a slotted ladle.Again cover cook for some more time till the onions turn golden brown. Adjust the flame whenever necessary.
onion-uttapam-step3
  • Remove with a slotted ladle and enjoy eating hot with ur favourite chutney,sambar !


Note

  • Adding oil generously gives u a nice,flavoured,roasted onions in dosa.
  • For variations,u can add few chopped tomatoes and make tomato,onion uttapam.
  • U can also sprinkle pepper powder or idli milagai podi for more taste.

Onion uttapam recipe

Onion uttappam with coconut chutney,Green chutney & idli podi for breakfast.
How is it,super illa Winking smileBe right back

Onion uttapam recipe

Continue Reading...


April 22, 2014

KOOTANCHORU RECIPE / கூட்டாஞ்சோறு-TRAVEL LUNCH IDEAS


Kootanchoru rice
Tirunelveli famous Kootanchoru @ kadamba sadam is one of the signature recipes of my mom.Mostly Nellai people make this rice for picnic/trips and for guests.This is one of the best foods for travel.It stays good for one to two days without refrigeration.When(me & my sis) we were young,we used to go to thatha,aachi’s house in Nellai for every summer vacation.My periamma and chithi also comes with their family.We go for a one day trip to tiruchendur & kutralam every year.Amma,periamma and chithi together prepare this rice in early morning in a big eeya paanai traditionally for 10-12 people and pack in a big vaali(thooku chatti) for travel.We have this rice for lunch in a  piece of vazhai ilai(banana leaf) after a nice bath in five falls,kutralam. With the awesome smell of banana leaf,it tastes great & we all have minimum of two servingsSmile with tongue out.Vathal/vadagam or  appalam  is the best side dish for kootanchoru.This rice tastes the best after it cools down.
Kootanchoru
Last week my mom was with me for two days.I told her to prepare this rice for our lunch and of course for blogging because some of my Nellai readers asked me to share kootanchoru recipe after trying my uluntham paruppu sadam.I asked my mom to prepare using pressure cooker but mom said making this rice in eeya paanai or indalium vessel or kadai gives the right consistency to the rice,vegetables and tastes great.As she said,it was very flavourful and tasty.But she also told the method on how to make in pressure cooker if needed.I have shared it below .Kootanchoru is very easy to prepare if u have chopped onions & vegetables ready in hand.It takes just 20 minutes to prepare this rice.I personally feel,it is better to do chopping & grinding work the previous night if u plan to make this rice for next day travel.
Sendhil had it for the first time and loved it.We had this rice for lunch and the leftover for dinner too.My mom & dad packed this rice in a foil box & took it for their train journey.Friends,if u plan for a picnic,do prepare this rice.I am sure u can have a delectable lunch.Thumbs up
kadamba-sadam-recipe

Kootanchoru recipe


Kootanchoru recipe Tirunelveli style kootanchoru recipe – Ideal & tasty food for travel !
Cuisine: Indian
Category: Lunch
Serves: Serves 6-7
Prep time: 20 Minutes
Cook time: 30 Minutes
Total time: 50 Minutes


INGREDIENTS
To chop
  • Carrot - 2 nos
  • Beans -  10 nos
  • Potato - 1 no (big)
  • Broad beans - 10 nos
  • Raw banana - 1/2 no
  • Raw mango - 1/2 no
  • Brinjal - 3 nos
  • Drumstick - 1 no
  • Drumstick leaves & arai keerai – a handful
To cook
  • Rice - 1.5cups
  • Toor dal - 1/2 cup
  • Water - 12 cups
  • Tamarind – Small lemon size( use big lemon size if u don’t add raw mangoes)
To grind
Paste -1
  • Red chillies – 12-14 nos
Paste-2
  • Small onions – 30-40 nos (3/4 cup)
  • Garlic cloves - 2 bulbs(small) or 1 bulb if big variety
  • Jeera- 1 tsp
To saute
  • Cooking oil -  1 tbsp
  • Small onions - 15 nos
  • Green chillies – 2 to 4 nos ( adjust)
Grated coconut – 1/2 cup
To temper
  • Gingely oil - 2 tbsp
  • Mustard seeds - 1 tsp
  • Urad dal – 1 tsp
  • Vadagam – 2-3 tbsp (OR)Small onions-20 nos(finely chopped)
  • Curry leaves – half handful
METHOD

  • Grind red chillies adding required water to make a smooth paste.This is paste-1.Set aside.
Kootanchoru step2
  • Wash and peel the small onions,garlic cloves and grind with jeera& water to make paste-2.
Kootanchoru step1
  • Soak tamarind in enough water.Take the extract using 1.5 cups of water and mix the paste-1 & paste-2,turmeric powder and salt.
Kootanchoru step3
  • Wash and chop all the vegetables of uniform size and keep the raw banana & potato cubes immersed in water till use.Chop drumstick,chop raw mango into big cubes as shown in the picture.
Kootanchoru step4
  • In a big vessel(preferably, eeya paanai or indalium vessel) take the mentioned quantity of water.When the water starts to boil,add toor dal,turmeric powder.Allow it to cook till the dal blossoms.It should be mashable.
Kootanchoru step5
  • After the dal is 3/4th cooked,add all the vegetables & keerai(greens) except raw mango pieces.It takes 10 minutes for all the vegetables to cook.Keep stirring whenever necessary.
  • After 10 minutes,wash and add the rice.Again boil for 10-15 minutes and check whether rice is done.Rice absorbs all the water and gets cooked.Add the required salt.
Kootanchoru step6
  • Check if the rice is cooked properly.Use back of the ladle to mix the rice to avoid it turning too mushy.In the mean time,heat 1tbsp oil in a kadai and saute onions,green chillies & add to rice.
Kootanchoru step7
  • Now add mango pieces.It takes 5 minutes & mango pieces will be half cooked.
Kootanchoru step8
  • Now add the tamarind extract mixture and allow it to boil for 5 minutes in medium flame.Keep stirring every now & then to avoid burnt bottom.
  • Remove the mango pieces alone after it is cooked yet firm in shape else mango will become mushy & mixed with the rice completely leaving the skin.It makes the rice tangy.
Kootanchoru step9
  • Use back of the ladle or fork like ladle to mix the rice.Lastly add grated coconut & mix well. 
Kootanchoru step10
  • Finally, temper all the ingredients given under”to temper” and add to the rice.Rice looks mushy initially but its consistency will get adjusted after it cools down.
Kootanchoru step11
Just before serving,add the cooked raw mango pieces & mix well.
  • Give a standing time of minimum one-two hours because it takes this time for all the taste to blend well with the rice.
Serve with koozh vathal/Vadam..!! Tastes great !!
**Do not use ur hands at any cost while serving.Rice will be spoiled very soon.So always use a ladle.


Note


PRESSURE COOKER METHOD
  • Take toor dal with 2 cups of water in pressure cooker and cook in high flame for 2-3 whistles.
  • Remove the lid and add the rice and chopped vegetables except raw mango.Cook it adding 6 cups of water & salt.
  • After rice is cooked,open the lid and add the sauteed onions,chillies,tamarind extract mixture & raw mango pieces & salt if needed.
  • Allow the raw mango to cook well. Rice absorbs all the tamarind extract mixture.Use fork like ladle to mix the rice.Simmer the flame & boil for few minutes.
  • Lastly add grated coconut & tempered ingredients.Mix well,check for taste.Give a standing time of 1-2 hours & serve with vathal/vadam.
TIPS TIPS
  • If the rice is too spicy,add little tamarind extract & grated coconut.It balances the taste.
  • If the rice is too tangy,add some chilli powder mixed in water & boil for sometime with rice.Add little salt if needed.
  • Adding a handful of drumstick leaves & arai keerai is suggested for this rice.But i din’t add both as i din’t have the stock.
  • Raw mango is purely optional but it gives a nice flavour to this rice.If u don’t add raw mango pieces,use big lemon size tamarind.
  • Adjust the quantity of red chillies based on ur taste buds.But use tamarind in correct quantity if u reduce chillies.

Pack this rice in a foil box for ur travel and enjoy with vadagam/Vathal & appalam.It tastes great !!!
kootanchoru-recipe
Very good recipes Tags: , , ,
Continue Reading...


April 17, 2014

Chettinad Vara Milagai Thuvayal(Red chilli Chutney Recipe)- Chutney For Paniyaram

Vara milagai chutney is a popular side dish for idli, dosa and paniyaram in Karaikudi - Chettinad region. This is one of the easiest chutney recipes & ideal for travel as it is without coconut. I think chettinad kara chutney and vara milagai thuvayal are the same because both have the same ingredients.

Friends from Chettinad, please tell me if there is any difference. I would love to try that too. Sendhil doesn’t like spicy side dishes. So I was waiting for a good chance to try this chutney for me. Yesterday my parents were in my house. As my dad is fond of kara chutney, I tried this spicy red chilli chutney for him. 

He loved it a lot and told me to pack this chutney with idli for his travel to Hyderabad. Whenever we go to hotels, myself and my dad ask for more servings of kaara chutney than coconut chutney & sambar. We are a big big fan of this. People looking for spicy side dishes must try this chutney. I am sure you will have at least 2 idlies more than your regular intake.


Chettinad Kara chutney recipe


Kara chutney recipe Kara chutney recipe - Chettinad style - Tastes great with idli, dosa & paniyaram
Cuisine: Indian
Category: sidedishes
Serves: Serves 3
Prep time: 10 Minutes
Cook time: 10 Minutes
Total time: 20 Minutes


INGREDIENTS

  • Tomato - 1 no
  • Small onions - 20 nos or big onion - 2 no
  • Red chillies – 5 nos
  • Tamarind - a small piece(a big pinch)
  • Garlic cloves - 3 nos
  • Salt & water - as needed
To temper
  • Gingely oil - 3 tbsp
  • Mustard seeds - 1/2 tsp
  • Urad dal - 1 tsp
  • Curry leaves - few
HOW TO MAKE CHETTINAD KARA CHUTNEY - METHOD

  • Grind tomato,red chillies,small onions, garlic cloves, tamarind with salt & water to a slightly coarse paste. (Tips Tips: Always pinch the tamarind into small pieces and use for grinding. It helps to grind smoothly)
Vara milagai chutney step1
  • Heat gingely oil in a pan and temper with mustard seeds, urad dal & curry leaves. Pour this chutney in hot oil and allow it to boil till raw smell emanates completely.Chutney thickens as well.
Vara milagai chutney step2
  • Remove & serve with idli, dosa or paniyaram.


Note

  • Do not reduce the oil quantity for tempering as it helps to suppress the body heat developed by red chillies. It is good for your tummies too.
  • Use one big onion if you don’t have small onions in hand. 
  • If you like the raw smell of onions & want more spicy, just temper & pour it on the chutney. No need to boil the chutney.
 Malligai poo idli with spicy hot vara milagai chutney for breakfast is a total bliss, Right?? 
Continue Reading...


April 15, 2014

Potato Chips Recipe - How To Make Potato Chips At Home (Indian Style )

potato chips recipe

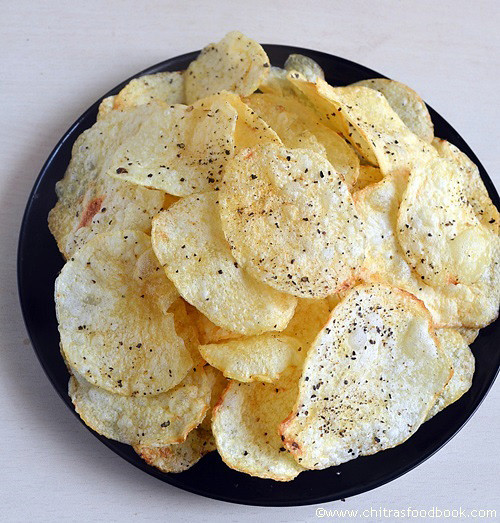
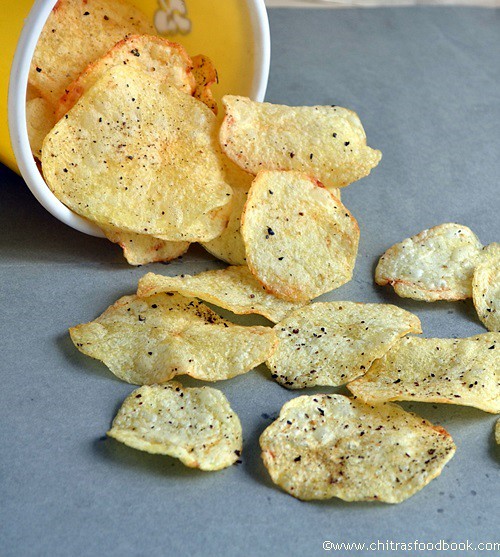
In this post, I have shared how to make crispy, white colored potato chips at home easily just like store bought ones. As you all know, crispy potato chips is loved by all irrespective of ages. Its our family favourite too. My Mil is an expert in making potato chips. She makes super crispy & white colored chips like in shops. 

By watching her, I have tried many times in my kitchen. It comes out crispy but turns reddish brown every time Initially I was thinking it was due to over heated oil. But then I found, the secret of making white colored chips lies in the variety of potato we use. 

Generally, there are two varieties of potato available in the Indian market. One is the normal cream colored potatoes we use for potato curry and the other one is red colored covered with mud. The second variety is mostly used for making chips. It is called as “chips potato”. I have shared the picture of  both the potatoes to differentiate them. 

When you use this chips potato, your chips won’t turn brown even if you deep fry for long time. So Friends, if you plan to make potato chips at home, first ask for chips potato. Vendors would know better. Also, do follow the technique I have given below. U’ll get it perfect ! I will try to share a detailed video for the same. Hope it will be useful for beginners like me. 

U can make this easy, Indian style crispy potato chips for parties in advance & store them in a box. Refer "Notes" section for tips. Also check out the video below for more details.

If you are looking for baked or microwave potato chips recipe, do visit this link.

Video: Potato chips recipe

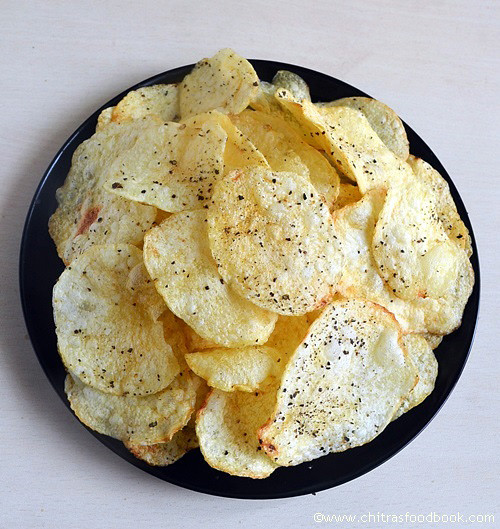
Check out homemade, crispy, white colored potato chips like store bought ones.


Potato varieties in India


As Sendhil is fond of pepper flavoured chips, my MIL always add coarsely ground pepper powder for her son. But I love the one with chilli powder like we get in shops. So she reserves last 2 batches for me for adding red chilli powder, how sweet !


Homemade Potato chips


Homemade Potato chips How to make crispy and white potato chips at home.
Cuisine: Indian
Category: Snacks
Serves: 50nos
Prep time: 10 Minutes
Cook time: 10 Minutes
Total time: 20 Minutes


INGREDIENTS

  • Potato - 3 nos
  • Salt - as needed
  • Water - to wash and soak
  • Oil - to deep fry
  • Pepper powder or chilli powder – as needed to sprinkle ( 1 tsp)
HOW TO MAKE POTATO CHIPS - METHOD

  • Wash and peel the potatoes. Take water in a wide bowl and slice the potatoes directly in the water. Keep the slices immersed in water to avoid discoloration. Rinse it well till the color of water changes to white. (You should remove the starch in potatoes).i.e Discard the water and again wash the potato slices. Repeat this for 2-3 times.
Potato chips recipe
Potato chips recipe
  • Spread the slices in a paper or cotton towel for 10 to 15 minutes. Pat it dry by covering with another paper or towel. Make sure there is no moisture in the slices.
Potato chips recipe
  • In a bowl, take the salt. Dissolve it by adding little water. Set aside.
  • In a kadai, heat the oil required for deep frying. Check the temperature by dropping a piece of potato slice. If it raises to top immediately, oil is just right.
Potato chips recipe
  • Keep the flame medium & drop the potato slices in batches. Do not dump more in one batch.  Keep tossing & pressing with a ladle till bubbles cease. Once the bubbles reduce & potato slices turns crispy, reduce the flame completely & carefully sprinkle the salt water standing a feet away.( If you are scared to do this step, skip it and sprinkle salt at the end after removing the chips from oil)
Potato chips recipe
  • As soon as you sprinkle the salt water, oil bubbles with crackling sound. Keep tossing the chips for salt water to get coated evenly. The noise is completely suppressed after a minute. Bubbles will cease completely. Flip the chips. Remove in a tissue paper.
Potato chips recipe
  • Sprinkle pepper powder or red chilli powder, mix well and enjoy with variety rice. Store in an air tight box when it is cooled down completely.
Potato chips recipe


Note
  • U can make this chips in advanced for birthday parties. Make the chips the previous day. After it cools down completely, keep it in a zip lock bag or polythene cover and store in a box. It stays crispy.
  • If you don’t want to sprinkle water directly on fire, deep fry the chips till crispy. Remove in a bowl. Mix salt with pepper powder or chilli powder. Sprinkle when the chips is hot. Toss well and serve !
  • Always deep fry the chips in correct flame. If you drop a pinch of potato, it should rise immediately. Reduce the flame to medium & then deep fry. Adjust the flame whenever necessary. Do not let the oil fume or smoke at any point. Then chips will become dark brown even if you use chips potato.
  • If you feel, the oil is overheated switch off the stove for sometime and let the oil cool down a bit. Then proceed again. By doing this way, you will get all the chips in uniform color.

Stay Connected  -     


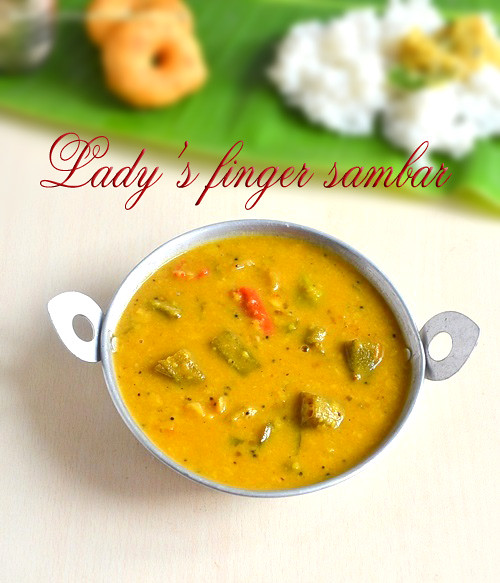
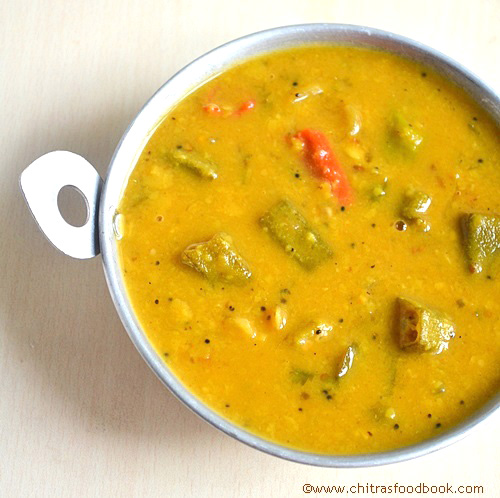
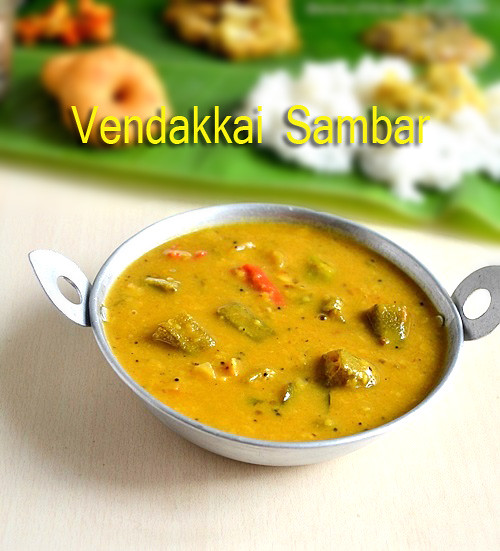
Enjoy potato chips with rice varieties or as evening snacks .U can’t stop munching !!


Very good recipes Tags: , , ,
Continue Reading...


April 13, 2014

VENDAKKAI SAMBAR RECIPE(LADY’S FINGER SAMBAR RECIPE)

This is my mom in law’s basic sambar recipe for rice in which we use lady’s finger @ okra. Last week a reader mailed me to blog basic sambar & vathakuzhambu recipes. So I thought of sharing this recipe which might be useful for Tamil new year lunch menu too. I usually make vendakkai sambar & avarakkai sambar for no moon day and for festivals where we don’t use onions because this sambar tastes good even without onions. My mom also makes vendakka sambar but the procedure is completely different. Do click here to know my mom’s Nellai sambar recipe.

This sambar is very easy to make and flavourful too.There is no grinding part. Hence bachelor’s also can give a try. We usually eat sambar sadam adding a few drops of ghee. It enhances the flavour of sambar and even kids would love to have it.

For this sambar, you can replace lady’s finger with brinjal, Raw mango, drumstick or even Keerai thandu. But the quantity of tamarind varies for each veggie. In this post, lets see how to prepare Tamil nadu style basic sambar recipe with Lady’s finger.


Vendakkai sambar recipe/Okra sambar recipe


Vendakkai sambar recipe/Okra sambar recipe Lady's finger/Okra/Vendakkai sambar recipe - Basic south indian style sambar for rice !
Cuisine: Indian
Category: Lunch
Serves:3
Prep time: 20 Minutes
Cook time: 10 Minutes
Total time: 30 Minutes


INGREDIENTS
To pressure cook
  • Toor dal - 1/3 cup
  • Turmeric powder - 1/8 tsp
  • Water -as needed
  • Red chilli - 1 no
  • Curry leaves - few (pinched)
To temper & saute
  • Ghee + oil - 1 tbsp
  • Mustard seeds - 1/2 tsp
  • Methi seeds - 1/2 tsp
  • Red chilli - 1no (pinch into two)
  • Curry leaves - few
  • Small onions - 12 nos
  • Green chillies -2- 3 nos
  • Lady's finger/Okra - 12 nos
  • Tomato – 1 no ( small)
  • Asafetida/Hing- 2-3 generous pinches
For gravy
  • Tamarind - Medium gooseberry size
  • Sambar powder- 1.5 tsp
  • Water - 2 cups
  • Turmeric powder - 1/8 tsp
  • Salt - as needed
Coriander leaves – handful ( chopped,for garnishing)

METHOD


  • In a pressure cooker, take the toor dal, turmeric, red chilli, curry leaves with required water. Pressure Cook in low flame for one or two whistles till dal turns mushy.
  • In the mean time, wash and pat dry the okra in a towel and cut into small pieces of 3-4. Peel onions, cut chillies and set aside.
vendakkai sambar recipe step1
  • Soak tamarind in enough water and take the extract using 2 cups of water. Add sambar powder , turmeric powder, salt, hing and curry leaves. Set aside .
  • In a kadai,heat ghee + oil and temper mustard, methi seeds, red chilli & curry leaves. Add the chopped lady’s finger pieces. Saute for a minute and then add onions and green chillies. Saute till onions turn transparent & lady’s finger shrink and skin turns slightly brown here and there. Then saute tomato pieces till mushy. Add 1 cup of water and allow the lady’s finger to cook well. When it is 3/4 th cooked, add the tamarind extract mixture.
vendakkai sambar recipe step2
  • Add some hing and pinched raw curry leaves (please note we are adding hing & curry leaves two times). Allow the sambar to boil well for 5-10 minutes till raw smell emanates.
  • Now add the mushy cooked dal and boil for 2-3 minutes. Lastly before switching off the flame.
vendakkai sambar recipe step3
  • Add chopped coriander leaves, boil for few seconds and switch off !
  • Cover the sambar with a lid and serve after 30 minutes to 1 hour for all the taste to blend well.
vendakkai sambar recipe step4


Note

  • Please reduce the amount of green chillies based on its size & spiciness. Use minimum 2.
  • Sauting okra is very important else it will become slimy while cooking.
  • Please add less tamarind as vendakkkai has the tendency to absorb all the tanginess.
  • Adding coriander leaves for garnishing gives a nice flavor.
  • Use ghee for tempering as it gives a nice aroma.

Enjoy this sambar with plain rice adding few drops of ghee with papad & poriyal as side dish. Tastes great !


Continue Reading...