I usually make Gobi Manchurian following my baby corn manchurian recipe. This time, for a change I tried crispy gobi manchurian recipe from Bharatz kitchen after getting tempted by the title. He had mentioned as “Crispiest Gobi Manchurian” with a clear video recipe. Usually in manchurian, Gobi turns soggy & soft immediately after mixing with gravy/sauce. But as he mentioned, this one stayed crispy for 30 minutes i.e till my photo session was over. This recipe really works well and tastes similar to the restaurant ones.
Some pre preparation work is needed for this recipe but its all worthy. If you don’t want to make gravy , simply skip the corn flour in sauce part and make it as gobi Manchurian dry version. It tastes even more crispy like street style ones. Soon I will post that recipe too. As Bharat explained, the secret of making crispy Manchurian lies in 2 things.
One, you have to use small sized florets for deep frying. Do not use bigger size florets. This makes a great difference in the texture. The second thing is, you have to deep fry the florets twice. Anything when deep fried twice gives you the best crispiness. My MIL usually tell this to me and I have experimented the same with my masala vada & urad dal vadatoo. Deep frying twice helps to maintain the crispiness for long time. The same formula is applied here. But one thing, I should warn you here. Oil absorption will be slightly more than the usual deep frying as we are doing it twice. So use oil absorbent/Tissue paper & keep changing it whenever needed. Also work out more to burn the additional calories ;).
Friends, do try this recipe confidently even if you are a beginner. Try this for your family and kids as an evening snack or as a starter for dinner. I am sure everyone will appreciate you. Lets see how to make gobi manchurian at home easily !
Gobi manchurian recipe
Gobi manchurian - An yummy starter recipe !
Cuisine:Indian
Category:Starter
Serves:2
Prep time:35 Minutes
Cook time:15 Minutes
Total time:50 Minutes
INGREDIENTS
Cauliflower florets/Gobi pieces – 25-30 nos ( small sized)
Corn flour - 2 tbsp
Ginger-garlic paste - 1 tsp
Pepper powder - 1 tsp
Salt - little
Water, turmeric powder & salt - as needed to boil gobi
Cooking oil - to deep fry
For the batter
Maida/All purpose flour - 1/2 cup
Corn flour – 1/4 cup
Red food color – a pinch ( optional, I dint use)
Salt & water -as needed ( I used 1/2 cup water)
For the sauce/Gravy
Cooking oil - 1 tbsp
Finely chopped garlic cloves - 5 nos
Ginger - 1/2 inch piece ( finely chopped)
Big onion - 1 nos (-do-)
Spring onion - 2 sprigs (-do-)
Capsicum - 1/4 no (-do-)
Red chilli powder - 1/2 tsp ( use 1 tsp to make it very spicy)
Pepper powder – 1/2 tsp
Sugar – 1/4 tsp
Salt - as needed
Sauce mix ( Recipe follows)
Sauce mix ingredients
Corn flour - 1.5 tsp
Water - 1/2 cup
Tomato sauce - 1 tbsp
Soya sauce - 1 tsp
Chilli sauce - 1/2 tsp
HOW TO MAKE GOBI MANCHURIAN - METHOD
Remove small sized florets from the cauliflower. Suppose, if you have removed them big,just cut them into small sized florets ( not too small). This is very important to get crispy gobi manchurian. Now boil the gobi in water mixed with turmeric powder & salt for 3 minutes. Remove and drain all the water immediately using a colander. Show it under running water to stop the gobi being cooked. It should stay firm.
Now add pepper powder, corn flour, G&G paste and little salt to the washed cauliflower florets. Mix it well & refrigerate it for 30 minutes. In the mean time, finely chop all the ingredients needed for sauce & keep the sauce mix ready by mixing corn flour & other mentioned ingredients in water & keep it lumps free.
Take a wide bowl and add maida, corn flour, salt and mix well. Add water to make a slightly thin batter like dosa batter. Now remove the florets from fridge & mix it with batter. Make sure all the florets are well coated with the batter.
Heat oil in a kadai and when it gets heated, put the florets one by one and deep fry them in medium flame for 2 minutes till they are 3/4 th cooked. Do not toss for one minute. Then stir well and cook till its 3/4th cooked. Do not wait for the bubbles to cease or the cauliflower turns golden brown because we are going to deep fry again. So remove the florets when they are still white in color. Drain in a tissue.
Again heat the oil for some more time but not smoky and add the florets now. Deep fry them till they turn golden brown & crispy. Bubbles will cease now. Now remove & drain in another tissue. You will find the gobi to be super crispy now. Have a bite n see, hehe (if you don't want to deep fry twice, just fry it till it becomes golden brown and crispy & proceed).
In another pan, heat 1 tbsp of oil & saute all the finely chopped veggies. Mix well adding some salt & sugar. Now add the sauce mix, red chilli powder & pepper powder and let it boil till the gravy reduces to half. Lastly add the deep fried gobi pieces, saute quickly and coat it well. Switch off the flame. Garnish with finely chopped spring onions & remove.
Serve hot & Enjoy !
Note
Deep frying twice is very important to get crispy manchurian. But it absorb more oil . So use tissue/absorbent paper.
If you don’t want to feep fry twice, you can just fry it once but you should do it till gobi turns golden brown & bubbles in the oil ceases.
If you want to try this as gobi machurian dry version, omit the sauce mix and add a tbsp of tomato sauce, 1/2 tsp of soya sauce & 1 tsp of red chilli powder after sauteing the onions & capsicum. Mix well & add the gobi pieces, mix well & serve immediately. Do not use corn flour paste here.
Try this yummy gobi manchurian recipe for your family. Have it along with veg fried rice. Tastes yummmm !!
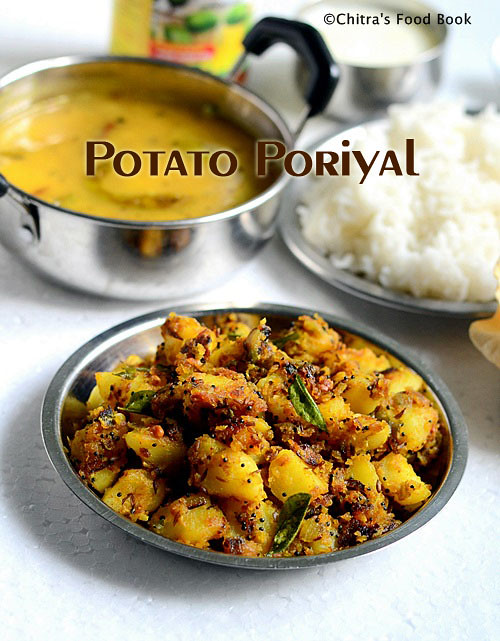
This is my favourite potato curry recipe next to my mom’s easy version.Its a pure South Indian style potato poriyal recipe for rice.I learnt this from my MIL.I usually make this poriyal & Aviyalfor my guest.All my guest like this curry very much & ask the recipe from me.This is my daughter’s favourite too.Its a best side dish for Sambar,rasam & More kuzhambu.Try it and let me know how u liked it.I make it less spicy for my family.Please adjust the quantity of sambar powder as per your spice buds.Soon i will share an easy potato curry recipe for bachelors.
Check out my brahmin’s style easy potato curry recipe too !
Potato curry recipe
Potato curry recipe/Urulaikizhangu poriyal - One of the best side dishes for Sambar & Rasam
Cuisine:Indian
Category:Side dish
Serves:Serves 3
Prep time:15 Minutes
Cook time:10 Minutes
Total time:25 Minutes
INGREDIENTS
Medium sized Potatoes - 3 nos
Salt & water - as needed
To grind
Grated coconut - 2 tbsp
Sambar powder - 1 tsp ( I use 1/2 tsp)
Big onion - 1 no ( medium size)
Turmeric powder - 1/8 tsp
Cumin seeds/Jeera - 1/2 tsp
To temper
Cooking oil - 1 tbsp + 1/2 tbsp
Mustard seeds - 1/2 tsp
Urad dal - 1/2 tsp
Cumin seeds/Jeera - 1/4 tsp
Curry leaves - few
Lemon juice - Few drops (optional)
METHOD
Wash and pressure cook the potatoes.Peel the skin and cut them into bite sized cubes.Set aside.Chop the onions into chunks for grinding.Chop another big onion finely for sautéing.
In a mixer,take the grated coconut,chopped big onion & jeera,sambar powder & turmeric powder.Pulse it once or twice.Onions should be coarsely ground.
Now take the potato cubes and mix it with the ground paste. Add the required salt & check for taste.Adjust the sambar powder & salt.
Heat a kadai with oil and temper mustard seeds,cumin seeds & urad dal.Add curry leaves & hing.After the dal turns golden brown,saute the onions till transparent.
Then add the masala coated potato cubes.Saute in low to medium flame till u get nice aroma from it and potato gets roasted nicely.Add 1/2 tbsp of oil the middle while roasting if u feel the mixture is dry.Do not cover n roast it.
Remove the roasted potato & squeeze some lemon juice if needed.Serve with sambar,rasam or more kuzhambu.
Enjoy !
Note
For variations,u can use raw banana or brinjal in place of potato but cook them in prior without losing its shape.
U can also 3 cloves of garlic along with onions while grinding.That gives a nice masala smell.
You can also garnish with finely chopped coriander leaves & squeeze lemon juice if u wish.
Make this yummy potato curry for rice & enjoy with sambar or rasam.Tastes great!
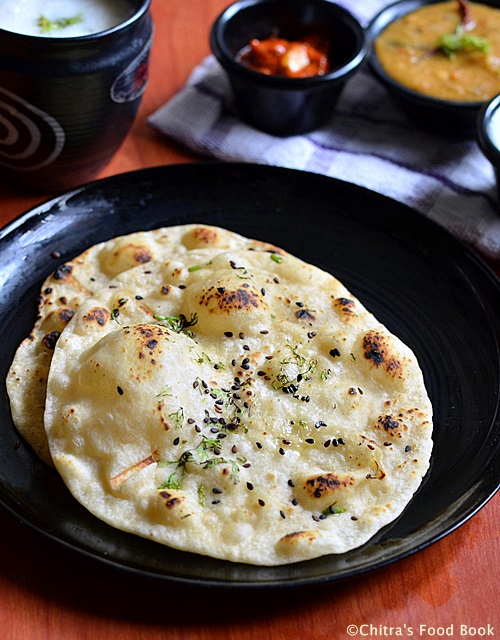
I have tried kulcha without yeast at home only once when I prepared Punjabi lunch menu and that too it was stuffed Amritsari aloo kulcha, not the plain one. I have forgotten the taste of all the other recipes I tried for that Punjabi platter but I still remember the softness of the kulcha. At that time I had followed the recipe from “The Hindu-Food Safari” Section which was an excellent, fool proof, easy kulcha recipe without yeast. So I made this butter kulcha following the same recipe for our Sunday breakfast. Kulchas are meant to be too thick & round but I made it thin as per my family’s likings. It came out really awesome. I couldn’t believe when Raksha had 3 kulchas and asked for more !!. Not just Raksha, even Sendhil & myself loved its softness very much, though we felt bad about the maida used in it. Sendhil was asking me the difference between Naan & kulcha. So I browsed & found some points which I have shared them below. He told me to try the same recipe with wheat flour too. I must give it a try. I made Restaurant style dal fry as side dish for Kulcha. It was a lovely combo. Friends do try this plain kulcha recipe without yeast. I am sure u won’t regret it. Just grease the kulchas with butter or ghee & relish it with the most popular side dish Punjabi Chole or paneer butter masala. It will taste heaven I say !
Here is difference between kulcha & naan for your reference Naan Vs Kulcha - What is the difference between naan and kulcha ?
Naan and Kulcha are flatbreads that have Indian origin. While Naan is the more celebrated type of bread, Kulcha is a typical Punjabi bread that has old Punjabi traditions.
Naan is made in oven or earthen ware made of clay using charcoal to provide heat to cook the bread whereas Kulcha can be made on stove top too.
Naan is made with yeast and sometimes with milk and yogurt to make it soft and also to give it a bounce. But Kulchas are made using baking powder, baking soda, milk & yogurt to give softness.
Although Kulcha is similar to naan in looks and flavor, it is typically thicker and fluffier than naan.
Naans are usually oblong in shape while Kulchas are round.
I am glad i have successfully reached the 3rd post in my Sunday lunch Recipes Series.I have been sharing biryani,pulao & other rice varieties that i make in weekends.This week,i have blogged my vegetable fried rice recipe in Indian style using electric rice cooker.I know most of u make veg biryani & veg pulao in rice cooker.But making a fried rice in rice cooker may be new to some of u.Not just this,the method i have shared here may also be new & it is somehow different from our usual fried rice recipe.A very big thanks to my dear friend Shalini for teaching me this easy,hassle free,wonderful ,Indian style fried rice recipe.Whenever i go out for shopping in weekends with my family,i make this rice recipe along with curd rice.It stays warm & as soon as we reach home,i just saute the required amount in ghee & serve it hot hot.As we love to have fried rice with tomato sauce as side dish,i don’t make any specifically.But my friend suggested peas butter masala& paneer butter masalaas the best side dish for fried rice.So make it as per your choice.Ok,Lets see how to make fried rice recipe in electric rice cooker.
Check out my tomato rice recipe using rice cooker & Chinese veg fried rice recipe
Veg fried rice recipe in rice cooker
Indian style Vegetable fried rice recipe using Rice cooker
Wash the rice twice & drain the water.Soak it adding 2.25 cups of water,lemon juice & oil for 1 hour.Rice will be soaked well.In the mean time,finely chop the vegetables,onion,capsicum & spring onion.Keep it ready.
Switch on the rice cooker,keep in cooking mode & allow it to heat for sometime. As soon as the plate is heated,add the soaked rice along with water,finely chopped carrot,beans & potato.Add the required salt,mix well & cover the rice cooker.Let the rice cook well.Open it once in the middle & fluff it with a fork.Once its cooked,rice cooker will switch to Keep Warm mode automatically.
Finely chop the cabbage,onions,garlic cloves,bottom part of spring onion & capsicum. Heat oil in a kadai & saute them well adding little salt( remember we have added salt in rice) Add this to the cooked rice.Add pepper powder & keep it closed till use.Now the rice cooker will be in”Keep warm” mode.
Just before serving,heat ghee in a kadai and add the required amount of fried rice.Saute well in high flame for a minute,Keep tossing & serve hot immediately.Enjoy with any side dish or tomato sauce.
Note
I have not used soya sauce here.You can use it if u need.
Adding onions & garlic is purely optional.My friend doesn’t add it.
Adding lemon juice in rice helps to give u white colored rice after cooking.But do not add more.
I don’t add ajinomotto as it is not good for health.
Try this easy veg fried rice recipe using rice cooker & enjoy ur weekend lunch
Hitikida avarekalu saaru is an easy, yummy, flavorful gravy prepared using freshly peeled hyacinth beans. It is also known as hitikida avarekalu masala saaru or hitikida bele saaru in Kannada. It is the best side dish for rice and ragi mudde. But people here love to have it with idli, dosa, akki roti, ragi roti and even with uppittu. Avarekalu is a winter season vegetable that is available all over Karnataka during december to february. I was waiting for Avarekalu season to start just to post this gravy recipe in my blog.
Now the season is started and you can see avarekalu ( Flat beans/Hyacinth beans/Indian lilva beans in English, Mochakottai in Tamil, Surti papdi in Hindi) everywhere in Bangalore. My apartment residents buy in kgs almost everyday and add them in almost all the dishes like uppittu/upma, pulao, sagu/kurma and even sambar.
Thanks a ton to my friend Megha for teaching me this wonderful Karnataka style hitikida avarekalu saaru recipe. Myself & Sendhil started liking Ragi Mudde only after having it with this gravy as side dish. Not only ragi mudde, this avarkalu saaru tastes great with rice, idli , dosa and chapathi too. Last year this time, I went to Megha’s house to learn making ragi mudde At that time, she gave me this gravy to taste with mudde. I loved it very much and noted down the recipe. She immediately packed some and told me to give Sendhil too. He liked it a lot. He also appreciated me that I have learnt 2 healthy and yummy authentic Karnataka dishes from my friend. I started making this gravy with ragi mudde regularly in weekends. I am yet to perfect ragi mudde recipe. I will try to post with a video soon after I get it right.
This particular gravy tastes more like kurma/Saagu and this has no tamarind/Huli. Coconut masala & tomato makes the base for this gravy. It can be done very easily in one pot / pressure cooker and its one of the best side dish for Ragi mudde. Scroll below to see how to make this yummy hitikida avarekalu saaru recipe with step by step pictures and video.
Hitikida avarekalu saaru recipe
Hitikida avarekalu saaru recipe for rice !
Cuisine:Indian
Category:Gravies
Serves:2
Prep time:10 Minutes
Cook time:15 Minutes
Total time:25 Minutes
INGREDIENTS
1 cup - 250ml
Avarekalu/Flat beans - 1 cup ( add more if you like)
Remove the seeds ( avarekalu ) and soak it in water over night or for 4 hours. Peel the skin by pressing it between your thumb finger & fore finger. It will come off easily. After removing the skin, wash the seeds & set aside. This is called as Hitikida avarekalu (avare bele).
Grind all the ingredients given under ”To grind " to a smooth paste adding enough water. Remove in a bowl. ( You can use Karnataka sambar powder in place of red chilli powder and dhania powder).
Heat oil in the kadai OR pressure cooker and splutter mustard seeds, cumin seeds. Now add chopped onions & tomatoes. Saute till tomato turns mushy ( this step is optional). Then add the hitikida avarekalu / chilkavare ( peeled seeds) and curry leaves, mix well. Now add the ground masala paste. Saute till its raw smell leaves it. Add a cup of water. Cover & pressure cook it in low flame for one whistle.
Open the cooker after the steam is released completely. Mix well & allow it to boil for sometime if you feel there is excess water. Else remove in a bowl & garnish with coriander leaves. Serve with ragi mudde, rice, idli, dosa or roti.
Enjoy !
Note
For variations, you can add avarekalu ( whole hyacinth beans) instead of peeled hyacinth beans.
Adjust the quantity of red chilli powder / sambar powder as per your spice level.
You can use coriander leaves for garnish. But use less for grinding. Adding more may change the flavor.
Enjoy this hitikida bele saaru with ragi mudde. Tastes yum !!
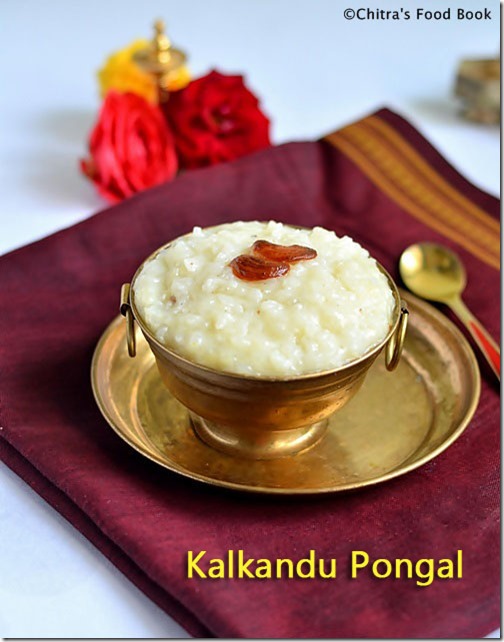
Kalkandu( Rock sugar in English & Kal Sakkare in Kannada) sadam aka Kalkandu pongal was in my to-do list for years.I had a recipe in my cook book which was waiting for me to try.Pongal is around the corner.This is the perfect time to blog this recipe.Actually it was mentioned as kalkandu bath recipe in my book.But whatever be the name,its method was very similar to our sakkarai pongal/sweet pongal using milk & sugar.I tried it this morning for the first time and it came out finger licking good.We all loved it very much.I packed it to my school moms friends.Everybody liked it so much & gave thumbs up!! This kalkandu pongal is a very rich sweet rice recipe.We can make it for any special occasions & festivals.Rice cooked in milk gives a super rich taste & flavor.Please don’t forget to add the spices i’ve given here.That’s the highlight for this recipe.One thing i would like to say is “ Do not compromise on the quantity of ghee”.It not only makes the pongal tasty but also helps to balance the body heat developed by rock sugar.My MIL usually tells us to consume moderate quantity of kalkandu pongal because over eating may upset your stomach ( ie may cause loose motion trouble).I am not sure about this.So take care and consume less.
Ok,Lets see how to prepare this yummy kalkandu pongal/rock sugar pongal. Wish u all a very happy Pongal 2015 ! அனைவருக்கும் எனது இனிய பொங்கல்நல்வாழ்த்துக்கள் !!
Kalkandu pongal recipe
Kalkandu pongal for thai pongal festival !
Cuisine:Indian
Category:Sweet
Serves:Serves 4
Prep time:5 Minutes
Cook time:15 Minutes
Total time:20 Minutes
INGREDIENTS
Raw rice - 1/2 cup
Yellow moong dal – 1 tbsp(optional,i dint use)
Raw milk - 2.5 cups
Water - 1/2 cup
Sugar candy/rock sugar - 1/2 cup( heaped) OR Powdered rock sugar - 3/4 cup+2 tbsp
Salt - a pinch
Spices for flavor
Ghee - 3-4 tbsp
Cardamom - 2 seeds( crushed)
Cloves - 1 no
Saffron threads - few
Nutmeg/Jathikai - a very small piece
METHOD
Wash and soak the rice for 10 minutes.In the mean time,boil raw milk + water in a pressure cooker base.When it comes to a boil,add the washed rice draining the water.Let it pressure cook in low flame for one whistle.It takes nearly 10-12 minutes.After the steam is released,remove the lid & mash the rice well.Keep aside ( Note : If u want to add moong dal,roast it in a tsp of ghee & add to pressure cooker along with rice.)
Take the rock sugar and break it using a hammer or rolling pin by wrapping it in a news paper.Now it will be broken into small pieces & easy to powder in mixie.If u grind the rock sugar without breaking,mixie blade may break.So its better to follow this procedure.Suppose if u have small candies ( ie diamond kalkandu)u can powder it directly.
After opening the cooker,add the powdered rock sugar & mix well.It will melt soon & mixes with the rice.The mixture will become watery now.Keep stirring by adding a tbsp of ghee. Keep the flame medium.
In the mean time,roast the cashews,clove & nutmeg.Powder the nutmeg & cardamom.Add it to the pongal.Add saffron threads too.Mix well.After some time,Pongal will turn thick and start to leave the sides of cooker.Now add all the remaining ghee along with roasted cashews.Remove & let it cool.No problem if the pongal is slightly thin.It will thicken completely once its cooled down.
Please make sure the pongal has moisture content when u switch off. ( ie it should be slightly watery n mushy. Don’t make it very thick .) This is very important ..
Once it cools down,the consistency will be correct else it will become very hard.If u feel , all the water is absorbed and if it looks dry , add little boiled milk, Mix well and switch off the flame.
Add a tsp of ghee & serve.
Enjoy !
Note
I have not used moong dal as per the recipe given in the book.If u wish to add,roast it in a tsp of ghee & add to rice in cooker.
Adjust the quantity of sugar candy as per your taste.I felt the ratio of rice & rock sugar should be 1:1.5 for perfect sweetness.U can also add 1:2 ratio if u have sweet tooth.
Do not compromise in the quantity of ghee.It not only makes the pongal tasty but also helps to balance the body heat developed by rock sugar.
My MIL usually tells us to consume moderate quantity of kalkandu pongal because over eating may upset your stomach ( ie may cause loose motion trouble).I am not sure about this.So take care and consume less.
Prepare this rich,creamy,delicious kalkandu pongal for this pongal festival and have a great celebration !
Today I have shared a simple Karnataka special avarekalu rice bath / avarekalu pulao with methi leaves (menthya soppu). Its Avarekalu (Hyacinth beans / Flat beans / Indian liva beans in English, Surti papdi in Hindi, Chikudukaya/Anapakayalu in Telugu and avarekai/Mochakottai in Tamil) season in Bangalore. Here people buy them in Kgs and make avarekalu pulao / rice bath, avarekalu saaru/sambar, uppittu/upma, avarekalu sagu etc with it. You can find avarekalu recipes in all the houses, hotels and even in marriage feast in this season. I too learnt few yummy recipes with avarekalu from my School moms friends.
Yesterday we had a small get together at Tara’s house to celebrate this new year and we all prepared a quick and yummy lunch menu. I madeeggless chocolate cake. Megha made this avarekalu-methi pulao also known as avarekalu bath and Tara made Karnataka’s one of the most popular masoppu saaru recipe along with white rice, onion raita and gram flour bonda. It was a simple yet very filling, delicious and healthy lunch menu. I learnt this pulao from Megha and clicked the stepwise pictures too for my reference.
Today I made it in my house for our lunch and for the sake of my Sunday special lunch recipe series too. So here you go my second recipe in this series, Avarekalu Methi Pulao. Its a very yummy, flavourful one pot meal which can be made under 15 minutes. You can prepare this pulao easily for your lunch box during busy morning hours easily in a pressure cooker if you have avarekalu ready in hand.
For variations, you can skip methi leaves and make it with avarekalu alone. Very less chopping works and moreover this recipe would be apt for avarekalu sesaon. I used sona masoori raw rice instead of basmati rice as I felt this recipe tasted yummy with raw rice. Finally the choice of rice is yours ! Do try this easy and yummy avarekalu methi pulao recipe with simple onion raita as side dish for your Sunday lunch menu, enjoy and spend time with your family.
Avarekalu methi pulao recipe / avarekalu bath recipe - Easy rice recipe to prepare in weekend & lunch box !
Cuisine:Indian
Category:Lunch
Serves:Serves 3
Prep time:10 Minutes
Cook time:15 Minutes
Total time:25 Minutes
INGREDIENTS 1 cup= 250ml
Avarekalu/Flat beans/Mochakottai - 1/2 cup
Methi leaves/Fenugreek leaves - 1/4 cup
Good quality sona masoori raw rice - 1 cup ( soak for 15 minutes)
Cooking oil + Ghee - 2 tbsp + 1 tsp
Bay leaf - 1 no
Big onion - 1 no
Water - 2 cups
Salt - as needed
To grind
Grated coconut - 2 tbsp
Green chillies – 3-4 nos (medium)
Cinnamon - 2 inch stick
Cloves - 3 nos
Cardamom - 2 nos
Big onion - 1/2 no
Coriander leaves - 3 sprigs
Turmeric powder - 1/8 tsp
Ginger – A small finger size
Garlic cloves - 5 nos
HOW TO MAKE AVAREKALU PULAO - METHOD
Wash and chop methi leaves. Keep avarekalu ready. For avarekalu, you don’t need to remove the skin. Just wash and keep aside. Wash and Soak rice in water for 15 minutes.
Grind all the ingredients given under “to grind” to a smooth paste adding water. Set aside.
In a pressure cooker base, heat oil+ghee. Add the bay leaf, saute for a while. Now add the chopped onions and saute till transparent. Add methi leaves & avarekalu.
Mix well for a minute and add the ground masala paste. Saute till its raw smell goes off. Now add the soaked rice with the required water and salt. Cook in low flame for one whistle. Remove and serve hot with raita !
Enjoy !
Note
For variations, you can use only methi leaves & make this pulao.
You can replace methi leaves with mint leaves along with avarekalu. But use mint leaves in very small quantity.
Adding more oil+ ghee makes this rice taste yummy. So use accordingly.
Use less coconut and onions for grinding else coconut make the rice look dry.
U should use more spices to get a nice aroma. So I used 3 cloves, 2 cardamom and 1 big stick cinnamon.
My friend used 1.75 cups of water for fluffy rice.
Enjoy this yummy averakalu pulao recipe with simple onion raita & curd rice !


 Gobi manchurian - An yummy starter recipe !


 .I make it less spicy for my family.Please adjust the quantity of