When I was working, my colleague who is a bachelor used to bring this simple veg biryani in a pressure cooker at least twice in a week. It looks like a plain colored rice with vegetables here and there. Whenever we ask for the recipe, he says its a 10 minutes biryani using masala powder.
When I was planning for this week’s Sunday Lunch recipes, this biryani flashed in my mind. I thought this recipe may be helpful for bachelors & working women to make a chatpat, simple and no grinding biryani recipe for lunch box. Actually I wanted to make this biryani in rice cooker but finally I used pressure cooker.
Soon I will share a biryani recipe using electric rice cooker. I don’t want to create a hype by saying this biryani tastes awesome, rich, flavourful and all. Rather I would say, its a good biryani recipe with least spices. The result would be worthy for it and I am sure you will love the simplicity of this recipe. Just give a try. I have updated this recipe with a video. Pls check it below.
Whole garam masala - 1 each ( Cinnamon, cloves, cardamom, bayleaf) OPTIONAL
Big onion - 1 no
Tomato - 1 no
Green chilli - 1 no
Ginger - 1 inch piece
Garlic - 8 cloves OR use 1/2 tbsp of g&g paste.
Mint & coriander leaves - a handful( use more mint than coriander)
Turmeric powder - 1/4 tsp
Red chilli powder – 3/4 tsp
Dhania powder – 1/2 tsp
Biryani masala powder or Garam masala powder- 1.5 tsp
Salt - as needed
Ghee - 2 tbsp ( u can also use cooking oil)
HOW TO MAKE VEG BIRYANI IN PRESSURE COOKER - METHOD
Wash and soak the basmati rice for 30 minutes in 1.5 cups of water. If you don’t have time to soak, use 2 cups of water for 1 cup of rice. I used 1.75 cups of water as per my family's taste.
Wash and chop all the vegetables into small cubes. Chop onions, tomato, ginger, garlic & green leaves. Slit chilli into two.
In a pressure cooker base, heat ghee and add the whole garam masala if using. Add sliced onions, chilli, ginger, garlic, mint and coriander leaves. Saute everything well for a minute. Now add the tomato along with the chopped vegetables.Saute till tomato turns mushy. Add the required salt to quicken the process.
After the tomato turns mushy,add red chilli powder, dhania powder, biryani masala powder and turmeric powder. Mix well for a minute. Lastly add the washed & drained rice and saute well for a minute. Now add the required water and pressure cook in low flame for one whistle.
Open the cooker after the steam is released. Fluff the rice with a fork.Serve it hot with raita. Enjoy !
Note
Adjust the quantity of biryani masala powder as per your taste.
You can also add 2 tbsp of curd or 1tsp of lemon juice at the end. i.e before closing the cooker.
Mint leaves & coriander leaves gives a nice flavor to this biryani. So don’t skip it.
U can replace finely chopped ginger & garlic with g&g paste.
You can also prepare the same using electric rice cooker too.In that case,use 2.5 cups of water for one cup of rice.
Palakura pappu/Spinach dal is an Andhra based, simple and easy one pot recipe. It can be made under 15 minutes and its a super healthy dish packed with the nutrition of dal & palak leaves. I had tasted this once in Jayanagar, Nagarjuna restaurant. Long back, I shared this Palakoora pappu recipe tried from Sailu’s food in my Andhra Lunch Menu post.
This time I tried it by getting the recipe from my friend Megha & I modified it slightly as per our taste. As her in-laws belong to Andhra, she makes this palak dal very often. Nowadays I make this for Sendhil’s lunch box whenever I don’t have enough time to prepare in busy mornings. Its a great recipe for Bachelors and working women. You can prepare this recipe at least once in a week and have a simple and healthy lunch.
My friend made it spicy but I had reduced the chillies as per my family’s taste. Also Megha told me to add little tamarind extract at the end but I used tomato here. But I read in readers comments in Vahchef's site that palak & tomato should be not be used together. I don't know the actual reason for it. So I am planning to use tamarind extract or lemon juice in place of tomato from next time. Please enlighten me if you know the correct reason. Try this easy palak dal recipe for rice and enjoy !
Palakura pappu recipe
Andhra style dal palak - Palakura pappu
Cuisine:Indian
Category:Lunch
Serves:Serves 4
Prep time:5 Minutes
Cook time:10 Minutes
Total time:15 Minutes
INGREDIENTS
1 cup - 250ml
Palak/Spinach - 2 cups ( 1 big bunch)
Toor dal - 1/2 cup
Tamarind or Tomato OR lemon juice - Berry size or 1 no (Do not chop the tomato)/ few drops
Salt & water - as needed
Big onion - 1 no
Green chillies – 4 nos ( I used 2)
Ginger - 1 inch (finely chopped)
Turmeric powder - 1/4 tsp
Sugar – a pinch
Oil - a drop
To temper
Cooking oil or ghee - 1 tbsp
Mustard seeds - 1/2 tsp
Urad dal - 1 tsp
Garlic cloves - 5 nos ( crushed with skin)
Red chillies - 2 nos ( I used guntur chilli)
Cumin seeds - 1/2 tsp
Curry leaves - few
Hing/Asafetida - a big pinch
METHOD
Wash and chop the palak leaves finely.In a pressure cooker base, take the toor dal and add 1.5 to 2 cups of water. Add turmeric powder,roughly chopped big onion, one full tomato(optional) slitted green chillies ginger, ,salt, sugar and chopped palak leaves.{Here I used one tomato.But I read its not good to add palak & tomato together. So If uou don’t want to use tomato, use 1 tsp tamarind extract after cooking the dal and boil well}
Let it pressure cook in low flame for one whistle.After the steam is released,open the cooker and mash everything well using a thick ladle or whisk. Boil it to bring its right consistency.( If you don’t want to use tomato, add tamarind extract after opening the cooker now and boil the mixture for a minute)
In a kadai, heat ghee or oil and splutter mustard seeds, urad dal, cumin seeds, red chilli and crushed garlic cloves. Saute well for a minute and add them to the boiling dal.
Add tamarind extract if uing. Boil for a minute. After the dal becomes slightly thick and pourable, remove it and serve hot with rice adding a drop of ghee. Enjoy ! (Note : You can also add few drops of lemon juice instead of tomato or tamarind).
Note
I read in Vahchef’s site by readers that palak & tomato should not be cooked together. I am not sure about the reason. So if you want to skip tomato, add thick tamarind extract only after cooking the dal palak mixture. You can also use lemon juice instead of tomato or tamarind.
If using tomato, do not chop it and add to dal. Dal won’t be cooked well n mushy. So add it as whole tomato.
Make sure the dal is mashed well after cooking else the mixture will look watery and separate.
You can replace toor dal with moong dal too.
This palakura pappu can be done in another way.ie. Heat oil in a cooker. Temper all the spices given above and then add onions, green chillies, ginger. Saute them for a while and now add the moong dal and washed palak leaves. Add required water and salt. Pressure cook everything for one whistle in low flame.
Easy, healthy Palakura Pappu is ready to relish with hot rice n ghee !
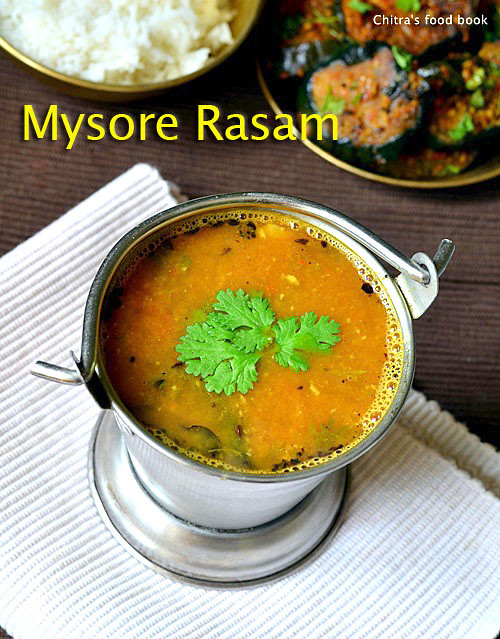
Mysore rasam is one of the most popular rasam varieties. In tamil, we can call it as “Arachuvitta rasam”. In most of the South Indian houses, rasam recipe makes it presence almost everyday for lunch. We love to make varieties of rasam recipes. Me too not an exception in this. So I keep trying some new, interesting rasam recipes in my kitchen. This mysore rasam recipe was in my bookmarked list for long time.I never thought this would taste soo good, refreshing and flavourful.
When I tried it last week for the first time, I felt its taste was very close to the rasam I had tasted in hotels and brahmin marriage feast here in Bangalore. My Kannadiga friends make a similar rasam using saaru pudi/ rasam powder and they call it as “Bele saaru”. I am not sure whether this is the authentic mysore rasam recipe but it tasted really good. So I made it again for my in-laws.This recipe became an instant hit among my friends and family.
Unlike our usual rasam, mysore rasam has a slightly thick consistency and it tastes spicy too. Its the freshly roasted and ground rasam powder that makes the difference. For this recipe, I watched Vahchef’s video and some more websites too. Also I made few changes in the quantity of ingredients based on my family’s taste. I just loved this rasam and I can even drink this as a soup. I’ll be surely making it very often.You too give a try and share your feedback. Lets see how to make this super flavorful and the most popular Mysore Rasam Recipe.
How to make flavorful, spicy mysore rasam for rice
Cuisine:Indian
Category:Lunch
Serves:3
Prep time:10 Minutes
Cook time:15 Minutes
Total time:25 Minutes
INGREDIENTS
Tamarind - Medium gooseberry size
Tomato - 1 no (big)
Sambar powder - 1 tsp
Green chillies - 1 or 2 nos (adjust)
Water - 2-3 cups
Cooked toor dal - 2 tbsp ( dilute it)
Grated jaggery - 1 tsp
Salt & turmeric powder - as needed
To roast n grind
Cooking oil - 1/2 tsp
Chana dal - 1 tsp
Urad dal - 1/2 tsp
Curry leaves – 5 nos ( I din’t add)
Dhania/Coriander seeds - 2 tsp
Red chilli - 1 no
Pepper corns - 1/2 tsp
Cumin seeds/Jeera - 1/2 tsp
Grated coconut - 1.5 tbsp
Hing/Asafetida- a pinch
To temper
Ghee - 1 tsp
Mustard seeds - 1/2 tsp
Curry leaves - few
Coriander leaves - to garnish
Grated coconut - very little ( to garnish, completely optional)
METHOD - HOW TO MAKE MYSORE RASAM
Reserve 2 tbsp of cooked toor dal. Mash it well by adding 1/4 cup of water. Grind tomato to a smooth paste using little water & keep aside.
In a wide bowl, take the tamarind extract adding 2 cups of water. To this add tomato puree, sambar powder, slitted green chillies, turmeric powder, salt & hing. Let it boil for 5 minutes.
Heat little oil in a kadai and when it gets heated, roast & grind all the items given under”to roast n grind”. Add the grated coconut at the end of roasting. Mix well & let it cool. Grind everything to a smooth paste adding enough water.
Add this paste & cooked toor dal to the rasam. Add little jaggery and allow it to boil well. It will give a nice smell & becomes slightly thicker than usual rasam. Switch off the flame & garnish with coriander leaves.
Temper the mustard, cumin seeds in ghee and add to the rasam. Mix well and close it with a lid to retain the aroma.
Give a standing time of at least 30 minutes to one hour before serving. It helps to infuse all the taste. If you want to serve it hot, you can reheat it at the time of serving. Mix it with plain rice in a bowl adding a drop of ghee. Tastes divine !
Every South Indian especially people in Tamilnadu and Kerala loves Parotta. But most of us stay away from eating as well as making parotta at home just by thinking about maida and the quantity of oil used in it.Even Iam a big lover of parotta right from my childhood. Be it Kerala Malabar parotta or Tamil nadu road side parota, I just love it like anything.
Before marriage, my dad used to buy this with salna (The most popular side dish for parotta) at least twice in a month from a small hotel nearby my house. On those days, I never mind about calories, oil etc etc and I was looking lean in spite of eating all these junk stuffs. But now, after marriage the tables turned. I have become much more health conscious & became a picky eater too. Even then I put on so much of weight which is still a mystery. So I keep restricting myself from buying frozen parottas as well as trying at home.
My friends and readers who had tried myvegetable salna recipe have asked me several times whether I have a parotta recipe in my blog. Whenever I get a query like this, I really feel bad to say “No”. So I was thinking to make this parotta post somehow without worrying about oil. But to my rescue, I found this awesome recipe in Asiya’s blog”Samaithu asathalam”. I was super excited when she made it with less oil when compared to the other recipes I had come across. Thanks to Asiya omar for sharing this wonderful recipe with a clear video in Tamil.
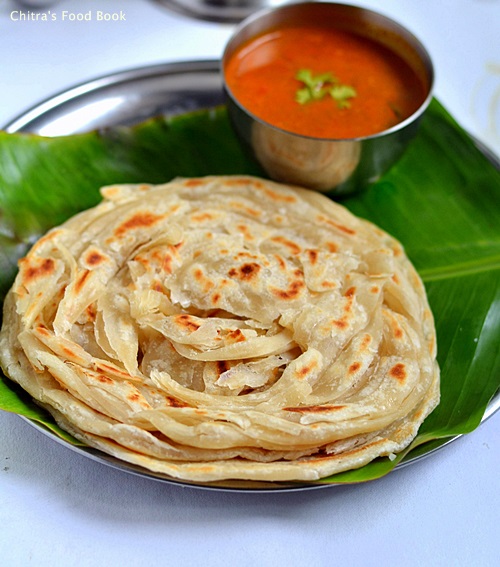
The best things about this recipe is it is eggless, dough doesn’t need much soaking time. All it needs is just 15 minutes & moreover there is no need to give oil bath to your parotta. Oil is used only for greasing. It comes out super flaky and tastes absolutely soft when eaten hot. It also stays good n soft for an hour. So this recipe is a perfect choice for people who are calorie conscious but craving to eat parotta at home. It is much much better than store bought hydrogenated frozen ones. You can make it easily for weekend breakfast. Give a try and let me know friends.
With the help of my MIL, I have uploaded a video on “How to roll parotta”. Hope you all find it useful !
Once you make this parotta successfully, you can try many varieties like kothu parotta, chilli parotta, Muttai parotta/Egg parotta etc. Ok, Lets see how to make this flaky parotta at home.
Check out the super hit recipe of my blog, vegetable salna – The best side dish for parotta !
Parotta recipe/Kerala parotta recipe
How to make kerala parota recipe at home with less oil
Cuisine:Indian
Category:Breakfast/Dinner
Serves:3 nos
Prep time:20 Minutes
Cook time:3 Minutes
Total time:23 Minutes
INGREDIENTS
1 cup = 250 ml
All purpose flour/Maida - 1 cup
Salt - as needed
Sugar - 1/4 tsp
Cooking oil - 1 tbsp + 1 tbsp ( for greasing)
Water - nearly 1/2 cup ( 1-2 tbsp lesser)
METHOD – HOW TO MAKE PAROTTA
In a wide bowl,take the maida, salt, sugar and 1tbsp of oil. Mix well to spread the oil in the flour. Now add water little by little and make a slightly sticky dough ( Not too sticky). Knead well for 5 minutes. Grease your hands with a drop of oil while kneading. Apply 1.5 tsp of oil all over the dough and keep it covered for 15 minutes.
After 15 minutes, dough would be soft and non-sticky. Take the dough and make 3 golf sized balls.
Take one ball and flatten it as much as possible using a rolling pin on a greased wide board or kitchen counter. The dough should be elastic and spread it as thin & transparent as possible. Apply little oil all over the parotta while rolling. Do it whenever needed. ( Never use maida for dusting. Only oil should be used)
Now pull one edge, move slightly forward and fold it. Do it like saree pleats. Please refer video for folding the parotta. After making pleats, just stretch it & roll them. If you find it difficult to do this, you can cut the rolled parotta into thin strips and place it one over the other. Roll it and make parotta.
After rolling and folding, give a resting time of 5 minutes. In the mean time, you can fold the other two balls. Now take the rolled ball, grease it with oil and roll it using a rolling pin. Do not use your hands to flatten it. Layers may suppress. Do not roll it too thin. Grease with oil whenever needed. Roll it thick like stuffed paratha because thick parotta tastes soft. Thin ones will become crispy while cooking.
Heat an iron dosa pan ( It works the best) and put the parotta. When you put it, the parotta may shrink. So spread it using your hands on the tawa carefully. Now drizzle 1/2 tsp of oil around the parotta. Keep the flame medium. Keep flipping and pressing the parotta with dosa flipper on both sides till you see the golden brown spots. Take care, flame should be medium and parotta should cook slowly.
Remove the parotta to the kitchen counter or the rolling board and using your hands, just press the sides forcefully when the parottas are hot. Do it like clapping the hands by keeping the parottas in between. This is the most important step to make it flaky. It helps to bring the layers out and make it soft. Stack the cooked parotta in a hot box/casserole. Serve hot with Parotta kurma or salna.
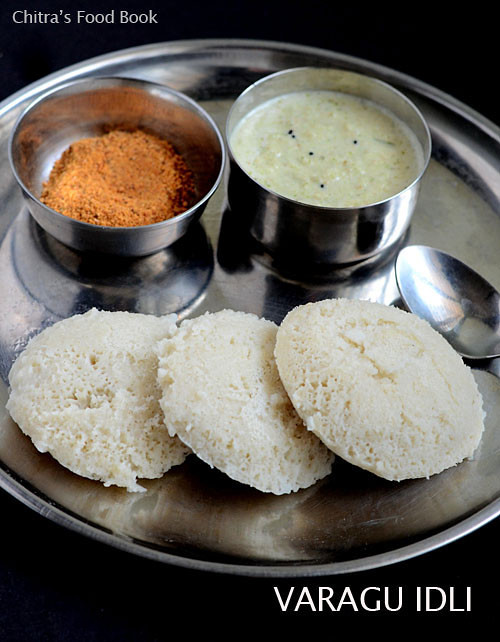
Varagu idli is a healthy millet idli recipe. Each and every millet has its own taste and health benefits. But I love varagu/Kodo millet(Kodra/Koden in Hindi, Harka in Kannada,Koovaragu in Malayalam and Arikelu in Telugu) among all because it helps to lose weight, controls diabetes,reduces joint pains and much more. So I keep trying one or the other varagu recipes in my kitchen at least once in a week.
After making thinai idli&Ragi idli successfully, I wanted to try some more idli,dosa recipes using millets. I tried kuthiravali idli but it was an utter flop. Idli was flat, sticky and too soft. I should make some improvements in the recipe and try again. So this time I prepared Varagu idli following my mixie idli recipe. It came out very well. This varagu idli is prepared without rice. Still my idlis were firm, soft, spongy and dosas were crispy as well. So this is completely a rice-free idli. The flavor of dosas were awesome. I just loved it. My in-laws are here with me. They too liked this varagarisi idli, dosa very much and my MIL told that she will be making it very often after going to salem. I was very happy to hear this feedback from them.
Friends,try this healthy millet idli and include it in your routine breakfast/dinner. Its sure a very healthy replacement for our regular rice idli.Very soon,i will share easy varagu upma recipe.
Check out my collection of 12 idli recipes and enjoy making varieties of idli for breakfast/dinner !
Varagu arisi idli,dosa recipe
Idli,dosa recipe using varagu/Kodo millet- Healthy breakfast/dinner recipe
Cuisine:Indian
Category:Millet recipes
Serves:15-20 nos
Prep time:4 Hours
Cook time:10 Minutes
Total time:4H10Min
INGREDIENTS
1 cup = 250ml
Varagu/Kodo millet - 1 cup
Round urad dal - 1/4 cup
Aval/thick Poha - 2 tbsp
Methi seeds/Venthayam - 1/4 tsp
Salt and water - as needed
HOW TO MAKE VARAGU IDLI DOSA - METHOD
Take all the ingredients given above except salt and wash them twice in water to remove the debris. Soak it together for 4 hours.
Take a big mixie jar and grind them in two batches adding enough salt & water. Please do not add more water because they can be easily ground in less water. So use water only when needed. The consistency of batter should be like our regular idli batter.If the batter is too watery, you cannot make idlis. Idli will be flat n sticky. If you add very less water, idli will be hard. So take care while adding water.
Ferment it overnight or minimum 16 hours ( if it is winter). The next morning, batter would have raised in volume but not doubled.
Stir the batter well with a ladle and make idlis. Steam it in an idli pot for 10 minutes. Check with a back of spoon or using fingers dipped in water. If it comes out clean, idli is cooked. Remove with a spoon and serve hot with chutney !
Enjoy !
Note
No need to add rice in this recipe.
Do not add more water while grinding.
Idlis come out soft for varagu and dal in 5 :1 ratio. If you want even more softness, use 4:1 ratio based on the quality of dal.
Adding methi seeds & aval/poha is for softness. Don’t skip it.
Ferment the batter for minimum 12 hours. During summer 8 hours is enough.
Use same cup for measuring all the ingredients.
Steaming hot Varagu Idli !
Enjoy this varagarisi idli, dosa with your favourite chutney or sambar. Stay healthy !
Bitter gourd biryani/Pavakkai masala rice -Yeah, you heard it right. Its an easy, yummy biryani recipe using bitter gourd. If you love bitter gourd like me, you must try this rice. It tastes super flavorful with mild bitter taste. When I was looking for this week’s Sunday Biryani Recipes, my MIL suggested me to try this biryani by reading this recipe from a Tamil Magazine.
Initially I was hesitant to try this worrying about its bitter taste but she also told suggested me a method to remove its bitterness. So I tried it confidently & the result was unbelievably great with a very mild bitter taste only in pavakkai pieces and not in rice at all. Raksha took two servings of this rice without knowing it had pavakkai.
U can make it very easily in busy morning hours as it has no grinding job and pack it for your lunch box too. But soak the bitter gourd pieces in curd+salt mixture and refrigerate it overnight so that you can prepare this biryani instantly in the morning. You can also use vinegar as suggested in the original recipe. But squeeze and rinse the bitter gourd thoroughly to remove vinegar smell.
Bachelors & working women can try this biryani if you love bitter gourd recipes. Try and share your feedack with me. Lets see how to make this yummy bitter gourd biryani.
Bitter gourd biryani recipe
Bitter gourd biryani/Pavakkai Masala rice- Easy n delicious rice variety
Cuisine:Indian
Category:Lunch
Serves:2
Prep time:30 Minutes
Cook time:15 Minutes
Total time:45 Minutes
INGREDIENTS
Basmati rice - 1 cup
Milk - 1 cup
Water - 0.75 cups
Salt - as needed
Oil - 1 drop
To soak for 30 minutes ( helps to remove bitterness)
Bittergourd – 1 no ( medium size)
Sour curd – 1/2 cup
Salt – little(u can use vinegar in place of curd)
To saute
Cooking oil - 1.5 tbsp
Cinnamon - 1 inch piece
Cloves - 3nos
Biryani leaf- 1 no
Kalpasi/Black stone flower - 1 no
Big onion - 1 no ( sliced)
Turmeric powder - 1/4 tsp
Red chilli powder - 1 tsp ( use more for extra spicy taste)
Wash and slice the bitter gourd pieces thinly as possible. Remove the seeds if any OR If you like the crunchy taste of seeds,retain it. Take half cup of sour curd. Add some salt, mix well and soak bittergourd for 30 minutes. Similarly wash and soak the basmati rice in water for minimum 30 minutes. Chop the onions,coriander & mint leaves and set aside.
After 30 minutes, squeeze the bitter gourd pieces very well using your hands and discard the curd mixture. Take the bitter gourd pieces alone in a plate.
Heat oil in a pressure cooker base and put the cinnamon, cloves, biryani leaf, kalpasi. Add onions and saute for a minute and then add the ginger, garlic paste.
Mix well for few seconds and add the mint+coriander leaves. Mix it. Now add the turmeric powder & red chilli powder, salt. Lastly add the squeezed bitter gourd pieces and saute well for a minute till it shrinks a bit. Add little more oil if needed.
Now add the soaked basmati rice without water. Add 1 cup of milk and 0.75 cups of water. Add 1/2 tbsp of ghee & 2 tsp of lemon juice in water. Check for salt & spiciness.
Pressure cook in low flame till one whistle. It takes 8-10 minutes. Remove & fluff with a fork after the steam is released. Serve it hot with onion raita.
Enjoy !
Note
Add more chilli powder if you want extra spicy taste.The quantity I have mentioned here would be just right.
U can also add 1/2 tsp of biryani masala powder or garam masala powder for more spicy flavor.
I have used milk + Water. U can also use coconut milk for more richness.
Do not skip mint & coriander leaves as they lend a special fragrance.
I din’t use biryani leaf here.
I used freshly ground ginger, garlic paste. U can use store bought too.
Soak basmati rice for minimum 30 minutes to get lengthy rice after cooking.
Try this unique and healthy bitter gourd biryani. It tastes yum with simple onion raita !


 Easy vegetable biryani recipe for bachelors with step by step photos and video