Search Chitra's Food Book

February 5, 2016

Chocolate Covered Strawberries Recipe – Valentine’s Day Recipes

Chocolate covered strawberries recipe
Valentine’s Day is fast approaching. Many of you might have started thinking about gifting ideas and to make some special recipes on Valentine’s day. Before 10 years,when our marriage date was fixed, 2005 Valentine’s day was very special to us. He gifted me ruby stone gold stud with a chocolate box and I gave him a T Shirt. From then, every year on Valentines day, he gives me some special gifts like Camera, mobile phones, dress, jewelleries, handbags etc whereas me as a wife shower all my love by making some interesting, new dishes for him as he loves to eat varieties of food. 

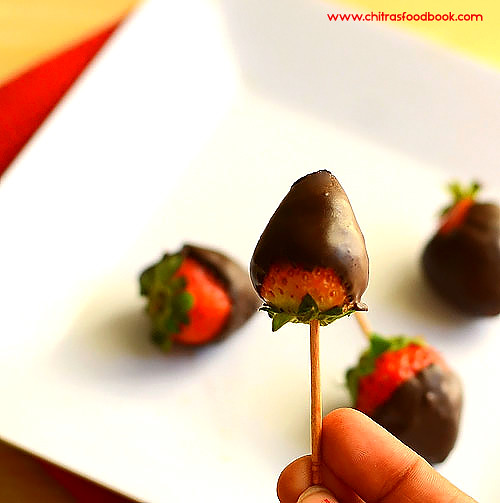
This year, when I was thinking about Valentines day recipes, my friend Shalini told me about this Chocolate covered strawberries ( Strawberries dipped in chocolate sauce). I browsed for this yummy dessert recipe & found it is a traditional gift for Valentine's Day in the United States. I became double happy & tried it this morning to start off Valentines day special recipes in my blog.

For this recipe,i referred few youtube videos for tips and tricks. I won’t say I made it perfect but still as a first timer,Iam happy with the outcome.Here i have showed you how to melt chocolate using microwave but i’ve discussed the other methods of melting as well. I used dark sweetened compound chocolate for melting.You can use white compund chocolate too. Even though the preparation is easy,there are few points you should keep in mind. 

Please refer “Notes” section for tips before you start. For variations,you can make homemade chocolate covered banana and other fruits like blueberries, prune, chocolate covered almond and even chocolate covered oreos. I decorated them with sprinklers,rice crisps. Run your imagination and play with it. Lets see how to make chocolate covered strawberries at home easily. 
Chocolate covered strawberries

Chocolate Covered Strawberries Recipe


Chocolate Covered Strawberries Recipe How to make Chocolate Covered Strawberries at home using microwave 
Cuisine: Indian
Category: Sweet
Serves: 4
Prep time: 10 Minutes
Cook time: 5 Minutes
Total time: 15 Minutes
INGREDIENTS

  • Compound Chocolate - 100 gms ( I used Vanleer brand, sweetened)
  • Fresh Strawberries - 10 nos
  • Sprinklers,rice crisps - for decoration
**Please refer”Notes”section before you start..
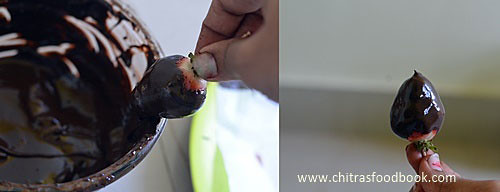
HOW TO MAKE CHOCOLATE COVERED STRAWBERRIES - METHOD

  • Wash & pat dry the strawberries completely. Make sure strawberries are completely dry because chocolate will not be coated over wet strawberries.
  • Break the compund chocolate into small pieces. Take them in a clean, dry, microwave safe bowl ( make sure there is not even a single droplet of water). Heat in medium power ( I kept 450W) for 30 seconds. Remove the bowl and stir it with a clean, dry spoon.
chocolate covered strawberries
  • Again microwave in medium power for 1 minute. Remove and stir well. Repeat this process until the chocolate is melted. No issues if there are minute pieces of chocolate. It will melt in the residual heat. Remove the bowl and keep mixing to melt completely. It took approximately 2.5 minutes to melt in my microwave. But this time may vary. So keep an eye. Over doing may stiffen the chocolate.Take care !!
chocolate covered strawberries
  • Now take the dry strawberries and insert a toothpick in the head part. Hold the toothpick and dip 3/4th or whole strawberry ( as per your wish) in the melted chocolate. Swipe it in the rim of bowl or pat it to remove the excess chocolate. Arrange the strawberries on a plate. Do this process quickly before the chocolate hardens.
chocolate covered strawberries
  • Suppose if the chocolate is hardened before you finish the work, microwave them in medium power for 30 seconds to melt them. If you are not able to bring the correct consistency for chocolate, add 1 tbsp of odourless cooking oil  for 100gms of chocolate and then melt in microwave. Chocolate will melt properly. Serve after few minutes once the chocolate sets.Enjoy !
Other methods of melting chocolate
  • Direct heat: This method is easy and convenient. Place the chocolate in a heavy saucepan over very low heat, stirring constantly till the chocolate begins to melt. Immediately remove the pan from the heat and stir the chocolate until it is smooth. Be careful while using this method because there are many chances for the chocolate to scorch. To avoid this,do the process in very low flame with constant stirring.
  • Double boiler: This method takes a little longer than the direct-heat method but eliminates the possibility of scorching the chocolate. Place water in the bottom of the bowl  and chocolate pieces in another bowl that fits the water bowl.The top of the water should be 1/2 inch below the upper pan. Then place the double boiler over low heat. Stir the chocolate constantly until it is melted. The water in the bottom of the double boiler should not come to boiling while the chocolate is melting.Stir chocolate occasionally as it softens. When you have just a few small unmelted chunks, remove bowl from heat (residual heat will melt the rest).


Note
Points you should keep in mind
1. There should be no water in strawberries or chocolate. So pat the strawberries and dry them completely before you dip them in the chocolate.
  • Make sure all equipment is completely dry. Any moisture on the utensils or in the container may cause the chocolate to seize/stiffen. If this happens, stir in 1/2 to 1 teaspoon shorteningor odourless cooking oil (not butter) for every 30 gms of chocolate.
  • Be careful to keep water from splashing into the chocolate. A single drop will cause the chocolate to seize.
  • Keep heat low to avoid scorching if using double boiler method.
  • Always stir chocolate during melting.
2.Melt the chocolate very carefully. Be patient and stir the chocolate every 30 seconds for best results.
  • If the chocolate becomes rock hard before completing the dipping process,add a tbsp of cooking oil  for 100gms of chocolate and melt to bring it to the right consistency.
Enjoy this easy, yummy deseert for your special day ! Have a fun filled celebration !!

Continue Reading...


February 3, 2016

Chanar Dalna Recipe – Bengali Recipes

Chanar dalna recipe
Last year i tried few Bengali dishes to share a lunch menu collection. I posted few dishes from the menu and this recipe was in pending list.Today when i was checking my drafts,i found this post lying in the folder.Chanar Dalna is an authentic vegetarian Bengali dish served for rice.It is made using potato and freshly prepared Chenna/homemade paneer.But i used store bought paneer and referred Sanjeev Kapoor’s recipe.Its a no onion no garlic recipe too.It came out pretty well.This weekend i will share the Bengali lunch menu platter.Now lets see how to make Bengali style Chanar Dalna Recipe – Vegetarian version !
Do check out my other bengali recipes

Continue Reading...


February 2, 2016

Garlic Chutney / Poondu Chutney - Tomato Garlic Chutney Recipe

Garlic chutney recipe
As I promised in my yesterday’s post here is the spicy, tangy, tomato garlic chutney (thakkali poondu chutney) that I had served with Puffed rice dosa. This recipe was shared by my reader Suchi vasan :) This tomato garlic ( Poondu in Tamil, Lahsun in Hindi) chutney is one of the best side dish for this puffed rice dosa. As the dosa has mild sourness this spicy, tangy chutney pairs with it very well. Its also a simple and easy to make chutney recipe with just 3 major ingredients. Not just for puffed rice dosa, you can make this chutney as a side dish for our regular idli dosa and it tastes good with curd rice too. Try it and enjoy. Lets see how to make this yummy tomato garlic chutney for puffed rice dosa !

You might be interested in

Easy Tomato Garlic chutney for chapathi

Onion Garlic chutney

Spicy Momos chutney

 65 Chutney recipes collection
Continue Reading...


February 1, 2016

Puffed Rice Dosa – Pori Dosa - Soft, Sponge Dosa Recipe Without Urad dal

Puffed rice dosa
I must thank my reader Suchi Vasan for sharing this super soft, spongy puffed rice dosa recipe ( Arisi pori dosai). When she told me about the ingredients of this dosa, I just couldn’t believe it. Its just a two ingredient recipe and that too a dosa without urad dal. Puffed rice ( Arisi pori in Tamil, Mandakki in Kannada, Murmura/bhel in Hindi, Borugula in Telugu) is the star ingredient for this recipe. As I haven’t tried any puffed rice recipes other than Kara pori, I got tempted to try this dosa & tried it on the same day. This dosa is not an instant version.Its batter needs to be fermented really well to enjoy its best taste. As Suchi said dosas came out very well, ultra soft and spongy with lots of holes in it. I usually make sponge dosa adding poha/aval & methi seeds. But this recipe does magic just with the puffed rice. You can grind the batter easily in a mixie.With garlic chutney as side dish, it tasted great!! Now lets see how to make this soft, sponge dosa using puffed rice/arisi pori.

Check out my other puffed rice recipes below.

Beach style Kara Pori

 Bhel Puri

Garlic flavored Kara Pori

Here is the LINK for Garlic chutney you see in the picture :)


Puffed rice dosa

Puffed rice dosa


Puffed rice dosa How to make soft,spongy dosa using puffed rice - Yummy breakfast recipe
Cuisine: Indian
Category: Breakfast
Serves: 8 nos
Prep time: 20Hours
Cook time: 3 Minutes
Total time: 20H3Minutes


INGREDIENTS
1 cup = 200 ml
  • Puffed rice - 2 cups
  • Raw rice - 1 cup ( Use good quality sona masoori rice)
  • Salt & water - as needed
METHOD

  • Wash the rice and soak in a bowl.Wash the puffed rice and soak in another bowl.(You can soak both together too).Let the rice soak for 2 hours.
Puffed rice dosa recipe
  • After 2 hours,take the soaked puffed rice,squeeze it well and take in a big mixie jar.Grind it to a smooth paste adding less water.No need to remove the batter.Now drain the soaked rice and add to the same mixie jar. Grind to a smooth paste adding required water and salt.
Puffed rice dosa recipe
  • Transfer the batter to a vessel and mix with your hands to aid fermentation.Allow the batter to ferment for minimum 15 hours and maximum a day.The next morning batter would be raised slightly.Mix the batter well.Proper fermentation of  batter is very important for this dosa.
Puffed rice dosa recipe
  • Heat a dosa pan and pour a ladleful of batter. Do not spread the dosa.It will spread automatically.Make it like thick uthappam.Drizzle a tsp of oil around the dosa and cover the dosa with a lid.Let it cook in medium flame for 2 minutes.Open the lid and remove the dosa.You will see the dosa with full of holes and it looks spongy.Serve hot with chutney.I made this spicy Garlic chutney as suggested by Suchi.Serve & eat hot to know its best taste !!


Note
  • You should use good quality raw rice for making this dosa
  • Batter should be fermented well.So see to it.
  • You can either cover n cook the dosa without flipping OR cook like utappam by flipping it.
  • You can also soak and grind 2 tbsp urad dal along with rice for variations.

Try this easy puffed rice dosa for your breakfast and enjoy !!
Puffed rice dosa recipe
Continue Reading...


January 29, 2016

Bharwan Bhindi Recipe - Stuffed Okra Fry

Bharwan bhindi recipe
I love to try fry recipes with stuffed vegetables.Usually i made Stuffed brinjals like this.But its purely of South Indian style.So i was looking for a typical North Indian style stuffed vegetable fry recipe.This morning I came across Bharwan( meaning stuffed in English) bhindi i.e stuffed Okra masala fry in my favorite Vahrehvah Vahchef’s youtube video. The recipe for masala was so simple with besan & less oil.Its a no onion no garlic Jain recipe and it looked mouth watering too.So without any second thought,i went for this recipe by making some small changes as per my family’s taste buds.It came out really well and got thumbsup from SendhilDancing.As the chef says,the masala used in this recipe can be used to make Bharwa Shimla mirchi, Bharwan Karela and even stuffed tindora.And this stuffed bhindi fry would be a great side dish for roti/chapathi , simple Veg pulao or any paratha. But i loved to have it as a snackWinking.Lets see how to cook bharwa bhindi recipe with step by step pictures.

Continue Reading...


January 27, 2016

Avarekalu Huli Recipe – Hyacinth Beans Gravy–Karnataka Recipes

Avarekalu huli
Avarekalu(Cow pea/Hyacinth beans/Lilva beans in English, Mochai in Tamil) season is around in many parts of Karnataka. In Bangalore, every year during winter, december-Janurary Avarekalu Mela is conducted in Food street, VV puram. Recently when I met my School moms friends,Tara was telling me about the varieties of avarekalu dishes she tasted in Avarekalu Mela. I got tempted to try some recipes with it and post here.

Last year during this time, I shared Hitkidabele Avarekalu saaru and Avarekalu Pulao recipes. So this year i tried a yummy Avarekalu Huli recipe and Avarekalu dry palya  for rice by getting the recipes from my friend Megha. She shared her mom’s recipe which was very different from the ones I saw in various blogs.So i tried it & came out really well.We loved this gravy with rice. It was tasting more like Arachuvitta Vathakuzhambu. I used less oil than what Megha suggested. Still it was very tasty. Ok, Lets see how to prepare Karnataka style Avarekalu Huli.

Avarekalu saaru

Avarekalu Huli Recipe


Avarekalu Huli Recipe Avarekalu Huli Recipe - Gravy for rice adding field beans
Cuisine: Indian
Category: Side dish
Serves: Serves 2
Prep time: 15 Minutes
Cook time: 15 Minutes
Total time: 30 Minutes
INGREDIENTS

  • Avarekalu with skin / Hyacinth beans - 1/2 cup
  • Potato - 1 no
  • Brinjal - 1 no
  • Big onion – 1 no
  • Garlic bulb – 1 whole ( with 15 cloves)
  • Salt & water - as needed
To grind
  • Tamarind - A big gooseberry size
  • Grated coconut – 1 tbsp
  • Red chilli powder – 1 tbsp
  • Dhania powder - 2 tsp
  • Turmeric powder - 1/8 tsp
  • Coriander leaves - 1 sprig ( optional)
To temper
  • Cooking oil or gingely oil - 1 tbsp
  • Mustard seeds - 1/2 tsp
  • Cumin seeds/Jeera - 1/4 tsp
  • Urad dal - 1/2 tsp
  • Curry leaves - few
HOW TO MAKE AVAREKALU HULI - METHOD

  • Wash and keep the avarekalu.Wash and peel the skin of potato. Chop into 4 big pieces.Wash and cut brinjal into chunks.
Avarekalu huli recipe
  • Pressure cook avarekalu,chopped brinjal & Peeled,chopped potato adding required water & salt. Set aside.
  • Soak tamarind in a cup of water. Brush the onion with oil. Burn the whole onion(with skin) over direct flame.Use a tong & hold the onion. Roast it all the sides in low to medium flame. When the skin of onion turns black, remove & let it cool. Similarly roast the greased whole garlic bulb on all sides till its skin turns black.( Refer Notes for variations)
Avarekalu huli recipe

  • Peel the outer skin of garlic & onion. Grind it to a smooth paste adding soaked tamarind, coconut,chilli powder, turmeric powder, dhania powder and coriander leaves. Mix this paste with the cooked avarekalu,potato & brinjal pieces. Check for consistency  & taste and add some water  or chilli powder, dhania powder if needed.
Avarekalu huli recipe
  • Let the gravy boil for few minutes.Gravy will thicken as it boils. Switch off the flame & temper mustard seeds, cumin, urad dal & curry leaves. Add to gravy and mix well.
    Enjoy !

Note
  • Adjust the quantity of chilli powder & dhania powder as per your taste.
  • This gravy is meant to be thick. If you want to make it slightly thin, add little water.
  • If you don’t want to burn the onion & garlic, Just chop them and saute in a tbsp of oil.
  • You can also replace red chilli + dhania powder with 1 tbsp of sambar powder.

Try this yummy avarekalu huli saaru recipe for rice & enjoy !!
Avarekalu huli
Continue Reading...


January 25, 2016

Sorakkai Dosa / Bottle Gourd Dosa Recipe–Sorakkai Recipes

bottle gourd dosa
Usually I make Kootu with Sorakkai (Suraikai, Sorekai in Tamil, Sorakaya in Telugu, Lauki in Hindi, Bottle gourd in English). But this time for a change, I tried dosa with bottle gourd as suggested by my MIL.She usually adds it while grinding rice flour dosa/verum arisi dosa or in paruppu adai to make the dosa very soft. But I added some spices along with rice & bottle gourd to make a spicy, flavorful dosa like adai. 

My friend Shalini used to tell me about her Karam dosa recipe. So I just used those spices for grinding this batter. It came out very well with a nice color as I expected. With coconut chutney as side dish, we loved it a lot. I was very happy that I could make a spicy, yummy, flavorful dosa variety adding a healthy vegetable. 

Friends, if you buy bottle gourd/Sorakkai, don’t forget to try this dosa. You can enjoy it for your breakfast and dinner as well. Ok, lets see how to make bottle gourd dosa with step by step pictures.

Here is my Sorakkai Kootu Recipe – 2 versions,check it out !

Sorakkai dosa

Sorakkai Dosa/Bottle gourd dosa Recipe


Sorakkai Dosa/Bottle gourd dosa Recipe Spicy,soft dosa made of bottle gourd.
Cuisine: Indian
Category: Breakfast
Serves: 15
Prep time: 120 Minutes + 12 hours
Cook time: 5 Minutes
Total time: 125 Minutes
INGREDIENTS
1 cup = 250ml
  • Idli rice - 2 cups
  • Sorakkai/Botlle gourd - 1 cup (chopped)
  • Red chilli - 8 nos ( I used Byadge chilli to get bright red color)
  • Ginger - 2 inch piece
  • Cumin seeds/Jeera - 2 tsp
  • Hing/asafetida - 1/4 tsp
  • Salt & water - as needed
HOW TO MAKE SORAKKAI DOSAI - METHOD

  • Wash and cut the bottle gourd. Scrape the outer skin and discard it. Now slit the bottle gourd into two pieces and remove the central soft, spongy part. Discard it. Chop the remaining bottle gourd into pieces and add to batter.
  • Wash and soak the idli rice for 2 hours. After 2 hours, take the big mixie jar and add the chopped bottle gourd flesh part, red chillies, cumin seeds, hing and ginger piece. Grind it to a smooth paste. Now add the rice draining the soaked water and required salt and water. Grind it to a smooth paste.
  • Transfer the batter to a bowl and let it ferment for 8 hours or over night. The next morning, mix the batter well and add some water if its very thick. Heat dosa pan and pour a ladleful of batter. Spread it thin and drizzle a tsp of oil around the dosa. Cook the dosa in medium flame and flip the other side. Cook for few minutes and remove. Serve hot with coconut chutney.
Sorakkai dosa
    Enjoy !
Note
  • If you don’t want to flip the dosa, cover and cook the dosa for few minutes, fold it and serve.
  • I used byadge chillies to get more color and less spicy taste. Please adjust the quantity of chillies as per your need.
  • If you wish to make this dosa as thick adai adding lentils, soak 1/4 cup of toor dal and 1/4 cup of chana dal with rice and grind the batter.


Enjoy this yummy, colorful, healthy bottle gourd dosa with coconut chutney and Idli podi !!
How to make bottlegourd dosa
Continue Reading...


January 22, 2016

Eggless Chocolate Cake Recipe – Eggless Chocolate Cake Without Condensed Milk

Eggless chocolate cake recipe
Last month I tried this eggless, super soft, moist & spongy basic Chocolate cake recipe without condensed milk for my FIL’s birthday. I wanted to share this as my new year’s post but I couldn’t do it. This post was lying in my drafts. As I am out of station, I thought of sharing this post today. I tried to do icing/frosting for the cake but it was not good. I must learn to do it perfect. But the cake base was a super hit at home. 
I have tried eggless chocolate cake with condensed milk for my black forest cake recipe. So I was looking for a recipe without condensed milk & butter. I came across this recipe Sharmis blog, made a small change and tried it. It came out very well. I have baked this cake so many times for Raksha’s school Christmas & New year party but without icing. I just made a simple decoration by drizzling some Hershey’s chocolate syrup and sprinkled some sugar balls. All her friends loved the cake and asked her whether your mom is a chef. This was the best complement I’ve ever received for my baking.
 And now Iam happily sharing this fool proof recipe with you all. Try it for your family and take the credits. Ok, lets see how to make this eggless, spongy, moist chocolate cake recipe using oil. If you wish to try this cake using pressure cooker, please refer THIS POST for the baking procedure.
Eggless chocolate cake

Eggless Chocolate cake recipe


Eggless Chocolate cake recipe Eggless Chocolate cake recipe - Moist, soft and spongy
Cuisine: Indian
Category: Eggless baking
Serves: 10-12 pieces
Prep time: 10 Minutes
Cook time: 35 Minutes
Total time: 45 Minutes


INGREDIENTS
1 cup = 250 ml
  • All purpose flour/maida - 1.5 cups
  • Cocoa powder - 3 tbsp
  • Baking soda - 1 tsp
  • Baking powder - 1/8 tsp
  • Salt - a pinch
  • Granulated Sugar - 1 cup
  • Chocolate Chips - 2 tbsp
  • Water - 1/2 cup (125ml)
  • Boiled milk - 1/2 cup ( at room temp) ( Vegan use 1 cup of water instead of milk)
  • Vanilla essence - 1/2 tbsp
  • Lemon juice or White Vinegar - 1 tbsp
  • Oil - 1/4 cup (60 ml)
METHOD

  • Sieve and mix the dry ingredients ( Maida, baking soda, baking powder, salt and cocoa powder). Keep aside. Take the wet ingredients ( oil, water, milk, vanilla essence, vinegar) and mix well. Add sugar and stir well to dissolve it.
  • To this,add the sieved maida mixture. Make a smooth batter using a whisk. Make sure there are no lumps and sugar is dissolved properly. Grease a baking tray with butter and sprinkle maida all over it OR line the baking pan with butter paper.
  • The consistency of batter should be thin and falls like a thin ribbon. Lastly add the chocolate chips and mix well.
  • Pour the batter and keep it ready. Pre heat the oven in convection mode at 180c and keep the baking pan inside the oven. Let it bake for 30-35 minutes. Remove and check it with the back of spoon or tooth pick. If it comes out clean, cake is done else bake for 5 more minutes. Let the cake cool down for 15 minutes. Invert the cake and remove it in a plate. You can do icing & decorate the cake as you wish Or simply drizzle some chocolate syrup and sprinkle sugar balls. Serve & Enjoy !


Note
  • I used milk & water in equal quantity but the original recipe used only water.So Vegans can replace milk with water.
  • If you trying this cake for the first time, you can just half the measures given in this recipe and try it.
  • If you wish to try this cake in pressure cooker, do refer THIS POST for the procedure.

Try this easy, yummy eggless chocolate cake at home. You will love it !!
Continue Reading...


January 21, 2016

Red Rice Idli Dosa Recipe – Kerala Matta Rice Idli dosa - Healthy Idli Recipes

Red rice idli recipe

We all know Red rice has amazing health benefits when compared with our usual white rice. So I always think to include it in my regular diet. Last week I made this healthy red rice (Kerala Rosematta) idli recipe for the first time. I have tried varieties of idli recipes using millets, brown rice, oats and even with barley. 

When I saw 1/2 kg of Kerala red rice in my pantry which I bought for my Onam sadya, red rice idli & dosa flashed in my mind. I browsed through many recipes and watched some youtube video recipes too. Finally I came up with this version. Idli came out super soft and dosa was very flavorful except the color was dull white. I was very happy with the result and including this in my Idli varieties collection.

Sorry, I am not able to post this recipe with stepwise pictures as they got deleted by mistake. Please find the picture of red rice I used in this recipe. Lets see how to make this healthy, soft idli recipe using Kerala Red rice. 

Check out my Idli varities collection HERE


Red rice

Red rice idli,dosa

Red rice idli,dosa recipe


Red rice idli,dosa recipe Red rice idli, dosa recipe - Healthy breakfast ideas
Cuisine: Indian
Category: Breakfast
Serves: 25 
Prep time: 18 Hours
Cook time: 15 Minutes
Total time: 18Hrs15Min


INGREDIENTS
1 cup = 200ml
  • Red rice - 2 cups ( I used Kerala Red Rice)
  • Salem Idli rice - 1/2 cup
  • White round urad dal - 1/2 cup
  • Thick Poha/Aval – 1 tbsp
  • Methi seeds - 1/4 tsp
  • Salt & water - as needed
METHOD
  • Wash and soak Red rice + Idli rice + poha together for 2-3 hours. Wash & soak urad dal + Methi seeds for 2 hours.
  • Grind the soaked urad dal first adding water little by little in regular intervals. I used nearly 1 to 1.25 cups of water. Make a smooth, fluffy batter. Remove in a bowl.
  • Grind the rice to a smooth paste adding required salt & water. Remove the batter and mix with urad dal batter. Use your hands and mix it well.  Allow the batter to ferment for 15 hours or overnight.
  • The next day morning,batter would have raised a bit with sour smell. Batter din’t double for me. Mix the batter well and make idlis. Heat idli pot with water. Grease the idli plate with little oil and pour the batter. Steam the idlis for 10 to 15 minutes till the back of spoon comes out clean. Remove the idlis and serve hot with chutney & sambar.
  • For making dosa, mix the batter well. Add little water if its very thick. Heat dosa pan, pour a ladleful of batter and spread it thin. Drizzle a tsp of oil around the dosa. Cook both the sides and remove. Enjoy !
I served it with  Chidambaram kathirikai gothsu and tomato chutney.

Note
  • Here I have used 5:1 ratio of rice & dal. You can use 4:1 if you use red rice alone.
  • I used a small portion of white rice just for the taste. You can skip it if you wish.

Enjoy this healthy, super soft red rice idli recipe for your breakfast & dinner !!

I served it with  Chidambaram kathirikai gothsu and tomato chutney.

Red rice idli,dosa
Continue Reading...