Podi uthappam is one of the favorite uthappam varieties for myself and Raksha. We love it more than Onion uttapam.I can have it for breakfast,dinner or just as an evening snack with hot coffee or tea. I pack this dosa for her lunch box at least once in a week.Whenever I prepare fresh Idli Podi(Gun powder in English),Raksha demands this Podi dosa. I make crispy podi roast dosa adding ghee if she wants to have at home and thick mini uthappam if carrying for school. In hotels,you could find the same with onions and served as onion podi dosa. For variations, check out my Tomato Onion uttappam and Kadai onion uthappam recipes. As I have not updated my old idli podi post, I have shared the recipe for spicy Idli powder using Garlic in the recipe section.It is my mom’s signature recipe which she has been doing for ages.You can also use Idli podi with sesame seeds/Ellu podi if you like.It tastes great with both.Try it and enjoy making Podi dosa or smear it over piping hot idli . Lets check how to make Podi uthappam recipe adding Garlic Idli Podi recipe.
Check out my Mini Cheesy Uthappam for Kids and Oats onion uthappam for people under diet
Podi Uthappam Recipe
How to make Podi Uthappam recipe using Garlic flavored Idli Podi/Gun powder.
Cuisine:South Indian
Category:Breakfast
Serves:Serves 3
Prep time:15 Minutes
Cook time:5 Minutes
Total time:20 Minutes
INGREDIENTS
For Idli Podi/Gun powder : 1 cup = 200ml
Round,white urad dal - 1/2 cup
Chana dal - 1/4 cup
Red chillies - 15-18 nos ( I used 10 spicy chillies + 6 Byadgi chillies for color)
Garlic cloves - 8-10 nos ( Chopped roughly)
Curry leaves - 1 sprig ( 8-10 leaves)
Hing/Asafetida - 1/8 tsp
Salt - as needed
Cooking oil – 2 tsp
For Podi uthappam
Easy Dosa Batter - 2 cups
Idli Podi - As needed
Sesame oil/Gingely oil OR Ghee - As needed
Onion & tomato pieces - optional ( Add them for variations)
METHOD
Heat 2 tsp of oil in a kadai and roast the dals, red chillies, curry leaves separately OR roast everything together in low to medium flame by mixing constantly to avoid burning. My mom roast everything separately and grind them together.But I roast them together.Both procedure takes the same time.So do it as per your wish.After the dals cool down,grind them in a mixie jar coarsely.Lastly add the salt and roughly chopped garlic cloves.Grind it to a slightly coarse powder.Mix well and store in an air tight box to retain the aroma of garlic.This podi tastes spicy for first 2 days then it blends well & becomes perfect.
For making Podi dosa,take the dosa batter and add 1/4 cup of water if the batter is too thick.Heat dosa pan and pour a ladleful of batter.Do not spread it.It will automatically spread by itself to some extent.Make it thick and spongy.
Drizzle a tsp of oil and cook in medium flame for few seconds.You can also cover cook it.After the dosa is 3/4 th cooked on top,sprinkle idli podi all over the dosa.Add more or less depending on your taste.Drizzle one more tsp of oil over the podi and flip the dosa.Cook it for few seconds and remove it.Serve hot with your favorite chutney or enjoy as it is ! Enjoy !
For variations,you can sprinkle finely chopped onions ( tomatoes too) after the dosa is half cooked and then sprinkle idli podi.Cook till onion turns golden brown and remove.Use sesame seeds Idli podi/Ellu podi in place of Garlic Idli Podi.
Soft,thick and spicy Podi uthappam is ready for breakfast/dinner or just as after school evening snack !! Enjoy !
Its been years since I posted Vegetable momo recipe in my blog. Generally momos are made using maida/All purpose flour. But my MIL makes it using whole wheat flour as it is more healthy. So I too started making the same following my MIL. I have heard wheat flour momos are very popular in Delhi. Here I have shared the steamed version. You can try deep fried version too. According to me, there is no major difference in taste between maida & wheat momo except its color.
One more thing, this momo has to be eaten really hot to enjoy its best taste else it will become slightly chewy & hard. But when compared with maida momo, this is a healthy option indeed. I have used cabbage alone for stuffing. You can use finely chopped mixed vegetables if you are allergic of cabbage. Recently I got a request from my reader and cute sister Dhivya to prepare wheat flour momos and post here. So here it is Dhivya, just for you.
Friends, do try this healthy momos & share your feedback. Ok, Lets see how to make whole wheat flour momos at home with step by step pictures & a Video.
I will make a separate video for wrapping momos in different shapes.
Wheat flour veg momos recipe
How to make Vegetable momos using whole wheat flour
Cuisine:Indian
Category:snacks
Serves:20 ( small)
Prep time:15 Minutes
Cook time:10 Minutes
Total time:25 Minutes
INGREDIENTS
For outer covering : 1 cup = 250ml
Wheat flour - 1 cup
Cooking oil or sesame oil - 2 tsp
Salt & water - as needed
For stuffing
Cooking oil - 2 tbsp
Grated cabbage - 2 cups
Big onion - 1 no ( chopped finely)
Garlic cloves - 5 nos ( -do-)
Spring onion - 2 sprigs ( chop finely)
Soya sauce - 1/4 tsp
Pepper powder - 1 tsp
Sugar - 1/2 tsp
Salt - as needed
Cooking oil – 1 tsp to add in idli pot water.
METHOD
Take the wheat flour,salt,cooking oil and mix well.Then add water little by little and make a soft,non-sticky dough.Knead well for 5 minutes.Cover & Let the dough rest for 30 minutes.
In the mean time make the stuffing.Grate the cabbage finely( u can replace with mixed vegetables like carrot,beans,potato and capsicum).Finely chop the garlic cloves,big onion and spring onions. Heat oil in a kadai and saute garlic,onion till it turns transparent. Add the spring onions,cabbage,salt ,sugar and saute well. Cover & cook till its done in low flame. Sprinkle water if needed. Add soya sauce and pepper powder. Mix well and keep the stuffing ready.
Now take the dough and make small balls of 10gms size. Dust in wheat flour and roll it thinly. Make sure the corners are thinner than the center. Keep 1 tbsp of stuffing in the middle of circle and wrap them in different shapes. Please CLICK this post for wrapping methods.
Make all the momos and arrange them in a greased idli plate. Boil water in the idli plate adding a tsp of cooking oil.When the water starts to roll boil, keep the idli plate and steam the momos for 7- 8 minutes. Switch off the flame and let it rest for 2 minutes. Remove the momos and serve with chilli garlic chutney !!
Enjoy !
Note
Adding oil in wheat flour while making the dough is to make a soft outer covering.
Roll the dough ball thinly to get a thin covering & to make the momos soft to eat.
Wheat flour momos become slightly chewy & hard after it cools down. So eat it hot. Reheating is not recommended.
Replace wheat flour with maida or use maida & wheat flour in equal quantities for variations.
Replace cabbage with mixed vegetables for stuffing.
Adding a tsp of oil in the idli pot while steaming momos helps the momo to remain soft n shiny.
Orange mocktail / Orange lemon juice recipe is a simple and yummy summer drinks recipe. I make juices & milk shakes with fruits very rarely as we love to eat whole fruits. Recently I had this Orange mocktail in a juice corner. Raksha & myself loved it a lot. She told me to pack it for her school morning break time. So I browsed for mocktail recipes without alcohol and found it from Sharmi’s blog. The combination of Orange juice and lemon juice was perfect. Raksha gave a big thumbs up after drinking it and she told me to make it very often too. I usually make Eggless Orange cake during this fruit season.I am happy that I got yet another interesting recipe using orange fruit. Lets see how to make this non–alcoholic cocktail recipe - Orange Mocktail at home easily.
Extract the juice from Oranges.Add lemon juice and mix well.Strain the juice and add required sugar and water.Mix well and check for taste.Add more sugar or water if needed. Serve immediately.
Enjoy !
Enjoy this easy,delicious healthy mocktail at home !
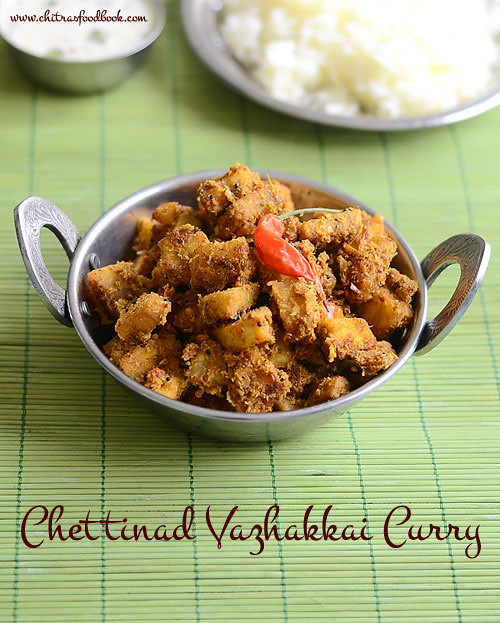
Raw banana / Vazhakkai is our family favorite vegetable. So I keep trying varieties of curry/fry recipes with it. Recently I came across this Chettinad style vazhakkai masala curry recipe in this blog. As it had fennel seeds/soambu, I got tempted to try it. I made it as a side dish for mor kuzhambu. It was a yummy combo. We all loved it.
Though I made it less spicy, it was very flavorful and tasty with rice. I have included this curry in my routine lunch menu too. Sure, its a welcome change from my usual Raw banana poriyal. Next I am eyeing on Chettinad varuval /roast without coconut. I will try to make it soon and upload here. Now Lets see how to make Chettinad Vazhakkai curry recipe for rice with step by step pictures. Check out my other raw banana recipes
Chettinad style raw banana fry recipe using freshly ground masala
Cuisine:Indian
Category:Side dish
Serves:2
Prep time:10 Minutes
Cook time:20 Minutes
Total time:30 Minutes
INGREDIENTS
Raw banana / Vazhakkai - 1 no
Big onion - 1 no ( chopped finely)
Tomato - 1 no
Green chilli - 1 no ( slitted)
Garlic cloves - 4 nos ( chopped)
Turmeric powder - 1/4 tsp
Red chilli powder - 1/2 tsp ( i used Kashmiri chilli pwd)
Salt - as needed
To temper
Cooking oil - 1.5 tbsp
Mustard seeds - 1/2 tsp
Curry leaves - few
To grind
Grated coconut - 1/4 cup
Fennel seeds/soambu - 1 tsp
Coriander leaves - to garnish
METHOD
Wash & peel the skin of raw banana. Chop into cubes & keep inside water to avoid discoloration. Grind the coconut + fennel seeds to a smooth paste adding enough water.
In a kadai,heat oil and splutter mustard seeds,curry leaves. Saute onions,green chilli & garlic pieces until onion becomes transparent. Add chopped tomato pieces and saute till mushy.
Add turmeric powder,red chilli powder and required salt. Mix well and add the raw banana cubes. Mix well. Add some water & cover cook till the raw banana is cooked well. Make sure it is not mushy. It should be firm.
Now add the ground coconut masala and mix well. Keep the flame medium and saute until you get a nice masala smell and raw banana gets coated with masala.Switch off the flame and garnish with coriander leaves.
Enjoy !
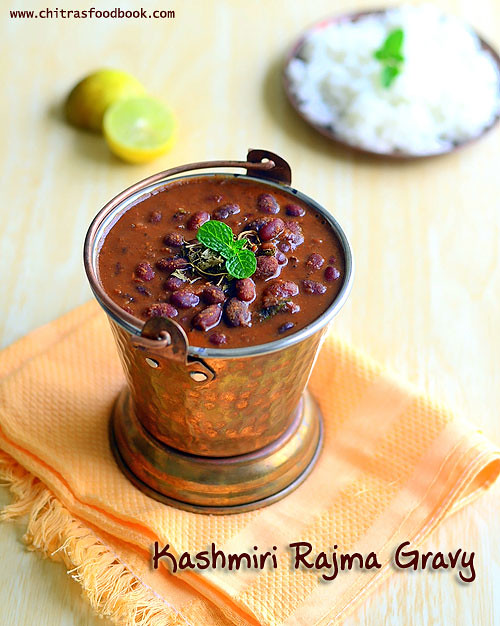
Recently I bought a pack of Rajma ( Red kidney beans in English,Karamani or Karamani Payir in Tamil , Rajma in Punjabi,Hindi , Capparadavare in Kannada, Chikkuduginjalu / Nallachikkudu in Telugu ) to try some gravy/masala for rice. I have heard a lot about Rajma Chawal, a popular North Indian Dish. So I wanted to try that but then I found the pack had Kashmiri Rajma which was smaller in size than the usual rajma. So I browsed for some Kashmiri rajma masala gravy that can pair with rice and chapathi as well. I found one in Divine tasteusing freshly ground garam masala powder. It is a no onion no garlic Jain recipe too. I became double happy and tried it for our lunch with slight modifications in the original recipe. It came out very well. We had the same for our dinner as a side dish for Chapathi/Roti. It tasted yum and we were happy to have a healthy, protein rich gravy for our lunch & dinner. Ok lets see how to make Kashmiri Rajma masala for rice and chapathi.
Check out my Rajma Sundal & Rajma Biryani recipes too.
Basically I love to experiment different types of coffee at home. Long back I had tried and shared homemade Espresso coffee without machine. After that I tried to make Cappuccino at home but it was not upto the mark. My recent crush is to try Cold Coffee at home. I have not tasted cold coffee in Cafe Coffee Day(CCD). But I have heard a lot from my friends. So I got tempted to give a try on my own & thought Valentine’s day would be a good choice because Sendhil likes to have cold coffee more than our South Indian filter coffee.
This morning I made it for the first time following this recipe. I have never thought its so easy to make at home. Its just a mix and blend of instant coffee powder,cocoa powder, milk and ice cubes. With a mild bitterness, it was awesome. Being a coffee lover,i enjoyed every sip thoroughly. I tried to decorate the glass with hershey choco syrup. But it wasn't perfect :( Cold coffee can be made with & without ice cream. Today I made it without icecream and used Bru instant coffee powder. But I read using Nescafe and ice cream makes it tastier, creamy and rich like Cafe Coffee Day.
So try to use them if you have in hand. Soon I must try Frappe, mocha and other variants of coffee. Ok, now lets see how to make cold coffee recipe at home. Try it for your loved ones on this Valentine’s day. Enjoy one coffee with two straw.
Cold coffee recipe without ice cream
How to make cold coffee without ice cream at home
Cuisine:Indian
Category:Beverages
Serves:2
Prep time:5 Minutes
Cook time:5 Minutes
Total time:10 Minutes
INGREDIENTS
1 cup = 250ml
Instant coffee powder - 2 tbsp ( I used Bru, Nescafe would be better)
Unsweetened cocoa powder - 1/2 tbsp
Water – 3 tbsp
Sugar - 3-4 tbsp
Boiled milk - 2 cups ( use full fat milk for best taste)
Ice cream - 1 scoop ( optional, Vanilla or chocolate)
Ice cubes - few ( I used 3 nos)
HOW TO MAKE COLD COFFEE WITHOUT ICE CREAM - METHOD
Heat 3 tbsp of water in a pan and mix coffee powder, cocoa powder along with sugar. Boil the mixture in slow flame till sugar dissolves completely. Keep stirring. Mixture will becomes a thick solution. Switch off the flame and let it cool.
Take a big mixie jar and add 2 cups of milk ( Preferrably boiled milk at room temperature or chilled), 3 tbsp of coffee solution, ice cubes and blend well for few seconds till the coffee becomes frothy. ( Store the remaining coffee solution in a refrigerator and use it the next day itself). Check for taste and add more coffee solution, sugar as per your taste.
Transfer it to a glass along with froth and serve it with a scoop of icecream on top. If you are not using ice cream, just decorate it with a sprinkle of coffee powder or cocoa powder. You can also add colorful sprinklers or even choco chips.
Enjoy !
Note
Adjust the quantity of sugar as per your taste.
Add more cocoa powder if you like chocolate flavor in your coffee.
Full fat milk gives more creamy,frothy coffee. But I used low fat milk here.
Store the remaining coffee solution in refrigerator and use it the next day. Do not keep it for long.
Enjoy this cold coffee with your loved ones and have a lovely day !
Making homemade pizza must be the dream for many.Me too not an exception.Whenever I order Pizza online from Dominos or Pizza Hut,i used to think “When I am i going to make it on my own???” Of course,I have tried pizza using readymade pizzabase and shared a post in my blog years ago.But i was waiting to make a perfect pizza from scratch following a simple recipe.Recently my friend Shalini shared me an easy,no knead,no wait, stovetop pizza recipe(Also known as Tawa pizza/skillet pizza)video in youtube.I was super excited to see the ease and quickness of this recipe and tried it on the same day.I used a simple topping with onions,tomato,olives and capsicum.It was excellent in taste and got a big thumbs up from my family members!! Raksha loved it very much and asked me to make it the next day too.I tried a no yeast stovetop pizza as well.I will try to share that recipe by next week.As Valentine’s day is nearing,i thought this post would be useful for people to cook pizza without oven and treat your family.You can make the pizza base/crust thick or thin as per your wish.This recipe uses Self rising flour.As a susbtitute you can use maida + baking powder + salt.Check its quantity in ingredients section.I am sure this recipe would surely help you in making a great Veg pizza at home and that too within 20 minutes.You can enjoy it for breakfast,dinner or as an evening snack.Just give a try and share your feedback here,I am waitingggg .Ok, lets check how to make this super easy,quick Tawa Veg pizza on stovetop with step by step pictures.
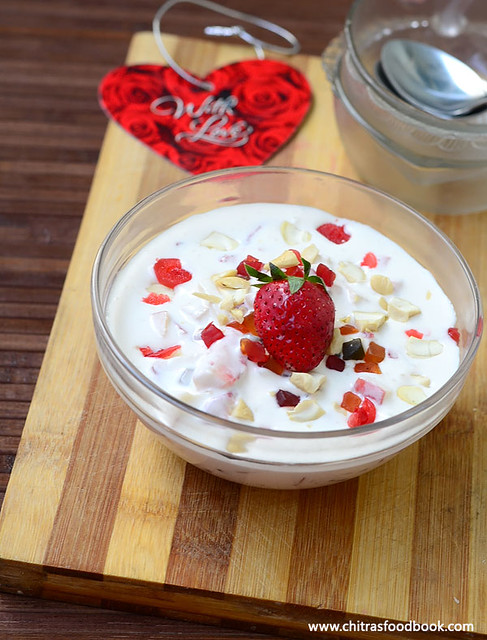
Fresh fruit cream is an easy and yummy Indian dessert recipe that can be prepared for potluck and birthday party. Last Saturday I watched Chef Venkatesh Bhat’s sweet special episode in Samayal Samyal Programme,Vijay TV. Among the recipes he showed, this fresh fruit cream dessert attracted me very much.The recipe was so easy & simple. It looked so rich, creamy, colorful and appealing to eyes.I thought it would be the best recipe for Valentine’s day celebration and tried it for our Sunday lunch along with Veg biryani.
When I browsed for more details, I found most of the recipes call for Whipping cream and condensed milk. But whipping cream is not widely available in India. So I tried it with Amul fresh cream instead of whipped cream. Its result din’t disappoint me. It came out really fantastic & lip smacking. We loved it very much. Usually I make fruit custardusing vanilla custard powderfor my guests and birthday parties. After tasting this fruit cream dessert, I felt this would be even more special to try for guests and party celebrations.
Friends, if you are looking for an yummy dessert recipe to impress your husband on this Valentine’s day, Do try it. I am sure your will be showered with praises. But one thing I should warn you here, this is a high calories dessert. So work out more :) Ok, Lets see how to make fruit cream at home with simple steps.
Fruit cream recipe
Fruit cream recipe using Amul fresh cream,fruits and nuts
Cuisine:Indian
Category:Dessert
Serves:Serves 2-3
Prep time:10 Minutes
Cook time:20 Minutes
Total time:30 Minutes
INGREDIENTS
Amul fresh cream - 200 ml ( U can use whipping cream too)
Fruits - 1/2 cup ( I used 1/2 apple, 4 strawberries, some tutti frutti)
Nuts - 2 tbsp of chopped cashewnuts
Vanilla essence - 1 tsp
Powdered sugar or icing sugar – 1/3 cup ( add 1/4 cup and increase based on ur taste)
HOW TO MAKE FRESH FRUIT CREAM - METHOD
Take the Amul fresh cream from the refrigerator. DO NOT SHAKE IT. Take the thick cream in a wide bowl leaving the water content. Make sure there is no water in the cream because thin cream may take more time to become thick and stiff.
Now take an electric beater and beat the thick cream in low speed for 1 minute. Now increase the speed and beat it until the cream becomes stiff and forms a soft peak. It takes 5 to 7 minutes approx ( Electric beater can do a better job than hand whisk. You can try in mixie but i am not sure how it turns out)
Add 1/4 cup of powdered sugar or icing sugar, vanilla essence. Beat it again till sugar mixes well with the cream. Check for sweetness and add more sugar if needed.
Keep the beaten cream in the freezer for 10 minutes. In the mean time,chop the fruits and nuts. Add it to the frozen cream and mix well. Serve immediately ! Enjoy ! This recipe stays good for 2 days when refrigerated. So you can make it for parties well in advance. Fruits releases water. So mix well before use.
Note
You can use fruits like Pomegranate, chopped Kiwi and even banana if you like.
You can also add saffron threads.
Use whipping cream instead of fresh cream if you have in hand.
This recipe stays good for 2 days when refrigerated. So you can make it for parties well in advance .
Try this easy, quick and rich dessert recipe for parties and other special occasions. Enjoy !!


 .Try it and enjoy making Podi dosa or smear it over piping hot idli
  . Lets check how to make Podi uthappam recipe adding Garlic Idli Podi recipe.
 How to make Podi Uthappam recipe using Garlic flavored Idli Podi/Gun powder.


 .Whenever I order Pizza online from Dominos or Pizza Hut,i used to think “When I am i going to make it on my own???
 .You can make the pizza base/crust thick or thin as per your wish.This recipe uses Self rising flour.As a susbtitute you can use maida + baking powder + salt.Check its quantity in ingredients section.I am sure this recipe would surely help you in making a great Veg pizza at home and that too within 20 minutes.You can enjoy it for breakfast,dinner or as an evening snack.Just give a try and share your feedback here,I am waitingggg