Eggless honey cake recipe with step by step and video. Honey cake reminds our childhood days for most of us. Yes, when we were kids many of us would have tasted this cake from our local Indian bakery. The taste of this soft, juicy, moist, honey drenched sponge cake is still lingering in our tongue.
Whenever I visit Iyengar bakery here in Bangalore, I never forget to buy their popular stuffs like Khara bun, Benne biscuit, Baked Nippattu etc. Recent days I started buying few pieces honey cake as well. Raksha is not a big fan of this cake due to the extra sweetness from honey and fruit jam. But myself and Sendhil enjoy & love this cake a lot.
Recently many of our fellow bloggers are sharing their versions of eggless honey cake which tempted me very badly to try at home.Yesterday morning I got determined to try this honey cake without eggs and followed THIS RECIPE which I had bookmarked already. Actually I wanted to follow my eggless, butter less tutti frutti cake recipe for the base of this cake. But then I thought of trying the sponge cake base using condensed milk and butter so that I can learn another eggless, moist sponge cake recipe.
Cake came out porous, pillow soft, fluffy with spongy texture as I wished. I could really feel the taste of Iyengar bakery honey cake when I tasted a piece of this cake. I am completely happy with this recipe. Even Raksha liked it very much and taken for her snack box today. You can try this cake in pressure cooker as well. I will try to share a detailed recipe for eggless pressure cooker cake.
Friends, do try this easy, delicious cake for special occasions like birthday and anniversary. I am sure you will get perfect result and enjoy with your family. Now lets see how to make Indian bakery style eggless honey cake recipe with step by step pictures and VIDEO !
If you are looking for an eggless sponge cake recipe without condensed milk and butter, do check out this recipe. For eggless orange cake recipe using cooking oil, please check this link.
Eggless Honey Cake Recipe - Indian Bakery style recipe
How to make Indian bakery style honey cake recipe without eggs.
All purpose flour / Maida - 1. 25 cups / 1 1/4 cup
Corn flour - 1/4 cup
Baking powder - 1.5 tsp
Baking soda - 3/4 tsp
Butter - 1/2 cup (Soft at room temperature, do not melt)
Condensed milk - 1/2 cup
Boiled milk - 3/4 cup ( at room temperature)
Vanilla essence - 1 tsp
Vinegar or lemon juice - 1 tbsp
For honey syrup
Honey - 1/4 cup
Sugar - 2 tbsp
Water - 1/2 cup + 2 tbsp
Rose essence - 1/2 tsp
*Increase the quantity of ingredients for honey syrup if you like more sweet and juicy cake.
For sauce
Mixed fruit jam - 3 tbsp ( I used Kissan )
Sugar - 2 tsp
Dessicated coconut powder - to garnish the cake
HOW TO MAKE EGGLESS HONEY CAKE - METHOD
In a dry bowl, sieve maida, corn flour, baking powder and baking soda . Keep it aside.
In another bowl, take the butter at room temperature ( Do not melt) and add the condensed milk. Beat it well till it becomes smooth and creamy. It takes 2-3 minutes.So beat it patiently. To this, add vanilla essence and vinegar. Just Mix well. Do not beat.
Add the sieved maida mixture to the creamy butter mixture little by little ( say 1/2 cup), Simultaneously add boiled milk at room temperature little by little (say 1/4 cup). Use a spatula and fold the cake mixture. Never beat or mix vigorously. Do it gently. When all the flour and milk is over, check the batter consistency. It should not be too thick or thin like falling ribbon. It resembles creamy paste. So don’t panic.
Grease a baking pan ( use square pan ) with butter and dust with maida all over the pan. Pat the excess flour. Add the cake batter to the baking pan and level it.
Preheat the oven in convection mode at 180c. Place the baking tray inside the oven and bake the cake for 25 to 30 minutes. Original recipe mentioned to bake for 25 minutes whereas mine took nearly 35 minutes as I added more milk. So keep an eye after 20 minutes and check with the knife as explained in the next step.
Insert a knife and check if it comes out clean. If the knife comes with uncooked batter, bake for 2-3 minutes more. Again check it. Bake the cake till the inserted knife comes out clean or with crumbs. Remove the baking tray and let it rest for 15 minutes. Run a knife along the sides and invert the cake in a plate.
Cake will come out easily if its properly cooked. You can trim the brown part of cake on the sides if you wish. But I din't remove it. Now prick the cake with a fork for the sugar syrup to spread inside the cake.
Now make the honey syrup and fruit sauce. For this, take a small kadai. Add sugar, water and boil till sugar dissolves completely. After the sugar is melted, switch off the flame. Add rose essence, honey after the sugar syrup becomes warm. Mix well and keep aside. Pour this honey syrup all over the cake. As soon as you pour, cake will absorb all the syrup. ( You can increase the quantity of honey if you like the cake to be more juicy and sweet)
In another kadai, take the jam and sugar. Mix well and melt in medium flame till the jam becomes thin. Switch off the flame and immediately apply the sauce all over the cake. If the melted jam cools down. it will start to solidify. In that case, you can heat and melt the jam again to coat over the cake. Atlast sprinkle the dessicated coconut powder for garnishing and cut into pieces.
Enjoy !
The outer layer/ crust of cake will dry if you leave it open for long time. So keep it covered in an air tight box till use. If you want to prepare this cake in advance, you can do it one day before and refrigerate the cake in a box. You should bring it to room temperature before serving.
Note
The outer layer/crust of cake will dry if you leave it open for long time. So keep it covered in an air tight box till use. If you want to prepare this cake in advance, you can do it one day before and refrigerate the cake in a box. You should bring it to room temperature before serving.
Do not beat the batter while adding milk. Fold the batter gently.
The base of this cake is not so sweet. So if you apply sugar syrup and jam sauce, sweetness will become perfect.
Do not more milk and make the batter thin. It takes longer time to cook.
Keep an eye after 20 minutes and check with the knife. Keep checking like this for every 3 minutes. Remove only after the knife comes out clean.
Original recipe told to bake for 25 minutes whereas mine took nearly 35 minutes.So baking time may slightly vary as per the oven temperature.
Do not invert or remove the cake when its hot. It will break. Invert the cake only after it cools down.
Enjoy this juicy, soft honey cake for special occasions. Have a great, sweet filled celebration.
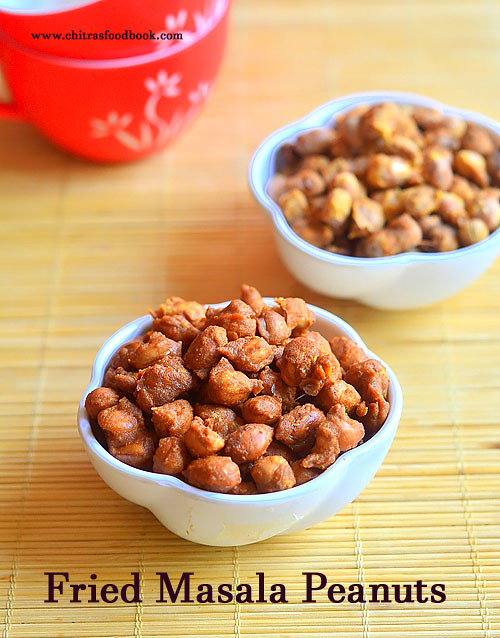
When I was young, my dad used to buy this besan coated, red colored, deep fried, spicy, dry masala peanuts( masala kadalai in Tamil) and roasted green peas ( Kara Pattani ) that is sold in small packets along with cone ice cream in cinema theatres to munch on during interval time Nowadays we could find mostly popcorn & boiled sweet corn ( butter cup corn) in most of the theaters which I am not fond of. So we buy it only for my daughter Raksha. She likes Haldirams masala peanuts and moong dal as well. But I feel the quantity of salt is high in it. So I started making them at home either in microwave or by deep frying in oil depending on the time in hand. Mostly I make it for Raksha’s school snack box or for her evening snacks after coming back from school. Yesterday I prepared this masala peanuts for our teatime. I took a video recipe by making one batch in microwave and deep frying the other batch. Both came out really well, equally crunchy and tasty. Kids would like the deep fried version more than microwave ones. For people under diet or calorie conscious, you can opt for baked version in oven to cut down the calories.I have shared both of them with step by step pictures and a video below. Do try this easy, quick and yummy evening snack for your kids & elders in your family. Enjoy your teatime ! Now Lets see how to make this yummy South Indian Masala peanuts / masala kadalai at home.
Masala Peanuts Recipe - Microwave & Deep Fried Versions
How to make besan coated masala peanuts - Deep fried version & microwave versions !
Wash and soak raw peanuts in water for 15 minutes. Soaking helps to skin to remain intact with peanuts while frying. The masala won’t come off with the skin after frying. After soaking drain the soaked water completely.
Take them in a wide bowl and add the besan, rice flour, red chilli powder, Garam masala powder, Ginger & garlic paste, hing and required salt. Mix well. Then add water little by little and mix well till all the peanuts are well coated with the masala. Do not make the batter too thick or too thin. Now add 1 tsp of cooking oil all over the batter. Mix well and set aside.
For deep frying : Heat cooking oil to deep fry and drop a pinch of batter to check its temperature. When its hot, it will rise to the top immediately. Now sprinkle the masala coated peanuts in oil and deep fry till it becomes golden in color and crunchy. Cook in medium flame and toss them in oil whenever needed, cook till bubbles cease. Remove in a tissue paper.
For microwave version : Grease a microwave plate with oil and spread the masala coated peanuts in the plate.You can spread them directly on the glass plate inside the microwave. Microwave in high power for 6-7 minutes and cook till its roasted. Keep an eye to avoid burning of peanuts. You should remove the plate once in the middle( after 3 minutes) and flip them to cook the other side as well. Again microwave for 3-4 minutes. Mine took totally 7 minutes in 800w power. Roasted Peanuts will be soft to touch when hot. But it will become very crispy once it cools down. So let it cool down completely before you munch. Serve with tea !
Enjoy !
Note
Adjust the quantity of spice powders as per your taste buds.
If you don’t have enough time for soaking, just wash the peanuts and mix all the flours in the wet peanuts and proceed as given above.
Timings in microwave depends on the power of microwave. So please keep an eye. It will burn off suddenly.
Enjoy this crunchy masala peanuts for your teatime !
Kakarakaya ( Bitter Gourd in English, Pavakkai in Tamil, Karela in Hindi) is a very healthy and diabetic friendly vegetable. I make bitter gourd recipes at least once in a week. Usually I prepare bitter gourd curry, Chettinad puli kuzhambu or Pavakkai pitlai.
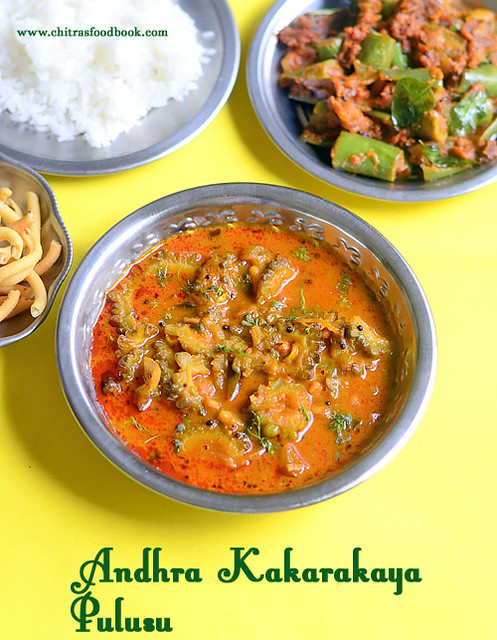
Kakarakaya Pulusu is an Andhra style bittergourd gravy made by frying bitter gourd pieces in oil and its added to a spicy gravy. But I came across an easy, one pot, Andhra style Kakarakaya Pulusu ( Pulusu means Kuzhambu/Gravy in Telugu) in a Youtube video. I tried it for lunch along with brinjal masala poriyal. It tasted very well without much bitterness.
Bitter gourd lovers like me must try this recipe. Addition of jaggery (Bellam), tamarind and thinly sliced bitter gourd sauted in oil helps to reduce the bitterness I feel. So friends, do try this Andhra special Kakarakaya Pulusu recipe for rice. I am sure you will enjoy it. Now lets see how to make it with step by step photos !
Ginger & Garlic paste - 1/2 tsp ( or use 1/2 tsp Ginger paste)
Red chilli powder - 1.5 tsp to 2 tsp
Dhania powder - 1 tbsp
Salt & water - as needed
Grated jaggery - 2 tsp
To temper
Cooking oil - 3 tbsp
Mustard seeds - 1/2 tsp
Urad dal - 1 tsp
Curry leaves - few
Hing - a pinch
Coriander leaves - to garnish
HOW TO MAKE KAKARAKAYA PULUSU - METHOD
Wash and cut the bitter gourd vertically. Remove the middle portion along with the seeds. Slice it thinly as shown in the picture below. These steps will help you to remove the bitterness to a certain extent.So slice it thinly.
In a pressure cooker base, heat oil and splutter mustard seeds, urad dal, cumin seeds, curry leaves. Add bitter gourd slices, saute till it becomes soft. Add onion, gg paste and saute till its raw smell goes off. Add slit green chillies and saute for few seconds. Bitter gourd turns dark green in color.
Now add the red chilli powder, turmeric powder, dhania powder and salt. Dhania powder helps to give thickness to the gravy. Mix well in low flame without burning them. Now add 1 cup of tamarind extract, raw pinched curry leaves. Let it boil for a minute. Add the grated jaggery, check for salt and spice. Add more chilli powder and salt if needed. Mix well and pressure cook in very low flame for 2 whistles. Bitter gourd cooks soft.
Open the cooker and see a layer of oil floating on top. Check if the gravy is too watery. If its too watery, boil for sometime till slightly thick. Mix well and serve hot with rice, papad ! ( Oil floats on top only if you cook this gravy in pressure cooker. If you make in kadai, you should boil the gravy till oil oozes out.)
Enjoy!
Note
Adjust the quantity of green chillies and red chilli powder as per your taste buds
Add the mentioned quantity of oil to get the oil floating on top.
Try this Andhra delicacy at home and enjoy your lunch !!
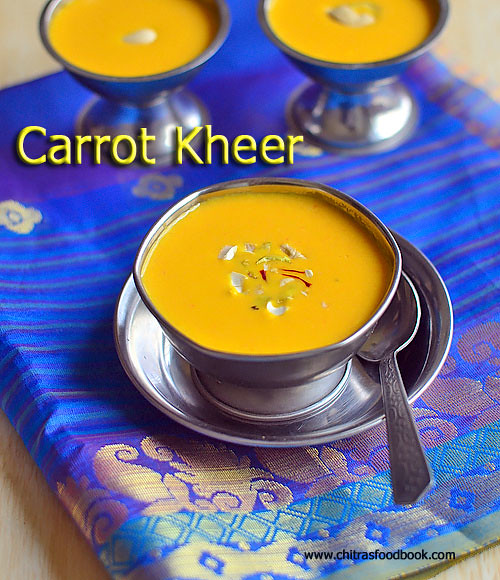
Every Thursday and Friday I do Guru Pooja and Vaibhava Lakshmi Pooja at home. So every week I make one or the other neivedyam recipes like Sweet pongal/ Sakkarai pongal, Payasam varieties or sweet appam to offer God. Sometimes I make Rava Kesari or other sweets as well. This week, I prepared carrot Kheer ( Carrot Payasam in Tamil, Gajar Ka Kheer in Hindi) for a change. Long back I had tasted carrot kheer in my Aunty’s house( Chithi). She served it chilled after lunch. I just loved its color and creamy texture. I asked her for the recipe and noted down in my diary. As I had more carrots in my pantry, I tried this today for my pooja. It came out very tasty and rich. We all loved it a lot. My daughter Raksha became a big fan of this dessert recipe and asked me to make it often. Carrot kheer is one of the best ways to include carrots in our kids diet. To made this kheer rich and creamy, I added cashews and condensed milk. But you can skip them if you don’t have it.To make Kerala style carrot payasam, add coconut milk instead of condensed milk. Carrot, Sugar, Milk and cardamom powder are the most important ingredients to make this yummy, easy Indian style dessert recipe in minutes. Its a crowd pleaser as well. So you can prepare this for small family functions or birthday parties. I am sure everyone will enjoy it. Lets see how to make this simple and yummy carrot kheer / carrot payasam recipe with step by step pictures and a video !
Carrot Kheer / Carrot Payasam Recipe
How to make carrot kheer - Easy Indian Dessert Recipe
Grated carrot - 1 cup OR Small sized carrot - 2 nos
Boiled milk - 2.5 cups ( Use full fat milk for best taste)
Sugar - 4 tbsp
Condensed milk - 2 tbsp
Cardamom powder - 1/2 tsp
Cashew nuts - 5 nos + 2 nos to roast
Ghee - 1 tbsp
METHOD
Wash and Peel the skin of carrot. Grate it using a fine grater and set aside.
In a kadai, melt ghee and roast broken cashews. Remove in a plate when its golden brown. Now add the grated carrot and saute till its raw smell goes off and its color changes to pale orange.
Add milk in the kadai and let it boil for few minutes. In the mean time, grind carrot along with cashews. Grind to a smooth thick paste adding enough water. I used 1/2 cup of milk to grind the carrot.So my paste became pale yellow after grinding. If you want orange shade for your kheer, use water instead of milk.
Add this paste to the boiling milk.Mix well and boil for 2-3 minutes in medium flame. Add sugar and condensed milk, Mix well and boil till sugar dissolves.Check for taste and add more sugar if needed. Lastly add the cardamom powder/ cardamom essence and switch off the flame. Add the roasted cashews. Mix well. If you like it thin, add more boiled milk, some sugar. Mix well, Refrigerate for an hour to serve chilled. Serve warm or chilled as you like.
Enjoy !
Note
You can skip condensed milk in this recipe. In that case, you have to add more sugar.
You can also use de skinned almonds instead of cashew nuts.
Do not forget to add cardamom powder.It helps to suppress the raw smell of carrot.
Sauting carrot in ghee helps to remove its raw smell.
This kheer will thicken over time. So add more boiled milk if you like it watery.
If you add jaggery, kheer may curdle because of milk. So use water and coconut milk if using jaggery.
Enjoy this easy, creamy, rich carrot kheer at home for special occasions !
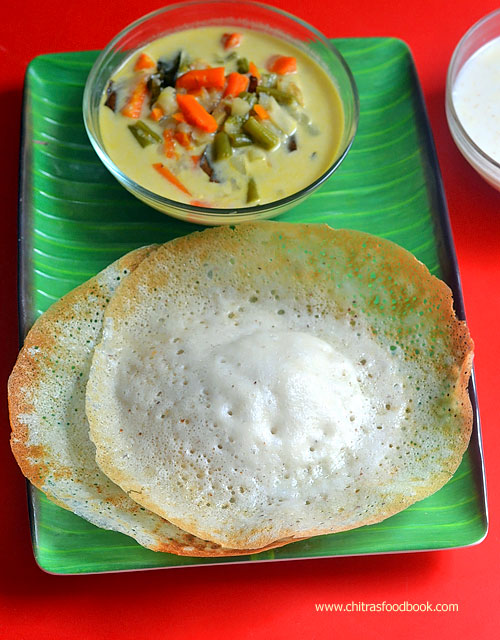
Appam is one of the most popular South Indian breakfast recipe. It is commonly found in Tamil nadu and Kerala hotels. Tamil nadu style appam can be prepared in many ways. In my family, everybody loves appam very much. So I make it at least twice in a month. I have experimented and shared different recipes for appam like appam with cooking soda, appam without soda adding ENO and have made appam recipe using idli, dosa batter as well. But I have never thought of trying Kerala’s traditional appam recipe popularly known as Palappam.
Recently when I was going through my Instagram feed, I got tempted by seeing a picture of Kerala Appam served with vegetable stew for breakfast. Since then, I was searching for traditional Kerala style appam and found many recipes with variations. I found it can be prepared with yeast , without yeast and even with rice flour. This time, I tried the traditional appam recipe using raw rice and yeast. Now I wish to try the easy appam recipe with rice flour and see the difference in texture.Soon I will share restaurant style vegetable stew recipe. Now lets see how to make Kerala Palappam recipe using raw rice and yeast !!
Salt & water - as needed (You can use coconut water for grinding the batter)
Cooking oil - to drizzle appam
HOW TO MAKE KERALA APPAM / PALAPPAM - METHOD
Wash and soak raw rice for 4 hours.Chop the coconut into small pieces and grind it coarsely. Instead you can grate the coconut and grind it along with rice. Grind the soaked rice adding grated coconut, cooked rice, salt, sugar and yeast till it becomes a smooth paste. You can grind in a grinder or in a mixie. You can use coconut water while grinding. But do not add more water and make the batter watery.
Transfer the batter to a big vessel and cover it with a lid.Let it ferment for 8 hours. I kept it for 12 hours as winter has started in my place.
After fermentation, the batter would have become frothy and almost doubled. Mix well with a ladle and add some water if the batter is too thick. The consistency of batter should be like regular dosa batter.
Heat an appam pan and pour 1.5 ladleful of batter. Swirl the pan and make a circle. The center part of appam should be thick and the sides should be thin and lacy. Drizzle a tsp of oil around the appam and cover it with a lid. Keep the flame low to medium. I cook till its bottom turns light golden brown and corners turn crispy. If you want soft, white colored appam, remove it before the corners turn crispy. Remove and serve hot with sweetened coconut milk and vegetable stew.
Enjoy !
Note
Traditionally yeast is added in Palappam/Kerala appam. But if you don’t like its smell, you can avoid it.
If you are not using instant dry yeast, you should proof it. For this, dissolve 1/2tsp of yeast in 1/2 cup of warm water, 1 tsp sugar. Mix it well and cover with a lid. Let it sit for 15 minutes. Check to see if the mixture turns frothy. If its active, add this mixture to the rice and grind it. If its not frothy, yeast is not alive/active. In that case, discard it and use a fresh yeast.
Cooking appam is medium flame patiently is more important else appam will burn in the bottom.
To make sweetened coconut milk, Grind 1cup of grated coconut adding 3/4 cup of warm water. Grind smooth and strain the coconut milk in a sieve. Collect them in a bowl and mix 1/4 cup of sugar and 1/2 tsp of cardamom powder to it. Mix well. Heat the coconut milk lightly till its warm and mix well for the sugar to dissolve completely. Do not boil the coconut milk. Serve warm with appam.
Enjoy this traditional Kerala Appam with sweetened coconut milk and Vegetable stew for a delicious breakfast !