I have never thought that making homemade chocolate fudge is so easy until I come across THIS easy, microwave chocolate fudge recipe with just 2 ingredients. As I wanted to share some easy recipe for Christmas & New year celebrations, I thought of posting this simple dessert recipe with you all. Basically old fashioned homemade fudge is made using cocoa powder, sugar, milk, butter and vanilla extract from scratch. But this is an easy and quick Chocolate fudge recipe with just 2 ingredients - Sweetened Condensed milk & Choco chips. It came out really well with soft, chewy texture. I have used microwave to melt the Choco chips. It can be done on stove top as well.You can make any number of variations in this recipe by adding nuts, raisins, variety of choco chips like dark, milk choco chips etc. Do try this easy homemade vanilla chocolate fudge recipe with condensed milk. I am sure you will love it a lot. Lets see how to make this easy chocolate fudge using 2 ingredients with step by step photos and a video !
Easy chocolate fudge recipe
Easy chocolate fudge recipe with condensed milk and Choco chips - 2 ingredient fudge recipe in microwave
Line a baking pan with parchment paper or thermal foil sheet.
In a bowl, take choco chips ( I used 1/2 cup of dark choco chips & 1/2 cup of milk choco chips) and sweetened condensed milk. Mix well
Microwave in high power (800w) for just 1 minute. Remove the bowl and mix well with a spatula till all the Choco chips melt completely. Add Vanilla essence and mix quickly. Mixture will start to thicken.
Immediately transfer the mixture to the baking pan. Level it with a spatula and pat it twice. Refrigerate the fudge for 1 hour.
Invert the fudge in a plate and peel the butter paper. Cut into squares and serve ! It stays good for 2-3 days without refrigeration.
Enjoy !
Note
I used a combination of dark & milk Choco chips in this recipe. You can use any as u wish.
Do not replace sweetened condensed milk with evaporated milk.It won’t work
Do not cook the mixture for more than 1 minute in microwave. Its enough for the Choco chips to melt. If not, keep for just 30 seconds more.
For variations, you can add finely chopped nuts, raisins, pecans to the melted chocolate.Just play around.
Enjoy this easy, yummy chocolate fudge for Christmas & New year celebrations !!
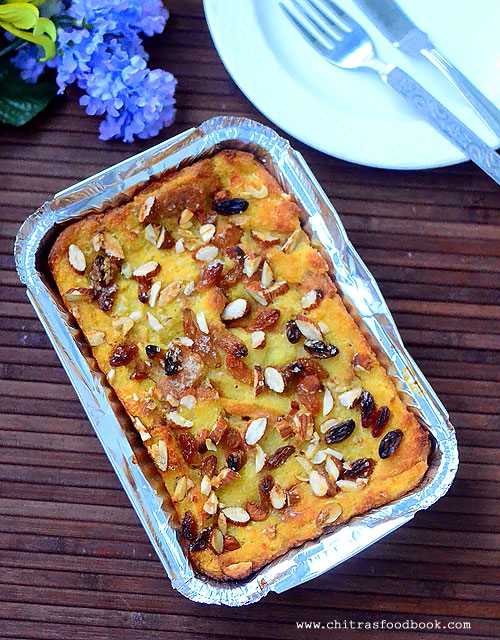
Eggless bread pudding with custard sauce is an easy to make and one of the most popular pudding recipes. Long back I had shared an easy pudding recipe with agar agar/ china grass. After that, I was looking forward to try some interesting pudding recipe.
Recently I came across this easy, eggless bread pudding recipe using bread, milk, custard powder, butter, raisins( dry grapes) and nuts in a You tube video. I tried it using my leftover 3 days old bread.Its a good option to use the leftover old bread slices. Pudding came out very well. Even though we are not big fan of pudding recipes, we liked this very much. I have followed baking method.
You can try it in pressure cooker as well.This eggless, custard bread pudding tastes really good.Kids would also love it. After making this, I am eager to try out eggless caramel bread pudding too.Friends, do try this easy, Indian style pudding recipe during Christmas and let me know your feed back. Lets see how to make bread pudding recipe without eggs and condensed milk with step by step photos and a video !
Check out my other dessert recipes using bread.
Soak dry grapes or raisins in 1/4 cup of hot water. Chop the almonds or cashews into small pieces.Take the bread slices and cut into small cubes. I din’t remove the sides of bread.
In a wide bowl, take the boiled milk.Add sugar, butter, custard powder, vanilla essence, cinnamon powder and mix well without lumps.( You can add condensed milk in place of sugar but quantity may slightly vary as per taste) Check for sweetness and add more sugar if needed. You can boil the milk for a minute till it starts to thicken.I din’t boil it. I added the milk directly to the bread pieces.
Now take a baking pan ( I used silver foil box). Grease it with butter. Arrange half of the bread pieces as the first layer. Pour half of the milk all over the bread pieces. Press it & Immerse the bread pieces in the milk using a spatula. Now sprinkle the soaked dry grapes and chopped badam/almonds.
Again layer the remaining bread pieces and pour the remaining half of milk. Press it well & Immerse the bread pieces in the milk using a spatula and mash it. Top it with the remaining soaked dry grapes and chopped almonds. Lastly sprinkle 1tbsp of sugar.
Preheat the oven in convection mode at 180c. Keep the baking tray inside the oven and bake it for 30 – 40 minutes OR till the top of bread turns golden brown. Remove the tray and slice the portion of pudding.Serve it hot or warm as you wish.Enjoy !
Note
Adjust the quantity of sugar as per your taste.
Baking time may slightly vary. Mine got done in 45 minutes. Bake till the crust changes to golden in color. Do not over bake, the bottom may get burnt. So keep an eye after 30 minutes.
If you boil the milk + custard mixture, 20 minutes of baking is sufficient. As I din’t boil the milk mixture, I baked it for more time.
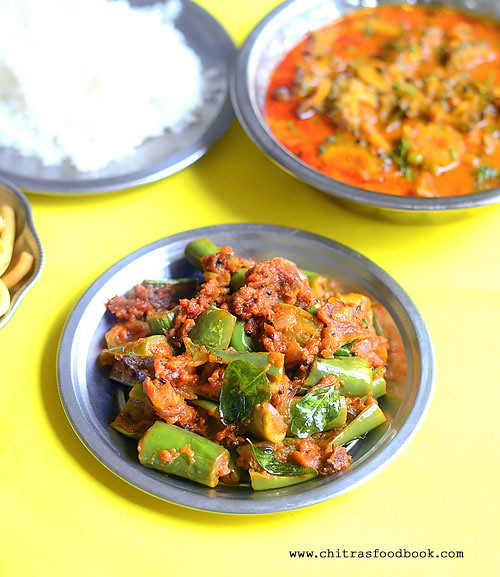
Recently I bought some long green brinjal to try Vangi bath. After making vangi bath, I had some leftover in my pantry. So I tried this easy green brinjal masala curry for Andhra Kakarakaya pulusu ( Bittergourd gravy) fromKamala’s corner. It came out really well and tasted great with rice. If you like, you can serve with chapathi too. The actual recipe called for using purple brinjal ( Naatu kathirikai). But I used green brinjals. So you can use any.
Basically I am a big fan of brinjal recipes. But Sendhil & Raksha eats brinjal only if the dish is very tasty. They both loved it a lot. I am sure I will make it very often in my kitchen. Do try this easy, tasty Kathirikai Pirattal/ vathakkal at home. You will love it. It goes well with dal rice, sambar rice & curd rice. If you like, you can have it with chapathi as dry subzi. Lets see how to make Indian style brinjal masala poriyal / Long green brinjal fry with step by step pictures !
Long green brinjal - 2 nos OR Purple brinjal – 4 nos
Red chilli powder – 1.5 tsp ( I used Kashmiri chilli pwd)
Dhania powder - 2 tsp
Turmeric powder - 1/4 tsp
Besan flour or rice flour – 1/4 cup
Salt & water - as needed
Tamarind extract - 1 tsp
To Temper
Cooking oil - 2 tbsp
Mustard seeds - 1/2 tsp
Urad dal - 1 tsp
Fennel seeds/ soambu – 1/2 tsp
Curry leaves - few
Big onion - 1 no ( finely chopped)
Coriander leaves – To garnish ( 2 tbsp chopped)
HOW TO MAKE GREEN BRINJAL FRY
Wash and chop the brinjals into 1 inch piece. In a wide bowl. take the besan flour, red chilli powder, dhania/coriander seeds powder, turmeric powder, salt and tamarind extract. Add the brinjal pieces to the spice powders and mix well.
Add little water if needed to make the masala coat well with brinjal. Let it marinate for 10 minutes.
In the mean time, chop the big onion. Heat oil in a kadai, splutter mustard seeds, fennel seeds, urad dal, curry leaves and saute onions. Add the marinated brinjal pieces and mix well for few minutes in medium flame.
After the raw smell of masala goes away, add little water (1/4 cup) and cover cook the brinjal for 5 minutes in low flame. Stir it once in the middle. Make sure brinjal is not mushy. It should retain its shape but cooked soft. Open the lid and check if its cooked soft. Mix gently and garnish with coriander leaves if you wish. Serve with sambar rice & curd rice. Tastes yumm !!
Enjoy !
Note
Adjust the quantity of spice powders as per your taste. I made it mildly spiced.
Any brinjal variety can be used. But make sure masala used for marination should coat well.
Do not over cook the brinjal. Cook in low flame by adding less water and cover it while cooking. It helps to cook faster too.
Enjoy this long green brinjal masala fry with sambar rice or curd rice. It tastes yummy !
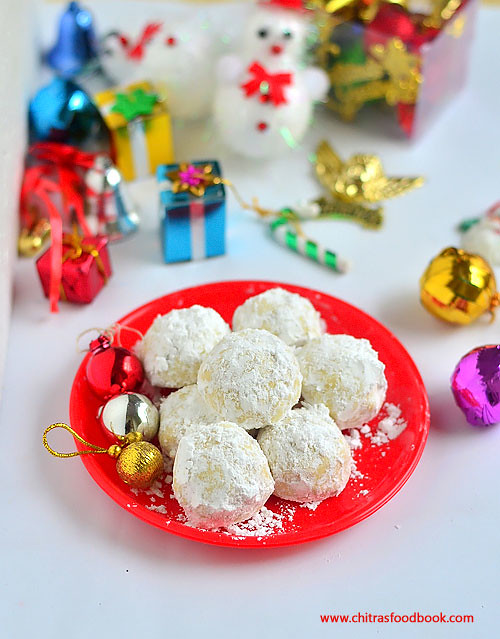
Easy Snowball cookies recipe with step by step photos and a video !
Christmas is the perfect time for me to attempt some interesting cakes and cookies recipes. Last year during this time, I posted few Christmas special recipes like Gingerbread man cookies, Tutti frutti cookies, eggless tutti frutti cake, shortbread cookies, Kulkul , eggless rose cookies and some more. This year, I wanted to start my Christmas recipes with this easy, melt in mouth, most special snowball cookies recipe. Its a very simple cookie that can be made with easily available ingredients. Snowball cookies is also called as Mexican wedding cakes/cookies, Russian tea cakes.
With lots of butter and nuts ( Pecan or walnuts)these cookies comes out with a melt in mouth texture and crunchy taste. Pecan nuts is widely used for the recipe. But I had used a combination of nuts which you can find in the ingredients list.These snowball cookies can be made without nuts as well. I followed the recipe from Classy cakes and watched You tube video by Jenny can cook. Even though this is my first try, I am completely happy with the result. Raksha loved it a lot and took it for her school snack box today.
Do try this easy Christmas special snowball cookies recipe for your kids and enjoy the vacation. Lets check out how to make eggless snowball cookies with step by step pictures and a video !
Do check out my other Christmas recipes in THIS LINK
Snowball Cookies Recipe - Easy Christmas recipes
Eggless snowball cookies recipe with step by step pictures and video
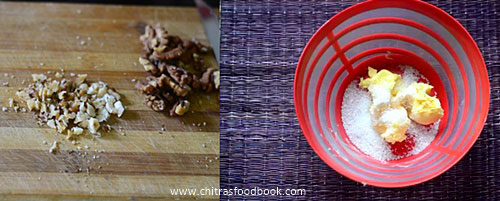
Granulated sugar - 2.5 tbsp ( Powdered sugar can also be used)
Vanilla essence - 1 tsp
Salt - A small pinch
Chopped Nuts - 1/2 cup ( Pecan nuts is preferable, I used combo of walnuts, cashews, hazelnut and melon seeds)
Icing sugar or powdered sugar – 1/2 cup ( to coat the cookies)
Cinnamon powder – 1/2 tsp ( optional)
METHOD
Chop the nuts finely and keep aside. In a wide bowl, mix the softened butter, sugar, salt and vanilla essence. Beat well for 5 minutes. The mixture will become creamy.
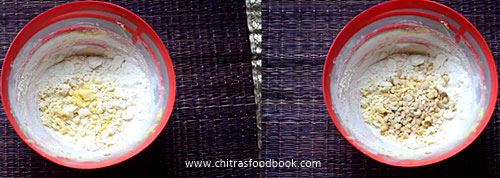
Add maida, mix well. Add chopped nuts and mix well with your hands. Make a smooth , non-sticky dough. Dough should not be too wet and sticky. Some recipes call for refrigerating the dough for 30 minutes. But some recipes don’t say so. So I baked the cookies immediately using half of the dough. I wrapped the remaining dough in a cover and refrigerated it for 30 minutes. Then made balls and baked it.
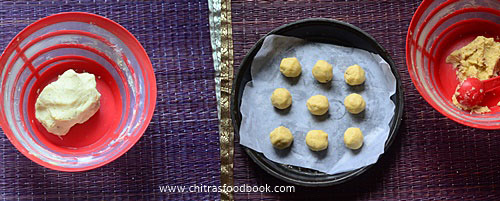
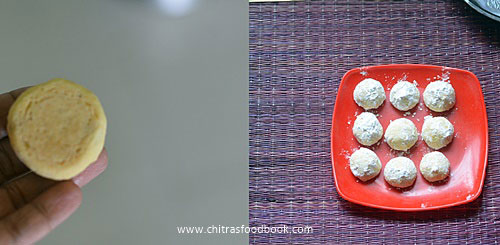
To make balls, take the cookie dough ( If refrigerated, thaw it for 10 minutes and then use it) and scoop out a tbsp of dough. Make balls and arrange them in a butter greased or butter paper lined baking tray. Leave half inch gap between each cookies.
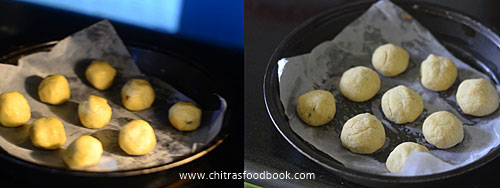
These cookies don;t expand or flatten much as we have not used baking powder or soda. If your cookies flatten so much, then the quantity of butter is more. In that case, add more maida and sugar, proceed.
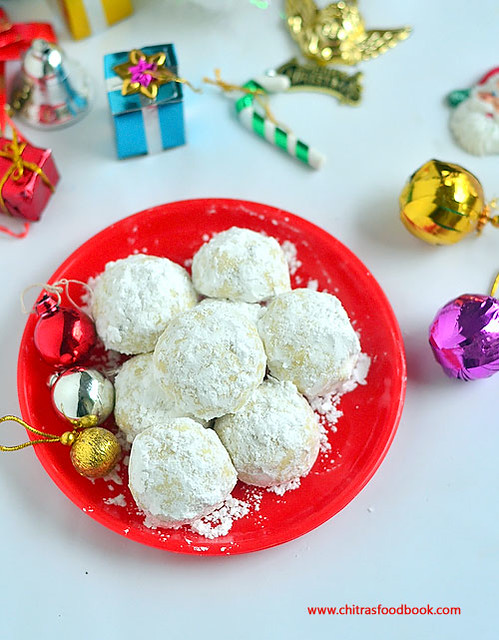
Preheat the oven in convection mode at 180c and place the baking tray inside the oven.Bake at 180c for 10-12 minutes. Open the oven and touch one cookie,try to move it. If its too soft, immovable, sticky and doughy, bake for another 2 minutes else remove the baking tray and check the bottom of cookies.If its slightly golden in color, your cookies are done. These cookies would be very soft when hot. But it will continue to cook even after taking out from the oven.So do not over bake the cookies.Just 12 –14 minutes is sufficient. My cookies had some cracks on top.
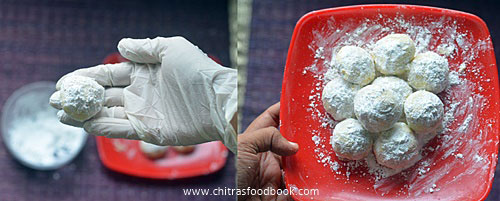
Do not touch the cookies till it becomes warm. Take 1/2 cup of icing sugar in a wide bowl. Once the cookies turn warm, dip the cookies in the icing sugar and give one coating. Arrange them in a tray and let the cookies cool down completely. Again dip the cookies in the icing sugar and give the second coating. If you wish, you can go for third coating as well. Keep the cookies in a tray and serve them. These cookies stays good for 2-3 days if done properly.
Enjoy !
Note
Do not over bake the cookies. It will turn hard and sometimes burnt. I baked it approx. 13 minutes.
The cookie dough I kept in the refrigerator baked quickly ( 2 minutes lesser) than the ones I baked without refrigeration.
Do not add more sugar than the mentioned quantity because we are coating the cookies with icing sugar.It will become over sweetened.
My cookies were mildy cracked.
Enjoy these delicious, melt in mouth cookies for your tea time!!
I have heard about Bombay chutney from my friend Shalini but never tried it on my own.She makes it for idli, dosa and poori.I heard this chutney is very popular in North India and Andhra. Its a very quick and easy side dish recipe which needs no dal, no coconut and absolutely no grinding job. Many of you would have tasted this kind of side dish for poori in small road side hotels. Usually I make my MIL’s besan sambar ( Kadalai maavu sambar) for idli, dosa which is slightly different in ingredients and consistency than this Bombay chutney. Last weekend I made this chutney for the first time as a side dish for tomato poori. This is sure a good replacement for our usual potato masala. I am not sure about its combination for idli, dosa but it was really great with poori. I think this chutney should be made thinner and more spicy for accompanying with idli, dosa.For variations and if you are making for your kids, do add some pieces of boiled potato. They will love it. Friends, do try this easy Bombay chutney for poori or idli, dosa. You will like it a lot. Lets see how to make Bombay Chutney aka Besan chutney with step by step pictures !
Check out my 50 chutney varieties for idli and dosa in THIS LINK !
Bombay chutney recipe
How to make Bombay chutney recipe / Besan chutney for poori, idli and dosa
Lemon juice - few drops ( only if needed, optional)
METHOD
In a wide bowl, take the besan and dilute it adding 2 cups of water. Mix it without lumps and keep aside. Chop the onion, ginger, tomato finely. Slit the green chillies and set aside.
Heat oil in a kadai and splutter mustard seeds, urad dal and chana dal. Roast till dals turn golden. Now add the chopped onion,ginger, green chillies and curry leaves. Saute till onion turns transparent. Then add the tomato pieces, saute till mushy.
Lastly add the diluted besan flour and mix well.As soon you add it, besan will turn thick. So add 1/2 cup more water if needed. Add the required salt and turmeric powder. Mix well and boil for 5-7 minutes till the raw smell of besan leaves off.
This chutney becomes thick as it boils.So adjust the consistency by adding water in the middle and add more salt if needed. Switch off the stove and garnish with a fistful of coriander leaves. Serve hot with idli, dosa or poori. NOTE : This chutney thickens when it cools down.So you may have to add more water to adjust the consistency while serving. In that case, add hot water, more salt and add little red chilli powder ( if needed), boil for a minute and serve !
Enjoy !
Note
Add more green chillies if you want more spicy chutney.
I made it for poori .So I made it mildly spiced and added 2 green chillies.
Do not add more besan flour. Chutney will taste and smell raw.If you want to make more quantity, add more besan flour and increase the quantity of onion, tomato and green chilli proportionately.
Adding coriander leaves at the end improves the flavor a lot.So do not skip it.
Make this yummy, easy Bombay chutney for idli, dosa and Poori. Enjoy !!
Recent days I have been trying varieties of Poori recipes for our weekend breakfast. I have tried and posted palak poori,masala poori, beetroot poori, chola poori . This week I made tomato poori ( Tamatar ki puri in Hindi and Thakkali poori in Tamil) for the first time. I just combined the recipes of my regular poori & masala poori and tried this tomato poori by adding tomato puree.It came out really well with nice red color. I prepared Bombay chutney as the side dish for this poori. It was a nice combo and we loved it a lot. This poori can be packed for kids lunch box or for snack as it tastes good and soft even if its not hot. Do try this colorful poori variety for your family and let me know the feedback. Tomorrow I will share the recipe of Bombay chutney. Today lets check out how to make this yummy tamatar puri recipe with step by step photos !
Tomato poori recipe / Thakkali Poori / Tamatar ki puri
How to make tomato poori recipe - Weekend special breakfast recipe
Wash and grind 2 tomato in a mixie jar without adding water. Grind it to make a smooth puree.
In a wide bowl or plate, take the wheat flour, tomato puree, rava, red chilli powder, garam masala powder, crushed kasoori methi, salt and ghee. Mix till crumbly.Remove the unground tomato pieces if any.
Add water little by little and make a thick, smooth dough. Dough should be non-sticky.Knead the dough with your palm for 2-3 minutes and keep aside for 10 minutes. If you wish, you can make poori immediately.
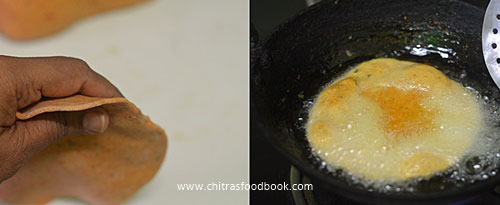
Make lemon sized balls out of the dough.Take one ball, dust with wheat flour and roll into thick, small poori as shown below. Thickness of poori should be more than chapathi. Only thick poori would puff up well.
Heat oil in a kadai to deep fry the poori. Check its temperature by dropping a pinch of dough. If it rises to top immediately, oil temperature is just right.Make sure oil is not smoking hot. Keep the flame medium . Take a rolled poori, pat it with your hands to dust off the excess wheat flour and drop one poori in hot oil.
When it starts to come up, just press it gently with the ladle. Poori will puff up well. Now flip the other side and cook for a minute. Remove in a tissue paper, drain the excess oil and serve hot with your favorite side dish.
Enjoy !
Note
Adjust the quantity of masala powders as per your taste.
Do not make the dough sticky. Poori will absorb more oil.
Adding rava helps to maintain the poori puffy for long time.
Addition of ghee helps to keep the poori soft for hours.
Roll the poori thicker than chapathi else it won’t puff up.
Heat of the oil should be perfect to get well puffed poori. If the heat of oil is less, poori will sink in oil and drinks more oil. If the heat is more, the color of poori will become dark and may turn like a papad.
We enjoyed this yummy tomato masala poori with Bombay chutney !