Search Chitra's Food Book

December 21, 2017

Goan Kormolas Recipe – Eggless Kormolas - Goan Christmas Recipes

Kormolas recipe
Kormolas is a Goan special Christmas sweets recipe. Traditionally the Christmas goodies, called kuswar are specially prepared by the Catholics in Goa and are distributed to neighbors, friends and relatives during Christmas. It is very similar to Kulkul/ Gala Gala in ingredients and the method of preparation. But its shape is different. Authentically Kormolas is prepared with all purpose flour, sugar, egg, semolina and coconut milk. 

But I tried an eggless version following the recipe of Hilda’s Touch of Spice. It came out really well with a crunchy taste even without egg and tasted mildly sweet. Though I couldn’t make proper shapes, we loved its taste very much. Friends do try this easy, yummy Kormolas recipe during this Christmas. I am sure your family members would enjoy it to the core. Lets see how to make this Goan special Christmas sweet recipe – KORMOLAS with step by step pictures.

Check out my Kerala special Achappam/Rose cookies recipe and Goan KULKUL/KALKAL too. 

Kormolas recipe

Kormolas Recipe - Eggless Version


Kormolas Recipe - Eggless Version How to make Goan special Christmas sweet KORMOLAS without egg
Cuisine: Indian
Category: Sweet
Serves: 30 
Prep time: 15 Minutes
Cook time: 20 Minutes
Total time: 35 Minutes


INGREDIENTS
1 cup - 250ml , 1 tbsp - 15ml , 1 tsp - 5ml
  • All purpose flour/Maida - 1 cup (Levelled)
  • Sugar - 1/3 cup ( Powder the sugar)
  • Melted butter or melted ghee – 1.5 tbsp
  • Salt - a pinch
  • Water or coconut milk - as needed
  • Vanilla Essence - Few drops
  • Cooking oil - to deep fry
HOW TO MAKE EGGLESS KORMOLAS - METHOD
  • Powder the sugar and keep aside. Take a wide bowl and add maida, salt and powdered sugar.( If you powder 1/3 cup of sugar, you will get around 1/2 cup. Use all the sugar.) Mix well and check for taste. If sweetness is less, add more powdered sugar as per your taste.
Kormolas recipe
  • Melt the ghee and let it become warm. Add it to the maida mixture and make a crumbly mixture. Ghee should spread all over the maida.
Kormolas recipe

  • Now add milk little by little( I used 2 tbsp) and make a dough like a thick, non-sticky roti dough. Let it rest for 10 minutes. Keep it covered.( Suppose if you have added more water, add little maida and correct the dough)

  • Divide the dough into 2 balls. Take one ball and dust it lightly with maida. Roll it thin to a circle. Trim the edges to bring square shape. Cut into small squares. Make shapes immediately. Do not dry it for long time.
Kormolas recipe
Kormolas recipe
  • Take one square and join one of the opposite edges. Pull the other two edges in the opposite direction and join them. Make a twist at both the ends to give a bud like shape. If you don’t twist it properly, it will open up while frying. Please refer the pictures below to get the idea.
Kormolas recipe
Kormolas recipe
Kormolas recipe
  • Heat cooking oil and test it by dropping a pinch of dough.It should rise on top immediately.( If you are a beginner,make a trial by frying 1-2 before you put them in batches. Check whether it breaks in oil. If it breaks in oil, add little more maida and make the dough.)
Kormolas recipe
  • Lower the flame completely and drop a batch of kormolas at a time.Flame should be low to medium.Let them cook for few minutes till one side turns light golden brown. Flip it and cook the other side till light golden brown. Don’t wait for all the bubbles to cease because kormolas will cook even after removing from the oil. So remove it as soon as it turns golden. While you take out from the oil,it looks & tastes soft.  But when it cools down completely, it will become super crunchy and becomes dark in color too. So please wait till it cools down to enjoy its best taste. Cook the remaining kormolas in batches. Adjust the flame from low to medium whenever needed.
Kormolas recipe
Store in an air tight box after it cools down completely. It stays good for a week or two.Enjoy this crispy and yummy snack with your family !
Note
  • Suppose if you add excess milk and make the dough very sticky, add some more maida to it.
  • If you add more ghee, Kormolas will break in oil. So add the mentioned amount.
  • If the heat of oil is more, the color of kormolas turn golden brown quickly without cooking inside. So deep fry them in low to medium heat oil for uniform cooking.
  • Kormolas will absorb more oil if you fry them in low insufficient heat. So deep fry in proper heat.

Enjoy this crispy Goan special Christmas sweet at home !! Merry Christmas !
eggless Kormolas recipe
Continue Reading...


December 19, 2017

Avarekalu Mixture Recipe – Hyacinth/Field Beans Snacks - Avarekalu Recipes

Avarekalu mixture
Avarekalu season is started in Bangalore. Every year I never forget to try some interesting avarekalu recipes during this season. My School moms friends are the biggest inspiration & source for my 
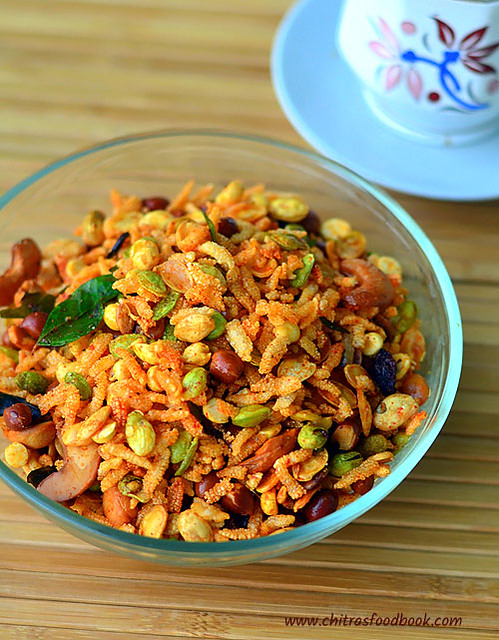
Karnataka recipes. This year they suggested me to try Avarekalu uppittu & avarekalu mixture recipe. Avarekalu mixture is an yummy South Indian mixture recipe prepared with the combination of deep fried avarekalu(Hyacinth beans / Flat beans/ Indian lilva beans in English, Mochakottai in Tamil, Surti papdi in Hindi), poha, peanuts, nuts and raisins.

 One can find it easily in most of the snacks and savory shops in Bangalore at this time. In many places, people make this mixture only with avarekalu. But I like to add all the other ingredients to yield more quantity and taste. Hitikida avarekalu (Skinless beans) works well for this mixture recipe. It was so good and crunchy to taste. I am sure kids and adults would love to munch it during tea time. It would be ideal for their snacks box as well. Even though its high in calories, its a very tasty indulgence. You can also make this mixture with dry avarekalu/ dried beans by soaking overnight in water. 

Do try this yummy mixture recipe in this avarekalu season. You will love it. Ok, lets see how to make Avarekalu mixture recipe with step by step pictures.

Check out my other Avarekalu Recipes below
  1. Avarekalu Saaru
  2. Avarekalu pulao
  3. Avarekalu sagu for poori, roti 
  4. Avarekalu huli
Avarekalu mixture

Avarekalu mixture recipe


Avarekalu mixture recipe How to make South Indian style mixture recipe with avarekalu / Mochai / Hyacinth beans
Cuisine: South Indian
Category: Snacks
Serves: Serves 4
Prep time: 5 Minutes
Cook time: 15 Minutes
Total time: 20 Minutes


INGREDIENTS
1 cup - 250ml
  • Hitikida Avarekalu / Skin less Field beans / Hyacinth beans / Pachai mochai kottai - 1 cup
  • Thick poha - 1/2 cup ( Use 1/4 cup for less poha)
  • Peanuts – 2.5 tbsp
  • Fried gram dal - 1 tbsp
  • Cashew nuts - 5 nos (Break into two)
  • Dry grapes/ Raisins - Few (Optional)
  • Red chilli powder - 1 tsp
  • Curry leaves – few
  • Cooking oil – to deep fry
  • Salt - as needed
  • Sugar – 1/4 tsp (optional)
  • Dry coconut pieces – Few (Optional, I din’t use it)
  • Hing / asafetida – A big pinch
HOW TO MAKE AVAREKALU MIXTURE
  1. Wash and soak avarekalu in water overnight or for 6 hours.
  2. Peel the skin and keep it ready.
  3. Spread them in a cloth. Pat it dry.
  4. Heat oil and deep fry avarekalu in batches. Cook till bubbles cease.
  5. Remove them in a paper towel. Deep fry poha, peanuts, cashews, dry grapes and fried gram dal one by one and add to fried avarekalu.
  6. Add salt, red chilli powder and hing. Mix well.

METHOD - STEP BY STEP PICTURES
  • Wash and soak avarekalu in water overnight or for 4 to 6 hours. Peel the skin by pressing the avarekalu between your thumb finger and pointer finger. Skin comes off easily. Collect them in a bowl. You can also split them into two halves if you like. Refer the picture below.
    Avarekalu mixture
  • Spread the peeled avarekalu in a cotton cloth and pat it dry to remove its moisture completely. Make sure its dry. Do not rest the avarekalu in the cloth for long time. It will become hard to eat after frying. So its enough if you just pat it dry nicely.
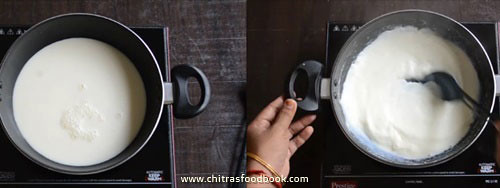
  • Heat oil in a kadai to deep fry. Fry avarekalu in 3 batches. When you put the avarekalu in oil, it settles down in the bottom of oil with lots of bubbles. Once its cooked and becomes crispy, it will float on the top of oil without bubbles. You can remove them at this stage. Cook in medium high flame and keep tossing gently till its crispy else the entire mixture will become soggy the next day. So please be patient while frying avarekalu. Each batch takes nearly 5 minutes but its color won’t change.
    Avarekalu mixture
  • Drain the oil and Remove the avarekalu in a tissue paper. Now deep fry poha till crispy and add to fried avarekalu. Then deep fry peanuts, cashews till golden and remove them.
    Avarekalu mixture
    Avarekalu mixture
  • Collect them in the avarekalu bowl.Deep fry dry grapes till puffy. Remove and add to the mixture. Lastly fry the fried gram dal just for a minute and remove it. Fry curry leaves and add it.
    Avarekalu mixture
  • Avarekalu mixture
  • Mix all the fried items in a wide bowl. Add salt, red chilli powder, sugar and a pinch of hing. Toss it to coat well. Serve with hot coffee/tea. Enjoy !
    Avarekalu mixture
    Avarekalu mixture
  • Store in an air tight box after it comes to room temperature. Enjoy up to a week!

Note

  • For variations, you can roast Kellogg's corn flakes in 2tsp oil and add to the mixture instead of poha.
  • Frying the avarekalu properly is the key to make perfect crispy mixture.
  • If you rest the avarekalu in the cloth for long time, it loses all the moisture and becomes very dry. So it will taste hard once you deep fry. So it is enough if you just pat it dry.
  • Adjust the quantity of chilli powder as per taste.
  • For variations, you can also add 2 pinches of chat masala powder and black salt.
Try this easy, yummy, crispy Avarekalu Mixture and enjoy with tea/coffee !
Avarekalu mixture recipe
Continue Reading...


December 16, 2017

Orange Peel Pachadi Recipe – Orange Skin Pachadi

Orange peel pachadi
Last weekend I had shared Orange peel pachadi in sweet taste. Today’s post is orange skin spicy pachadi prepared by my MIL. Basically pachadi is a South Indian style side dish recipe in which the ingredients are similar to pickle but slightly different in cooking procedure, taste and semi thick in consistency. We make pachadi with raw mango, ripe mango, citron fruit / narthangai. 

This recipe is very similar to my Narthangai pachadi but we used orange skin (kamala orange in Tamil). So the quantity of tamarind, green chilli and other spices vary slightly. Its so easy to cook as its done in a pressure cooker. If you have oranges at home, do not throw its skin. Make and consume it in the form of this pachadi and reap its health benefits. 

Next week I will share Orange skin kuzhambu and orange peel pickle. In the mean time, check out my orange skin sweet pachadi too. Ok, lets see how to make orange peel pachadi recipe in a pressure cooker easily !

Check out my mango pachadi recipe too !

Orange skin pachadi

Orange Skin Pachadi


Orange peel pachadi Spicy pachadi recipe with orange peel.
Cuisine: South Indian
Category: Pickle Recipes
Serves: 1.5 cups
Prep time: 10 Minutes
Cook time: 20 Minutes
Total time: 30 Minutes


INGREDIENTS
1 cup – 250ml
  • Orange skin/peel – 1 cup
  • Green chilli – 12 nos ( use 10 for less spice)
  • Tamarind – Big gooseberry size
  • Jaggery – 1.5 tbsp
  • Salt - as needed
  • Water – as needed ( I used 1/2 cup)
  • Hing - 1/2 tsp
  • Methi seeds - 1/4 tsp
To Temper
  • Sesame oil – 1 tbsp
  • Mustard seeds – 1 tsp
  • Curry leaves - Few
HOW TO MAKE ORANGE SKIN PACHADI
  1. Wash and chop orange skin into small pieces. 
  2. In a pressure cooker base, take the chopped orange peel, slit green chilli, salt, hing, tamarind extract and jaggery.
  3. Pressure cook in very low flame for 2 whistles. Remove the lid after steam is released.
  4. Add roasted fenugreek seeds powder, mix well and boil for a minute.
  5. Temper mustard seeds in sesame oil and add to the pachadi. Store in a box after it cools down.
METHOD - STEP BY STEP PICTURES
  • Wash and chop orange skin into small pieces. Set aside.
    Orange peel pachadi
  • Soak the tamarind in 1 cup water.Take the required green chilli and slit into two. Dry roast methi seeds and grind to powder.Keep aside.
    Orange peel pachadi
  • In a pressure cooker base, take the chopped orange, slit green chilli, 1/2 cup of tamarind extract, salt, jaggery and hing. Pressure cook in low flame for 1 to 2 whistles.
    Orange peel pachadi
  • Open the cooker lid after steam is released. Add roasted methi seeds powder. Mix well and roll boil for a minute. If the pachadi is too watery, you can boil for one more minute to make it slightly thick. Remember this pachadi thickens a bit after it cools down. Check for taste and add more salt if required.Let it cool down. The actual taste of this pachadi can be known after a day or two. Remove the pachadi from cooker to another vessel ( porcelain or glass jar) because it may react.
  • Temper mustard seeds, curry leaves in sesame oil and add to pachadi. Mix well.
    Orange peel pachadi
  • Store the pachadi in a box only after it cools down completely. Refrigerate it. Stays good for 15 days. But you should reheat it once in 3 days to avoid pungent smell. Enjoy with curd rice! 

Note

  • Adjust the quantity of tamarind and green chillies as per the bitterness of skin. I hope the measurements I have given in this recipe works well. If you need it more spicy, add more green chillies sauteed in oil separately. Mix with pachadi . Boil for a minute. The next day, you can get the spicy taste.
  • You may have to reduce the number of chillies if its too spicy.
  • Addition of jaggery balances all the taste. So do not skip it.
  • We like the pachadi to be slightly watery. If you want it thick, just boil for more time.
  • You can use kolingikai or narthangai and make the same pachadi.
Try this easy, yummy, spicy pachadi with orange skin and enjoy with curd rice.
Orange peel pachadi
Continue Reading...


December 15, 2017

Bread Rasmalai Recipe - How To Make Instant Rasmalai With Bread

 Bread Rasmalai
Bread Rasmalai is an easy to make, instant rasmalai recipe. Even though its taste and texture cannot be compared with the authentic, traditional rasmalai prepared with rasgulla, it can satisfy our sweet cravings quickly. It takes very less time to prepare. Also it an yummy sweeet recipe that can be prepared using leftover bread slices. Kids would love it for sure.

Last week I made it using some left over dry bread slices at home. As I had already shared an instant rasmalai recipe using store bought rasgolla and condensed milk, I did not use condensed milk in this recipe. I just used sugar, nuts and prepared rabri in its usual method. This bread rasmalai tastes the best when served chilled. Friends, you can try this easy rasmalai recipe with bread for your kids and family to serve a quick dessert for an occasion or weekends. Ok, lets see how to make bread rasmalai recipe with step by step pictures and video.
Check out my gulab jamun and shahi tukda.


Bread Rasmalai Recipe


Bread Rasmalai Recipe Easy, instant rasmalai recipe with bread
Cuisine: Indian
Category: Sweet
Serves: 6-7 nos
Prep time: 10 Minutes
Cook time: 20 Minutes
Total time: 30 Minutes

INGREDIENTS
1 cup - 250ml
  • Bread Slices - 6 nos
  • Full Fat Milk - 1/2 litre ( 2 cups)
  • Sugar – 2 to 3 tbsp (adjust based on your taste)
  • Cardamom powder - 1/2 tsp
  • Saffron threads - Few
  • Chopped nuts - 2 tbsp (Cashews & Badam)
METHOD
  1. Take milk in a wide pan and boil till it reduces to 1.5 cups.
  2. Add sugar, chopped nuts, cardamom, saffron.
  3. Boil till it reduces to 1 cup. Rabri is ready. Switch off and keep aside.
  4. Take bread slices and cut into round shape using a lid.
  5. Dip the bread in rasmalai. Remove in a plate and garnish with nuts.
  6. Refrigerate for an hour and serve chilled for best taste.
METHOD - STEP BY STEP PICTURES

  • Heat 2 cups of milk in a wide kadai. Boil till it reduces to 1.5 cups. Scrape the sides, collect the skin and add it back to the kadai while the milk boils. Stir at regular intervals to avoid over flowing.


  • After the milk is reduced, add sugar, chopped nuts, saffron threads and cardamom powder.Mix well, .Boil till milk reduces to 1 cup. So total milk should be half the quantity of original measure. Now check the taste. Add more sugar if needed and mix well. When you pour the milk, it should be slightly thick. Remove from the flame and let it become warm. Milk becomes thicker when it cools down.So do not reduce it too much.
  • Now take the bread slices. Cut into round shape with a lid.Remove the sides. Dip the bread slice in thickened milk.
  • Pour some thick milk over the bread. Remove in a plate. Garnish with chopped nuts.Refrigerate for an hour and serve chilled.
  • Enjoy !

Note

  • Do not use very dry and old bread.Using fresh bread is also not advisable because it may dissolve in milk due to its softness. Use 2 days old bread for best taste.
  • Adjust the quantity of sugar as per taste. You can also add at the end before dipping bread slices to increase the sweetness.
Try this easy, instant bread rasmalai and enjoy a quick dessert at home !

Continue Reading...


December 12, 2017

Red Rice Dosa Recipe – Sigappu Arisi Pirandai Dosai

Red rice dosa
I watched this red rice, Adamant creeper dosa recipe (Sigappu arisi pirandai dosai in Tamil) in Jaya TV’s arusuvai neram by Mrs. Mallika Badrinath. She shared this healthy sivappu arisi dosai adding pirandai. Recently my MIL had given some pirandai ( also known as bonesetter) from our backyard garden to make thuvaiyal. As I had some red rice and pirandai in stock, I tried this dosa immediately. Addition of pirandai helps to give more softness to the dosa. So I changed the ratio of red rice & urad dal as per my taste. It came out very well. We had a satisfaction of including a healthy food for our breakfast and dinner. I had already shared Kerala red rice idli, dosa recipe in my website. This red rice dosa is completely different from that recipe on ingredients and method.I have also shared the picture of red rice used in this recipe.  Ok, lets see how to make red rice dosa recipe / Sigappu arisi dosai adding pirandai with step by step pictures.

Also check out my  PIRANDAI THUVAIYAL, KERALA RED RICE IDLI/DOSA RECIPE and 15 IDLI VARIETIES !

Name of Adamant creeper in different languages


  • English: Bonesetter, Devil's Backbone, Veldt Grape.
  • Hindi: Hadjod, Hadjor, Asthisrumgala
  • Malayalam: Changalamparanda-ചങ്ങലംപരണ്ട
  • Sanskrit: Vajravalli, Asthisrinkhala, Kulisa, Asthisamharaka.
  • Tamil: Pirandai-பிரண்டை
  • Telugu: Nalleru, Gudametige, Kokkitaya-ralu

  • Sigappu arisi dosai

    Red rice

    Red Rice Dosa Recipe - Sigappu Arisi Dosai With Pirandai


    Red Rice Dosa Recipe - Sigappu Arisi Dosai With Pirandai Dosa with red rice and adamant creeper - Sigappu arisi dosai with pirandai
    Cuisine: South Indian
    Category: Dosa recipes
    Serves: 15 nos
    Prep time: 10 Minutes
    Cook time: 20 Minutes
    Total time: 30 Minutes


    INGREDIENTS
    1 cup - 250ml
    • Red Rice - 2.5 cups
    • White round urad dal - 1/2 cup
    • Adamant creeper/ Pirandai - 2 long sticks (As shown in picture below)
    • Methi seeds - 1/2 tsp
    • Salt & Water - As needed
    HOW TO MAKE RED RICE DOSA
    1. Wash and soak red rice, urad dal and methi seeds together for 5 hours.
    2. Wash and clean pirandai. Chop into pieces and grind to coarse paste.
    3. Grind rice, dal mixture along with pirandai adding salt and water.
    4. Ferment overnight or for 12 hours. The next day, mix dosa batter well.
    5. Add some water if needed. Make dosa thin or thick. Serve with chutney or sambar !
    METHOD - STEP BY STEP PICTURES
    • Wash and soak red rice, urad dal, methi seeds together in enough water for 5 hours. Take the pirandai and clean it.
      Red rice dosa
    • Grease your hands with sesame oil. Wash the pirandai and chop the head & tail part. Remove the ridge like part using a peeler or knife. Remove the fiber portion too. Chop into small pieces and set aside.
    • Red rice dosa

    • Grind pirandai pieces to a coarse paste without water. Add this paste to rice while grinding.
      Red rice dosa
    • Grind the soaked rice + urad dal + methi seeds adding pirandai paste to a smooth batter adding enough water and salt. Collect in a bowl. Ferment overnight or for 12 hours.
    •  Red rice dosa

    • The next morning, batter would have raised slightly. Mix it well and add some water if needed. Consistency of this batter should be like our regular dosa batter. (Sorry I mixxed these pictures. I will try to update these steps with picture soon.)
    • Heat dosa tawa and sprinkle some water to check the heat of tawa. Water droplets should evaporate immediately. Wipe with a cloth or tissue. Spread 1.5 ladle of red rice dosa batter thin or thick as you like. Drizzle 1tsp sesame oil all over the dosa. Flip the dosa and cook the other side. Remove and serve hot with chutney or sambar. Enjoy !

    Note

    • If you don’t have adamant creeper/pirandai in hand, you can use red rice & urad dal in 4:1 ratio.
    • Fermentation is mandatory for this dosa batter else it will smell raw.
    • Do not worry if the batter is not raised well. Just check whether batter has got sour smell / Pulippu vasanai the next day morning.
    • You can increase the quantity of urad dal to 1/2 cup +2 tbsp to get softer dosa.

    Try & enjoy this healthy red rice dosa with pirandai. I served it with easy tomato thokku and raw onion chutney !
    Sigappu arisi dosai


    Continue Reading...


    December 9, 2017

    Orange Peel Sweet Pachadi – Orange Skin Recipes Indian

    orange peel sweet pachadi


    Orange peel sweet pachadi is our latest invention with orange skin. Last week I bought a kg of Orange( Kamala orange in South India) as Raksha loves its juice very much. Every time I discard its skin as I was not aware of its benefits. Recently I found orange peel has so many health benefits. So I told my MIL to try some recipes with orange peel. She prepared 4 different recipes with orange peel. I have shared a picture of them in my instagram page as well. 

    Some of my readers wanted the recipe for orange sweet pachadi. So I thought of sharing this as my first post with orange peel. I will try to share the remaining recipes in upcoming weekends. My MIL prepared this orange sweet pachadi following our mango sweet pachadi. But coconut is not used in this recipe. Instead we used ground black dates paste to give thickness and binding. 

    You can also call this as orange peel dates pachadi. We used jaggery instead of sugar. It tasted yummy with the sweetness of dates, jaggery to make it healthy. Tanginess & mild bitterness of orange skin with spicy taste of green chillies. So this pachadi is a blend of all the 5 taste. I relished this pachadi with sambar rice and curd rice. I loved it. I am sure you will like it too. Ok, lets see how to make orange skin sweet pachadi with step by step pictures. 

    Do check out my  super soft eggless orange cake without condensed milk.

    orange skin sweet pachadi

    Orange Peel Sweet Pachadi Recipe - Orange skin pachadi


    Orannge Peel Sweet Pachadi Recipe - Orange skin pachadi How to make orange peel sweet pachadi with dates and jaggery !
    Cuisine: Indian
    Category: Orange Recipes
    Serves: 1/2 cup
    Prep time: 10 Minutes
    Cook time: 10 Minutes
    Total time: 20 Minutes


    INGREDIENTS
    1 cup - 250ml
    • Orange skin / Orange peel - 1/4 cup
    • Green chilli - 1 no ( Finely chopped)
    • Grated jaggery - 1/2 cup
    • Dates - 2 nos (I used black dates, big)
    • Salt - a pinch
    • Water - as needed ( I used 1/2 cup)
    To Temper
    • Cooking oil - 2 tsp
    • Mustard seeds - 1/2 tsp
    • Urad dal - 1/2 tsp
    METHOD
    1. Wash and chop the orange skin into small cubes.
    2. Pressure cook by keeping in a box in high flame for 2-3 whistles adding little water.
    3. Discard the water and set aside.
    4. Boil jaggery, green chilli, salt, water till jaggery melts.Add cooked orange skin.
    5. Grind dates to paste. Add to the pachadi. Boil till thick.
    6. Temper mustard seeds, urad dal in oil. Add to pachadi and mix well.
    7. Store in a box after it cools down. It stays good for a week in refrigerator.
    METHOD - STEP BY STEP PICTURES
    • Remove the white threads from orange skin to reduce the bitterness and chop it into small cubes. In a pressure cooker base add 1 cup of water, keep the orange cubes in a small tiffin box, add little water and cook in high flame for 2 to 3 whistles. You can also steam in an idli pot. Discard the excess cooked water. Keep the orange cubes aside.
      orange peel sweet pachadi
    • In a kadai, take grated jaggery, finely chopped green chillies, a pinch of salt and 1/4 cup of water.After the jaggery is melted, add cooked orange pieces. Mix well. Do not cook orange pieces for long time. It will become hard to chew.
      orange peel sweet pachadi
    • Crush black dates to a paste using mortar & pestle. Add this paste to the orange mixture.  Add 1/4 cup of water. Mix well and boil till raw smell of jaggery and dates goes off. If the pachadi is too thick, you can add some water. Adjust the consistency like jam. Remove from the kadai. Orange pieces tastes slightly chewy on the first day but it becomes soft the next day.
      orange peel sweet pachadi
    • Heat oil in a kadai and when it gets heated , splutter mustard seeds, urad dal and add to the pachadi.Mix well and let it cool down.
      orange peel sweet pachadi
    • Store in an air tight box and refrigerate. It stays good for 1 week to 10 days. This pachadi thickens over time. So you can adjust its consistency by adding some water and boil it. Relish it with bread, curd rice or sambar rice. I can lick it as such ; –)). Enjoy !
    Note
    • Cooking orange pieces before adding to pachadi is mandatory. If you saute and cook in jaggery, it will becomes chewy and hard. So do not attempt to cook directly in pachadi.
    • Adjust the quantity of jaggery as per the bitterness of orange skin.
    • Dates is used for binding. You can also use tomato puree instead.
    • Add more green chillies if you want to make sweet and spicy pachadi.

    Try this easy, yummy orange skin sweet pachadi and enjoy !
    In the below image, you can find orange pickle, orange skin kuzhambu and sweet pachadi.
    orange skin pachadi
    Continue Reading...