Search Chitra's Food Book

Showing posts with label HOW TOs. Show all posts

June 10, 2017

Bajji Bonda Mix Recipe – How To Make Bajji Bonda Pakoda Mix Powder At Home

Bajji bonda mix powder
Bajji, Bonda, Pakoda & Vada are the most popular tea time snacks recipes in India especially South India. Most of us make these crispy, deep fried delicacies during weekends or for guests as evening snacks. My friends in Tamil nadu buy Aachi or Sakthi bajji bonda mix powder regularly.But in my family, both MOM & MIL never buy store bought bajji bonda mix. They make it fresh whenever needed. Both follow the same proportion of besan flour and rice flour to make bajji batter / Bajji maavu. 

By learning from them, I can make different types of crispy bajji recipes at home easily. Not me, anyone can make it perfect if you know the right proportion of ingredients & the consistency of batter. I never thought of making homemade bajji, bonda mix recipe until Raksha started to eat them during weekends or holidays very often. Whenever I ask her choice of evening snacks, her reply would be mostly onion bajji or homemade cake. I don’t make cakes thinking about the consumption of maida. 

So I prepare onion/potato bajji or pakoda based on her wish. Sometimes I feel lazy to make it. So I started making bulk quantity of my own, homemade bajji, bonda mix and store in refrigerator for a month. It stays good even without refrigeration. I don’t add food color or cooking soda in the mix. I add them while making bajji only if needed. Lets see how to make bajji, bonda mix at home easily! If you have this mix in hand, you can make varieties of bajji, bonda or pakoda in just 5 minutes.  I hope all the moms like me would find this post useful.

Do check out my rava upma mix and instant poha upma mix recipes too.

Check out Raw banana bajji,  Potato bajji,  onion bajji,  Karpooravalli bajji,  aloo paneer bonda,  Potato bonda,  Instant bonda,  Mangalore bonda,  millet flour pakoda.

How to make bajji bonda mix at home

Homemade Bajji, Bonda Mix Recipe


Khoya Kaju Gravy RecipeHomemade Bajji, Bonda, Pakoda mix – How to make bajji, bonda mix recipe at home 

Cuisine: Indian
Category: Snacks Recipes 
Yields:  1.5 cups
Prep time: 5 Minutes
Cook time: 10 Minutes
Total time: 15 Minutes


INGREDIENTS
1 cup - 250ml
  • Gram flour / Besan flour – 1.5 cups 
  • Rice flour - 1/2 cup
  • Asafetida / hing – 1/2 tsp 
  • Red Chilli Powder –  1.5 to 2 tbsp (Adjust based on spice level)
  • Orange Red food color –   2 pinches ( optional)
  • Cumin seeds or ajwain/omam - 1.5 tsp  
  • Cooking soda or baking soda – 1/2 tsp (optional, You can add a pinch of soda while making bajji.)
To make bajji, bonda or pakoda
  • Bajji, bonda mix – as needed
  • Vegetables like onion, potato, brinjal, raw banana
  • Water – as needed 
  • Cooking soda or baking soda – a pinch  ( If needed)
  • Cooking oil – to deep fry 

HOW TO MAKE BAJJI BONDA MIX - METHOD

  • In a wide bowl, mix the besan flour, rice flour, red chilli powder, cumin seeds or ajwain, salt, food color ( if using) and mix well. If you want, you can sieve the flour, salt, chilli powder for uniform mixing and then add cumin seeds. Adding soda in the mix makes the bajji absorb more oil while frying. So I add baking soda just before making bajji.
    Homemade bajji bonda mix powder
     Homemade bajji bonda mix powder
  • To make bajji or bonda : Take the required quantity of bajji mix in a bowl. Add a pinch or dash of cooking soda if you have not added already. Mix well. Add water to make a slightly thick batter. If the batter is too thick, vegetables won’t get coated properly. If the batter is thin, bajji will have tails. So add water gradually. Dip the vegetable in the batter, deep fry till golden in color. Please refer my ONION BAJJI RECIPE & POTATO BONDA for more details.
    Homemade bajji bonda mix powder
     
  • To make onion pakoda : Take the required quantity of bajji mix in a wide bowl. Add thinly sliced onion and mix well. Rest for 5 minutes. Add water and make a thick paste. Onions should be coated well. Add some hot oil and make pakoda. I will try to make a detailed post soon. Check out my Millet flour onion pakoda if interested.
    Homemade bajji bonda mix

  • Enjoy !
Note
  • Adjust the quantity of chilli powder as per your taste.
  • Adding Kashmiri chilli powder gives a nice color to the bajji. You don’t need to add food color too.
  • You can store this mix upto one month.  
  • For masala flavor, you can add garam masala powder & ginger-garlic paste while making bajji.
Make this easy mix at home. Enjoy bajji, bonda anytime !
Bajji bonda mix
Continue Reading...


May 20, 2017

Pressure Cooker Cake Without Egg – How To Make Eggless Vanilla Cake In Pressure Cooker

Pressure cooker cake recipe
Eggless vanilla cake using a pressure cooker is my long time pending readers requested recipe. Many readers who tried my eggless cakes using convection oven had requested me to share some eggless cake recipes using a pressure cooker. Long back I had shared an eggless chocolate cake in a pressure cooker. But its procedure and recipe is completely different from the usual cooker cake. I used water in the bottom of cooker instead of salt or sand. 

Today I have shared the proper & perfect pressure cooker cake using powdered salt. I followed my eggless tutti frutti cake recipe and made it using pressure cooker instead of baking in oven. This simple, eggless cake recipe is made without using condensed milk or butter. Curd and cooking oil are the major ingredients. Cake came out really well, spongy and very soft as expected. The texture of the cake is equally great with the oven ones. There is no much difference in baking time as well. This vanilla sponge cake can be used as the base, decorate it with simple frosting and enjoy for birthday & anniversary celebrations Or it can be relished as simple tea time cake as well.For variations, you can mix in some tutti frutti to make this cake colorful.

 Friends, do try this cake during this vacation for your kids. I am sure you will get perfect results. I tried frosting the cake using Amul fresh cream.It tasted great but its texture was not so perfect. Soon I will try to make a simple and easy frosting recipe using fresh cream and share here. Lets see how to make eggless vanilla sponge cake in a pressure cooker with step by step pictures and video !


Eggless cake in a pressure cooker

Eggless Pressure cooker Vanilla sponge cake


Eggless Pressure cooker Vanilla sponge cake Eggless vanilla sponge cake in a pressure cooker
Cuisine: Indian
Category: Cakes
Serves: 1/2 kg
Prep time: 10 Minutes
Cook time: 40 Minutes
Total time: 50 Minutes


INGREDIENTS
1 cup - 240ml
  • All purpose flour / Maida - 1.5 cups
  • Baking powder - 1.25 tsp
  • Baking soda - 1/2 tsp
  • Powdered Sugar Or fine sugar – 1 cup
  • Fresh curd - 1 cup  ( Semi solid)
  • Cooking oil - 1/2 cup (I used refined oil. Any flavorless oil works)
  • Milk - 1 to 2 tbsp ( optional)
  • Vanilla essence – 1.5 tsp
  • Maida & cooking oil – 1 tsp to grease the baking pan
HOW TO MAKE EGGLESS VANILLA CAKE IN PRESSURE COOKER - METHOD

  • In a wide bowl, take the curd. Add sugar and mix till sugar dissolves in curd. Then add baking powder and baking soda. As soon as u mix them, bubbles appear in the curd. Mix  gently and keep the curd bowl aside for 5 minutes. It foams up well.
    How to make eggless cake in pressure cooker
    How to make eggless cake in pressure cooker
  • After 5 minutes, add vanilla essence and cooking oil in the curd mixture. Mix gently.
    How to make eggless cake in pressure cooker
  • Add sieved maida to the curd mixture little by little. If the cake batter is too thick, add 1 to 2 tbsp milk and loosen the batter slightly. Batter should be thick but pourable.

  • Take an aluminium baking pan and grease with oil. Spread 1 tsp maida all over the pan and pat the excess flour. Pour the cake batter and pat it twice to spread the batter evenly.
    How to make eggless cake in pressure cooker
  • Take the pressure cooker, remove the gasket and whistle in the lid. Spread 1/2 kg powdered salt evenly in the bottom of cooker. Put a slotted plate or any plate over the salt.
    How to make eggless cake in pressure cooker
  • Heat the cooker in high flame for 5 minutes. Salt gets heated well. Now open the cooker and place the cake pan inside it carefully. Close with the lid and heat the cooker in very low flame for 30 to 40 minutes. Open the cooker after 30 minutes and insert a toothpick or back of spoon. If it comes out clean, cake is done else cook for another 5 minutes. Mine got done in 35 minutes.
    How to make eggless cake in pressure cooker

  • How to make eggless cake in pressure cooker
  • Remove the cake pan carefully and rest it for 10 minutes. Run a knife around the cake and invert in a plate. Cut the cake into pieces after it becomes warm. Enjoy. Store the leftover pieces in an air tight box. Do not refrigerate or let it open, cake will become dry. It stays good for 2 days. How to make eggless cake in pressure cooker


Enjoy !

Note
  • Adjust the quantity of sugar as per your taste. For me 1 cup sugar was fine.
  • Do not add more milk than the mentioned quantity.
  • Baking time varies from 30 to 40 minutes. So keep an eye after 30 minutes. Make sure you don’t burn the cake.

How to make eggless cake in pressure cooker

Try this soft and spongy eggless pressure cooker cake. You will like it ! I tried frosting the cake using fresh cream. Soon I will try to make a perfect frosting recipe and share here !

How to make eggless cake in pressure cooker
Continue Reading...


May 12, 2017

Mango Frooti Recipe – How To Make Frooti At Home

Mango frooti recipe
Homemade mango frooti recipe with video and step by step pictures. Frooti is my most favorite mango drink since childhood. I guess most of you are like me. On those days, for any small functions at home like birthday party or guest visits, Frooti bottle makes its presence without fail. My mom used to serve it as a welcome drink. Even though there are many soft drinks available in the market, the craze for this store bought mango drinks like Frooti, Maaza or Slice never goes away. But once my family had a bad experience after drinking Frooti in a tetra pack. It must be an old stock I guess. So we stopped buying it and started running miles away whenever I see it in functions or parties. I restrict Raksha & Sendhil too. 

Last week I bought few alphonso mangoes and a raw mango to try some interesting recipes with it. When I was browsing for it, I saw few homemade Frooti recipe. I never imagined Frooti making process at home would be so easy with very less ingredients and that too without any preservatives. What else I need to try this !. I became very happy and tried it immediately with an over ripen mango which I wanted to finish off. This juice came out yummilicious in taste. It tasted very close to Frooti, Maaza or any store bought mango drink. 

Sendhil & Raksha loved it and gave a big thumbs up. You can make this as concentrate, refrigerate & store it, add ice cold water to dilute it and drink chilled anytime.The best part is we didn’t get any stomach pain, loose stools, cold/throat infection or fever.

 As everyone says, homemade is always the best !! Now I don’t have to buy the highly priced mango drink from shops anymore. I have tried this drink thrice so far with different mangoes and observed few points.

To make a perfect homemade Frooti recipe, you must follow this.

1. Use only Alphonso mangoes. It works the best ! Taste differs for Badami, malgova or Banganapalli mangoes. 2. Mango should be over ripen. Make sure it doesn’t have sour taste. You can clear off the over ripen ( about to decay) mangoes by making this drink. 3. The ratio of ripe mango & raw mango should be 2:1 based on the size of raw mango. Raw mango is just to give mild tanginess. 4. Quantity of sugar differs as per the sweetness of mango. 5. Color of the juice also varies based on the color of mango.

Now I can confidently prepare this mango juice for my guests.  You too try this recipe in this summer vacation for your kids and family. I am sure your kids will sing  “ Mango Frooti Fresh and Juicy”.

Ok, Lets see how to make Homemade mango Frooti recipe with step by step pictures and a video !


Mango Frooti Recipe

Homemade Mango Frooti Recipe - How to make Frooti drink at home


Homemade Mango Frooti Recipe - How to make Frooti drink at home Mango Frooti Recipe - How to make mango frooti drink at home without any preservatives and very less ingredients !
Cuisine: Indian
Category: Drinks
Serves: 4 glasses
Prep time: 10 Minutes
Cook time: 20 Minutes
Total time: 30 Minutes


INGREDIENTS
1 cup - 250ml
  • Over ripen Alphonso mango - 1 no  (1 cup chopped)
  • Raw mango - 1/2 no (If small sized mango or 1/4 part of big mango) (1/2 cup chopped) 
  • Sugar - 1/4 to 1/2 cup (Adjust)
  • Water - 3 to 4 cups
  • Ice cubes – while serving
METHOD

  • Wash and peel the skin of raw mango & ripe mango. Chop into pieces.
    Homemade Frooti Recipe
  • In a pressure cooker, take the chopped mango pieces, add 1/3 cup sugar and 2 cups of water ( If you want to make thick concentrate, add 1 cup of  water). Pressure cook in very low flame for 2 whistles or till mango cooks soft.
    Homemade Frooti Recipe
    Homemade Frooti Recipe
  • Open the cooker after the steam is released.Strain it and filter the cooked water. Keep it aside till use.

    Homemade Frooti Recipe 
  • Grind the cooked mango to a pulp without adding water. Mix this pulp with the cooked mango water. Mix well and strain it again to remove the fiber part of mango. Discard the fiber part.
    Homemade Frooti Recipe - How to make mango frooti at home
    Homemade Frooti Recipe
  • Mix the mango juice well and check for taste and thickness. If you want to store as concentrate, pour in a glass bottle and refrigerate it. If serving immediately, add 1/2 to 1 cup water and adjust the consistency. If sugar is less, add little more sugar and mix well. Refrigerate for 3-4 hours till chilled.
    Homemade Frooti Recipe -How to make mango frooti at home
  • Put some ice cubes in a glass and pour the drink. Serve immediately ! This drink stays good for 3 days if refrigerated !

    Enjoy !
Note
  • Use over ripen alphonso mango for best taste.
  • Adjust the quantity of sugar and water as per taste and desired consistency.
  • Some recipes suggested equal quantity of ripe mango and raw mango. But I feel 2:1 ratio would be fine.

Enjoy yummy, juicy homemade Mango Frooti !
Continue Reading...


May 8, 2017

How To Celebrate Chitra Pournami At Home – Pooja Procedure & Recipes

Chitra pournami pooja celebration at home
Hello Friends, In this post, I have shared the importance of Chitra Pournami – (A festival with my name;)) celebration, how to celebrate it at home with its pooja procedures as per my family’s practice. I have also shared the links for Chitra pournami recipes for neivedyam. Hope this post would be helpful for beginners. I must thank my Mother-in-law for giving me detailed guidance about this celebration. Please visit my in-laws blog “ LEARN KOLAM” for Rangoli/ Kolam ideas for this festival.

Chitra Pournami is a ceremony observed on the Poornima day (Full moon day) in the Tamil month of Chithirai that falls any day between April 15th – May 15th. This year 2024, it falls on 23rd April ( i.e on Tuesday). Chitra pournami is one of the important festivals celebrated in Tamil nadu. 
 
This auspicious day is celebrated as Chitragupta’s Birthday. Chitra Pournami /Chithirai pournami (in Tamil) ritual commemorates Chitra gupta who is known as the assistant of Lord Yama, the God of Death. Chitra means collection of Pictures and Gupta means Hidden. Chitra Poornima is the day dedicated to Chitra Gupta, the Keeper of Deeds. Lord Brahma created Chitra Gupta through the Sun God and he is considered as the younger brother of Lord Yama. It is believed that Chitra Gupta examines the good and bad performances of each individual. 

When a person dies, his soul first goes to Lord Yama, where Chitragupta tallies the deeds and report it to Yama. He reads out the good and bad deeds of the person. He is the Devata for planet Kedhu. Worshipping Chitra Gupta on this day would ward of kedhu dhosha in one's horoscope.Worshipping Vinayaka also ward of this dosha. There is only one temple in South India for Chitragupta at Kanchipuram. Chitra Pournami is a very auspicious day here. The day is also dedicated to Indra, the head of Devas. It is on this day that the star Chitra and Pournami (full moon) come together.

On this day, special poojas are conducted at temples and people take bath in holy rivers and temple ponds to wash away the sins committed and to bag the virtue for the life beyond. Chitra Pournami is the time where your sins can all be cleansed. Many people would observe fasting ( Viratham in Tamil) and make the sacred walk on Chitra pournami day in Tiruvannamalai. Offering food to the poor and needy people during this night would receive the blessing from the Almighty directly, along with this you can vanish the bad karma which is on you. To know more about this festival, please check my FIL's post in Learn Kolam.

Source : http://www.astrologypredict.com/masimagam.php

In our home, every year we used to celebrate Chitra pournami in a grand manner by drawing maakolam all over the house and by offering Navadhaniyam ( 9 varieties of grains) in a Muram , Vellai pongal ( without salt, உப்பு  சேர்க்காத பொங்கல்)), Sweet pidi kozhukattai, Raw mango pachadi, Panagam and neer mor for neivedyam. 

So based on ours I have shared the details of Chitra Pournami celebration procedure below with pictures. Hope you will find it helpful. Tamil brahmins have their own way of celebration which may differ from this. So please consult the elders of your family if you have any doubts regarding your tradition.


Chitra Pournami Kolam
This kolam is from my in-laws blog Learn kolam. We usually draw this thear kolam for Chitra Pournami.Click the above picture to see the video

Our Celebration Procedure

Ingredients needed for pooja & neivedyam

For Pooja
  • Winnowing basket / Muram in Tamil
  • New mud pot for making pongal, keeping panagam and neer mor ( This is optional)
  • 9 grains ( Navadhaniyam – Any 9 from this list :  Chana/chickpeas( brown & white), Green moong dal, Masoor dal, Toor dal,Urad dal ( Black or white), Peas, Rajma, Black eyed peas ( karamani), Ragi, Wheat, Arisi nel ( unhusked rice), Yellow moong dal, chana dal )
  • Raw rice ( maavu arisi ) Or Rice flour to draw maakolam ( Visit THIS LINK to check maakolam)
  • Raw Mango – 1 no for keeping near muram.
  • Indian Hand Fan / Kai visiri in Tamil (விசிறி)
  • One full coconut ( It would be better if its with mattai/shell)
  • One paper written with “Chithiranar Puthiranar Sivanadiyar Perungkanakar”)
  • One Pen
  • Lamp, wick, Oil/ghee, matchbox, incense stick, dhoop, camphor
  • Betel leaf & nut ( Vetrilai paaku), banana ( 2 nos) and one coconut
For Neivedyam
  • Raw rice(Maavu arisi) if making homemade rice flour for sweet pidi kozhukattai OR Store bought modak flour (kozhukattai maavu).
  • Raw mango, Jaggery, Green chilli for making Mango pachadi.
  • Curd, water, ginger, green chilli, seasoning ingredients for neer mor.
  • Raw rice ( Good quality sona masoori) for making white pongal without salt.
  • Water,edible camphor, jaggery, cardamom, cloves for making panagam.
Chitra Pournami Recipes

Neivedyam Recipes

Rice varieties

Some people have the practice of making 5 rice varieties along with sweet pongal on this day. 
We do this for Aadi 18 / Aadi perukku. Please check the link below for rice varieties if you want to try them. 


Our Celebration

Pre – Preparation

On the previous night of Chitra Pournami, we wash the lamps, keep turmeric, kumkum dots, put thread and keep it ready for the next day. Sweep the house and keep it clean. Usually we make sweet pidi kozhukattai using homemade rice flour. So we prepare the homemade rice flour in advance and keep it ready for next day’s use.

 We draw maakolam in the entrance and in front of pooja room. Usually we draw thear kolam in the entrance and pooja room. Foot of Chitra gupta along with an umbrella, hand fan, stick,foot of bull, foot of horse and flag should also be drawn. Refer picture below. You should draw it from entrance till pooja room just the way you put Lord Krishna feet for Gokulashtami/Krishna jayanthi. It is believed that Chitra Gupta is entering our house on this day. Refer the picture below.

Chitra pournami kolam

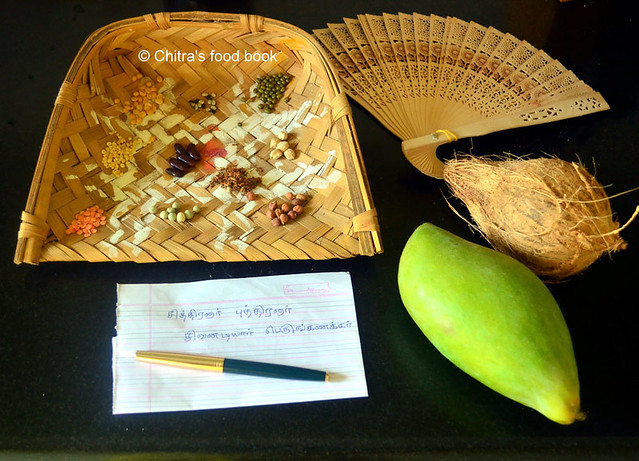
Wash the muram and divide into 9 parts by drawing segments using maakolam. Keep 9 types of grains/ Navadhaniyam in them as shown in the picture. Keep a fresh bunch of neem flower if you have. I have kept some dried flowers.You should also keep a coconut, raw mango and palm hand fan nearby the muram.

 I have kept sandalwood hand fan as I don’t have palm hand fan ( Please refer the first picture of this post). In a white paper, write “Chithiranaar Puthiranaar Sivanadiyaar Perungkanakkar” ( "சித்திர  புத்திரனார் சிவனடியார் பெருங்கணக்கர் ") and keep a Pen nearby. 

Place a raw mango & coconut in the muram. My MIL says "Kothoda manga kulaioda thengai" is placed in olden days. Please refer the picture given below. Keep this muram ready the previous night itself.

Chitra pournami celebration at home
Chitra pournami celebration
On Festival Day

The next day early morning ( around 6 am), we take head bath and start to make dishes for neivedyam. We make sweet Pidi kozhukattai by mixing the 1 cup of homemade rice flour in jaggery syrup ( 1 cup grated jaggery & 1.25 cups of water) adding 1/4 tsp of cardamom powder & 2 tbsp of grated coconut. 

Make shapes using fingers and steam it in an idli pot. In the mean time, wash and pressure cook 1/2 cup of raw rice adding 2.5 cups of water. Cook for 2 whistle in very low flame. Remove and mash the rice. Transfer to a bowl. Make a dent in the center. Keep a small piece of banana, jaggery and add a tsp of ghee.  If you wish you can make a no onion no garlic sambar as well.

 Then make Panagam by mixing water, jaggery, a pinch of edible camphor, crushed cloves, cardamom. Make neer mor and temper it. Keep all the neivedyam dishes in mud pots and plates if you have. Every year my MIL used to buy a new mud pot for making pongal and serving panakam, neer mor. She buy 3 pots ever year. But that practice has become obsolete now.

In an auspicious time of the day, light the lamp and keep the neivedyam in front of God. Avoid Rahu Kalam and Yama kandam. Place the muram ( winnowing basket) with 9 grains, hand written paper & pen. In a plate, keep betel leaves, nuts, banana and a coconut. Keep the panakam, neer mor in bowls.Sweet pidi kozhukattai  and white pongal in a plate. Show the deep, dhoop and mangala harathi.Finish the pooja. If you wish, you can read the story of Chitra Gupta and chant some slokhas as well.  

This is how we celebrate Chitra Pournami festival in our house. There may be slight variations in the celebration procedures based on your tradition. Consult the elders in your home and do the changes accordingly. Some people also make Vada, Payasam for lunch.

If you wish, you can offer food to the poor & needy on this night to get the blessings of Almighty and remove the bad karma on you. I hope this post would help you to get some idea of Chitra Pournami celebration. Share your celebration procedure too.

Technorati Tags: Chitra Pournami,Chitra Pournami celebration,How to celebrate Chitra Pournami,How to celebrate Chitra Pournami,Chitra Pournami Pooja Procedure,Chitra Pournami festival,Chithirai pournami,Chitra Poornima,How to celebrate,Festival recipes
Very good recipes Tags: Chitra Pournami, Chitra Pournami celebration, How to celebrate Chitra Pournami, Chitra Pournami festival, Chithirai pournami, Chitra Poornima, How to celebrate, Festival recipes
Continue Reading...


April 18, 2017

Elai Vadam Recipe – Ilai Vadam – Easy Rice Appalam In Banana Leaf

Elai vadam
Elai Vadam / Exhibition appalam – Rice papad / Arisi appalam made in banana leaf ( Vazhai ilai) was in my try list for the past few years. Whenever my fellow bloggers post this elai vadam recipe, I get tempted to try but I never got the confidence to try on my own. Recently my MIL prepared this ilai vadam using idli rice after watching Revathy Shanmugam mam’s cookery show in Jaya TV. Last week when she came to Bangalore, she brought some vadam to taste. She said its a time consuming process but the end result is worthy.Its taste reminded Delhi appalam we get in exhibition.We had this rice papad sprinkled with red chilli powder and we loved it very much.  

My MIL told me the tradition behind this appalam making process.On those days, people in Tamilnadu villages used to make this rice vadam using Vadham ilai or Poovarasan ilai. This vadam is usually given for ladies after delivery ( Postpartum diet) as urad dal papad creates gas problem.This vadam is roasted in direct fire ( Sutta appalam) instead of deep frying in oil as deep frying makes it difficult to digest.The best thing about this vadam is it dries up quickly even under the shade. It takes one to two days to get ready based on the weather in your place. Overnight drying under the fan would be enough. I felt this vadam is ideal for places where there is lack of sunlight. 

With the help of my MIL, I prepared this easy arisi appalam in Bangalore using raw rice. This vadam can be prepared with raw rice, idli rice or both in equal quantity. If you make it with raw rice, vadam comes out super light, airy and crispy whereas vadam made with idli rice comes out crunchy and very flavorful like store bought arisi appalam but slightly dense in texture. 

In that case, you can add little sago( javvarisi) to bring the light texture. As I have thatte idli stand, this vadam process was completed within one hour. If you don’t have this plate it may take more time. You can buy thatte idli stand or elai vadam stand in the market if you are really interested to try this one. Now lets see how to make elai vadam recipe with step by step pictures and VIDEO !

Delhi appalam

Elai vadam recipe- Ilai vadam - Easy rice appalam in banana leaf


Elai vadam recipe- Ilai vadam - Easy rice appalam in banana leaf How to make elai vadam - Easy rice appalam n banana leaf - Summer special recipes
Cuisine: South Indian
Category: Snacks
Serves: 24 
Prep time: 120 Minutes
Cook time: 60 Minutes
Total time: 180 Minutes


INGREDIENTS
1 cup - 250ml
  • Raw rice - 1 cup ( I used Maavu arisi/dosa rice)
  • Salt - as needed
  • Cumin seeds - 1/2 tsp
  • Water - As needed (I used 1/2 cup for grinding, 3/4 cup for mixing)
HOW TO MAKE ILAI VADAM / RICE APPALAM - METHOD

  • Wash and soak the raw rice in enough water for 2 hours. Drain the excess soaked water completely and grind the rice coarsely without adding water. Then wipe the sides and add 1/2 cup water, required salt. Grind to smooth paste like maida. Please note there should not be any grits in the batter. It should be completely smooth. So grind patiently for long time. I used my Indian mixie for grinding the batter and it took 5 minutes. Grind in two batches.
    Elai vadam
    Elai vadam
  • Remove the batter in a bowl.Add cumin seeds. The consistency of batter should be slightly thinner than dosa batter.
  • Now take a banana leaf and spread the leaf inside the plate according to its shape.Add 1/2 ladle of batter and swirl the plate. Batter spreads all over the plate. If you don’t have banana leaf, just spread the batter directly in the plate & swirl/rotate it.It also works but its difficult to peel once its cooked. If you have 3 plate or 6 plate ilai vadam stand, follow the same and spread the batter in all the plates.
    Elai vadam
    Elai vadam
  • Heat water in an idli pot. When the water comes to roll boil, place the idli plate. Let it steam for 5 minutes. The color of batter changes to pale white & transparent after cooking. Remove the leaf from the plate and let it become warm. Peel the cooked vadam and spread in a cotton cloth( Dhoti) or in a polythene sheet. Do not put in newspaper. It will stick with it.
     Elai vadam
    Elai vadam
  • Let it dry in balcony or under the sun for one day. If you don’t have this option, dry it under the fan wind. When it dries up, it shrinks in size & changes in color slightly.
    After one day drying, it would have dried up to 75%. During night, keep it under the fan. If its crispy all over, its ready. If its soft in the middle, it needs more time to dry. So the next day, keep it under the sun & repeat the same till its completely moisture free. Store it in a box & use it for months. Stays good even for an year if prepared properly.
    Elai vadam
  • Heat required oil in a kadai to deep fry. Break the vadam into half & deep fry in oil. Flip & cook both the sides. Remove & drain in a tissue. Sprinkle red chilli powder on top & serve as an evening snack or with any variety rice !
    Elai vadam
Enjoy !

Note
  • The consistency of batter is very important. Do not make it too watery or thick.
  • You can make this vadam with idli rice instead of raw rice.
  • Steaming takes maximum 5 minutes.
  • Try to peel the vadam after its cooled down.
  • If the vadam turns golden brown after frying, it may be due to the quality of rice. In that case, you can try adding few drops of lemon juice in the batter and make it next time. 
ilai vadam
Enjoy this crispy, yummy arisi appalam with rice or as an evening snack !
Easy arisi appalam
Continue Reading...