In South India - Tamil nadu, most of the housewives do this thiruvilakku poojai regularly at home in a simple way by chanting 108 potri. We worship Goddess Mahalakshmi in the lamp and perform this pooja.When I posted Friday neivedyam recipes, my readers requested me to share our Pooja vidhanam with Ingredients needed, Pre-preparation, Pooja kolam/Rangoli, songs in a detailed manner just like my other festival procedures post.
Few readers wanted me to share a simple pooja that helps working women and busy moms. So I have shared the pooja procedure in two ways by referring my Friday pooja book in Tamil. One is a very simple version( Panchopachara pooja) that hardly takes 5 to 10 minutes to do it. It would be ideal for working women to do it either in the morning or evening around 6 pm.
Not just on Friday, you can do this pooja everyday. The second one is my family’s traditional way with 108 potri which I learnt from my MIL. Some people make it in an elaborate way by keeping kalasha. If you are looking for the authentic Mahalakshmi pooja vidhanam with shodasha upachara puja, please refer my in-laws blog – Learn kolam. I have shared it in detail.
Not just on Friday, you can do this pooja everyday. The second one is my family’s traditional way with 108 potri which I learnt from my MIL. Some people make it in an elaborate way by keeping kalasha. If you are looking for the authentic Mahalakshmi pooja vidhanam with shodasha upachara puja, please refer my in-laws blog – Learn kolam. I have shared it in detail.
Basically Lakshmi puja is performed by married women seeking long life for their husband, health, wealth, peace of their family.This pooja gives us immense benefits if done whole heartedly with full faith. In North India, this puja is performed during Diwali in a grand manner.
Today I have shared this post mainly for beginners and newly wedded girls. I have also mentioned the benefits and significance of this pooja. I have shared all the pictures from my pooja room. Hope it would be useful for you all to get some ideas.
When I was young, I have seen Thiruvilakku pooja performed in Amman temples & Murugan temples in Tamil nadu. But I never thought it can be performed at home till my marriage. I came to know about it from my MIL. She used to do this pooja every Friday at home. Initially I was just a listener sitting along with her and watching it. After 5 years of my marriage, I started doing it on my own by following her method while she continues to do it in our Salem house even at this age.
After buying a own house, I performed Vaibhava Lakshmi pooja by keeping Kalasam for 11 weeks as advised by my neighbor. Its an elaborate pooja just like Varamahalakshmi festival. So I will share it later. In this post, we will see how to do Friday Mahalakshmi pooja at home in a simple way without keeping kalasam/Kalasha.
As usual, this post would be very lengthy as I have given all the sloka in English and Tamil. So please bear with me. If possible. I will try to make a separate post in Telugu and Hindi with the help of my friends and try to make a PDF of them in near future. Thanks for visiting this page. If you find this post helpful, please share a few words in the comment section which will make me happy.
Click THIS LINK to download the PDF format of sloka, mantras in Tamil.
Click THIS LINK to download the PDF format of sloka, mantras in Tamil.

1. SIGINIFICANCE & BENEFITS OF MAHALAKSHMI POOJA
Mahalakshmi pooja is performed by married women or young girls at home seeking health, wealth, harmony and long life for their husband, removal of sins and black magic. By doing this pooja, It is believed that Lakshmi, wife of Lord Vishnu and the Goddess of wealth visits her devotees house during this pooja and bless them with abundant wealth and good health.Goddess Lakshmi prefers clean house. So devotees clean their houses, decorate them with lights and flowers, prepare sweet delicacies/neivedyam as offerings and do the pooja. We believe that when the God is more happy at her visit, we get more blessings from her. Lakshmi pooja can be done performed by a single person or by a group of ladies at home. It is considered to be more auspicious to do this pooja on Pournami day( Full moon day).
People can get various types of benefits if they do it in Tamil months from Chithirai (April) to Panguni (March).
Chithirai : Blessed with increased production of Pulses.
Vaigasi : Blessed with Money
Aani : Blessed with Marriage
Aadi : Blessed with Long Life
Aavani : Blessed with New Born Children
Purataasi : Blessed with more Cows
Aipassi : Blessed with Food
Karthigai : Blessed with Moksha
Margali : Blessed with Good health
Thai : Blessed with Victory in life
Maasi : Blessed with removal of sins.
Panguni : Blessed with Dharma

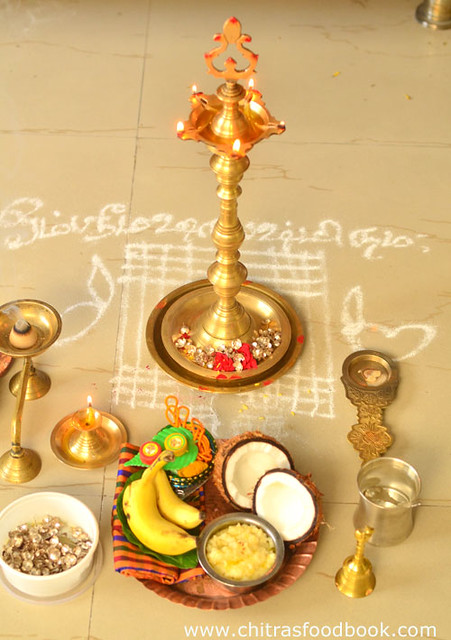
2. Wooden plank or plate or peeta for placing the lamp.Banana leaf or plate for offering sweets/Neivedyam. Thoobakal for sambrani stick, incense stick stand
3. Betel leaf & Nuts ( Vetrilai Paaku – 2 or 4 nos)
4. Banana - 2 nos ( You can keep in even number count)
5. Coconut – 1 no
6. Kumkum, Turmeric, sandal powder
7. Flowers ( Uthiri poo or malai / garland)
8. Incense stick, camphor, Dhoop / Sambrani in Tamil( Benzoin in English)
9. Gingely oil/Sesame oil & Ghee to light the lamps
10. Wick/ Thread for lamps ( Thiri nool or panchu thiri)
11. Match box, Plates to keep fruits, coconut.
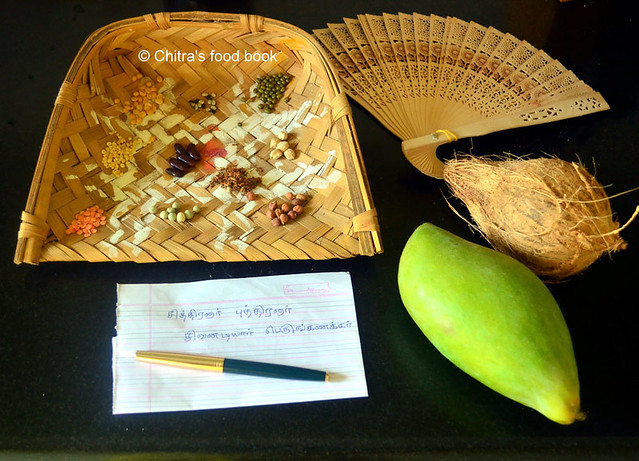
12. If you wish, you can keep a set of blouse piece, bangle, turmeric piece(Virali manjal), small mirror, comb, black chain(Karugamani), kumkum packet etc. Please refer the above picture.
13. I have 108 silver flowers which I use it for archanai. Please check the picture given above. You can use uthiri poo/ flowers instead.


Place the wooden plank or peeta over the kolam. Keep the lamp on the plank or peeta. Lamp should always face the East or North direction. South & west should be avoided. Make sure you leave some space around the lamp for Pradhakshinam ( circumambulation). Please refer the above picture for pooja arrangements.
B. Decorate the lamp, idols with flowers.Garland it if you wish. Keep sandal & kumkum dots. Add gingely oil/ sesame oil or ghee generously. Lamp should not go off while doing pooja. So add more oil before starting the pooja. Put 5 wicks or minimum 2 wicks in the lamp.
C. Decorate the idols and photo frames with flowers. Some people keep kumkum dots for all the photo in pooja room every Friday. But I do it only for festivals. Prepare the neivedyam. Mostly I make Payasam/Kheer or sweet pongal/ Sakkarai pongal in pressure cooker as sweet pongal is meant to be the favorite for Goddess. You can also make Ven pongal, rava kesari or sweet dishes with aval/poha and jaggery. I will try to make a separate post for neivedyam ideas soon.
D. Place the neivedyam bowl, broken coconut, banana, betel leaves & nuts in a plate or banana leaf. Place them in front of the lamp.
E. Keep the incense stick in the stand. Do not pierce it over the banana. Place the sambrani/dhoop stick in the stand or thoobakal. Keep some ash(viboodhi/thirueeru) in the camphor plate and place the camphor over it.If you don’t have a plate to place camphor, you can keep it over the betel leaf or banana leaf. Do not use the betel leaf which you have kept for neivedyam.
F. Place a mat for you to sit in the side of lamp. We call it as Thadukku in Tamil. Keep all the sloka books nearby. You should sit facing North or East. Avoid facing south.
Chant these lines if you are doing manasa pooja ( Imagine the offerings)

Do this pooja in the morning before rahu kalam OR do it in the evening around 6 pm. Light all the lamps other than the one you have kept for pooja because we should light the main lamp only after reciting Ganapathi sloka.
People can get various types of benefits if they do it in Tamil months from Chithirai (April) to Panguni (March).
Chithirai : Blessed with increased production of Pulses.
Vaigasi : Blessed with Money
Aani : Blessed with Marriage
Aadi : Blessed with Long Life
Aavani : Blessed with New Born Children
Purataasi : Blessed with more Cows
Aipassi : Blessed with Food
Karthigai : Blessed with Moksha
Margali : Blessed with Good health
Thai : Blessed with Victory in life
Maasi : Blessed with removal of sins.
Panguni : Blessed with Dharma
2.INGREDIENTS NEEDED FOR LAKSHMI POOJA
1. Lamp ( Thiruvilakku – 1 no, Big or small)2. Wooden plank or plate or peeta for placing the lamp.Banana leaf or plate for offering sweets/Neivedyam. Thoobakal for sambrani stick, incense stick stand
3. Betel leaf & Nuts ( Vetrilai Paaku – 2 or 4 nos)
4. Banana - 2 nos ( You can keep in even number count)
5. Coconut – 1 no
6. Kumkum, Turmeric, sandal powder
7. Flowers ( Uthiri poo or malai / garland)
8. Incense stick, camphor, Dhoop / Sambrani in Tamil( Benzoin in English)
9. Gingely oil/Sesame oil & Ghee to light the lamps
10. Wick/ Thread for lamps ( Thiri nool or panchu thiri)
11. Match box, Plates to keep fruits, coconut.
12. If you wish, you can keep a set of blouse piece, bangle, turmeric piece(Virali manjal), small mirror, comb, black chain(Karugamani), kumkum packet etc. Please refer the above picture.
13. I have 108 silver flowers which I use it for archanai. Please check the picture given above. You can use uthiri poo/ flowers instead.
3. PRE-PREPARATION FOR POOJA
On the previous day i.e Thursday night, Sweep the house clean. Wash all the lamps and pooja accessories. Dry them and decorate it by keeping sandal and kumkum dots. You can draw kolam in the entrance on previous day night of you wish. Please visit my in-laws blog Learn Kolam to get some padi kolam ideas.4. POOJA TIMINGS
Mostly we do this pooja in the morning before Rahu kalam ( 10.30am to 12 noon) or yamagandam (3:00 pm to 4:30pm) on Friday. So we do it around 8 to 9 am after sending the kids and husband to school & office. It is also auspicious if you do this pooja in the evening around 6 pm. So keep all the things ready before pooja timings. 5. HOW TO ARRANGE FOR POOJA
A. Near the pooja room, draw a kolam/rangoli on the floor. You can draw either maakolam( Kolam with wet rice flour paste) or with usual rangoli powder. My MIL draws padi kolam with hrudaya kamalam in the center. But I draw padi kolam with a simple flower kolam in the center as I am not good at drawing hridaya kamalam kolam .Please visit my in-laws blog Learn Kolam to get ideas on padi kolam.Place the wooden plank or peeta over the kolam. Keep the lamp on the plank or peeta. Lamp should always face the East or North direction. South & west should be avoided. Make sure you leave some space around the lamp for Pradhakshinam ( circumambulation). Please refer the above picture for pooja arrangements.
B. Decorate the lamp, idols with flowers.Garland it if you wish. Keep sandal & kumkum dots. Add gingely oil/ sesame oil or ghee generously. Lamp should not go off while doing pooja. So add more oil before starting the pooja. Put 5 wicks or minimum 2 wicks in the lamp.
C. Decorate the idols and photo frames with flowers. Some people keep kumkum dots for all the photo in pooja room every Friday. But I do it only for festivals. Prepare the neivedyam. Mostly I make Payasam/Kheer or sweet pongal/ Sakkarai pongal in pressure cooker as sweet pongal is meant to be the favorite for Goddess. You can also make Ven pongal, rava kesari or sweet dishes with aval/poha and jaggery. I will try to make a separate post for neivedyam ideas soon.
D. Place the neivedyam bowl, broken coconut, banana, betel leaves & nuts in a plate or banana leaf. Place them in front of the lamp.
E. Keep the incense stick in the stand. Do not pierce it over the banana. Place the sambrani/dhoop stick in the stand or thoobakal. Keep some ash(viboodhi/thirueeru) in the camphor plate and place the camphor over it.If you don’t have a plate to place camphor, you can keep it over the betel leaf or banana leaf. Do not use the betel leaf which you have kept for neivedyam.
F. Place a mat for you to sit in the side of lamp. We call it as Thadukku in Tamil. Keep all the sloka books nearby. You should sit facing North or East. Avoid facing south.
6. HOW TO DO FRIDAY VILAKKU POOJA – SIMPLE METHOD
Click THIS LINK to download PDF format of sloka, mantras in Tamil
This method is for people who have very less time in hand for doing pooja. It would be ideal for working people. This is called as “Panchopachara Pooja” ( Five fold worship).
1 Offer Gandham (sandalwood paste/powder)
2 Offer Pushpam (flower)
3 Offer Sugandham dhoop (incense)
4 Offer Jyotham (light)
5 Offer Naivedyam (food)
2 Offer Pushpam (flower)
3 Offer Sugandham dhoop (incense)
4 Offer Jyotham (light)
5 Offer Naivedyam (food)
In fact, this pooja can be performed everyday. You can do this pooja by standing in the pooja room.No need to keep the lamp separately in a peeta or plank. If you do not have the offerings/ pooja items in hand, you can do manasa pooja. ie. Assume that you are offering all the 5 things.
The second method is by offering all the 5 in real. If you have prepared any neivedyam recipe, you can keep it in a plate in front of the lamp/Thiru vilakku and do this pooja and offer sandal paste, flowers, dhoopam, dheepam, neivedyam and mangala harathi/Karpooram.
Panchopachara pooja in EnglishChant these lines if you are doing manasa pooja ( Imagine the offerings)
- oṁ śrī gaṇeśāya nama:
- oṁ śrī mahāgurubhyo nama: / oṁ śrī sadguru paramātmane nama :
- oṁ śrī mahālakṣmyai nama: śrīmahālakṣmiprītyarthe gandhaṁ parikalpayāmi ( Imagine that you offer sandal paste)
- oṁ śrī mahālakṣmyai nama: śrīmahālakṣmiprītyarthe puṣpaṁ parikalpayāmi ( Imagine to offer flowers)
- oṁ śrī mahālakṣmyai nama: śrīmahālakṣmiprītyarthe dhūpaṁ parikalpayāmi ( Imagine showing dhoopam)
- oṁ śrī mahālakṣmyai nama: śrīmahālakṣmiprītyarthe dīpaṁ parikalpayāmi ( Imagine showing dheepam)
- oṁ śrī mahālakṣmyai nama: śrīmahālakṣmiprītyarthe naivedyaṁ parikalpayāmi ( Imagine offering neivedyam)
- oṁ śrī mahālakṣmyai nama: śrīmahālakṣmiprītyarthe samasta upacāra pūjān samarpayāmi ( imagine showing camphor/karpoora harathi)
- oṁ śrī gaṇeśāya nama:
- oṁ śrī mahāgurubhyo nama: / oṁ śrī sadguru paramātmane nama :
- oṁ śrī mahālakṣmyai nama: śrīmahālakṣmiprītyarthe gandhān dhārayāmi ( Keep two sandal dots in the feet of lamp)
- oṁ śrī mahālakṣmyai nama: śrīmahālakṣmiprītyarthe puṣpai: saṁpūjayāmi ( offer flowers)
- oṁ śrī mahālakṣmyai nama: śrīmahālakṣmiprītyarthe dhūpaṁ āghrāpayāmi ( Show dhoop/sambrani stick or incense stick)
- oṁ śrī mahālakṣmyai nama: śrīmahālakṣmiprītyarthe divya maṅgala dīpaṁ darśayāmi ( show dheepam preferrably ghee dheepam)
- oṁ śrī mahālakṣmyai nama: śrīmahālakṣmiprītyarthe amṛta mahā naivedyaṁ nivedayāmi ( Offer neivedyam)
- oṁ śrī mahālakṣmyai nama: śrīmahālakṣmiprītyarthe samasta upacāra pūjān samarpayāmi (show mangala harathi/Karpoora harathi)
7. HOW TO DO THIRUVILAKKU POOJA – METHOD 2
Click THIS LINK to download PDF format of sloka, mantras in Tamil.
Basically any pooja should be done by worshipping Lord Ganesha at the beginning. So Vigneshwara pooja is to be performed by reciting Lord Ganapathi slokas. So lets start with Ganapathi song. I have given all the mantra and songs in Tamil and English.
1. Ganapathi Vaazthu
Ainthu Karaththanai aanai mugathanai
Indhin Ilampirai polum eyitranai
Nandhimagan thanai gnyanak kozhunthinai
Punthiyil vaiththadi potrugindrene
Now light the lamp. While lighting the lamp, chant the following :
”ஓம் ஒளிவளர் விளக்கே போற்றி” – “Om Olivalar Vilakke Potri “
Continue this with Thiruvilakku Archanai (108 potri). You can chant thiruvilakku Ashtothram in Sansrit or Thiruvilakku archanai song in Tamil with 108 potri which I have given below. We offer flowers ( uthiri poo) or kumkum in the feet of lamp while chanting this potri. You can offer a combination of 54 flowers & 54 kumkum archanai.I use my 108 silver flowers for this. Please check the image given above ingredients section. You can buy this silver flowers & golden flowers in all jewelry shops.
Click HERE to listen Thiruvilakku Archanai sthothram in Sanskrit.
108 Potri in English
1. pŏṉṉum mĕyppŏruḽum taruvāy potri
2. pokamum tiruvum puṇarppāy potri
3. muṟṟaṟivu ŏḽiyāy miḽirntāy potri
4. mūvulakam niṟaintiruntāy potri
5. varampil iṉpamāy vaḽarntiruntāy potri
6. iyaṟkaiyāy aṟivŏḽi āṉāy potri
7. īreḻulakam īṉṟāy potri
8. piṟarvayamākāp pĕriyoy potri
9. periṉpap pĕrukkāy pŏlintāy potri
10. peraruṭ kaṭalām pŏruḽe potri
11. muṭivil āṟṟil uṭaiyāy potri
12. mūvulakum tŏḻum mūttoy potri
13. aḽavilāc cĕlvam taruvoy potri
14. āṉanta aṟivŏḽi viḽakke potri
15. om ĕṉum pŏruḽāy uḽḽoy potri
16. iruḽ kĕṭuttu iṉparuḽ ĕntāy potri
17. maṅkaḽa nāyaki māmaṇi potri
18. vaḽamai nalkum valliyai potri
19. aṟamvaḽar nāyaki amme potri
20. miṉ ŏḽi ammaiyām viḽakke potri
21. miṉŏḽip piḻampāy vaḽarntāy potri
22. taiyal nāyakit tāye potri
23. tŏṇṭar akattamar tūmaṇi potri
24. mukkaṭcuṭariṉ mutalvi potri
25. ŏḽikkuḽ ŏḽiyāy uyarvāy potri
26. cūḽāmaṇiye cuṭarŏḽi potri
27. iruḽ ŏḻittu iṉpam īvoy potri
28. aruḽ pŏḻintu ĕmmai āḽvoy potri
29. aṟiviṉukku aṟivāy āṉāy potri
30. illaka viḽakkām iṟaivi potri
31. cuṭare viḽakkām tūyoy potri
32. iṭaraik kaḽaiyum iyalpiṉāy potri
33. ĕricuṭarāy niṉṟa iṟaivi potri
34. ñāṉaccuṭar viḽakkāy niṉṟāy potri
35. arumaṟaip pŏruḽām āti potri
36. tūṇṭu cuṭaraṉaiya joti potri
37. jotiye potric cuṭare potri
38. otum uḽŏḽi viḽakke potri
39. iruḽ kĕṭukkum illaka viḽakke potri
40. cŏllaka viḽakkām joti potri
41. palarkāṇ pallaka viḽakke potri
42. nallaka namaccivāya viḽakke potri
43. ulappilā ŏḽivaḽar viḽakke potri
44. uṇarvucūḻ kaṭantatora viḽakke potri
45. uṭampĕṉum maṉaiyaka viḽakke potri
46. uḽḽattakaḻi viḽakke potri
47. maṭampaṭum uṇarnĕy viḽakke potri
48. uyirĕṉum tirimayakku viḽakke potri
49. iṭampaṭum ñāṉattī viḽakke potri
50. nokkuvārkku ĕrikŏḽ viḽakke potri
51. ātiyāy naṭuvumākum viḽakke potri
52. aḽavilā aḽavumākum viḽakke potri
53. jotiyāy uṇarvumākum viḽakke potri
54. tillaip pŏtu naṭa viḽakke potri
55. karuṇaiye uruvām viḽakke potri
56. kaṟpaṉai kaṭanta joti potri
57. aṟputakkola viḽakke potri
58. arumaṟaic cirattu viḽakke potri
59. ciṟpara viyoma viḽakke potri
60. pŏṟpuṭaṉ nañcĕy viḽakke potri
61. uḽḽattiruḽai ŏḻippāy potri
62. kaḽḽappulaṉaik karaippāy potri
63. urukuvor uḽḽattu ŏḽiye potri
64. pĕruku aruḽcurakkum pĕrumāṉ potri
65. iruḽcer iruviṉai ĕṟivāy potri
66. aruve uruve aruvuru potri
67. nantā viḽakke nāyakiye potri
68. cĕntāmaraittāḽ tantāy potri
69. tīpamaṅkaḽ joti potri
70. matippavar maṉamaṇi viḽakke potri
71. pākam piriyā parāparai potri
72. ākama muṭimelamarntāy potri
73. ekamāy naṭañcĕy ĕmmāṉ potri
74. ūḻi ūḻi uḽḽoy potri
75. āḻiyāṉ kāṇā aṭiyoy potri
76. ātiyum antamum āṉāy potri
77. antamil iṉpam aruḽvoy potri
78. muntaiya viṉaiyai muṭippoy potri
79. pŏṅkum kīrttip pūraṇī potri
80. taṇṇaruḽ curakkum tāye potri
81. aruḽe uruvāy amaintoy potri
82. irunila makkaḽ iṟaivi potri
83. kuruvĕṉa ñāṉam kŏṭuppāy potri
84. āṟutal ĕmakkiṅku aḽippāy potri
85. tītĕllām tīrkkum tiruve potri
86. paktiyil āḻnta parame potri
87. ĕttikkum tuti ĕntāy potri
88. añcalĕṉṟaruḽum aṉpe potri
89. tañcamĕṉṟavaraic cārvoy aṉpe potri
90. otuvārakattuṟai ŏḽiye potri
91. oṅkārattuḽḽŏḽi viḽakke potri
92. ĕllā ulakamum āṉāy potri
93. pŏllā viṉaikaḽ aṟuppāy potri
94. pukaḻccevaṭi ĕṉmel vaittāy potri
95. cĕlvāya cĕlvam taruvāy potri
96. pūṅkaḻal viḽakke potri potri
97. ulakam uvappuṟa vāḻvaruḽ potri
98. uyirkaḽiṉ pacippiṇi ŏḻittaruḽ potri
99. cĕlva kalvi ciṟapparuḽ potri
100. nallaṉpu ŏḻukkam nalkuvāy potri
101. viḽakkiṭṭārkku mĕynĕṟi viḽakkuvāy potri
102. nalam ĕlām uyirkku nalkuka potri
103. tāye niṉṉaruḽ taruvāy potri
104. tūya niṉ tiruvaṭi tŏḻutaṉam potri
105. potri ĕṉpār amarar viḽakke potri
106. potri ĕṉpār maṉitar viḽakke potri
107. potri ĕṉ aṉpupŏli viḽakke potri
108. potri potri tiruviḽakke potri
After archanai, chant the following lines and offer the sandal paste in the feet of lamp, offer flowers, show the dhoopam, dheepam. Do the neivedyam and finally mangala harathi/Karpoora harathi.
Sarva mangala Mangalye Shive sarvartha sadhake,
Saranye tryabike devi, Narayani namosthuthe.
Lastly do the pradhakshinam( circumambulation of lamp ) – 3 times and do the namaskaram in front of the pooja place. Move the lamp slightly towards the east. This shows the end of pooja. Now you can offer kumkum and thamboolam prasadham to the married ladies and young girls if you wish.
Quell the lamp with a flower.If you have offered kumkum for archanai, you can keep it on your forehead and mangal sutra for daily use.Take the flowers used for pooja and put it in a flower pot.Pour the water in tulsi plant or any other plants.
Please do not get too much hung up on the methods/procedures. More than anything, Bhakthi/Bhavana is important. Lord Krishna says in Bhagavad Gita 9th chapter:
patram puspam phalam toyam
yo me bhaktya prayacchati
tad aham bhakty-upahrtam
asnami prayatatmanah’'
Meaning : If one offers me with love and devotion a leaf, a flower, a fruit, water, I will accept it.
Shubam !!
DISCLAIMER : I have shared the pooja methods based on my family’s tradition. Please consult your elders in family, change it and follow as per your custom.
1. Ganapathi Vaazthu
Ainthu Karaththanai aanai mugathanai
Indhin Ilampirai polum eyitranai
Nandhimagan thanai gnyanak kozhunthinai
Punthiyil vaiththadi potrugindrene
Now light the lamp. While lighting the lamp, chant the following :
”ஓம் ஒளிவளர் விளக்கே போற்றி” – “Om Olivalar Vilakke Potri “
Continue this with Thiruvilakku Archanai (108 potri). You can chant thiruvilakku Ashtothram in Sansrit or Thiruvilakku archanai song in Tamil with 108 potri which I have given below. We offer flowers ( uthiri poo) or kumkum in the feet of lamp while chanting this potri. You can offer a combination of 54 flowers & 54 kumkum archanai.I use my 108 silver flowers for this. Please check the image given above ingredients section. You can buy this silver flowers & golden flowers in all jewelry shops.
Click HERE to listen Thiruvilakku Archanai sthothram in Sanskrit.
108 Potri in English
1. pŏṉṉum mĕyppŏruḽum taruvāy potri
2. pokamum tiruvum puṇarppāy potri
3. muṟṟaṟivu ŏḽiyāy miḽirntāy potri
4. mūvulakam niṟaintiruntāy potri
5. varampil iṉpamāy vaḽarntiruntāy potri
6. iyaṟkaiyāy aṟivŏḽi āṉāy potri
7. īreḻulakam īṉṟāy potri
8. piṟarvayamākāp pĕriyoy potri
9. periṉpap pĕrukkāy pŏlintāy potri
10. peraruṭ kaṭalām pŏruḽe potri
11. muṭivil āṟṟil uṭaiyāy potri
12. mūvulakum tŏḻum mūttoy potri
13. aḽavilāc cĕlvam taruvoy potri
14. āṉanta aṟivŏḽi viḽakke potri
15. om ĕṉum pŏruḽāy uḽḽoy potri
16. iruḽ kĕṭuttu iṉparuḽ ĕntāy potri
17. maṅkaḽa nāyaki māmaṇi potri
18. vaḽamai nalkum valliyai potri
19. aṟamvaḽar nāyaki amme potri
20. miṉ ŏḽi ammaiyām viḽakke potri
21. miṉŏḽip piḻampāy vaḽarntāy potri
22. taiyal nāyakit tāye potri
23. tŏṇṭar akattamar tūmaṇi potri
24. mukkaṭcuṭariṉ mutalvi potri
25. ŏḽikkuḽ ŏḽiyāy uyarvāy potri
26. cūḽāmaṇiye cuṭarŏḽi potri
27. iruḽ ŏḻittu iṉpam īvoy potri
28. aruḽ pŏḻintu ĕmmai āḽvoy potri
29. aṟiviṉukku aṟivāy āṉāy potri
30. illaka viḽakkām iṟaivi potri
31. cuṭare viḽakkām tūyoy potri
32. iṭaraik kaḽaiyum iyalpiṉāy potri
33. ĕricuṭarāy niṉṟa iṟaivi potri
34. ñāṉaccuṭar viḽakkāy niṉṟāy potri
35. arumaṟaip pŏruḽām āti potri
36. tūṇṭu cuṭaraṉaiya joti potri
37. jotiye potric cuṭare potri
38. otum uḽŏḽi viḽakke potri
39. iruḽ kĕṭukkum illaka viḽakke potri
40. cŏllaka viḽakkām joti potri
41. palarkāṇ pallaka viḽakke potri
42. nallaka namaccivāya viḽakke potri
43. ulappilā ŏḽivaḽar viḽakke potri
44. uṇarvucūḻ kaṭantatora viḽakke potri
45. uṭampĕṉum maṉaiyaka viḽakke potri
46. uḽḽattakaḻi viḽakke potri
47. maṭampaṭum uṇarnĕy viḽakke potri
48. uyirĕṉum tirimayakku viḽakke potri
49. iṭampaṭum ñāṉattī viḽakke potri
50. nokkuvārkku ĕrikŏḽ viḽakke potri
51. ātiyāy naṭuvumākum viḽakke potri
52. aḽavilā aḽavumākum viḽakke potri
53. jotiyāy uṇarvumākum viḽakke potri
54. tillaip pŏtu naṭa viḽakke potri
55. karuṇaiye uruvām viḽakke potri
56. kaṟpaṉai kaṭanta joti potri
57. aṟputakkola viḽakke potri
58. arumaṟaic cirattu viḽakke potri
59. ciṟpara viyoma viḽakke potri
60. pŏṟpuṭaṉ nañcĕy viḽakke potri
61. uḽḽattiruḽai ŏḻippāy potri
62. kaḽḽappulaṉaik karaippāy potri
63. urukuvor uḽḽattu ŏḽiye potri
64. pĕruku aruḽcurakkum pĕrumāṉ potri
65. iruḽcer iruviṉai ĕṟivāy potri
66. aruve uruve aruvuru potri
67. nantā viḽakke nāyakiye potri
68. cĕntāmaraittāḽ tantāy potri
69. tīpamaṅkaḽ joti potri
70. matippavar maṉamaṇi viḽakke potri
71. pākam piriyā parāparai potri
72. ākama muṭimelamarntāy potri
73. ekamāy naṭañcĕy ĕmmāṉ potri
74. ūḻi ūḻi uḽḽoy potri
75. āḻiyāṉ kāṇā aṭiyoy potri
76. ātiyum antamum āṉāy potri
77. antamil iṉpam aruḽvoy potri
78. muntaiya viṉaiyai muṭippoy potri
79. pŏṅkum kīrttip pūraṇī potri
80. taṇṇaruḽ curakkum tāye potri
81. aruḽe uruvāy amaintoy potri
82. irunila makkaḽ iṟaivi potri
83. kuruvĕṉa ñāṉam kŏṭuppāy potri
84. āṟutal ĕmakkiṅku aḽippāy potri
85. tītĕllām tīrkkum tiruve potri
86. paktiyil āḻnta parame potri
87. ĕttikkum tuti ĕntāy potri
88. añcalĕṉṟaruḽum aṉpe potri
89. tañcamĕṉṟavaraic cārvoy aṉpe potri
90. otuvārakattuṟai ŏḽiye potri
91. oṅkārattuḽḽŏḽi viḽakke potri
92. ĕllā ulakamum āṉāy potri
93. pŏllā viṉaikaḽ aṟuppāy potri
94. pukaḻccevaṭi ĕṉmel vaittāy potri
95. cĕlvāya cĕlvam taruvāy potri
96. pūṅkaḻal viḽakke potri potri
97. ulakam uvappuṟa vāḻvaruḽ potri
98. uyirkaḽiṉ pacippiṇi ŏḻittaruḽ potri
99. cĕlva kalvi ciṟapparuḽ potri
100. nallaṉpu ŏḻukkam nalkuvāy potri
101. viḽakkiṭṭārkku mĕynĕṟi viḽakkuvāy potri
102. nalam ĕlām uyirkku nalkuka potri
103. tāye niṉṉaruḽ taruvāy potri
104. tūya niṉ tiruvaṭi tŏḻutaṉam potri
105. potri ĕṉpār amarar viḽakke potri
106. potri ĕṉpār maṉitar viḽakke potri
107. potri ĕṉ aṉpupŏli viḽakke potri
108. potri potri tiruviḽakke potri
After archanai, chant the following lines and offer the sandal paste in the feet of lamp, offer flowers, show the dhoopam, dheepam. Do the neivedyam and finally mangala harathi/Karpoora harathi.
- oṁ śrī mahālakṣmyai nama: śrīmahālakṣmiprītyarthe gandhān dhārayāmi - Keep two sandal dots in the feet of lamp
- oṁ śrī mahālakṣmyai nama: śrīmahālakṣmiprītyarthe puṣpai: saṁpūjayāmi - Offer flowers
- oṁ śrī mahālakṣmyai nama: śrīmahālakṣmiprītyarthe dhūpaṁ āghrāpayāmi - Show dhoopam
- oṁ śrī mahālakṣmyai nama: śrīmahālakṣmiprītyarthe divya maṅgala dīpaṁ darśayāmi - - show dheepam
- oṁ śrī mahālakṣmyai nama: śrīmahālakṣmiprītyarthe amṛta mahā naivedyaṁ nivedayāmi - – offer neivedyam
- oṁ śrī mahālakṣmyai nama: śrīmahālakṣmiprītyarthe samasta upacāra pūjān samarpayāmi - – Show karpoora harathi
Sarva mangala Mangalye Shive sarvartha sadhake,
Saranye tryabike devi, Narayani namosthuthe.
Lastly do the pradhakshinam( circumambulation of lamp ) – 3 times and do the namaskaram in front of the pooja place. Move the lamp slightly towards the east. This shows the end of pooja. Now you can offer kumkum and thamboolam prasadham to the married ladies and young girls if you wish.
Quell the lamp with a flower.If you have offered kumkum for archanai, you can keep it on your forehead and mangal sutra for daily use.Take the flowers used for pooja and put it in a flower pot.Pour the water in tulsi plant or any other plants.
Please do not get too much hung up on the methods/procedures. More than anything, Bhakthi/Bhavana is important. Lord Krishna says in Bhagavad Gita 9th chapter:
patram puspam phalam toyam
yo me bhaktya prayacchati
tad aham bhakty-upahrtam
asnami prayatatmanah’'
Meaning : If one offers me with love and devotion a leaf, a flower, a fruit, water, I will accept it.
Shubam !!
DISCLAIMER : I have shared the pooja methods based on my family’s tradition. Please consult your elders in family, change it and follow as per your custom.
Technorati Tags: Friday Pooja,Friday thiruvilakku pooja,thiruvilakku pooja at home,Mahalakshmi pooja,how to do friday pooja,mahalakshmi pooja in tamil,how to do lakshmi pooja at home every friday in tamil,how to perform lakshmi pooja at home,how to do lakshmi pooja at home in tamil,friday lakshmi pooja songs,friday pooja kolam,mahalakshmi pooja procedure,how to do laxmi puja,simple lakshmi pooja at home,how to do friday pooja at home,how to worship lakshmi on fridays,thiruvilakku pooja strotram in tamil,thiruvilakku pooja strotras,thiruvilakku pooja mantras,friday pooja at home in tamil,vilakku pooja slokas in tamil,lakshmi puja vidhi

 Homemade Bajji, Bonda, Pakoda mix