Search Chitra's Food Book

October 31, 2018

Soft Mysore Pak Recipe Step By Step - Ghee Mysore pak Recipe

 Soft mysore pak recipe

Making Soft mysore pak at home like Krishna sweets ghee mysorepak (Nei mysore pak) has become a dream for every foodie. Even though the ingredients are same, this soft mysore pak recipe is in no way related to our traditional, olden days South Indian mysore pak in taste, texture or looks. Nowadays people especially kids love this soft, melt in mouth, ghee dripping mysore pak from sweet shops more than the traditional ones served in Tamil nadu weddings. 

Basically I am not a big fan of mysore pak but after becoming a food blogger, I started developing my taste towards all the sweets and snacks which I hated in my childhood days. Just like everyone I too wanted to try Krishna sweets style soft mysore pak at home. 

Long back I have shared 3 minutes microwave mysore pak recipe which is one of the super hit recipes in my blog. Following that I wanted to try the stove top version as well based on my readers request. So I watched few You tube videos, surfed few websites and tried few times during last year Diwali. It became crumbly, sometimes hard and it was not up to the mark. I wasted so much of ghee, oil and sugar and got nicely from Sendhil too. 

 Recently I watched Gowri’s Samayal Arai mysore pak recipe video shown by a caterer in Salem. I got inspired, became confident and tried it again as my first sweet for Diwali. It came out very well with a melt in mouth texture as I expected. But I felt raw besan smell in the end product slightly, also I couldn’t get the golden brown center part formed due to the latent heat. But it was very soft and tasted yummy. So I tried the same recipe again with few modifications of my own.  

In some sweet shops, milk powder is used I feel. So I roasted the besan in little ghee, added milk powder to get brown caramalized color. Even though I couldn't achieve the perfect brown center, its taste was exactly like sweet shop ones. It was a great success at home and everybody loved it. I passed few pieces to my neighbors in a sweet box as shown in the picture above. They too loved it and appreciated me. 

Anyone can make this mysore pak perfectly if you follow the instructions carefully. I have also shared a tip for trouble shooting in the Notes section. Hope the step by step pictures will be helpful too. There is very less chances of going wrong in this recipe. Even beginners can dare to try it. So friends do try this soft, melt in mouth mysore pak for this Diwali and have a great celebration.

mysore pak recipe


Soft Mysore Pak Recipe


Soft Mysore Pak Recipe

How to make soft mysore pak like sweet shops at home.


Cuisine: Indian
Category: Sweet
Serves: 12 small pieces.
Prep time: 10 Minutes
Cook time: 20 Minutes
Total time: 30 Minutes


INGREDIENTS
1 cup - 240ml
  • Besan flour / Kadalai maavu - 1/2 cup
  • Milk Powder - 1/4 cup
  • Sugar - 1 cup
  • Melted Ghee - 1 cup ( at room temperature)
  • Cooking oil - 1/2 cup (Use refined oil)
  • Water - 1/3 cup ( for sugar syrup)
HOW TO MAKE SOFT MYSORE PAK
  1. To make soft mysore pak, roast besan flour in 1 tbsp of ghee. 
  2. Mix melted ghee + cooking oil in a bowl and heat till warm to touch.
  3. Mix the besan flour, milk powder in 1/3 cup of melted ghee+oil mixture without lumps. Set aside.
  4. In a kadai, make sugar syrup of one string consistency.
  5. Add the besan mixture to sugar syrup and mix in medium flame.
  6. After the syrup is absorbed, add 2 tbsp ghee. Mix till its absorbed by besan mixture.
  7. Repeat adding ghee till the besan starts to leave the sides of kadai. It gives a nice smell. 
  8. If you touch with your finger, it will be non sticky.
  9. Switch off the flame, remove the kadai from the stove. Lastly add 2 tbsp of ghee, mix quickly and transfer the mysore pak mixture to a greased bowl or plate. Let it cool down completely.
  10. Make pieces and serve. Enjoy melt in mouth, soft mysore pak at home.
MAKING MYSORE PAK - STEP BY STEP PICTURES
  • Heat 1 tbsp ghee in a non-stick kadai. Add 1/2 cup of besan flour and roast in medium flame for 5 minutes. Besan gives a nice smell once its roasted. Transfer to a bowl. 
  • soft mysore pak recipe
  • In a bowl, mix melted ghee + refined oil ( use any flavorless oil) and set aside. Heat it till warm. Add milk powder to the roasted besan flour. Mix well and add 1/3 cup of melted ghee + Oil mixture. Use a whisk and mix without lumps. Set aside. Take an aluminum plate or pan ( I used loaf cake pan) and grease it with ghee or oil. Choose a bowl or pan that holds heat for long time. You can line it with an aluminium foil for easy removal. Keep it ready.
  • soft mysore pak recipe
  • In a good non-stick kadai, take 1 cup of sugar and 1/2 cup of water. Keep the flame medium and melt the sugar. Boil the syrup till one string consistency. To check this, slide a drop of syrup from the back of ladle using your fore finger and touch it with your thumb finger. When you release it, it will form one string as shown in the picture below. .
  • soft mysore pak recipe
  • Lower the flame completely and add the diluted besan. Mix till all the sugar syrup is absorbed by the besan. It becomes slightly thick.
  • soft mysore pak recipe
  • At this point start adding 2 tbsp of ghee +oil mixture.  No need to use hot ghee. It should be in room temperature. Mix well. Bubbles will form in the middle. Ghee would be absorbed by the besan as you mix. Mixture starts to thicken.
  • soft mysore pak recipe
  • Again add 2 tbsp ghee and mix well till its absorbed. Keep the flame medium throughout the process. Repeat the same at regular intervals till the mixture becomes slightly thick, pale in color, slightly frothy in the corners and starts to leave the sides of kadai. It gives a nice smell too. Smell indicates the doneness. If you touch the mixture, it will be non sticky. You don’t have to add all the remaining ghee. 2 tbsp to 1/4 cup of it may leftover. You can use it in your regular cooking. Do not over cook the mixture.
  • soft mysore pak recipe
  • Once the mysore pak starts to leave the sides of kadai with a nice smell, switch off the flame immediately and remove the kadai from the stove. Lastly add 2 tbsp ghee and mix quickly. You will find the ghee float in the sides of the kadai. No need to stir till the ghee is absorbed.
  • soft mysore pak recipe
  • Immediately transfer the mysore pak mixture to the greased pan. It will fall like a ribbon. Pat the pan gently. Just level the top with a flat spoon or using a bottom of small bowl immediately. Do not press it too much. Do it gently. Mixture will be too hot. Handle carefully. Let it rest for 6 hours or over night to cool down completely. If you try to make pieces when its hot or warm, pieces won't come properly. There may be crumbles. So wait until it cools down. 
  • soft mysore pak recipe
  • After cooling down, run a knife in the sides and invert the pan in a plate. It will fall easily. Now make big or small pieces as you like. Serve and enjoy. Stays good for a week if you store in an air tight box. Do not let it dry in air.
  • soft mysore pak recipe
    Enjoy yummy, melt in mouth, sweet shop style mysore pak at home for this Diwali.

Note

  • Do not reduce the quantity of sugar, ghee.
  • If you don’t want to add cooking oil, you can use ghee alone but mysore pak becomes hard the next day as the ghee becomes thick after cooling down. Refined Oil helps to maintain the soft texture of mysore pak. Don't worry oil smell won't be there.
  • If you want to make traditional, porous mysore pak you should add hot oil + ghee to the besan instead of using it warm.
  • Just cook the mixture till it starts to leave the sides of pan. Over cooking make the mysore pak crumbly.
  • Instead of adding milk powder completely, add 1/2  to 1 tbsp maida and reamining milk powder just like sweet shops. 
  • TROUBLE SHOOTING TIPS : Suppose if your mysore pak becomes crumbly or hard, do not worry. Grind it adding little milk to a smooth paste. Stir again in low flame till the mixture starts to leave the kadai, add 2 tbsp ghee+ oil and transfer to a plate. Cool down and make pieces.
  • You can also add a pinch of turmeric powder for nice color. 

Try this yummy Mysore pak at home for this diwali and enjoy !
soft mysore pak recipe step by step

Continue Reading...


October 29, 2018

Chettinad Thenkuzhal Murukku Recipe - White Thenkuzhal Murukku

Chettinad thenkuzhal recipe
Chettinad style thenkuzhal murukku recipe was in my try list for years. Recently I had a 2 days trip to Karaikudi, Pillayarpatti and Kundrathur. I visited Karaikudi just to enjoy Chettinad special food. We stayed in Chidambara vilas, heritage resort and had a good time exploring places in Karaikudi. I had Chettinad special vegetarian lunch at The Bangala and enjoyed their food thoroughly. I went to the most popular Soundaram aachi snack shop and bought all the snack items worth Rs.1500. 

Among the snacks I tasted, I loved this Chettinad thenkuzhal and seepu seedai. I couldn’t meet Soundaram aachi but I got the recipe and details from the workers. I came to know Chettinad people use IR20  C. R Pachai arisi (Cut vellai pacharisi) for making this thenkuzhal/murukku. They add ghee and roasted urad dal powder to the processed rice flour and make this thenkuzhal. They use a 3 holed murukku mould for shaping it. I enquired them and bought the same from shops in Koppudai Nayaki amman temple street( Bazaar street) in Karaikudi. Here is collage of pictures of  IR20 raw rice, thenkuzhal murukku press, Soundaram snacks shop and their products. But I did not try Soundaram aachi's recipe instead I followed the authentic Chettinad thenkuzhal murukku recipe without butter or ghee and tried it.


I referred Solai aachi's thenkuzhal murukku maavu post for the ratio of raw rice and urad dal. Murukku came out super white in color even without using Vanaspati, butter or ghee. Generally Chettinad people make murukku maavu by grinding raw rice and roasted urad dal. They just wash the rice, dry under the shade for a day. Dry roast the urad dal till hot and grind both rice and dal in a flour mill. They store this murukku maavu and make thenkuzhal whenever needed. As we are not using butter or ghee, this murukku would be crunchy and slightly hard to bite. It doesn’t have a melt in mouth texture. You should have a strong teeth to munch this murukku😀. 

Its taste will remind the olden days thenkuzhal recipe which our granny's used to make without butter. To make soft murukku, you can add melted butter or ghee but the color of this murukku may change. Finally its your choice of making this murukku with or without butter. Similarly you can try the same recipe with store bought idiyappam flour but results may vary slightly.  Friends, do try this easy, yummy Chettinad thenkuzhal recipe for this Diwali and enjoy ! Lets see how to make Chettinad murukku recipe with step by step pictures.

Here is a collage of our stay at Chidambara vilas, heritage resort along with its Chettinad special breakfast.
Chidambara vilas, Karaikudi

Chettinad thenkuzhal murukku recipe

Chettinad Thenkuzhal Recipe


Chettinad Thenkuzhal Recipe

Chettinad Thenkuzhal Recipe - White murukku recipe without butter or ghee.


Cuisine: Chettinad
Category: Snacks
Serves: 15 nos.
Prep time: 180 Minutes
Cook time: 5 Minutes
Total time: 185 Minutes

1 cup - 250ml
  • Raw rice / Pacharisi ( IR20 ) – 1 cup ( Maavu arisi)
  • White urad dal – 1/4 cup + 1 tbsp
  • Salt – as needed
  • Ghee – 1 tbsp (Optional, I dint use)
  • Water – to knead the dough
HOW TO MAKE CHETTINAD THENKUZHAL
  1. To make Chettinad thenkuzhal murukku maavu, wash and soak raw rice in water for one hour.
  2. Drain the water completely. Spread in a white cloth. Dry under the shade for one day or two.
  3. After the rice is completely dry, grind to a fine powder. Sieve and set aside.
  4. Dry roast white, round urad dal without changing its color till hot. Powder and sieve it.
  5. Add to rice flour, salt, asafetida, melted ghee(If using) and mix well. Add the required water.
  6. Make smooth dough. Heat oil to deep fry. Press and shape the murukku. Drop in oil.
  7. Deep fry both sides till bubbles cease. Remove from oil, drain and store in a box.
  8. Chettinad thenkuzhal is ready. It stays good for a month.
CHETTINAD THENKUZHAL RECIPE - STEP BY STEP PICTURES
  • Lets prepare Chettinad thenkuzhal murukku maavu as a first step. For this, wash the maavu pacharisi (IR20 raw rice) and soak in enough water for one to 2 hours. Drain the water and spread the soaked rice in a cotton cloth under shade for one day based on the weather.  Do not dry under the sun. Rice should become completely dry. Alternately you can just roast the rice till puffy and grind the rice.
  • Chettinad thenkuzhal murukku
  • After the rice is dry, grind in a mixie to a fine powder. Sieve in a wide plate and grind the coarse ones again till smooth. Repeat until all the rice is ground finely.
  • Chettinad thenkuzhal murukku Chettinad thenkuzhal murukku
  • Dry roast white, round urad dal until hot. Roast it patiently without changing the color. Murukku doesn’t come out white if you roast the dal till golden brown in color. Keep mixing and tossing the dal. When the dal becomes hot, remove from the flame and let it cool down.
  • Chettinad thenkuzhal murukku
  • Grind to a smooth powder. Sieve and add to rice flour. Add salt, hing and melted ghee(if adding). Mix well. Then add required water and make a smooth dough. No problem if the dough is slightly sticky.

  • Fill the murukku press with the dough ( I sealed 2 holes with a cello tape inside and outside). Heat oil to deep fry. Drop a pinch of dough and check the oil temperature. Keep the flame low to medium and squeeze the murukku over the oil directly OR press the murukku in a greased ladle or a sheet as shown in the picture. Then drop in hot oil. You can put 3 to 4 murukku per batch. Cook both sides by flipping it. Cook till bubbles cease completely.
  • Chettinad thenkuzhal murukku
  • Murukku remains white in color if you fry in medium flame by tossing whenever needed. If you have used ghee in the dough, color may change slightly. Remove the murukku from the oil. Drain in a paper towel. Repeat the same in batches. Chettinad thenkuzhal is ready. Cool down the murukku and store in a box. It stays good for a month.
  • Chettinad thenkuzhal murukku
    Enjoy !

Note

  • You can wash the rice, dry under shade and grind in a mill else dry roast the rice till puffy and then grind it. Both works well.
  • Ratio of rice and urad dal is 2.5 :1. Some recipes use 3:1 too.
  • Addition of ghee or butter helps to give soft texture to the murukku but color may not be pure white.
  • If you feel the oil has become too hot, you can switch off the flame and cool down the oil. Then make the next batch.

Chettinad thenkuzhal murukku is ready to enjoy ! Try this for Diwali and share your feedback with me.

Chettinad thenkuzhal murukku


Continue Reading...


October 28, 2018

18 Halwa Recipes - Indian Halwa Varieties

INDIAN HALWA VARIETIES

Here is the collection of 18 different types of halwa recipes / Halwa varieties in my blog. In this list, you can find the links of 18 halwa recipes under one page. Most of them are popular, easy to make, must try Top South Indian and North Indian halwa recipes for Diwali and other festivals. As you all know Halwa (Halva/ Halawa/ Sheera in Hindi) is one of the most popular Indian dessert recipes. The word halwa means sweetness. It is prepared using flour or nuts as the base ingredient. 

In this collection, you can find the Indian halva recipes starting from easy carrot halwa using pressure cooker, suji halwa, beginners special corn flour halwa to the most time consuming Tirunelveli halwa / wheat halwa. Among these halwa varieties, my favorite is badam halwa, easy atta halwa and suji halwa. You too choose your favorite, try and share your feedback. I am yet to try Kerala halwa and some more popular halwa recipes. I will update this list whenever I share them. Lets see the collection of 18 halwa varieties below. Please click on the images to see the particular halwa recipe.

CARROT HALWA WITH KHOYA USING PRESSURE COOKER


This is an easy and quick carrot halwa (Gajar halwa in Hindi) that is prepared using grated carrot, khoya, sugar, ghee and nuts. This recipe is without milk and condensed milk. Please click the image below to know how to make carrot halwa easily using a pressure cooker.


Carrot halwa with khoya

BEETROOT HALWA USING PRESSURE COOKER


Beetroot halwa very similar to carrot halwa in cooking procedure . It is a healthy, yummy, quick halwa recipe. This recipe is without khoya/ mawa. Check how to prepare it.


Beetroot halwa

BADAM HALWA


Badam halwa / Almond halwa like sweet shop style. It is one of the popular halwa recipes in South India. This rich and costly halwa can be made easily at home too. check out the recipe link by clicking the image below.


Badam halwa

CORN FLOUR HALWA/ KARACHI HALWA


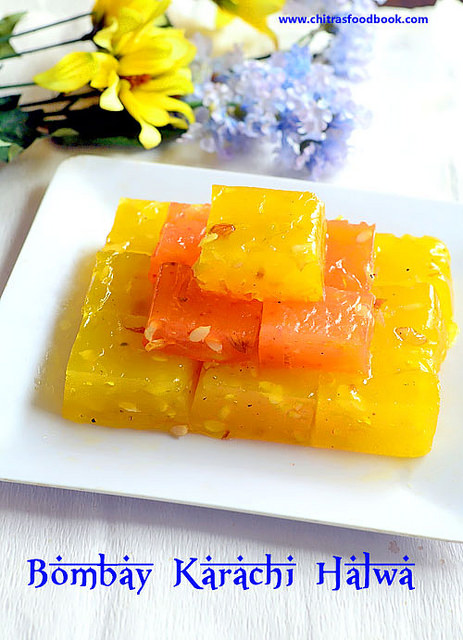
Bombay Karachi halwa, the most popular halwa recipe in North India. But its a very simple recipe prepared using corn flour, sugar and ghee. According to me this halwa is a beginners recipe. Anyone can make it easily and perfectly by following the steps. Do check it out.


Corn flour halwa

TIRUNELVELI HALWA USING WHEAT FLOUR


This is a simplified version of Tirunelveli halwa using wheat flour. It tastes close to original Tirunelveli halwa. Do give a try.


Tirunelveli halwa with wheat flour

MOONG DAL HALWA / MOONG DAL SHEERA


This is a popular North Indian style sheera recipe. It tastes so good. I have shared an interesting method to reduce the cooking time of this halwa. Do check out the recipe.


Moong dal halwa

SOOJI HALWA / SUJI KA SHEERA


Suji halwa is a very simple and quick halwa recipe prepared for most of the festivals. This halwa is served along with Poori, Chole for breakfast. Halwa puri chole is one of the most popular breakfast combo in North India and Pakistan.


Sooji halwa

MILK HALWA / DOODH HALWA/ PAAL HALWA


Milk halwa / Paal halwa in Tamil / Doodh is the first sweet which got me a good name from my relatives. This halwa is very easy to make and tastes very rich. It is different from milk kesari in ratio, method of preparation as well as taste. It tastes similar to paal khova.


Milk halwa


KASI HALWA/ ASH GOURD HALWA


Kasi Halwa (Vellai Poosanikai Halwa in Tamil,Ash Gourd Halwa /Winter Melon Halwa in English, Boodida Gummaikaya Halwa in Telugu, Kumbalanga Halwa in Malayalam, Kushmandha halwa, காசி அல்வா /  பூசணிக்காய் அல்வா / Kalyana Poosani Halwa ) is one of the most popular sweet recipes which is served in Brahmin weddings.


Kasi halwa

ASHOKA HALWA / PASI PARUPPU HALWA


Ashoka halwa is one of the most popular South Indian sweet which is popular in Thiruvaiyaru. Thiruvaiyaru Asoka halwa (Pasi paruppu halwa) made with yellow moong dal, sugar and ghee. This paasi paruppu halwa is completely different from North Indian moong dal halwa.


Ashoka halwa

CARROT HALWA WITHOUT KHOYA USING PRESSURE COOKER


Carrot halwa | Gajar ka halwa is the easiest and delicious sweet recipe that can be made in jiffy.The best thing about this sweet is it takes very less ghee unlike other halwa recipes. It tastes the best when served warm with ice cream.


Carrot halwa in pressure cooker

ATTA HALWA / KADAH PRASAD


Atta halwa also known as Atta ka sheera is one of the most popular sweet/ dessert recipe in North India. This is an Instant halwa made with whole wheat flour( atta in Hindi). This atte ka halwa is served as Kadah prasad ( Karah prashad) to all the visitors of Gurudwara ( A place of worship for Sikhs ) in Punjab.


Atta halwa

CHEWY CORN FLOUR HALWA


This chewy Bombay Karachi Halwa also known as Jelly halwa  is prepared using the same ingredients of corn flour halwa but slightly different in procedure. The basic difference between soft halwa and chewy halwa (rubbery halwa) lies in the cooking time. Do click the image to see the recipe with video.


Bombay Karachi halwa

MAIDA HALWA


This is yet again a beginners recipe. It never goes wrong. You can make it soft or chewy as per your taste by changing the cooking time.


Maida halwa

BREAD HALWA RECIPE


One of the best ways to use the leftover bread slices. It can be prepared so quickly with just milk, sugar and ghee.


Bread halwa

MICROWAVE SOOJI HALWA


Sooji halwa / Rava kesari in Tamil can be easily prepared in a microwave oven too. Check it out.


Microwave sooji halwa

TIRUNELVELI HALWA


If you are looking forward to try authentic Tirunelveli halwa recipe with whole wheat (samba godhumai), here is the link for you.


Tirunelveli halwa

CARROT HALWA WITHOUT KHOYA IN KADAI


Traditionally carrot halwa is prepared in a wide kadai by boiling the carrots in milk. I have shared the same here without using khoya or condensed milk.


Traditional Carrot halwa
Continue Reading...


October 26, 2018

Shakkarpara Recipe With Wheat Flour–Wheat Flour Shankarpali Recipe

shakkarpara recipe with wheat flour
Shakkarpara/ Shankarpali is a most popular North Indian style deep fried snacks recipe prepared during Diwali and Holi festivals. It is popular in Gujarat and Maharashtra. It tastes mildly sweet and is served as a teatime snack. In South India, it is known as sweet maida biscuit. It is usually added in South Indian mixture. I have already shared that recipe HERE. Traditionally shakkarpara is prepared using maida, sugar, ghee and milk or water.

 Today I have shared shankarpali recipe using wheat flour/ atta. I watched few YouTube video recipes and came up with this version. As I wished,  it came out really well. It was super crunchy and mildly sweet in taste. Sendhil and Raksha loved it very much. They started munching even before it cooled down completely. I was very happy that my first recipe for Diwali and it was a big hit with my family.

 There was no big difference in the ingredients and taste of maida Shakkarpara and wheat flour Shakkarpara. Only thing is the color of wheat flour shankarpali is darker than maida ones. People who are looking for snacks and sweets using wheat flour must give this a try. You will love it for sure. For healthier options, you can also use jaggery instead of sugar and bake them instead of frying in oil. Ok, lets see how to make Shakkar para with wheat flour.

Check out my sweet maida biscuits and spicy diamond cuts too.

 
Shankarpali with wheat flour

Shakkarpara Recipe Using wheat flour - Wheat flour shankarpali


Shakkarpara Recipe Using wheat flour - Wheat flour shankarpali

Shakkarpara Recipe Using wheat flour - Wheat flour shankarpali


Cuisine: North Indian
Category: Sweet
Serves: 1 cup
Prep time: 10 Minutes
Cook time: 20 Minutes
Total time: 30 Minutes


INGREDIENTS

1 cup = 250 ml
  • Wheat flour / Atta - 1 cup
  • Semolina / Sooji / Rava - 1 tbsp ( fine or coarse)
  • Melted ghee - 2 tbsp
  • Sugar - 1/4 cup
  • Water - 1/4 cup (adjust upto 1/3 cup)
  • Cardamom powder - 1/2 tsp
  • Cooking oil - to deep fry

HOW TO MAKE SHAKKARPARA WITH WHEAT FLOUR

  1. To make Shakkarpara, heat sugar and water in a kadai.
  2. After the sugar is melted, switch off the flame.
  3. Add ghee, cardamom powder and set aside to cool.
  4. Add wheat flour, sooji, a pinch of salt and make a non-sticky dough.
  5. Roll to a thick chapathi and cut into squares.
  6. Heat oil to deep fry. Drop a batch of Shakkarpara and deep fry till golden in medium flame.
  7. After the bubbles cease, remove the Shakkarpara and cool down to become crunchy.
  8. Store in a box and enjoy for a week.

SHAKKARPARA WITH WHEAT FLOUR - STEP BY STEP PICTURES

  • In a kadai, take sugar and add water, ghee. Heat and melt the sugar. No need to bring any consistency. Switch off the flame. Add cardamom powder. Mix well.
  • Shakkarpara with wheat flour
  • Let the sugar water cool down completely. Add wheat flour, semolina / sooji, a pinch of salt and mix well.
  • Shakkarpara with wheat flour
  • Knead to a smooth, non sticky dough. Roll into thick 1 inch chapathi and trim the cracked edges. Cut into small squares using a knife or a pizza cutter.

  • Finish the entire dough by making shapes. Collect them in a bowl.
  • Shakkarpara with wheat flour
  • Heat oil to deep fry. Drop a pinch of dough. If it rises to the top immediately, oil temperature is correct.  Fry the Shakkarpara in batches in low to medium flame till bubbles cease completely. As soon as you put the shakkarpara in oil, do not disturb it for a minute. It will break it you touch it now. Let it cook in low flame. Then flip and toss it gently. Toss it whenever needed for uniform color.
  • Shakkarpara with wheat flour
  • Color of wheat flour shankarpali would be darker than maida ones. So do not panic. Try to cook in low flame patiently by tossing it regularly. It helps to get nice golden color as shown in the pictures. But remember to remove them only after the bubbles cease. Remove them in a tissue paper. It tastes soft when hot. But it becomes crunchy once it cools down completely.
  • Deep fry all the Shakkarpara in batches. Cool down and store in a box. It stays good for one week to 10 days. Enjoy !

Note

  • You can add sugar and water up to 1/3 cup based on the quality of wheat flour because some flour takes more water while kneading the dough.
  • Deep fry shakkarpara only in low to medium flame else the outer layer darkens soon without cooking inside. So the next day it will become soggy and soft.
  • Similarly deep fry all the batches properly. Even if one batch is not fried well, it will spoil the entire sweet. So please fry them patiently.

Try this yummy shakkarpara with wheat flour, you will love it !
wheat flour shakkarpara


Continue Reading...