Search Chitra's Food Book

Showing posts with label DINNER RECIPES. Show all posts

January 20, 2015

Kulcha Recipe , Plain Butter Kulcha Recipe Without Yeast

Plain kulcha recipe

I have tried kulcha without yeast at home only once when I prepared Punjabi lunch menu and that too it was stuffed Amritsari aloo kulcha, not the plain one. I have forgotten the taste of all the other recipes I tried for that Punjabi platter but I still remember the softness of the kulcha. At that time I had followed the recipe from “The Hindu-Food Safari” Section which was an excellent, fool proof, easy kulcha recipe without yeast. So I made this butter kulcha following the same recipe for our Sunday breakfast. Kulchas are meant to be too thick & round but I made it thin as per my family’s likings. It came out really awesome. I couldn’t believe when Raksha had 3 kulchas and asked for more !!. Not just Raksha, even Sendhil & myself loved its softness very much, though we felt bad about the maida used in it. Sendhil was asking me the difference between Naan & kulcha. So I browsed & found some points which I have shared them below. He told me to try the same recipe with wheat flour too. I must give it a try. I made Restaurant style dal fry as side dish for Kulcha. It was a lovely combo. Friends do try this plain kulcha recipe without yeast. I am sure u won’t regret it. Just grease the kulchas with butter or ghee & relish it with the most popular side dish Punjabi Chole or paneer butter masalaIt will taste heaven I say !
Here is difference between kulcha & naan for your reference

Naan Vs Kulcha - What is the difference between naan and kulcha ?
  1. Naan and Kulcha are flatbreads that have Indian origin. While Naan is the more celebrated type of bread, Kulcha is a typical Punjabi bread that has old Punjabi traditions.
  2. Naan is made in oven or earthen ware made of clay using charcoal to provide heat to cook the bread whereas Kulcha can be made on stove top too.
  3. Naan is made with yeast and sometimes with milk and yogurt to make it soft and also to give it a bounce. But Kulchas are made using baking powder, baking soda, milk & yogurt to give softness.
  4. Although Kulcha is similar to naan in looks and flavor, it is typically thicker and fluffier than naan.
  5. Naans are usually oblong in shape while Kulchas are round.
Source : http://www.differencebetween.com/difference-between-naan-and-vs-kulcha/

Ok, Lets see how to make this soft kulcha recipe with stepwise pictures.
Continue Reading...


January 8, 2015

How To Make Soft Chapati / Super Soft Chapathi Recipe With Tips

Chapati

“How to make soft chapati??” was my biggest worry when I was a beginner in cooking. I was not aware of the secrets, tips and tricks for making hotel style soft chapati when I was new to cooking. Not just me, making a super soft chapathi that stays soft for long time would be the dream for many. When I was a beginner I used to make hard, chewy chapati and sometimes like roasted papad too.  As we were newly married, Sendhil couldn’t scold me instead he used to make fun of my chapathi. Once my MIL told this method, ingredients and suggested me to give a try. When I tried it for the first time, I couldn’t believe the results. It came out super soft. I felt very happy and excited to see my chapathi soft like a kerchief. More than me, Sendhil was feeling much more relieved 😃. Thanks a ton to my MIL for teaching me this wonderful recipe. 

After making this chapathi successfully, I attempted phulka/roti without oil and now I can confidently make phulka/roti and chapathi anytime. Soon I will share my phulka recipe too. Before going to this recipe let me tell you, this is not chapathi without oil. It is not North Indian phulka or roti. I hope you know the difference between roti and chapati.You would have come across different types of soft chapati recipes using milk, hot water, ghee etc. This is one such kind. 

Many of you must have tasted this kind of chapati in Tamil nadu hotels. Here I have used oil & curd to bring the softness. So fat is used in this recipe. Please do not attempt this recipe if you are calorie conscious or if you are in diet. This recipe is purely for beginners & bachelors who craves for making soft chapathi. You can dare to try this recipe for your lunch box and to your guests as well. It stays soft for long time. 

If you follow this recipe, you do not have to worry about the wheat flour brand. It works for all the brand like Aashirvaad, Pillsburry, Any multi grain atta, Swad etc. You can even try with homemade wheat flour ground using ration wheat grains/ ration godhumai. I have also given some general tips to make soft chapathi dough. Hope this will help. Lets see how to make soft chapati with step by step pictures.

Soft chapathi recipe

Chapathi recipe

Soft Chapati recipe 


Soft chapati How to make soft chapathi at home with tips and step by step pictures !
Cuisine: Indian
Category: Dinner
Serves: 5 nos for 1 cup
Prep time: 35 Minutes
Cook time: 1 Minutes
Total time: 36 Minutes


INGREDIENTS

1 cup = 250 ml
  • Wheat flour/atta - 1 cup
  • Refined oil  OR Gingely oil (Nalla ennai) - 1 tbsp 
  • Curd - 1 tbsp ( Not too sour & thick, I use semi solid curd)
  • Water – 1/3 cup (+/- 1/2 tbsp)
  • Salt - 1/4 tsp
Oil or ghee - for brushing(optional)

HOW TO MAKE SOFT CHAPATI 

  1. Mix wheat flour/ atta, curd, oil and salt.
  2. Add water, knead for 5 minutes.
  3. Cover and rest the dough for 30 minutes.
  4. Make small balls, dust in flour, roll chapathi.
  5. Cook both sides brushing oil or ghee !

SOFT CHAPATHI - METHOD 

  • In a wide bowl or plate, measure the flour/atta & take it. Add curd, oil & salt to it. Mix it well so that curd & oil spreads well with atta/ wheat flour. Now sprinkle water in small quantity & try to make a soft,non-sticky dough. No problem if the dough sticks lightly to your hand. Knead the dough well at least for 5 minutes. If possible beat in a hard surface. Keep it covered for minimum 30 minutes.
Soft-chapati-1
Soft-chapati-2
  • After 30 minutes, dough would become very soft. Now make golf sized balls out of the dough & keep in the bowl. Take one ball, roll it without any cracks, pat it slightly & dust in the flour. Keep the remaining balls closed till use. Roll the ball into a uniform, thin circle. Dust it once in the middle only if necessary.
Soft-chapati-3Soft-chapati-4
  • Put the chapathi in a news paper or sheet & cover it well. Do not keep it one over the other. Roll the other chapathis & spread it. Heat a good conditioned non-stick pan & put the chapathi. Reduce the flame to medium. Keep rotating it. U will see some bubbles appear on the top of chapathi. Immediately flip the chapathi.
Soft-chapati-5
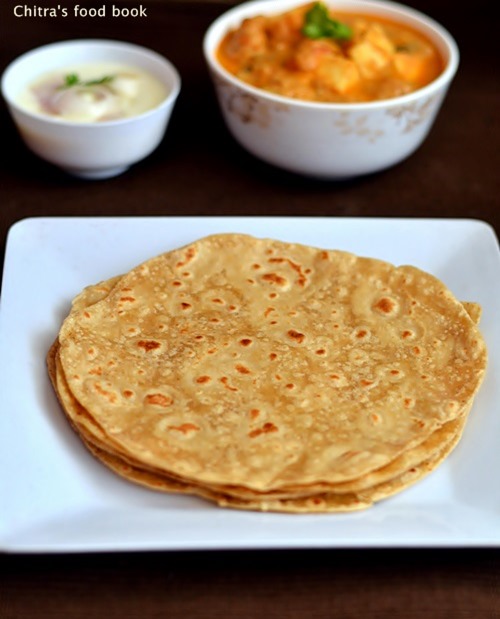
  • Cook the other side in low flame by pressing it using a ladle so that corners will cook well. Remove and brush with ghee or oil if needed. Serve hot with vegetable kurma.
Soft-chapati-6
  • If you want to store the chapathi, spread a towel inside a hot pack. Brush the cooked chapati with oil or ghee. Then stack the chapathis one above the other. Wrap it with a cloth napkin & store it.  It will stay soft for hours. If you want to pack the chapathis for lunch box, brush it with oil /ghee. Just fold the chapathi like a triangle and stack it. It will remain soft for long hours.


TIPS TO MAKE SOFT CHAPATI

These are some of the general tips and secrets to be followed to make a soft chapathi or phulka.
  1. The quantity of water may vary based on the atta/wheat flour brand you use. Aashirvaad takes little more water than Pillsbury. The water quantity I have given here is an approximate measure. It may vary for multi grain atta.
  2. Do not add all the water while kneading the dough. Sprinkle water only in small quantities. If you feel you have added excess water, you can add little flour to it but you should add few more drops of oil & knead it really well else chapathi will come out hard.
  3. Rolling the chapathi of uniform thickness is necessary for uniform puffing else chapathi won’t puff up in some places. Also never roll the chapathi very thin like a transparent sheet. They will roast like a papad.
  4. Do not over dust the chapathi in flour. Do it once or twice. If you dust more, chapathi may come out soft but it will look dry.
  5. Do not leave the chapathi dough or rolled chapathi in air for long time. It will become dry & gives you hard chapati. So keep it closed till use.
  6. Heat of the flame is very important while cooking chapathi. It should be low to medium. Never cook in high flame. It will become a papad. Flame should be high only for making phulkas and that too while showing in direct flame.
  7. Always brush the chapathi with oil or ghee if you keep for long time. No need to brush  if you consume immediately.


Try this recipe at home & enjoy soft chapathi for dinner or lunch with your favourite side dish. I served it with paneer kurma ! It was yummly !!
Soft chapati

Continue Reading...


November 27, 2014

Kuthiraivali Puli Upma Recipe|Barnyard Millet Recipes

Kuthiravali-upma

Barnyard millet/Kuthiraivali in Tamil, Oodalu in Kannada, Odalu in Telugu, Jhangora in Hindi and Kavadapullu in Malayalam is a healthy millet which has 6 times high fiber content when compared with wheat. Its a gluten free millet with high calcium,phosporous & fiber. It is high in carbohydates & fat too. It helps to maintain the body temperature.It acts as a good anti oxidant too. This puli upma with kuthiravali is an easy and yummy breakfast and dinner recipe which can be made under 20 minutes. Its a flavorful one pot meal. Its a great time saving recipe for people who look for quick breakfast/dinner options.We usually make this puli upma with rice or broken rice/Noi arisi.

Last week I just tried it with kuthiraivali for a change following my Puli sundal recipe & it tasted yummy when drizzled with few tsp of gingely oil. The best side dish for this puli upma is finely chopped sambar onions/pearl onions. This is not only a tasty combo but also it helps to balance the heat of tamarind & keeps the body cool. 

Friends try this easy, tasty puli upma recipe with any millet. I am sure you are going to love it. You can also replace kuthiravali with varagu or samai. Cooking procedure & water quantity are the same. This upma can be done in electric rice cooker too. In that case, add 1/2 cup of water more than the mentioned quantity. Ok, Lets see how to make this tasty puli upma using healthy barnyard millet. It stays good for one day travel too. Check out my varieties of millet recipes here.

barnyard millet recipes

Kuthiraivali puli upma recipe


Kuthiravali puli upma recipe Kuthiraivali/Barnyard puli upma recipe
Cuisine: Indian
Category: Breakfast/Dinner
Serves: 3
Prep time: 10 Minutes
Cook time: 15 Minutes
Total time: 25 Minutes


INGREDIENTS

  • Kuthiravali/Barnyard millet - 1 cup
  • Toor dal - 2 tbsp
  • Water - 2.5 cups
  • Tamarind - Big gooseberry size
  • Turmeric powder - 1/4 tsp
  • Hing/Asfetida - 1/8 tsp
  • Curry leaves - few
  • Salt - as needed
To temper
  • Cooking oil or gingely oil - 2 tbsp
  • Mustard seeds - 1 tsp
  • Urad dal - 2 tsp
  • Red chillies - 4-6 nos
  • Curry leaves - few
  • Hing/Asafetida - 1/8 tsp
HOW TO MAKE KUTHIRAIVALI PULI UPMA - METHOD

  • Soak tamarind in warm water for 10 minutes and take the extract using 2.5 cups of water as mentioned above. Its not necessary to use all the 2.5 cups for taking tamarind extract. U can use 2 cups of water for extract and add the remaining 1/2 cup of water directly to the cooker.To this tamarind juice, add curry leaves, turmeric powder, salt and hing. Set aside.
  • In a kadai, heat a tsp of oil & roast the toor dal. Remove in a plate. In the same kadai, roast the millet/kuthiravali till it changes to white & puffy. Remove it in toor dal plate.
kuthiravali-puli-upma-recipe-1
  • Heat a pressure cooker base with oil and temper all the ingredients given above in the same order. Now add the tamarind extract taken using 2.5 cups of water. When the water comes to boil, simmer the flame and add the roasted dal & millet. Mix well without lumps.
barnyard millet recipes
  • Pressure cook in low flame for one whistle or 3-4 whistles if high flame. It takes 10-12 minutes. After the steam is released, open the lid and fluff it with a fork. It will look mushy when it is hot but it becomes grainy & separate as it cools down.
kuthiravali-puli-upma-recipe-2
  • Don’t forget to add a tsp of gingely oil while serving. Enjoy this upma with small onions as side dish.

Note

  • Roast the dal & millet carefully in medium flame. Make sure nothing gets burnt.
  • Adjust the quantity of chillies based on your spice level.
  • Add less water ( around 2.25 cups) if you want more fluffy upma.


Enjoy this healthy kuthiravali upma with small onions as side dish. Tastes yumeee !!
kuthiravali-puli-upma

Continue Reading...


November 20, 2014

VARAGU ARISI PONGAL RECIPE/KODO MILLET PONGAL-MILLET RECIPES

varagu arisi pongal recipe

Recently I started making upma & pongal varieties using millets. I tried Ven pongal using Varagu arisi( Kodo millet in English, Koden/Kodra in Hindi, Harka in Kannada, Arikelu in Telugu, Koovaragu in Malayalam- Source-Wikipedia) for the first time. It came out very well. 

As you all know Varagu rice/Kodo millet has amazing health benefits. It is basically a digestion friendly millet. It is rich in phytochemicals, Phytate that helps in reduction of cancer risks. It helps to reduce the body weight which is most needed for obese people. It helps to overcome irregular period problems in women. It helps to reduce knee & joint pains. It is good for diabetic people. It reduces nervous disorders especially in eyes. 

This varagu arisi pongal is a very easy and tummy filling breakfast recipe. Just 1/2 cup of varagu arisi is enough to serve 2-3 people because it doubles in quantity once its cooked. It tastes very similar to our regular rice pongal with full of flavors. My daughter Raksha loves pongal a lot. When I gave this for her breakfast today, she couldn’t identify its varagu rice pongal and not our usual one. We had with coconut chutney as side dish. It was yum. Do try this easy and healthy pongal recipe for your breakfast or dinner. I am sure your entire family would love it.

check out my other millet recipes here.

varagu arisi pongal

Varagu arisi pongal/Kodo millet pongal recipe


Varagu arisi pongal/Kodo millet pongal recipe Varagu arisi pongal recipe - Healthy millet recipe for breakfast !
Cuisine: Indian
Category: Breakfast
Serves: 3
Prep time: 5 Minutes
Cook time: 20 Minutes
Total time: 25 Minutes


INGREDIENTS

  • Varagu arisi/Kodo millet - 1/2 cup
  • Moong dal - 2 tbsp
  • Water - 2 to 2.5 cups
  • Salt - as needed
To temper
  • Ghee - 1 tbsp
  • Pepper corns - 1/4 tsp
  • Cumin seeds/jeera - 1/2 tsp
  • Hing/Asafetida - a small pinch
  • Ginger - 1/2 inch piece ( finely chopped)
  • Green chillies - 1 no ( small sized)
  • Curry leaves - few
HOW TO MAKE VARAGU PONGAL - METHOD

  • Wash the kodo millet ,drain and set aside. In a pressure cooker base, heat ghee and add the moong dal,pepper corns.Saute for a minute in low flame. Make sure the color of dal should not change. Then add the cumin seeds/jeera and saute till it turns light golden. Lastly add the curry leaves, green chillies & hing. Stir it. Add the measured water and required salt.
varagu-pongal-1
  • Add the washed & drained millet and ginger pieces. Close the cooker and cook for one whistle in low flame.It will take nearly 10-12 minutes.
varagu-pongal-2
  • Remove the lid and mix well. Add a tsp of ghee and serve hot !Tastes the best with coconut chutney !
Enjoy !


Note

  • Serve this pongal when its hot to enjoy its best taste. When it cools down, it will become slightly hard.You can reheat the pongal while serving by adding little water and mix well in high flame for few seconds.
  • You can follow the same method and make pongal with thinai & samai too. But the quantity of water may slighty vary.
  • Here I used 1: 5 ratio of millet and water. You can use 1:4 too.
  • Replace ghee with cooking oil if u are calorie conscious. But ghee gives  a great flavor.
  • Add a tsp of ghee while serving for kids.

Serve this healthy,easy varagu pongal with chutney and sambar. Tastes yummy !
Kodo millet recipes


Continue Reading...


November 12, 2014

KAMBU DOSAI-BAJRA DOSA /PEARL MILLET DOSA RECIPE

Kambu-dosai

Last week i shared instant millet dosa using mixed millets energy mix powder.Though i make it very often,i wanted to try a dosa recipe with kambu (in tamil)/Pearl millet ( in English)/Bajra(in Hindi) as i got tempted by seeing my fellow bloggers post.Recently my friend Shalini was telling me about kambu dosai which she has been making for her breakfast regularly.So I took this recipe from her and tried today for the first time.She told me to use brown rice and pearl millet but i used raw rice as i din’t have brown rice in stock.So feel free to use brown rice instead of raw rice in this recipe.You will get good results and its a healthier option too.I will try to post kambu adai and kambu koozh recipes soon.Lets see how to prepare this kambu dosai for breakfast/dinner.This dosa tastes the best when it is served hot.It becomes slightly chewy when its cooled down but overall its a very flavorful and healthy breakfast recipe.Check out my other millet recipes below.

Millet energy mix powder

Millet ladoo

Instant millet dosa recipe

Thinai idli,dosa recipe

Saamai sweet pongal/Little millet pongal recipe

Types of millets with health benefits,other names,where to buy etc.


A small update : I made this dosa for dinner with raw onion-garlic chutney as side dish.I felt this combo was awesome than coconut chutney.Even my daughter told the same.This chutney pairs very well for kambu dosa.Try this combo ! U will like it ;)


Kambu dosai

Kambu dosai/Pearl millet dosa


Kambu dosai/Pearl millet dosa Pearl millet dosa/Kambu dosai recipe - Healthy millet recipe for breakfast/dinner
Cuisine: Indian
Category: Millet recipe
Serves: 15 nos
Prep time: 3 Hours
Cook time: 2 Minutes
Total time: 3H2Min
INGREDIENTS


  • Kambu/Pearl millet - 1.5 cups
  • Raw rice or brown rice - 1/2 cup
  • Round Urad dal - 1/2 cup
  • Methi seeds - 1 tsp
  • Salt & water - as needed
  • Cooking oil – to drizzle ( while making dosa)

  • METHOD

  • Wash and soak the kambu,rice,urad dal and methi seeds together for 2-3 hours.In a big mixie jar,take half of the quantity of soaked grains and grind it adding ice cold water(It helps the mixie jar to prevent heating). Grind it to a smooth paste adding enough water and salt.(I used the soaked water itself).Transfer the batter to a vessel. Kambu-dosai-step1

  • Let the batter ferment over night or for 10-12 hours.The next day morning batter would have raise well.Mix it well and check the consistency.If it is too thick,add little water say 1/4 cup and mix well.Heat dosa pan and pour a ladleful of batter.Spread it well if u want to make thin,lacy dosas OR spread it little if u want thick soft dosas.Make it as per your wish.Drizzle a tsp of oil and cook for a minute.Cover it with a lid and cook the dosa if u want crispy ones.Do not flip the dosa.If u want thick dosas like utappam,flip the dosa and cook for a while.Remove and serve hot. Kambu-dosai-2


    Enjoy with your favourite chutney.I served it with coconut chutney and idli podi !


  • Note


  • Use enough water while grinding the batter.Batter has to ferment for 10 hours minimum in cold weather.If the climate is hot,this batter will ferment quickly and it will become sour.So keep an eye.
  • Use brown rice instead of raw rice.U can use idli rice too.
  • If u don’t want to use rice at all,just follow 2:1 ratio of kambu & urad dal and grind the batter as mentioned above.
  • This dosa becomes soft when its cooled down.So serve n eat hot !


  • Have this healthy millet dosa for your breakfast/dinner.I enjoyed it with coconut chutney,idli podi and had milk with Lion dates syrup.

    A small update : I made this dosa for dinner with raw onion-garlic chutney as side dish.I felt this combo was awesome than coconut chutney.Even my daughter told the same.This chutney pairs very well for kambu dosa.Try this combo ! U will like it ;)

    Kambu-dosai-recipe

    Continue Reading...


    October 28, 2014

    ADAI RECIPE-SOUTH INDIAN TIFFIN RECIPES


    adai recipe
    Adai is one of the most special & healthy breakfast/dinner recipes for South Indians especially for people in Tamil nadu & Kerala.Both mom & MIL usually make adai for dinner & especially for guests.Few years back i shared my mom’s crispy adai version.Today i have shared my MIL’s recipe here which she has been following for years.It comes out soft as well as crispy.Adai avial is the most famous combo everywhere.But i have not tasted it so far.We personally like adai with sugar & coconut chutney.Lets see how to make our family’s traditional adai recipe.
    adai

    Adai recipe


    Adai recipe Adai recipe - South indian breakfast recipe using rice & lentils
    Cuisine: Indian
    Category: Breakfast
    Serves: 15 nos
    Prep time: 2 Hours
    Cook time: 10 Minutes
    Total time: 2H10M


    INGREDIENTS

    • Boiled rice/Idli rice - 2 cups
    • Chana dal - 1/2 cup
    • Toor dal - 2 tbsp
    • Urad dal - 2 tbsp
    • Red chillies - 7-8 nos ( i used byadgi,if using spicy chillies add 5 nos)
    • Salt & water - as needed
    To add in the batter
    • Small onions - 20 nos
    • Curry leaves - 2 sprigs
    • Finely chopped ginger - 1 tsp
    • Finely chopped coconut bits - 1 tbsp ( optional)
    • Asafetida/Hing - 1/4 tsp
    METHOD

    • Wash and soak the rice for 2 hours.Wash & soak the dals together for 2 hours minimum.
    • While grinding,drain all the water.In a big mixie jar,take the red chillies,salt and hing.
    adai recipe 1
    • Grind it coarsely without adding water.Then add the drained rice and grind it like rava adding required water.Remove the batter.Add the drained dals and grind it coarsely adding less water.
    adai recipe 2
    • Remove and mix with rice batter.Add 1/4 tsp of hing.Mix well.Let the batter ferment for 3-4 hours as we want mild sourness.We usually soak rice n dal around 10 am & grind the batter at 12 pm.We make adai for dinner around 7 pm.So ferment the batter based on the weather in your place.U can also make this adai instantly without fermenting the batter if u don’t want sourness in the batter.

    adai recipe 3
    • Before making dosa,add finely chopped onions,ginger,coconut bits,curry leaves and mix well.Adjust the consistency of batter adding 1/4 cup of water if it is very thick.Heat dosa pan and pour a ladle ful of batter.Spread it & make it thick or thin as per your wish.I always make it thin as my family likes that way.After making dosa,keep the flame medium high and drizzle a tsp of oil over the adai.Close it with a lid & cook for a minute.Then flip the dosa,add little oil if necessary & cook for a minute again.
    adai recipe 4

    Remove the dosa and Enjoy with avial/sugar or coconut chutney !


    Note

    • For variations,u can add a tbsp of moong dal along with other dals.
    • To make crispy adai,grind the batter slightly coarse & make it thin adding little more water.
    • You can also add more toor dal to get crispier adai.


    adai-recipe-1

    Enjoy this healthy,yummy rice & lentil adai dosa with chutney & sugar.Sugar is my fav side dish for adai Winking smile
    adai-with-sugar


    Continue Reading...


    May 8, 2014

    INDIAN STYLE MASALA PASTA RECIPE (VEGETARIAN) | EASY PASTA RECIPES

    Masala pasta recipe - Indian style
    This is my first post on pasta recipes. I really wonder why din’t I try a pasta recipe so far. Actually I wanted to start with pasta with white sauce or red sauce but my friend Shalini suggested me to try our Indian style, easy pasta recipe with full of masala flavours.

    This recipe is very similar to Penne Arrabiata. As kids love pasta very much, I tried this recipe for Raksha’s breakfast. We too tasted some. It was very nice, flavourful and tasty. So my first attempt in making a pasta recipe was a great success. I felt very happy and I wanted to share this recipe with you all. U can make many variations in this recipe and prepare it more healthy & colorful by adding vegetables. Friends, if you are bored of making cheesy pasta recipes, try this low calorie, easy peasy pasta recipe with Indian masala. U will love it.
    Masala pasta recipe

    Indian style masala pasta recipe


    Indian style masala pasta recipe Easy,Indian style masala pasta recipe for breakfast/Dinner - Tastes great !
    Cuisine: Indian
    Category: Pasta recipes
    Serves:  3
    Prep time: 15 Minutes
    Cook time: 10 Minutes
    Total time: 25 Minutes


    INGREDIENTS
     
    To cook pasta
    • Penne pasta - 1 cup
    • Salt - as needed
    • Water - 5 cups
    • Cooking oil - few drops
    For the masala
    • To temper
    • Cooking oil+ghee - 1.5 tbsp +1 tsp
    • Mustard seeds - 1/2 tsp
    • Urad dal - 1 tsp
    • Chana dal - 1 tsp
    • Cumin seeds - 1/2 tsp
    • Big onion - 2 nos
    • Tomato - 2 nos or tomato puree - 1/3 cup
    • Curry leaves - few
    • Ginger-Garlic paste - 1/2 tsp
    • Red chilli powder or sambar powder - 1 tsp
    • Garam masala powder-1/2 tsp
    • Kasoori methi - 2 pinches
    • Coriander leaves - to garnish
    METHOD

    • How to cook pasta: Take 5 cups of water in a bowl. Add some salt and few drops of cooking oil. When the water comes to boil, add 1 cup of pasta. Mix well using a ladle to avoid pasta sticking to the bottom and cook for 10-12 minutes in medium flame. It should be soft but firm without losing its shape. Switch off the flame and transfer the pasta to a colander. Discard the excess water. Show the pasta under running water to make it firm. Set aside.
    How to cook pasta
    How to cook pasta
    • Heat oil+ghee in a kadai. Splutter mustard seeds. Add urad dal, chana dal. Now add big onions and saute till transparent. Add g&g paste and saute for few seconds till its raw smell emanates.
    Masala pasta recipe step3
    • Then add tomatoes or tomato puree. Saute till mushy. Add all the powders and mix well for few minutes. Add 2 pinches of kasuri methi and let mixture boil for a minute in low flame.
    Masala pasta recipe step4
    • Lastly add the cooked pasta, toss well and switch off the flame. Garnish with fresh coriander leaves, sprinkle some lemon juice if needed and serve hot.
    Masala pasta recipe step5
    Indian style masala pasta is ready !

    Note

    • For variations, add sambar powder in place of red chilli powder.
    • You can use tomato puree instead of chopped tomato.
    • Use pav bhaji masala powder or biryani masala powder in place of garam masala powder. But adjust the spice level as per your taste.
    • U can also add few mint leaves while sauting onions. It gives a nice flavor.


      Masala pasta and Horlicks – My daughter Raksha’s breakfast. 

    Masala penne pasta recipe
    Continue Reading...