In this post, lets see how to make soft idli and crispy dosa batter using idli rava in mixie with step by step pictures and video. I must thank my neigbour for introducing idli rava to me. I din't know that there is something called idli rava until she told me. She used to tell me to try idli, dosa using idli rava but I was hesitant because
idli is our staple food. I dint want to take risk using idli rava. Then she gave me some to taste and after that I started making it in my kitchen. Now I am very much comfortable with this idli rava idli. Not only soft idli, we can make crispy dosas too. U could have tasted this type of idli in Karnataka hotels/ restaurant. But in this method, idli wont be crumbly or coarse like in hotel.
First thing I liked in this method is very less soaking time , just 45 mins is sufficient. It takes the soaking time of urad dal. Total process (soaking + grinding) takes 1 hour. But it needs 8 - 15 hrs of fermentation time depending on the weather in your place. I grind the batter in the afternoon ( around 2 pm) & make idlies the next day morning (7 am).The batter will be fermented well.Second good thing is I grind the batter in mixie ( NO grinder cleaning). I have shared a Full video recipe on how to make these idlis. Please have a look.
People usually don’t grind this idli rava and they add it as it is(after soaking) to the ground urad dal batter. I too tried the same way initially but i felt the idli was very crumbly like rava idli and we dint like that taste. I wanted to bring the same taste as of our normal idli. So I grind the idli rava along with urad dal batter at the end till it becomes slightly coarse. Even then I felt the idli was slightly sticky while eating. I changed the ratio of dal & idli rava, I soaked it together and grind in mixie adding ice cold water. Now Iam getting the best idli out of it. I am very happy with the result.
Earlier my husband used to scold me whenever I prepare idli with idli rava. Nowadays he couldn’t find any difference in the texture and he is eating silently. There is no much difference in the cost of idli rava & idly rice. Friends, try this idli for a change and you’ll start making it often like me.. Lets see how to make soft idli and crispy dosa using Idli Rava.
Idli using Idli Rava - Video Recipe !

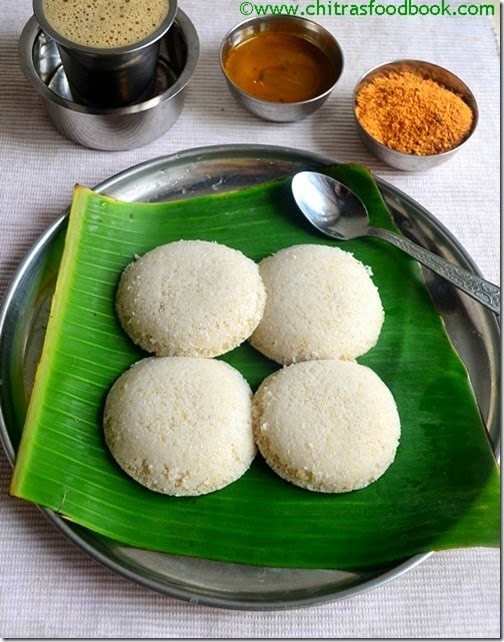
Idli using Idli Rava
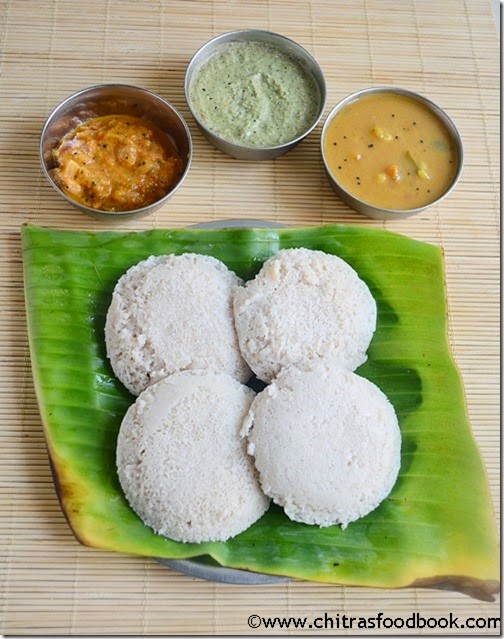
 How to make Idli using Idli rava easily at home. Not just soft idli, you can make crispy dosa too.
Cuisine: Indian
Category: Breakfast recipes
Serves: -
Prep time: 15Min+8Hrs
Cook time: 10 Minutes
Total time: 8hrs25Min
INGREDIENTS
1 cup - 250ml
- Idli rava – 2 cups
- White round urad dal – 1/2 cup ( If you follow the video recipe, please use 1/3 cup)
- Water – 1-1.25 cups ( Use Ice cold water)
- Salt – As needed
|
METHOD
- Wash and soak the Idli rava and urad dal together in a bowl for 45 minutes. Drain the soaked water completely before grinding. ( In the video I have mentioned to soak them & grind separately. Add 1/3 cup of urad dal in that case. This method needs less urad dal. )
- Grind half of its amount in mixie adding 1/2 cup of ice cold water & the required salt for 3-5 minutes.After 2 mins , open the lid , wipe the sides & grind again. Add little more water if its necessary.

- Again grind the remaining mixture adding 1/2 cup of water. ( Note : Batter will be slightly coarse even if you grind for long time , no need to worry) Mix both the batter using your hand. (Mixing by hand helps for fermentation). Keep the bowl closed & allow the batter to ferment for 8- 15 hrs based on the weather in your place.
- The next morning, batter would have raised well . Mix it well before making idlies. Pour the batter in idli plate , steam it for 6-8 mins & enjoy with ur favourite chutney !!

Enjoy !
|
Note
- The maximum amount of water it consumes while grinding is 1.25 –1.5 cups. Adjust as per your mixer. I used ice cold water to avoid the mixer getting heated. Plain water can also be used.
- Fermentation is very important to get soft, non-sticky idlies.
- People suggest idli rava & dal ratio as 3:1. But 4:1 is enough for soft idlies.
- If you want, you can add a tsp of soaked fenugreek seeds too to make it healthy.
- U can also make crispy dosa using the same batter.
|
Enjoy this easy Idli recipe for your breakfast !
Here is a picture of Crispy dosa made using the same batter.
Technorati Tags:
IDLI RAVA IDLI,
IDLI RAVA RECIPES,
IDLI USING IDLI RAVA,
SOFT IDLIES,
SOFT IDLI RECIPE,
IDLI RAVA DOSA,
IDLI RAVA DOSA RECIPE,
IDLI RAVA,
IDLI RAVA IDLI RECIPE,
HOW TO MAKE IDLI USING IDLI RAVA,
HOW TO MAKE SOFT IDLI,
BREAKFAST RECIPES,
idli rava,
idli rava picture


 . If yu have left over idli batter at home , you can try this recipe.This recipe is a nice replacement for kaima idli and chilli idli..If you r a pepper lover,do try this .. U’ll love its flavour for sure
  .. Even if you can’t make button idli, you can use the left over idli by cutting them into bite sized cubes and try the same. Recently my MIL told me after reading a magazine that eating 10 pepper corns per day helps better digestion , prevents stroke and heart attack.. So friends lets try to eat the whole pepper corns in ven pongal and include more pepper powder in our cooking