Search Chitra's Food Book

Showing posts with label LUNCH BOX IDEAS. Show all posts

January 11, 2015

Averakalu Methi Pulao Recipe - Avarekalu Bath - Avarekalu Recipes

avarekalu pulao recipe

Today I have shared a simple Karnataka special avarekalu rice bath / avarekalu pulao with methi leaves (menthya soppu). Its Avarekalu (Hyacinth beans / Flat beans / Indian liva beans in English, Surti papdi in Hindi, Chikudukaya/Anapakayalu in Telugu and avarekai/Mochakottai in Tamil) season in Bangalore. Here people buy them in Kgs and make avarekalu pulao / rice bath, avarekalu saaru/sambar, uppittu/upma, avarekalu sagu etc with it. You can find avarekalu recipes in all the houses, hotels and even in marriage feast in this season. I too learnt few yummy recipes with avarekalu from my School moms friends

Yesterday we had a small get together at Tara’s house to celebrate this new year and we all prepared a quick and yummy lunch menu. I made eggless chocolate cake. Megha made this avarekalu-methi pulao also known as avarekalu bath and Tara made Karnataka’s one of the most popular masoppu saaru recipe along with white rice, onion raita and gram flour bonda. It was a simple yet very filling, delicious and healthy lunch menu. I learnt this pulao from Megha and clicked the stepwise pictures too for my reference. 

Today I made it in my house for our lunch and for the sake of my Sunday special lunch recipe series too. So here you go my second recipe in this series, Avarekalu Methi Pulao. Its a very yummy, flavourful one pot meal which can be made under 15 minutes. You can prepare this pulao easily for your lunch box during busy morning hours easily in a pressure cooker if you have avarekalu ready in hand. 

For variations, you can skip methi leaves and make it with avarekalu alone. Very less chopping works and moreover this recipe would be apt for avarekalu sesaon. I used sona masoori raw rice instead of basmati rice as I felt this recipe tasted yummy with raw rice. Finally the choice of rice is yours ! Do try this easy and yummy avarekalu methi pulao recipe with simple onion raita as side dish for your Sunday lunch menu, enjoy and spend time with your family.

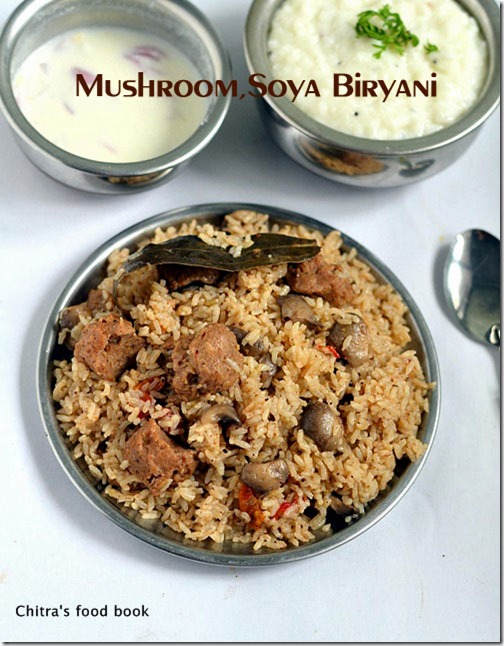
Check out my first post in this series : Dindigul Thalappakatti Biryani using Msuhroom & Soya chunks

avarekalu-pulao-recipe

Avarekalu-Methi Pulao Recipe


Avarekalu-Methi Pulao Recipe 
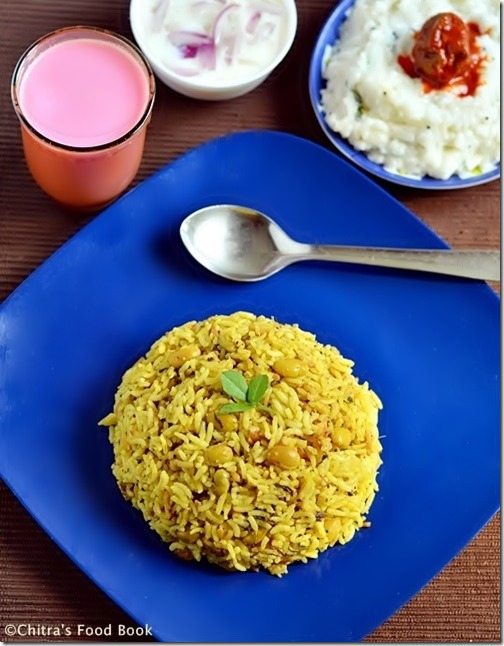
Avarekalu methi pulao recipe / avarekalu bath recipe - Easy rice recipe to prepare in weekend & lunch box !
Cuisine: Indian
Category: Lunch
Serves: Serves 3
Prep time: 10 Minutes
Cook time: 15 Minutes
Total time: 25 Minutes


INGREDIENTS 
1 cup= 250ml

  • Avarekalu/Flat beans/Mochakottai - 1/2 cup
  • Methi leaves/Fenugreek leaves - 1/4 cup 
  • Good quality sona masoori raw rice - 1 cup ( soak for 15 minutes)
  • Cooking oil + Ghee - 2 tbsp + 1 tsp
  • Bay leaf - 1 no
  • Big onion - 1 no
  • Water - 2 cups  
  • Salt - as needed
To grind
  • Grated coconut - 2 tbsp
  • Green chillies – 3-4 nos (medium)
  • Cinnamon - 2 inch stick
  • Cloves - 3 nos
  • Cardamom - 2 nos
  • Big onion - 1/2 no
  • Coriander leaves - 3 sprigs
  • Turmeric powder - 1/8 tsp
  • Ginger – A small finger size
  • Garlic cloves - 5 nos
HOW TO MAKE AVAREKALU PULAO - METHOD

  • Wash and chop methi leaves. Keep avarekalu ready. For avarekalu, you don’t need to remove the skin. Just wash and keep aside. Wash and Soak rice in water for 15 minutes.
Avarekalu-pulao-1
  • Grind all the ingredients given under “to grind” to a smooth paste adding water. Set aside.
Avarekalu-pulao-2
  • In a pressure cooker base, heat oil+ghee. Add the bay leaf, saute for a while. Now add the chopped onions and saute till transparent. Add methi leaves & avarekalu.
Avarekalu-pulao-3
  • Mix well for a minute and add the ground masala paste. Saute till its raw smell goes off. Now add the soaked rice with the required water and salt. Cook in low flame for one whistle. Remove and serve hot with raita !
Avarekalu-pulao-4

    Enjoy !


Note

  • For variations, you can use only methi leaves & make this pulao.
  • You can replace methi leaves with mint leaves along with avarekalu. But use mint leaves in very small quantity.
  • Adding more oil+ ghee makes this rice taste yummy. So use accordingly.
  • Use less coconut and onions for grinding else coconut make the rice look dry.
  • U should use more spices to get a nice aroma. So I used 3 cloves, 2 cardamom and 1 big stick cinnamon.
  • My friend used 1.75 cups of water for fluffy rice. 


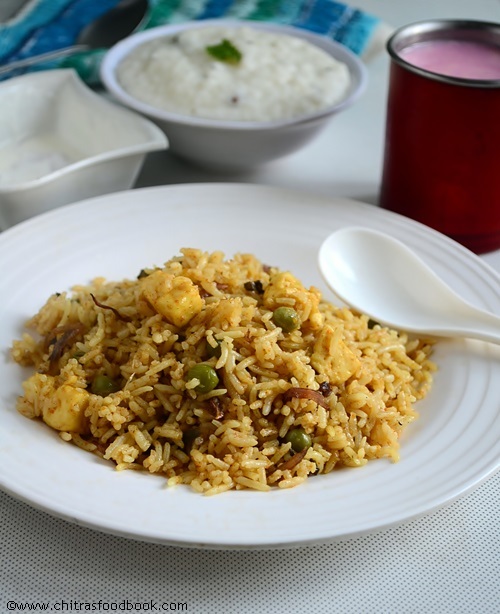
Enjoy this yummy averakalu pulao recipe with simple onion raita & curd rice !

Avarekalu bath recipe

Continue Reading...


January 4, 2015

Dindigul Thalappakatti Veg Biryani-Mushroom,Soya Chunks Biryani Recipe--Sunday Lunch Recipes -1

Dindigul-thalapakatti-biryani

In this New year, with all your support and blessings, I have planned to start biryani series from this week. I guess most of you make ( Both vegetarian & Non-vegetarian) make biryani in weekend especially on Sunday. Even I too make biryani mostly on Sundays, make myself free and enjoy my time with my family. To me, Biryani is an easy to make yet very rich & delicious one pot meal that make everyone drool over its smell & color. I love to try varieties of biryani recipes by watching TV shows, by referring blogs or cookbooks. I thought of blogging the same here as it might be useful to vegetarians who look for varieties of biriyani recipes. So every Sunday, you can expect some yummy biryani & pulao recipes in my blog. Actually I wanted to start this series with “How to cook Basmati rice” post. But I still have some work pending to bring that post here. As I am in Salem, I couldn’t do it. So I thought of starting this series with this most popular Dindigul thalappakatti biryani recipe in which I used jeera rice. Generally vegetarians have less options for biryani varieties. So I used to refer non-veg biryani recipe too & try it  by replacing chicken or mutton with vegetables like mushroom, Gobi/cauliflower and soya chunks. You can find one such example here.  Even today I have shared Dindigul thalapakatti biryani which is the most popular mutton biryani of Dindigul district. For this recipe, I referred so many sites and read readers comments to get some idea about its color, the rice used in it etc. Finally I landed upon here & tried this biryani by making small changes in the actual recipe to achieve its brown color. I used mushroom & soya chunks/meal maker in place of mutton ;). The taste was awesome. It came out super flavourful with minimum masala. Raksha & Sendhil loved it a lot. Raksha told me to make the same biryani next day too for her lunch box . So I made a minimum quantity for her using rice cooker. Now I can confidently try this biryani for my guests too. I served this biryani with simple onion raita as a side dish. I made fruit custard for dessert & curd rice as well. So last week we had this biryani, raita, fruit custard and curd rice for our lunch. It was simple yet divine ! I have updated this recipe with a full video. Do watch it !

I will try my level best to collect the best biryani recipes, try them in my kitchen and share it here.Wish me Good Luck. Leave your feedback or share the picture if you try any biryani recipes from this series. It will motivate me to try n post more. Check out my other biryani & pulao recipes that are popular in my blog.

I have updated this recipe with a video. Please check it !


Continue Reading...


December 2, 2014

Brinjal Masala Kuzhambu/Kathirikai Kuzhambu Recipe

Brinjal masala kuzhambu recipe
I learnt this brinjal masala gravy recipe from my friend Megha. Its a kurma kind of gravy that goes well with rice, idli, dosa and even chapathi too. Here in Bangalore, people make a brinjal gravy named as “Ennegaayi gojju” as a side dish for akki roti. This gravy tastes similar to that but not exactly. I will share authentic ennegaayi recipe soon.

I tasted this gravy once in Megha’s house and liked it a lot. I got the recipe from her immediately and wrote in my cook book. I have made this many times in my kitchen but somehow I couldn’t blog it. Today I made this brinjal gravy along with tindora curry(yet to post) for Sendhil’s lunch box and thought of sharing here. 

Basically I am a big fan of brinjal recipes. I keep trying one or the other new recipes using brinjal. When I made this gravy, I became very happy that I got yet another easy, interesting brinjal gravy recipe just like my Ennai kathirikai kuzhambu and brinjal kara kuzhambu recipes. Brinjal lovers, do try this gravy. Its very simple to make and yummy too ! The best part is this brinjal gravy can be made directly in a pressure cooker. Do try this brinjal masala gravy for rice and enjoy !

Brinjal masala kuzhambu

Brinjal masala kuzhambu


Brinjal masala kuzhambu Brinjal masala kuzhambu recipe - A kurma kind of gravy for rice,idli n dosa !
Cuisine: Indian
Category: Gravies
Serves: Serves 2
Prep time: 10 Minutes
Cook time: 15 Minutes
Total time: 25 Minutes


INGREDIENTS

  • Brinjal - 6 nos
  • Tomato - 1 no
  • Big onion - 1 no(finely chopped)
  • Salt & water - as needed
To grind
  • Grated coconut - 3 tbsp
  • Big onion - 1 no
  • Ginger & garlic paste – 1 tsp ( heaped) 
  • Cinnamon - 1 small piece
  • Cloves - 2 nos
  • Coriander leaves - a fistful( 2 tbsp,chopped)
  • Red chilli powder - 1 tsp ( add 1.5 tsp for spicy gravy)
  • Dhania powder - 3/4 tsp
  • Turmeric powder - 1/8 tsp
To temper
  • Cooking oil - 1.5 tbsp
  • Mustard seeds - 1/2 tsp
  • Urad dal - 1/2 tsp
  • Curry leaves – few
Coriander leaves – little ( to garnish)
HOW TO MAKE BRINJAL MASALA KUZHAMBU - METHOD

  • Wash and slit the brinjals into 4. Keep it immersed in water till use.
  • Grind all the items given under “ to grind” to a smooth paste.
Brinjal masala kuzhambu 1

  • In a pressure cooker base, heat oil and splutter mustard seeds,urad dal and cumin seeds. Saute finely chopped big onions till transparent. Add curry leaves and then add the slitted brinjals. Saute till the skin of brinjal shrinks lightly. Now add the ground masala paste and saute till raw smell vanishes.
Brinjal masala kuzhambu 2
  • Then add a roughly chopped tomato and saute till slightly mushy. Lastly add water and pressure cook in low flame for one whistle. Remove the lid after the steam is released completely. Mix well.Garnish with finely chopped coriander leaves and serve with plain rice adding ghee.
Brinjal masala kuzhambu 3

    Enjoy !
Note

  • You can replace brinjal with avarekalu/mochakottai/hyacinth beans.
  • This gravy tastes the best when mixed with plain rice adding ghee. Ghee is a must here.
  • You can also have this as a side dish for idli, dosa
  • Here I have not used tamarind.If u want u can replace tomato with a small gooseberry size of tamarind.
  • Garnish with coriander leaves for more flavor.

Enjoy this masala gravy mixing with plain rice and ghee.

brinjal gravy

Continue Reading...


August 21, 2014

PANEER SANDWICH RECIPE-KIDS LUNCH BOX RECIPES


paneer-sandwich-recipe-for-kids

I tried paneer sandwich recipe for the first time using homemade paneer for our breakfast .I referred few websites and came up with my own combination.We all liked it very much.More than us,Raksha enjoyed it a lot.The combination of paneer masala,green chutney and tomato sauce with bread was yummy.Its a simple yet filling breakfast recipe for kids as well as adults.It can be packed for lunch box too.I made few colourful open sandwich to serve my daughter.It was more appealing Happy.

Paneer-sandwich

Paneer sandwich recipe


Paneer sandwich recipe Easy & colorful paneer sandwich recipe for kids breakfast and lunch box
Cuisine: Indian
Category: Breakfast
Serves: Serves 2
Prep time: 10 Minutes
Cook time: 10 Minutes
Total time: 20 Minutes


INGREDIENTS
For paneer masala
  • Homemade paneer cubes - 20 nos
  • Big onion - 1/2tsp
  • Ginger garlic paste – 1/2 tsp
  • Red chilli powder – 1/2 - 1 tsp
  • Garam masala powder – 1/2 tsp
  • Salt & water - as needed
  • Turmeric powder - 1/8 tsp
  • Kasoori methi - a big pinch
  • Coriander leaves - to garnish
For green chutney
  • Mint leaves or coriander levaes - A handful
  • Green chillies - 2 nsos
  • Garlic - 2 cloves
  • Lemon juice - few drops
  • Cashew nuts - 5 nos
  • Salt & water - as needed
For Sandwich
  • Bread slices - 10 nos
  • Tomato sauce - as needed
  • Butter/ghee or oil - to toast
METHOD

  • Crumble paneer cubes into small pieces.Set aside.Grind green chutney with the ingredients given above and keep aside.
Paneer sandwich recipe 1
  • In a pan,heat oil and splutter cumin seeds.Saute onions.G&G paste.Mix well till raw smell leaves off.Now add the crumbled paneer,red chilli powder,turmeric powder & Garam masala powder.Add the required salt and mix well.Saute till u get a nice smell.Lastly add kasoori methi,give a toss and switch off the flame.Garnish with coriander leaves.
Paneer sandwich recipe 2
  • Now take one bread slice and apply green chutney on one side.Toast the other side for few seconds adding butter or ghee.Remove in a plate.Take another slice of bread and apply tomato sauce on it.Toast the other side with ghee or butter or oil.Now spread the paneer masala on top of tomato sauce bread.cover it with green chutney bread and toast both the sides for few seconds till u get browned top. Remove & cut it diagonally.
Paneer sandwich recipe 3
  • Serve & Enjoy !

Note
  • U can replace tomato sauce with red garlic chutney & make it more spicy.
  • U can also remove the corners of bread slices if needed.But  i dint remove as my bread slices were very small.
  • U can also do the grill & make a grill sandwich.

Paneer sandwich with tomato sauce tastes yummy.Do try it for ur kids !
paneer sandwich recipe
Continue Reading...


June 30, 2014

EASY PANEER BIRYANI RECIPE–PANEER RECIPES


Paneer biryani was in my try list for long time. Usually I make biryani in Sunday. So I tried this paneer biryani recipe for the first time yesterday and we loved it a lot. For this recipe, I quickly googled and found this easy recipe. I made slight changes as per my family’s taste and tried it. It came out very well.

 As it has no grinding and less chopping works, you can try this biryani in weekends to finish your cooking quickly and enjoy spending time with your family members. Also you can try even during weekdays in busy morning hours for your lunch box as it is very easy to prepare. I don’t think marination is a must here. But anyways I followed the original recipe as this is my first attempt.

The taste, texture everything was good but Sendhil told me to put paneer pieces smaller in size when I make it next time because he told this rice tastes even better when had with paneer pieces in each mouth. So I have given the method  accordingly. Ingredients list may seem lengthy but the procedure is very simple and quick. Try this exotic paneer biryani recipe, everyone would love this. Lets see how to make this yummy paneer biryani.


Easy Paneer Biryani Recipe


Easy Paneer Biryani Recipe Delicious paneer biryani in an easy way - No grinding and less chopping !
Cuisine: Indian
Category: Lunch
Serves: Serves 3
Prep time: 30 Minutes
Cook time: 20 Minutes
Total time: 50 Minutes


INGREDIENTS
To marinate
  • Paneer cubes – 1/2 cup (cut into small bite sized cubes)
  • Red chilli powder – 1 tsp
  • Black pepper powder – 1/2 tsp
  • Turmeric powder - 1/4 tsp
  • Biryani masala powder - 1/2 tsp
  • Curd - 1/3 cup
  • Kasoori methi - 1/4 tsp(optional)
  • Ginger garlic paste - 1 tsp
  • Mint leaves - 10 nos
To Soak in water
  • Basmati rice - 1 cup
  • Water - 2 cups
To saute
  • Cooking oil + ghee - 2 tbsp
  • Cinnamon – 1 inch
  • Cloves – 2 nos
  • Cardamom – 1no
  • Star anise – 1 no
  • Bay leaf – 1 no
  • Fennel seeds – 1/4 tsp
  • Green peas – a handful
To saute till golden brown
  • Cooking oil + ghee – 1.5 tbsp
  • Big onion - 1 no
  • Salt - as needed
  • Mint leaves & coriander leaves – few

HOW TO MAKE PANEER BIRYANI - METHOD

  • First cut the paneer into small bite sized cubes smaller than the ones in picture. Take it in a wide bowl and add all the ingredients given under “to marinate”. Let it marinate for 20 minutes.
  • In the mean time,wash and soak the basmati rice in 2 cups of water for 30 minutes. Chop onions into slices.
  • Heat oil+ghee in a kadai and saute the onion till golden brown and set aside.
Paneer biryani step1
  • In the same kadai, heat oil & ghee and saute cinnamom, cloves, cardamom, star anise and bayleaf. Saute for a second. Add fennel seeds, saute till it sizzles and add the peas. Saute for a minute.
Paneer biryani step2
  • Now add the marination mixture along with paneer pieces. Mix well and cook in low flame till the peas is 3/4th cooked and oil floats on top. Add little water if necessary while boiling. Add the salt required for biryani.
Paneer biryani step3
  • Now add the soaked rice along with water and check for salt. Add more if needed. Transfer everything to a pressure cooker.
Paneer biryani step4
  • Add some finely chopped mint & coriander leaves in water.
  • Close the lid and pressure cook in low flame for one whistle ( It takes 10-12 minutes). 
  • After the pressure is released, open the cooker and fluff the rice with a fork, add the fried golden brown onion slices. Mix well .
Paneer biryani step5
Serve with onion raita !


Note

  • If u want to make this biryani very quickly, then skip marination and add all the ingredients given under “to marinate” one by one after you saute the whole spices & peas. But keep the paneer pieces immersed in hot water till use to stay soft.
  • U can make the entire process in pressure cooker base or even in electric rice cooker. But I used kadai & transferred to cooker.
  • Always use ghee+oil for more flavour. Fry onions till golden brown and do not over fry them. Add it at the end before serving. It gives a nice taste.
  • Adjust the quantity of spices as per your taste 

This was our simple Sunday lunch. Paneer biryani, Onion raita, Curd rice & rose milk. 

Continue Reading...


June 25, 2014

HOTEL KUSKA BIRYANI RECIPE / KUSKA RICE-PLAIN BIRYANI RECIPE

Kuska biryani recipe

I am a big fan of Tamilnadu hotel style kuska biryani. Before marriage we used to have this rice from a nearby restaurant at least twice in a month during weekends. My appa calls this as”pattai sadam”. Madurai is popular for Kuska rice. In hotels, they usually serve kuska with onion raita and salna or ennai kathirikai. I love that combo.

Kuska, this term might be new to some you.I will tell you what it is. Kuskha is nothing but the plain rice cooked n flavoured with masalas without adding vegetables or meat. You can call it as plain vegetarian biryani. Usually muslim people do this for all their marriages and festivals. In urdu,”Kushk”means plain. It is very famous in Hyderabad and Tamilnadu. Thanks to Spiceindiaonline from where I got these details. In Tamil nadu, you get kuska mostly in small hotels or mess. In some big hotels, they serve chicken or mutton biryani as kuska just by removing the pieces. So my dad always buys it from vegetarian hotels.Its my long time dream to recreate kuska at home.

I  have tried several recipes but they were not satisfactory. Recently I was chatting with my reader Kirthiga devi in facebook. More than a reader, I should say she is like my sister. She calls me fondly as akka. When we were talking, I just asked her about kuska biryani and she immediately shared her recipe with detailed steps. She suggested me pressure cooker as well as Dum method. I chose pressure cooker method as I felt it easy. She also said that this is the recipe of muslim style kuska. Then, what else I need to try this??. I tried it for my lunch today. It was awesome. I got the same taste as I expected. Thank you so much kirthiga. Many people use coconut milk for kuska. But I used milk.

Friends,whenever you are run short of vegetables, do try this kuska rice. Bachelor’s & working women can make this easy rice for their lunch box during busy mornings. Its a no grinding & less chopping rice variety. Just one onion, half tomato & biryani spices is enough to prepare this delectable dish for two people. U can use either jeera rice or basmati rice as per your liking. Lets see how to make Tamil nadu style kuska biryani / plain biryani with step by step pictures.

Kuska recipe

Kuska biryani recipe


Kuska biryani recipe How to make hotel kuska biryani recipe at home easily.
Cuisine: Indian
Category: Lunch
Serves: 2
Prep time: 10 Minutes
Cook time: 15 Minutes
Total time: 25 Minutes


INGREDIENTS
1 cup - 250ml

  • Jeera rice or basmati rice - 1 cup
  • Water+coconut milk or water+milk - 2 cups
To add in the rice
  • Cinnamom - 1 small piece
  • Cardamom - 1 no
  • Cloves - 1 no
  • Bayleaf - 1no
  • Mint leaves – 10 nos 
  • Ghee – few drops
To saute
  • Cooking oil - 2 tbsp
  • Cinnamom - 1 small piece
  • Cloves - 1 no
  • Bayleaf - 1 no
  • Kalpasi/black stone flower – 1/2 tsp( click here to see the picture in stepwise pics)
  • Cardamom - 1 no
  • G&G paste – 1 tsp
  • Big onion - 1 no
  • Tomato - 1/2 no
  • Green chillies - 2 nos
  • Red chilli powder – 1/2 tsp to 1 tsp (adjust)
  • Dhania powder - 1/2 tsp
  • Curd – 1 tbsp
  • Mint leaves – 15nos (chopped)
  • Coriander leaves -  2 stalks (chopped)
HOW TO MAKE KUSKA - METHOD

  • Wash the rice and take it in a bowl. To this rice,add the spices mentioned under”to add in rice” . Add equal quantity of water+milk or water+coconut milk and soak the rice for 10-15 minutes. i.e. Rice and water+milk ratio should be 1:2.( you can soak only in water too if you don’t want to add milk or coconut milk)
  • In the mean time, finely chop onions,tomatoes,mint leaves and coriander leaves.
  • Then in a pressure cooker base, heat oil and add all the spices, saute for a second.
Kuska recipe step1
  • Then add onions, g&g paste and saute till raw smell leaves it.
  • Add tomato pieces and saute till mushy. Now add red chilli powder , dhania powder and saute for sometime.Kuska recipe step2
  • Add mint leaves, coriander leaves. Mix well. Now add the curd, soaked rice with water and spices.
Kuska recipe step3
  • Add the required salt. Check for taste and pressure cook in low flame for one whistle or 10 minutes. Open the lid after the steam is released. Mix with a fork once. Check whether rice is done else add 1/4 cup of water and allow it to cook for 1 whistle in high flame or keep it for 3-4 minutes in high flame.
Kuska recipe step4
Serve with onion raita and Enjoy !


Note

  • Rice takes longer time to cook in milk + water combo. So add more water and less milk if you want it to be quickly done.
  • U can add 1/4 tsp of fennel seeds while sauting spices. Its optional though.
  • Kuska I had tasted from hotels looks reddish orange in color. I think they add orange food color. But I used only red chilli powder to bring this color. So add food color if you wish.
  • For variations, you can add coconut milk instead of plain milk OR use water alone.
  • Remember the ratio of rice n water should be 1:2 even if  you soak for 30 minutes.
  • If you use jeera rice, soak only for 15 minutes else rice will turn clumpsy after cooking. If you soak for more time, add 1.5 cups of water instead of 2 cups.

Kuska-biryani-recipe

Easy n tasty Kuska biryani is ready ! 
Kuska-biryani

Continue Reading...


June 23, 2014

CHITRANNA RECIPE/NIMBEHANNU CHITRANNA-KARNATAKA RECIPES

Karnataka chitranna recipe

This is my first post on Karnataka recipes. As you all know, Chitrannam/Chitranna is a very popular breakfast/lunch recipe in Karnataka houses. Here people make this for all occasions and poojas. Not just in houses, this would be the breakfast recipe you can find in most of the small roadside hotels apart from thatte idli. I have tasted this chitranna with avalakki(poha) and Mandakki (puffed rice) in Davangere benne dosa stall.

Chitranna is nothing but our South indian variety rice with slight variations. They call it as Nimbe hannu chitranna for lemon rice. It can be made very quickly and its a tasty lunch box recipe too. Most of the kids in school bring this rice for their lunch box. I am really happy to share this most popular Chitranna recipe (recipe with my name) as my first Karnataka recipes post. The recipe I have shared here tastes close to the ones that is served in restaurants here. I have also shared a coconut chutney recipe in the “Notes” section which is the side dish served in road side hotels for Chitranna. In small hotels, I have seen people having this chitranna with coriander leaves chutney and Besan Bonda for breakfast. So I too served in the same way. It was awesome. Sendhil loved it a lot.

Nimbehannu chitranna recipe
Before going to this recipe, I would like to mention about my Kannadiga friends, without them this post wouldn’t have come up.

I have been in Bangalore for 8 years but I have not even blogged a single Karnataka recipe. I feel so bad for this. The reason behind this is I have not tasted typical Karnataka food in hotels or in friend’s places and I did not get a good source to teach me all their recipes too. We had tried several times to visit MTR & Vidyarthi bhavan which are very famous restaurants here. But by seeing the crowd, we step out each time.

Last year I got some 6 good kannadiga friends. We met & became friends in Raksha’s school. As all of them are mom’s of Raksha’s class mates, we used to discuss about school, studies, food, movies etc and we have a group named “School moms” in Watsapp too. They all cook authentic Karnataka recipes like ragi mudde, bisibelebath, Thatte idli etc very well .They know about my food blog & suggest me some good recipes to try. I am really lucky and proud to get those friends.

Earlier I used to speak butler kannada and now my language has much improved just because of them. Not just the language, I explored Bangalore only becoz of my friends. We used to go to famous hotels, malls, chaat shops etc during vacations and weekends. Now I thoroughly enjoy my life in Bangalore because of these sweet souls. I wanted to write about them in one of my blog post for a long time but I feel this post would be apt to mention about these wonderful people. Here is the picture of my friends.

My friends
From left- Nagalakshmi, Priya, Padmini, Archana, Megha(with baby) and Thara(right side corner) in the second picture.

I have already told much about Megha in my peanut chutney & aloo paratha posts who is very close to my heart. This Chitranna recipe is also from Megha. Thanks a lot dearie.

I will mention about my other friends in my upcoming Karnataka recipes post. With all these great resources, I had started venturing Karnataka recipes & I have planned to post them once in a week. Wish me good luck  friends. Ok,without much blah blahss, let me proceed how to make this yummy, easy chitranna recipe..

Chitranna recipe


Chitranna recipe How to make Karnataka style nimbehannu chitranna /Lemon rice recipe
Cuisine: Indian
Category: Lunch
Serves: 3
Prep time: 5 Minutes
Cook time: 15 Minutes
Total time: 20 Minutes


INGREDIENTS
1 cup - 250ml

  • Raw rice- 1/2 cup(Sona masoori rice)
  • Big onion - 1 no(small sized, skip onions if making for pooja)
  • Garlic cloves – 3 nos(finely chopped)
  • Green chillies - 4 nos
  • Turmeric powder - 1/4 tsp
  • Lemon juice - 2 tbsp
  • Grated coconut- 2 tbsp(optional)
  • Salt- as needed
  • Water - 2.5 cups
To temper
  • Cooking oil - 1 tbsp
  • Mustard seeds - 1/2 tsp
  • Urad dal - 1 tsp
  • Chana dal - 2 tsp
  • Roasted peanuts - 2 tbsp
  • Curry leaves - few
  • Coriander leaves - to garnish
HOW TO MAKE CHITRANNA - METHOD

  • Wash and pressure cook the rice adding required water and a drop of oil in low flame for one whistle. Open the lid and spread the rice in a plate.. Allow it to cool. Rice should be separate.
  • Finley chop onions, green chillies, curry leaves and coriander leaves. Set aside .
  • In a kadai, heat oil and temper all the ingredients given above.
Chitranna step1
  • Now add onions, garlic, green chillies and saute till transparent. Add grated coconut (if using) & mix well. Add turmeric powder, salt, mix well and switch off the flame
Chitranna step2
  • Add this to the cooked rice and mix well. Add the required lemon juice and check for taste. Add more salt or lime juice if necessary.
Chitranna step3
  • Finally garnish with lots of coriander leaves and enjoy serving hot.


Note

  • U can try this recipe with leftover rice too.
  • U can make this as a no onion, no garlic version by omitting these two ingredients. In that case, you must add grated coconut and serve. U can prepare this way for occasions and festivals.
  • For chutney: Grind 1/2 cup of grated coconut, 3 tbsp of fried gram dal, 3-4 green chillies, salt, little turmeric powder, a pinch of tamarind, 3 garlic cloves adding water. Adjust consistency as per your need. Usually it is served in watery consistency in hotels.

Enjoy this chitranna with green chutney and bonda !
Chitranna recipe

Continue Reading...