Search Chitra's Food Book

Showing posts with label NORTH INDIAN RECIPES. Show all posts

March 30, 2017

Paneer Puri Recipe – Stuffed Paneer Poori - Poori Varieties

Paneer poori recipe
During weekends, I am making varieties of poori for our breakfast and I have been sharing the same in my blog. Last Sunday I prepared this paneer poori (Indian cottage cheese in English) for our breakfast with the leftover paneer cubes. Its a stuffed paneer puri recipe. So you just have to add grated paneer to the wheat flour and make dough with it. Its so simple. 

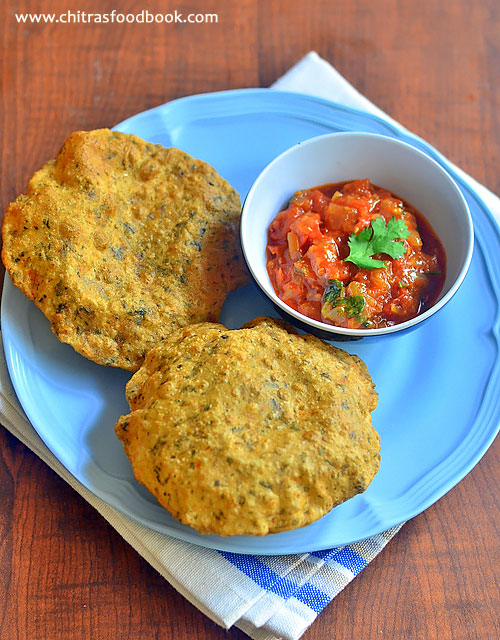
When I was searching for different types of puri recipes, I saw this one in Ramki’s one page cookbook. I liked the idea of paneer stuffed poori and tried this recipe in my own way. It came out really well, puffy and soft. Even though it tastes like masala poori, Paneer gives an additional softness to it and make it healthy too. Semolina/ Rava helps to keep the poori puffy and hold its shape for long time. So kids would love it for sure. 

Do try this different type of poori during this vacation for your kids and family. Enjoy the breakfast ! I made masala raita and onion masala as side dish for this poori. It was a good combination. You can make tomato bhaji, potato masala or even chana masala as a side dish.  Ok, Lets see how to make yummy, soft paneer poori with step by step photos and a video !


Paneer puri

Paneer Poori Recipe - Poori varieties


Paneer Poori Recipe - Poori varieties How to make masala poori with paneer - Paneer puri recipe
Cuisine: Indian
Category: Paneer Recipes
Serves: 12 nos
Prep time: 10 Minutes
Cook time: 2 Minutes
Total time: 12 Minutes


INGREDIENTS
1 cup - 250ml
  • Grated paneer - 3/4 cup
  • Atta/Whole wheat flour - 1.5 cups
  • Besan flour - 1 tbsp
  • Rava/Semolina - 1 tsp
  • Red chilli powder - 1 tsp
  • Garam masala powder - 1 tsp
  • Ajwain or cumin seeds - 1/2tsp
  • Coriander leaves - 1 tbsp( finely chopped, optional)
  • Salt & water - as needed
  • Cooking oil - to deep fry
HOW TO MAKE PANEER PURI - METHOD

  • Grate the paneer using a grater and measure 3/4 cup from it. Keep it aside.
  • In a wide bowl or plate, take the wheat flour, besan flour, rava, salt, red chilli powder, garam masala powder, ajwain/Omam OR cumin seeds and grated paneer. Mix everything well without adding water. Mixture looks crumbly.
    Paneer poori recipe
  • Now add water gradually and make a smooth dough. Dough should not be too hard or too sticky. Knead it for 5 minutes. Make poori immediately. Keep the remaining dough covered while rolling the poori. Take a portion of dough and make uniform sized balls.
    Paneer poori recipe
  • Dust the ball in wheat flour and roll into small thick poori. Remember thin poori won’t puff up. So roll it thick. Refer picture below for thickness. 
    Paneer poori
    Paneer poori
  • Heat oil in a kadai to deep fry. Check its temperature by dropping a pinch of dough. If it rises to the top immediately, oil heat is just right. If the heat of oil is less, poori won’t puff up. So check it before deep frying. Reduce the flame to medium and take one rolled poori. Pat it between your palm to remove the excess flour.  Drop the poori in oil. When it starts to come up, press the poori with a ladle gently. It puffs up well. Now flip the poori and cook for a minute till bubbles cease. Remove & drain in a tissue paper. Serve hot with masala raita and some bhaji/Poori masala.
  • TIPS:  Increase the flame to high till you drop the next poori. Reduce the flame to medium as soon as u drop it. You can follow this to maintain the heat throughout deep frying. If oil becomes smoky hot, switch off the flame for few minutes. After the oil comes to desired temperature, fry the poori.
    Paneer poori
Enjoy !


Note

  • Do not make the dough too sticky or soft. No need to rest the dough. Make poori immediately to prevent oil absorption.
  • Thickness of poori is very important to puff up. So roll it small and thick.
  • Heat of oil is also an important factor for puffy poori. Check its temperature.
  • Oil should not be smoky hot.
Try this yummy paneer poori at home for your weekend breakfast and enjoy !
stuffed paneer poori recipe
Continue Reading...


March 16, 2017

Jaljeera Recipe With Video –Jaljira – How To Make Jal Jeera At Home

Jaljeera recipe / Jaljeera - Jaljira recipe
Jal Jeera / Jaljira is a healthy summer drink that is most popular in North India. In Hindi, Jal means water and Jeera means cumin seeds. This drink is prepared with special spice mix masala powder that is mixed with water or soda. Jal jeera spice powder is made of roasted cumin, pepper, mint leaves, black salt, ginger, amchoor powder and lemon juice. So it has lots of health benefits. Basically it helps to improve digestion and aids for weight loss too. I have tasted this jaljira several times in “The Village” restaurant and in some other hotels as well. Mostly it is served as an appetizer in restaurants whereas I like to have this drink after a heavy meal. I love this drink very much and I don’t mind drinking at any time or any season of the yearWinking. So I bought a packet of jaljeera powder from the shop and prepared this drink at home for the first time. We loved it very much. Then I started serving this to my guests as a welcome drink. Everybody liked it so much and asked me the recipe tooWinking. Even though I make it with store bought powder, I used to tell the ingredients roughly and ask them to buy this jal jeera powder from the marketTongue
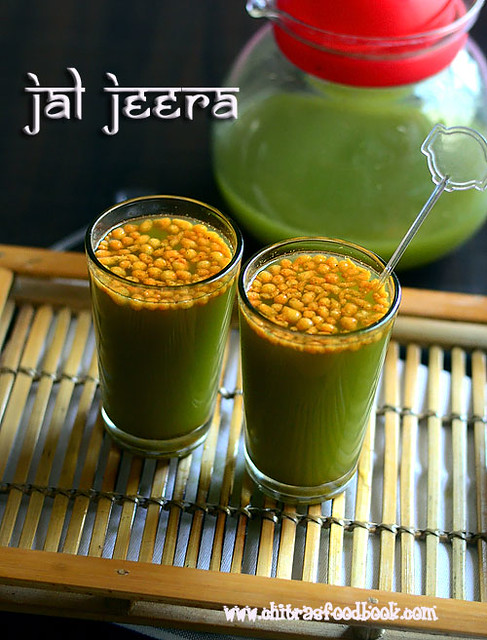
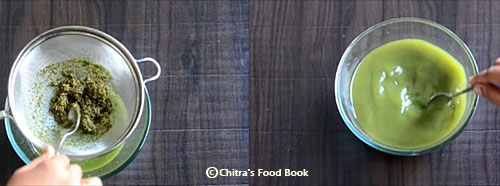
. Yesterday I was thinking to start summer recipes in my blog. The most refreshing summer drink jaljeera flashed in my mind. I tried it this morning by watching Sanjeev Kapoor’s YouTube video and made it from scratch. I altered the recipe slightly by looking at the ingredients list of store bought jaljira packet. It came out very well and tasty. Traditionally tamarind is used in jaljeera but have used lemon juice instead. So lets check how to make this refreshing, fresh, yummy, healthy, easy Indian drink for this summer – Jal jeera recipe with step by step pictures and a video. Do try it and enjoy !
Check out my other summer recipes in THIS LINK


Jal jeera recipe

Jal jeera Recipe - Jaljira - How to make Jal jeera at home


Jal jeera Recipe - Jaljira - How to make Jal jeera at home Jal jeera Recipe - Jaljira - How to make Jal jeera at home
Cuisine: Indian
Category: Summer Drink
Serves: Serves 3-4
Prep time: 5 Minutes
Cook time: 5 Minutes
Total time: 10 Minutes


INGREDIENTS
1 cup - 250ml
  • Mint leaves - 1/2 cup
  • Coriander leaves – 1/4 cup
  • Ginger - 1/2 inch piece
  • Pepper corns – 1/2 tsp
  • Roasted cumin seeds – 1/2 tbsp / 1.5 tsp  ( Dry roast)
  • Black salt - 1 tsp
  • Powdered white salt – 1/2 tsp  ( Regular salt)
  • Sugar or grated jaggery -  1 to 2 tsp ( adjust)
  • Chat masala powder Or Amchoor powder - 1 tsp
  • Lemon – 1 no
  • Cold Water -  3 cups
To Serve
  • Ice cubes – Few
  • Kara Boondhi – To garnish ( as needed)
METHOD

  • Dry roast cumin seeds in a hot kadai for one minute. Do not burn the jeera. It tastes bitter and spoils the taste of jaljeera.
  • Take all the ingredients given in the list in a mixie jar. Add the roasted cumin seeds. Grind to a smooth paste adding required water. I used 1/2 cup water to grind it.
    Jal jeera recipe
  • Transfer the ground paste to a bowl and wash the mixie jar with one cup of water. Add the washed water to the paste.  Place another bowl, keep a metal strainer and filter the drink. Press it with a spoon to filter well and discard the residue.
    Jal jeera recipe
  • Add 1.5 - 2 cups more water and mix well. Check for taste and add more salt, sugar or lemon juice if needed. If you need more cumin flavor, add 1/2 tsp readymade cumin powder if u have in hand.

  • To serve : Take a tall glass, add some crushed ice or ice cubes, top it with 2 tsp of kara boondhi and pour the jaljeera till the rim. sprinkle a pinch of cumin powder if u wish. Serve immediately. Refrigerate the remaining drink for later use. Stays fresh for 2-3 days in refrigerator.
Enjoy !
Note

  • You can add more black salt, amchoor powder , sugar and lemon juice at anytime after making the drink. Adjust them based on your taste. 
  • Jaljeera tastes the best when its served chilled. So always use ice cold water for preparation or refrigerate it  / add ice cubes while serving !
  • Never try this recipe without black salt and chat masala or amchoor powder.It adds a unique taste to this drink.
Try this easy drink at home and have it after or before a heavy meal. It helps to improve digestion and increases appetite !
Jaljeera recipe - How to make Jal jeera
Continue Reading...


March 13, 2017

Tomato Sabji Recipe – Onion Tomato Sabzi Recipe For Chapathi, Poori

tomato sabji for chapathi
When my father was working in Mumbai, he learnt this recipe from his North Indian friend.  Whenever my dad comes to Salem for holidays, he used to cook for us. We love our dad's cooking a lotLove Struck . We love his Kara kuzhambu, rasam and this onion tomato sabji. My dad used to say this tomato sabzi is their go to recipe for every day's dinner.They also make it for their lunch box as a side dish for chapathi or poori . Its so easy to make and tastes great too. Sometimes my dad make this sabji by adding boiled potato, peas and even ladies finger. We love this simple sabzi with idli,dosa as well. I don’t say this is the authentic Maharashtrian style tomato sabji or tomato bhaji. This is just an easy, one pot version which is ideal for working women and bachelors. Last weekend I made methi poori and this tomato sabji for our breakfast. It was a nice combo.Sendhil and Raksha loved it a lot. It tastes the best with roti and poori. Do try this tomato sabji recipe and share your feedback with me  :)
Onion tomato sabji recipe for chapathi

Tomato sabji recipe for chapathi, poori


Tomato sabji recipe for chapathi, poori How to make tomato sabji in a pressure cooker - Easy & quick side dish for poori and roti/chapathi !
Cuisine: North Indian
Category: Side dish for roti
Serves: Serves 3
Prep time: 5 Minutes
Cook time: 10 Minutes
Total time: 15 Minutes


INGREDIENTS

  • Ripe tomato - 3 nos
  • Big onion - 1 no ( Big sized)
  • Ginger-garlic paste - 1/2 tsp
  • Red chilli powder - 1/2 – 3/4 tsp ( I used Kashmiri chilli pwd)
  • Dhania powder/coriander seeds powder - 1/2 tsp
  • Turmeric powder - 1/4 tsp
  • Garam masala powder - 1/2 tsp
  • Sugar - 1/2 tsp
  • Salt & water - as needed
To temper
  • Cooking oil - 2 tbsp
  • Mustard seeds - 1/2 tsp ( optional)
  • Cumin seeds - 1/2 tsp
  • Curry leaves - few
  • Coriander leaves - to garnish
METHOD

  • Wash and chop the onion and tomato into small pieces. In a cooker base, heat oil and splutter cumin seeds.
    tomato sabji for chapathi
  • Saute onion until transparent and then add ginger-garlic paste and curry leaves.  Saute till the raw smell of g&g paste goes off.
    tomato sabji for chapathi
  • Now add the tomato pieces and saute for a minute. Add salt, turmeric powder, sugar, red chilli powder, Dhania powder, garam masala powder and saute till tomato turns mushy.
    tomato sabji for chapathi
  • Now add 3/4 cup of water, mix well and pressure cook in high flame for 2 whistles. Open the cooker after the steam is released. Oil would float on top. Mix well with a ladle and garnish with chopped coriander leaves. Boil for few minutes if the sabji is watery. Make it thick. Serve hot with poori or roti !
    tomato sabji for chapathi
    tomato sabji for chapathi
Enjoy !


Note

  • For variations, you can add equal quantity of tomato and onion but adjust the quantity of spice powders accordingly.
  • You can also add some cooked peas or boiled potato cubes.
  • You can skip dhania powder if u wish. But flavor varies.
  • Adding sugar helps to enhance the taste. It gives a mild sweetness to the bhaji.
  • You can also make this sabji in a kadai instead of pressure cooker.
  • For variations, you can add coarsely crushed peanut powder ( 1 tbsp )
Tomato sabzi recipe
Try this easy, yummy tomato sabji at home and enjoy !!
Tomato sabji recipe
Continue Reading...


March 10, 2017

Coconut Khoya Burfi Recipe – Nariyal Ki Barfi With Khoya

Coconut burfi recipe with khoya
I must thank my reader friend Harini for requesting me to try Chennai Ganga sweets shop style coconut burfi with khoya ( Thengai burfi in Tamil, Nariyal Ki burfi in Hindi). When she told me, I had no clue about its taste and texture. Recently I bought that coconut burfi from Ganga sweets during my Chennai trip. When I tasted it, I found the barfi is made with coconut and khoya. I browsed for the recipe and tried it by watching Dr.Shalini’s YouTube video. Even though its my first attempt, I am quiet happy with the results.I won’t say it came out 100% close to the sweet shop ones but it tasted similar. 

Usually South Indian coconut burfi is made by cooking freshly scraped coconut in sugar syrup of one string consistency. But this coconut burfi with khoya is prepared by cooking khoya/mawa, desiccated coconut, sugar and water together till it reaches the burfi consistency. You don’t have to check for one string sugar syrup. But this burfi takes long time to cook and set as it has khoya in it. 

I have not used milk, milk powder or condensed milk in this recipe as I had used yellow food color to resemble the sweet shop burfi. If you want to make white colored coconut burfi, use milk instead of water. I am happy that I could try this North Indian style nariyal ki burfi successfully at home. I am sharing this colorful recipe as my contribution for Holi festival. Do try this easy and yummy coconut mawa burfi at home for this festival and have a great celebration. Lets see how to make coconut khoya burfi with step by step photos and a VIDEO !

Do check out my Holi special recipes COLLECTION for more sweets and snacks ideas!


coconut khoya burfi recipe

Coconut khoya burfi recipe - Nariyal Ki barfi with mawa


Coconut khoya burfi recipe - Nariyal Ki barfi with mawa How to make coconut khoya burfi recipe at home - North Indian style coconut burfi with khoya !
Cuisine: Indian
Category: Sweet
Serves: 10 
Prep time: 5 Minutes
Cook time: 30 Minutes
Total time: 35 Minutes


INGREDIENTS
1 cup - 250ml
  • Desiccated coconut - 1.5 cups ( I used store bought dry coconut)
  • Unsweetened Khoya / Mawa - 1 cup ( I used  200gms of Milky mist khoya)
  • Sugar - 1 cup
  • Water - 3/4 cup
  • Saffron threads - Few
  • Yellow food color - A pinch
  • Cardamom powder - 1/4 tsp
  • Chopped pistachios – 2 tbsp ( To garnish)
  • Ghee – 1 tsp ( to grease the plate)
METHOD

  • Grease a tray with ghee and keep it ready. Mash the khoya well and measure 1 cup. Keep aside.In a kadai, take 3/4 cup of water, add saffron threads, food color and cardamom powder. Mix well and let it start to boil. Add 1 cup of mashed khoya and mix well without lumps. It resembles condensed milk after mixing.
    coconut khoya burfi recipe
  • When it starts to boil with bubbles, add sugar and mix well.Sugar melts and the mixture starts to roll boil. Let it boil for a minute.
    coconut khoya burfi recipe
  • Then add 1.5 cups of desiccated coconut and mix well. Mixture will start to thicken. Keep mixing till the burfi mixture is thick and leaves the sides of pan completely. It becomes a whole mass with nice coconut smell. Stay nearby and keep stirring to prevent burnt bottom. It takes nearly 10–15 minutes to reach the final stage if mixing in medium to high flame. Make sure there is very less moisture. It should not be too wet. Remember over mixing makes the burfi too hard and chewy.So remove it at the right time.
    coconut khoya burfi recipe
    coconut khoya burfi recipe
  • Grease the bottom of a small bowl with ghee. Put the burfi mixture to the greased tray and press it well with a greased bowl. Level it and sprinkle the chopped pista pieces. Press it well.
    coconut khoya burfi recipe
  • Freeze the burfi mixture for one hour OR refrigerate it for 2-3 hours. It helps to set the burfi quickly and make shapes perfectly. Mark square shape using a greased knife.As the burfi mixture is cold and frozen, it would be difficult to handle. So press it hard to mark shapes. Remove it after few minutes. It tastes slightly chewy when consumed on the same day. Tastes perfect the next day. This burfi needs a setting time of 8 hours. Be patient. Leave over night and taste it the next day to know its actual taste.
    coconut khoya burfi recipe
    coconut khoya burfi recipe 
  • Enjoy ! This burfi stays good for 2 days in room temperature and 4 – 5 days under refrigeration.

    Note
    • If you want to use fresh coconut, you can use instead of desiccated coconut. But it takes longer time to cook and reach the final stage as fresh coconut has some water content.
    • Shelf life of the sweet reduces if you use fresh coconut.

    Nariyal ki barfi with khoya

    Try this easy, yummy coconut khoya burfi at home and enjoy the festival !
    coconut khoya barfi recipe
    Continue Reading...


    March 4, 2017

    Easy Atta Halwa – Atta Ka Sheera Recipe – Instant Wheat Flour Halwa - Gurudwara Style

    atta halwa recipe
    Atta halwa also known as Atta ka sheera is one of the most popular sweet/ dessert recipe in North India. This is an Instant halwa made with whole wheat flour( atta in Hindi). This atte ka halwa is served as Kadah prasad ( Karah prashad) to all the visitors of Gurudwara ( A place of worship for Sikhs ) in Punjab.

    Traditionally, it is prepared with equal quantity of Whole wheat flour, Sugar and Butter/ghee to emphasize everyone are equal. Some people make this halwa adding equal quantity of wheat flour and sooji. For variations, this halwa can be made with milk or jaggery instead of sugar. I never thought making this North Indian style wheat flour halwa is so easy.

     South Indian style Godhumai halwa/wheat flour halwa ( Tirunelveli halwa) is in no way related to this atta halwa in preparation and cooking procedure. Both has its own variations and taste. This sweet can be prepared easily and instantly for surprise guest and to celebrate special occasions at home. I am sure this ghee dripping halwa gets a big applause from your family members and friends. I followed the recipe from HERE and watched some You tube video recipes too.

     Even though its my first attempt, making this halwa was a breeze for me. You can easily find the correct stage of removing the halwa. Its 100% a beginners recipe. This halwa tastes very soft and it slides in your mouth. I made in very less quantity just to serve 2 people as the quantity of ghee is more . Holi festival is fast approaching. Include this easy, rich atta ka halwa in your menu and enjoy the festival ! This atta halwa can also be prepared for babies but its made without ghee. I will share that recipe later.

    Now lets see how to make Instant, easy wheat flour halwa/ atta halwa with step by step pictures and a video !

    Check out my Sooji halwa and Bread halwa recipes too.


    atta halwa recipe

    Atta halwa recipe - Atta Ka Sheera


    Atta halwa recipe - Atta Ka Sheera Easy Atta halwa recipe - Atta Ka Sheera - Gurudwara Karah Prasad
    Cuisine: North Indian
    Category: Sweet
    Serves: 2
    Prep time: 2 Minutes
    Cook time: 10 Minutes
    Total time: 12 Minutes


    INGREDIENTS
    1 cup - 240ml
    • Whole wheat flour - 1/4 cup ( I used Aashirvad atta)
    • Sugar - 1/4 cup ( I used 1/4 cup heaped, add 1/2 cup for more sweetness)
    • Melted Ghee - 1/4 cup
    • Water - 1/2 cup
    • Cardamom powder - a pinch ( Optional, Its not used traditionally)
    • Cashews & sliced almonds - To garnish
    HOW TO MAKE INSTANT WHEAT FLOUR HALWA - METHOD

    • Heat 1/4 cup of ghee in a wide, non-sticky kadai. Add wheat flour and roast till it turns golden brown in color with nice aroma. Keep the flame low to medium  while roasting and keep mixing to prevent burnt bottom. It takes 3- 5 minutes to roast well based on the quantity you use.
      atta halwa recipe
    • Boil 1/2 cup of water in a bowl and add the hot water carefully to the roasted wheat flour. It splashes. Add 1/4 cup (heaped) sugar, cardamom powder ( I din’t use) and mix well without any lumps. All the water would be absorbed by the wheat flour and gets cooked.
      atta halwa recipe
    • Mix well till halwa leaves the sides completely, becomes a whole mass. Do not switch off the stove. Keep mixing till ghee starts to ooze out in the sides of kadai. It will turn glossy too. Do the whole procedure in medium flame. It takes just 3-5 minutes to release the ghee. Switch off the flame and remove in a plate or bowl. Serve warm or cold as you wish. Please watch the video for clear understanding !
      atta halwa recipe
    • For variations, you can add milk instead of water. You can also use grated jaggery in place of sugar. Enjoy !

    Note
    • Traditionally this halwa is prepared with equal quantity of wheat flour, sugar and ghee. But I used little more sugar ( 1.25 cups) as we are sweet toothed.
    • If you don’t want to use equal quantity of ghee, you can use half the quantity mentioned. But texture may slightly vary.
    • Cardamom powder is not used in the traditional atta halwa. If you wish, u can add it along with sugar.
    • If you feel the sweetness is less, you can add it even at the end. Heat the halwa till the sugar melts and ghee oozes out. Serve it warm.
    • I read people have this halwa as a side dish for poori too just like suji ka halwa.


    Try and enjoy this easy, yummy, rich wheat flour halwa at home !
      wheat flour halwa


    Continue Reading...