After trying mawa malpuasuccessfully, I prepared this instant, easy rabri recipe to serve with malpua. Its a quick version with just 3 major ingredients using microwave. It can be done in 6 minutes. Basically Instant rabri can be prepared using milk powder, ricotta cheese, khoya or even with condensed milk and corn flour.
But today I have used Paneer / Chena, Milk and condensed milk / milkmaid to make this instant rabdi recipe. I followed Tarla dalal’s recipe. It came out really well. I won’t say its taste is equal to the authentic rabri, but it tasted good when served chilled. I used store bought paneer. This rabri tastes even better when you make it with fresh chena. If you are craving for rabri, you can make it this way and enjoy instantly. Lets see how to make easy rabri recipe in microwave under 6 minutes with step by step pictures.
Instant Rabri Recipe Using Microwave
Instant rabri / rabdi recipe using microwave in 6 minutes.
Condensed milk - 1/2 cup + 2 tbsp ( Use 3/4 cup more for sweetness)
Cardamom powder - 1/2 tsp
Kewra water or rose water - 2 drops
Saffron strands - Few (optional)
Chopped nuts (Cashew, badam and pista) – 2 tbsp
HOW TO MAKE MICROWAVE, INSTANT RABRI WITH CONDENSED MILK
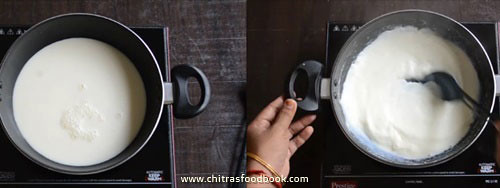
In a microwave safe bowl, take milk, condensed milk/milkmaid, grated paneer, cardamom powder and rose water.
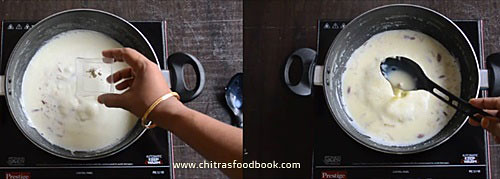
Mix well and microwave in high power ( 800W) for 6 minutes.
Mix it once in the middle after 3 minutes.
After 6th minute, remove the bowl. Mix well.
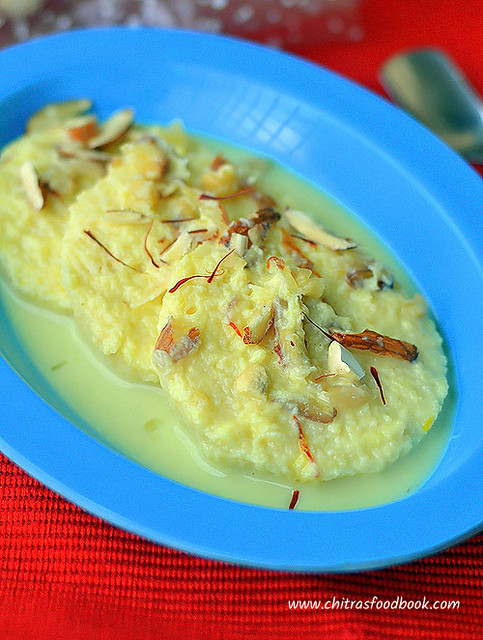
Transfer to serving bowl. Garnish with chopped nuts. Refrigerate for an hour. Serve chilled.
METHOD - STEP BY STEP PICTURES
Grate paneer and set aside.In a microwave safe bowl, take milk. Add grated paneer, condensed milk, cardamom powder and kewra water or rose water.
Mix well with a whisk or ladle. Microwave in high power at 800W for 6 minutes in total. Open it once in the middle at 3 minutes.
Mix well and again cook for 3 minutes. Remove, mix well and transfer to serving bowls. Garnish with chopped nuts. Refrigerate for 1 hour and Serve chilled.
Enjoy !
Note
Add more condensed milk if you need more sweetness.
Kewra water is optional. You can use rose water or saffron instead.
Rabri thickens after refrigeration. So you can add some milk to adjust its consistency while serving.
Try this easy, yummy instant rabri recipe for festivals and special occasions.Enjoy it serving with malpua, gulab jamun !
Mawa malpua recipe with step by step pictures / Instant malpua recipe. Holi festival is around the corner. Most of the North Indians make Malpua / malpura, Gujiya and Thandai for Holi celebration. Malpua is basically a pancake kind of dessert recipe that is deep fried in ghee and dunked in sugar syrup ( Chasni). It is usually served with rabri / Rabdi. Malpua is a most popular street food in Rajasthan, Bihar, West Bengal, Maharashtra and Odisha. Each recipe has its own variations. Authentic malpua recipe calls for maida, semolina / suji, milk and yogurt.Its batter is allowed to ferment for few hours before deep frying in ghee/ oil.
In some places, its batter is prepared by adding fruits like banana, mango or pineapple and even coconut. In Odisha, Malpua fritters are dipped in sugar syrup (chasni) after they are fried. The Bihari version of this dish has sugar added to the batter prior to frying. Today I have shared a simplified version of malpua recipe by using khoya / mawa. I followed this Instant, mawa malpua recipe from Sailu’s food twice successfully. I am sure even a beginner can try it and get perfect results if you follow this recipe and method carefully. For variations, condensed milk or milk powder can also be used in place of khoya. Friends, do try this easy, yummy malpua recipe for this Holi festival and have a colorful celebration.
Cooking oil or ghee – To deep fry malpua ( use flavorless oil)
For Sugar Syrup
Sugar – 1/2 cup
Water – 1/2 cup
Saffron threads – Few
Cardamom powder – 1/4 tsp
Chopped nuts (Cashews, Pista) – To garnish
HOW TO MAKE MALPUA - METHOD
To make malpua batter, take crumbled khoya in a bowl. Add 1/2 cup warm milk.
Whisk without lumps. Add maida, fennel seeds, sugar and salt.
Mix without lumps and make a smooth batter.Set aside for 15 minutes.
Make sugar syrup by boiling for few minutes. Add cardamom powder, saffron threads.
Heat oil or ghee to deep fry malpua. Cook both sides till golden. Remove and dunk in sugar syrup. Soak for 2 minutes by flipping it once.
Arrange in a plate and garnish with chopped nuts. Top with rabri if you wish and serve immediately for best taste.
METHOD - STEP BY STEP PICTURES
In a wide bowl, take 1/4 cup of crumbled or grated khoya. Add 1/2 cup warm milk. Whisk to make it smooth.
To this, add maida, fennel seeds, a small pinch of salt, sugar and mix well using a whisk. Add the remaining milk and make a smooth, lump free batter.
Consistency of batter should be neither too thick nor too thin. It should fall like a thin ribbon. Remember thick batter gives thick and bulgy malpua.You should press it with two ladles while draining from the oil. Similarly if the batter is too thin, malpua may disperse in oil with lots of big holes in it. So batter should be slightly thin and right in consistency. After you make the first malpua, check for the result and based on its texture you can add more milk if needed to make the batter thin. If the batter became too thin, add little maida to bring the right consistency.
Rest the batter for 10 to 15 minutes. In the mean time, you can make sugar syrup. In a wide or deep kadai, take sugar and water. Mix well and boil for 3 to 5 minutes in low flame or till the sugar syrup becomes slightly sticky like gulab jamun syrup. No need of bringing to one string or two string consistency. Just sticky and thin syrup is enough.
Heat oil or ghee in a flat bottomed kadai or pan. I used refined oil. Oil should be just 1inch in height ( like frying jalebi). Do not use more oil. Malpua may bulge and puff up if the oil is more.To make flat malpua, oil should be less. If malpua puffs up in oil, use two ladles, press it well while removing it from oil. This helps to make the malpua flat and drain the excess oil too.
Add a drop of batter to the oil. If it rises to the top immediately, oil temperature is just right. Simmer the flame to low to medium and pour one small ladleful of batter to the oil. Malpua spreads by itself and cooks in oil. Splash some oil on the top if needed. Flip it as soon as the edges become golden brown in color. Cook the other side for a minute and remove from the oil. Drain the oil completely. You can deep fry one by one or 2 to 3 based on the size of pan.
Add the cooked malpua to the sugar syrup immediately. Soak for 2 to 3 minutes. Flip it and soak both the sides. Similarly add all the fried malpua based on the size of sugar syrup bowl. Remove after 2 to 3 minutes by draining the excess sugar syrup. Deep fry the remaining malpuas, soak in syrup. Arrange in a plate and garnish with chopped nuts. Serve immediately or warm to enjoy its best taste. You can also top it with rabri and serve it rich ! Enjoy !
Note
Malpua batter should be in right consistency.
Its better to use flat pan for deep frying.
Sugar syrup should be just slightly sticky.
Try this easy, yummy Malpua for the Holi and enjoy the festival !
We celebrated Maha Shivaratri festival today. I made Sadudana kheer with sugar ( Sago kheer in English, Javvarisi payasam in Tamil, Sabbakki payasa in Kannada, Saggubiyam Payasam in Telugu, Sabudana kheer in Hindi) using big, white sago for the first time ( we call it as maavu javvarisi in Tamil). Its an yummy Indian dessert recipe.
Usually I make this kheer instantly by roasting nylon sabudana / nylon javvarisi( small sized). But this year, I wanted to try with maavu javvarisi which we use for making upma/ Kichdi.I watched a Marathi video in Youtube channel and tried this recipe. It came out very well. It tasted so rich and creamy with all the full fat milk, sugar, nuts and saffron. I loved it to the core.
For variations, you can also use condensed milk instead of milk & sugar. Sendhil loves sabudana kheer with jaggery more than sugar. So I am planning to prepare it with the leftover sago tomorrow for Thursday Guru pooja.
Sabudana kheer is one of the most commonly prepared vrat ki recipes / fasting food across North India. Basically Sabudana/ sago is healthy as its made from Tapioca. It has so many health benefits. Hence its considered as one of the best baby/toddler foods. Its good for muscle development, helps to gain weight, good for bones, improves digestion, energy levels and reduces body heat. Even though it is high in calories and full of carbohydrates, it keeps the tummy full for long time. So people make sabudana recipes on vrat/ fasting days. Just 100gms ( 1 cup) of serving has more than 200 calories. Hence its advised to consume in small amounts.
Ok, Lets see how to make sabudana kheer with sugar / Javvarisi payasam recipe with step by step pictures and video.
Sabudana Kheer Recipe / Javvarisi payasam recipe
How to make sabudana kheer/ sago kheer/ Javvarisi payasam for Shivratri fasting and Navratri festival.
White Sabudana / Sago / White javvarisi - 1/3 cup ( I used big ones)
Water - 1.5 cups
Boiled milk - 2 cups
Sugar - 1/4 cup
Saffron threads - Few
Cardamom powder - 1/2 tsp
Cashews and dry grapes - Few
Ghee - 1 tsp ( to roast the nuts)
HOW TO MAKE SABUDANA KHEER
Wash the sabudana twice in enough water. Drain it.
Add 1/2 to 3/4 cup of water to it and soak it overnight or minimum 4 hours.
In a kadai, boil 1 cup of water. Add soaked sabudana with water.
Cook in medium flame till sabudana turns translucent. Stir constantly.
After its cooked well, add milk and boil for 5 minutes. Add saffron threads while milk boils.
Sabudana cooks completely. Add sugar. Mix well till sugar dissolves. Give a boil. Check for thickness and add more milk if needed.
Switch off the flame and add cardamom powder. Roast nuts in ghee and add to kheer. Mix well and serve warm or chilled by refrigerating it for 30 minutes.
METHOD - STEP BY STEP PICTURES
Take sabudana/ sago in a wide bowl and wash it twice adding enough water. Drain the water completely. Add 1/2 to 3/4 cup of water and soak it for minimum 6 hours to overnight ( 12 hrs). It will increase in size after soaking.
Take a wide non-stick kadai. Add water and let it start to roll boil. Add sabudana with soaked water. Mix well and cook in medium flame till it turns translucent. It takes nearly 10 to 15 minutes to cook well. Stir occasionally to avoid sticking to the bottom of kadai and becomes like porridge.
When its 80% cooked, add milk and boil for 5 minutes in medium flame.Add saffron threads while the milk boils. Kheer turns mild yellow in color due to saffron. If you want white colored kheer, avoid saffron.
When the milk becomes slightly thick and sabudana is completely cooked, add sugar. Mix well and let the sugar dissolve. Check for consistency of kheer. If its too thin, let it boil for some more time. If its too thick, add little more boiled milk to bring desired consistency.Switch off the flame.
Add cardamom powder to the kheer. Roast cashew + dry grapes till golden in 1 tsp ghee and add to the kheer. Mix well and serve warm. If you like to serve chilled, refrigerate the kheer for sometime and serve. Remember this kheer thickens after it cools down. So add little milk and adjust its consistency when needed.
Enjoy with yummy sabudane ki kheer along with poori , sabzi & rice for breakfast or lunch. !
Note
Quantity of milk should be adjusted as per your taste and desired consistency.
For variations, you can directly cook sabudana in milk instead of water but milk may curdle. To avoid this, we are cooking in water firstly and add milk to it.
If you are using small sized nylon sabudana, you don’t need to soak it. Just wash it twice and cook in water directly.
Bigger sized sabudana needs to be soaked for more time.
Enjoy this yummy, creamy Sabudana kheer for festivals and occasions at home.
Recently I got Preethi zodiac mixer grinder for product review. As Preethi Kitchen appliances is one of my favorite brands, I agreed to do it. They make the best mixer grinder in India.
In this post, I have shared my opinion after using it for 10 days. I have also shared the recipe of an easy vegetable paratha made using Preethi Zodiac chopper and atta kneader.
Preethi Zodiac offers a wide range of user friendly options like grinding, atta kneading, juicing, grating, slicing, chopping and citrus juice press. Its more than a mixer grinder for sure but less than a proper food processor. It has a powerful 750w motor which is ideal for grinding dosa batter as well. I have tried all these options and shared my opinion about the same. Read on..
Preethi Zodiac MG 218 750-Watt Mixer Grinder SPECIFICATIONS (As mentioned in the product)
Model No.: Zodiac - MG 218
Voltage: 230V AC ~ 50 Hz
Power Consumption: 750 Watt
Motor: Universal 750 Watt High Power Motor
Material of Body: A.B.S
Material of Jars: Stainless Steel and Transparent Plastic
Blade Assemblies: Stainless Steel, Machine Ground and Polished
Speed Controls: Rotary Switch with 3 Speeds and incher
Flex Cord: PVC insulated 3 Core, Flexi cord with Plugtop and earthing
Country of Origin: INDIA
Preethi Zodiac looks awesome and attracts us by its first look especially the shiny black colored body and the steel rim combination makes it a real winner. Its Package is so neat. Every part was well wrapped and kept inside a cardboard so that it would be safe while shipping.
Its instruction manual is very small but its crisp with all the details. So I din't have any difficulties in assembling the jars and bottom. Before using the jars, I washed them individually using soapy water to remove the plastic smell.
PROS & CONS
PROS
Zodiac has a wide bottom with rubber holders. So it is stable while running and vibrates less.
It has a powerful 750w motor. So grinding job gets done quickly.
It has two blue light indicators.One at the speed knob and other at the bottom of the machine. The bottom light turns red to indicate overload conditions.
Master chef jar and its accessories are too good. But the slicing blade is sharp. Please be careful while handling them.
I loved the Atta kneader more than other attachments.
Juicer, extractor is also equally good. Spout in the juicer is a good idea.
Grater and slicer is doing its job perfectly.
Small Chutney Jar is quite helpful to grind very small quantity. Its handle is very strong and sturdy. Its lids are also interchangeable.
Medium and Big jars are useful for grinding Vada batter and Idli,dosa batter. Everything comes out great.
CONS
Too noisy. This is the first thing that irritated & scared me. Even though its noise level is mentioned as permissible in the specifications in AMAZON, I felt its high when compared with the other Preethi mixers I had used.
Other than grinding jars, all the accessories and atta kneading jars are plastic. So I am not sure about its life. It may break if heavily loaded or fallen down. But Preethi service center is available all over India.So getting the spare parts may not be difficult.
There is no coconut grater. Zodiac would become a complete food processor if its available. But you can extract coconut milk using the extractor.
Citrus juicer is Okay I feel.
Slicer has one size. It is not adjustable. So you cannot make very thin slices of vegetables for making chips. Similarly grater has one size.
Though the cleaning is easier, there are too many small parts. This mixer parts are not dish washer friendly.
Overall, I liked this product and felt worthy for its features. It would have been much better and secured 5 star rating if the noise is less. If you're looking for a good mixer grinder with multi-functions, you can go for it.
You can buy this product online in PREETHI Website Or in AMAZON, FLIPKART at a lesser price.
Now lets see how to make an easy mixed vegetable paratha using Preethi zodiac chopper and atta kneader. It does the job quickly and easily.
Preethi Zodiac mixer grinder
Easy mixed vegetable paratha recipe
How to make vegetable paratha recipe easily using Preethi Zodiac.
**Mixed vegetables : I used 1 small carrot, 1 big piece of cauliflower, 2 leaves of cabbage, 1/4 capsicum, 1 big onion, 1 green chilli, 2 tbsp coriander leaves)
HOW TO MAKE MIXED VEG PARATHA USING PREETHI ZODIAC
Wash and chop all the vegetables into 2 inch size to chop in Preethi zodiac.
Take the master chef jar and put the chopping blade.
Chop the vegetables finely. Remove the chopping blade and replace with atta kneader.
Add wheat flour, spice powders, salt and oil. Grind to mix well.
Add water little by little while the mixer runs. Dough will be kneaded in few minutes.
Remove and make shapes. Cook paratha on both the sides drizzling oil or ghee.
Serve with onion raita and pickle.
METHOD - STEP BY STEP PICTURES
Wash and chop all the vegetables into 2 inch size. Place the master chef jar and put the chopping blade with the coupler. Drop all the vegetables and coriander leaves. Grind to very fine pieces. Wipe the sides whenever needed.
Now remove the chopping blade and replace with atta kneader. Add in wheat flour, red chilli powder, garam masala powder, salt, ajwain and cooking oil.
Grind well to mix them evenly. Wipe the sides of jar using the spatula. Now add water gradually to make a non-sticky dough. Remember this dough needs less water. So add it carefully.
Pulse the mixer in speed one and grind till it becomes a smooth dough. It takes just few minutes. Check the dough if its non-sticky and smooth. If its too sticky, add some more wheat flour and knead again in the mixer.
Dough will come out easily without sticking to the walls of the jar. Remove the dough and make balls of uniform size.
Roll into thin or thick paratha by dusting in wheat flour. Roll it as you wish. I make slightly thick paratha. Heat dosa tawa and cook paratha on both the sides by drizzling and greasing oil on the paratha. Cook till you find brown spots all over the paratha. Cook in medium flame for better results. Remove and serve hot immediately with onion raita and pickle.
Enjoy !
Note
Adjust the quantity of spice powders as you like.
If you have added more water while kneading, you can add more wheat flour and knead to make smooth, non-sticky dough.
You can add up to 3 cups of atta for kneading the dough.
For variations, you can make masala using chopping vegetables and spice powders and then stuff it in the dough while rolling.
Do try this easy, yummy vegetable paratha using Preethi Zodiac.It makes your job done quickly and easily without any hassles !
Bread Rasmalai is an easy to make, instant rasmalai recipe. Even though its taste and texture cannot be compared with the authentic, traditional rasmalai prepared with rasgulla, it can satisfy our sweet cravings quickly. It takes very less time to prepare. Also it an yummy sweeet recipe that can be prepared using leftover bread slices. Kids would love it for sure.
Last week I made it using some left over dry bread slices at home. As I had already shared an instant rasmalai recipe using store bought rasgolla and condensed milk, I did not use condensed milk in this recipe. I just used sugar, nuts and prepared rabri in its usual method. This bread rasmalai tastes the best when served chilled. Friends, you can try this easy rasmalai recipe with bread for your kids and family to serve a quick dessert for an occasion or weekends. Ok, lets see how to make bread rasmalai recipe with step by step pictures and video.
Take milk in a wide pan and boil till it reduces to 1.5 cups.
Add sugar, chopped nuts, cardamom, saffron.
Boil till it reduces to 1 cup. Rabri is ready. Switch off and keep aside.
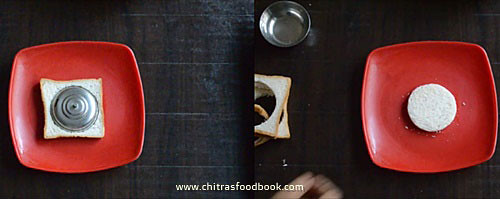
Take bread slices and cut into round shape using a lid.
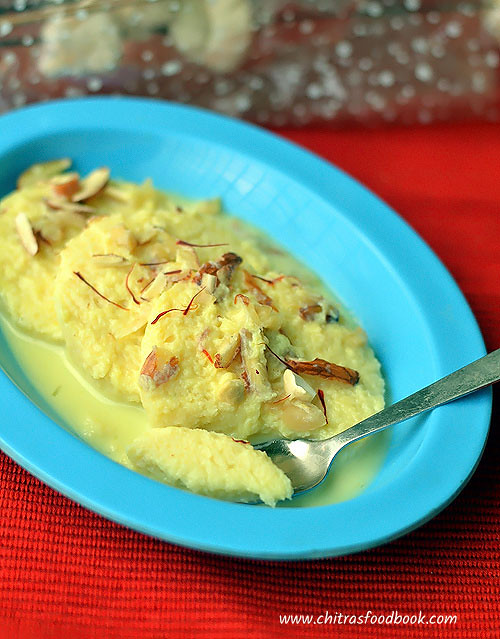
Dip the bread in rasmalai. Remove in a plate and garnish with nuts.
Refrigerate for an hour and serve chilled for best taste.
METHOD - STEP BY STEP PICTURES
Heat 2 cups of milk in a wide kadai. Boil till it reduces to 1.5 cups. Scrape the sides, collect the skin and add it back to the kadai while the milk boils. Stir at regular intervals to avoid over flowing.
After the milk is reduced, add sugar, chopped nuts, saffron threads and cardamom powder.Mix well, .Boil till milk reduces to 1 cup. So total milk should be half the quantity of original measure. Now check the taste. Add more sugar if needed and mix well. When you pour the milk, it should be slightly thick. Remove from the flame and let it become warm. Milk becomes thicker when it cools down.So do not reduce it too much.
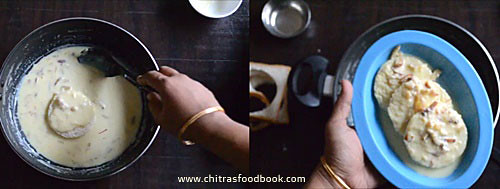
Now take the bread slices. Cut into round shape with a lid.Remove the sides. Dip the bread slice in thickened milk.
Pour some thick milk over the bread. Remove in a plate. Garnish with chopped nuts.Refrigerate for an hour and serve chilled.
Enjoy !
Note
Do not use very dry and old bread.Using fresh bread is also not advisable because it may dissolve in milk due to its softness. Use 2 days old bread for best taste.
Adjust the quantity of sugar as per taste. You can also add at the end before dipping bread slices to increase the sweetness.
Try this easy, instant bread rasmalai and enjoy a quick dessert at home !
This is an easy and quick version of moong dal halwa / moong dal sheera. I followed this recipe from Tarla Dalal’s website. Usually moong dal halwa takes more time to cook. But this is a quick recipe that can be prepared under 30 minutes. As it is prepared without khoya, I tried it immediately. It came out very well.
I have tasted moong dal halwa in many North Indian Lunch buffet. I love its coarse texture and softness. When I prepared this recipe, I was very happy that I could make a similar one at home easily. Friends, do try this quick moong dal halwa recipe without khoya. You will love it for sure. I took a video for this recipe. I will try to add it tomorrow. Now lets check out the recipe with step by step pictures.
Drain the water completely and dry grind the dal to a paste without adding water.
Strain the ground paste through a thin cloth. Squeeze the water content.
Heat ghee in a kadai. Add ground paste and saute in medium flame till it becomes golden brown.
Add milk + Water and cook till thick. Add sugar, mix well.
Cover and Cook for 5 minutes in low flame. Mix well.Add cardamom powder, saffron.
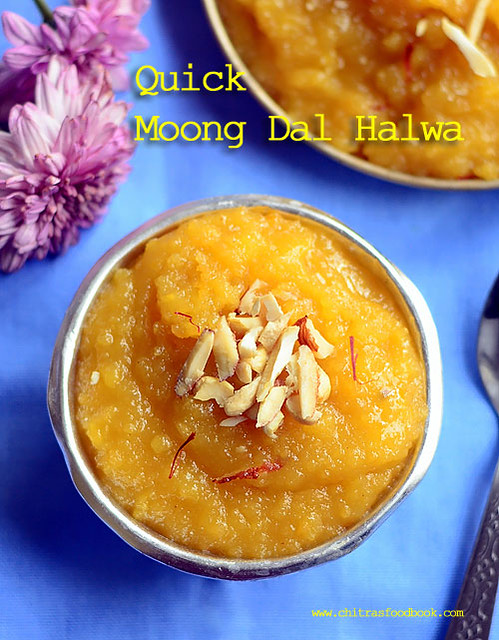
When the halwa starts to leave the sides of pan, remove and garnish with nuts. Serve warm.
METHOD - STEP BY STEP PICTURES
Wash and soak moong dal in hot water for 2 to 3 hours.Drain the water completely. Grind to a slightly coarse paste without adding water.Set aside. Chop the nuts finely. Soak saffron in 1 tbsp warm water.Keep aside.
Take a thin cloth and put the ground paste.Squeeze it well and remove the water content. Now the paste looks dry without moisture.
Heat ghee in a kadai. Keep the flame low and add the paste. Mix well till it spreads well with ghee. Cook in medium flame for 12 to 15 minutes till it becomes golden brown and crumbly.
Add milk and water. Mix well till 3/4 th of the milk + water is absorbed by the moong dal paste.
After it becomes slightly thick, add sugar and mix well.
Mixture becomes a semi liquid. Cover and cook in very low flame for 5 minutes. Open and mix well.
When it starts to leave the sides of pan, add cardamom powder. saffron thread soaked in little water ( soak 1/2 tsp saffron in 1 tbsp water).Mix well.
Halwa becomes thick and starts to leave the sides of kadai with traces of ghee, switch off the flame. No need to wait for the ghee to release. If you stir more, halwa becomes hard after cool down. Remove the halwa in a bowl and garnish with chopped nuts.
When the halwa becomes warm, it becomes non-sticky and well set. Enjoy when warm for best taste.
You can store this halwa upto 3 days in refrigerator. You can reheat it in a kadai , microwave or dosa tawa adding 1 tsp ghee to serve it fresh everytime.
Note
You can skip milk and use water completely.
Do not reduce the quantity of ghee. Halwa becomes hard.
Do not cook the halwa for more time after adding sugar. Sugar caramelizes and hardens the halwa. Remove the halwa as soon as it starts to leave the sides of pan.
Straining the ground moong dal paste in cloth helps to remove the water content. Hence it cooks quickly.


