Search Chitra's Food Book

June 16, 2014

MANATHAKKALI KEERAI THANNI SAARU RECIPE

manathakkali keerai thanni saaru
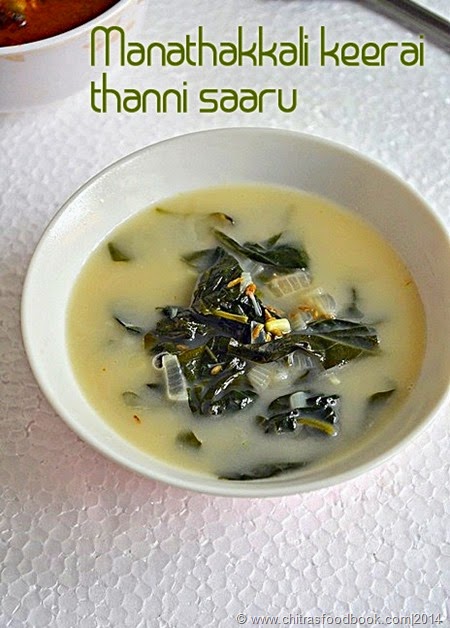
Manathakkali keerai/Black night shade is a wonderful green variety which has lots of health benefits. It is also called as Wonder berry. It is called as Kamanchi chettu in Telugu, Makoi in Hindi, Manathakkali in Malayalam, Kakke soppu or Ganike soppu in Kannada and Black night shade in English. 

We usually use sun dried berries in vathakuzhambu. But we make this thanni saaru with manathakkali keerai or agathi keerai whenever we get mouth ulcers, stomach inflammation & pains. Its a very good home remedy for it and you can feel the improvements in a day. The combination of manathakkali, small onions and coconut milk gives a great relief from mouth ulcers. Its very simple to do and tastes good when mixed with rice and ghee. Lets see how to make this manathakkali keerai thanni saaru recipe.
manathakkali keerai

Manathakkali keerai thanni saaru


Manathakkali keerai thanni saaru 
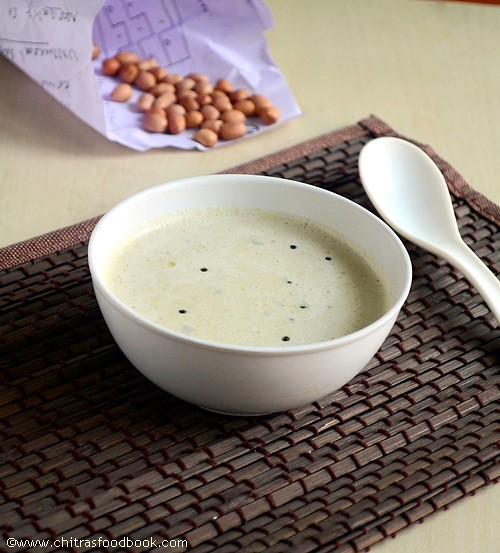
Manathakkali keerai thanni saaru - A good remedy for mouth ulcer
Cuisine: Indian
Category: Health food
Serves: 2
Prep time: 10 Minutes
Cook time: 10 Minutes
Total time: 20 Minutes


INGREDIENTS

  • Manathakkali keerai - 1 cup (tightly packed)
  • Grated coconut -1/2 cup
  • Cumin seeds - 1/2 tsp
  • Small onion - 10 nos
  • Salt - as needed
  • Sugar – a pinch
  • Milk - little (optional)

HOW TO MAKE THANNI SAARU - METHOD
  • Take out the leaves and discard the stem from manathakkali keerai. OR agathi keerai.  Chop small onions finely.
  • In a pressure cooker base , add water and keep a small vessel, take the keerai leaves and small onions adding 1 cup of water OR arisi kazhani/mandi with a pinch of sugar & salt in the vessel.
  • Cook in low flame till its soft. Keerai will be cooked well in 20 to 30 minutes( PS: This keerai takes more time to cook)
  • In the mean time, grind the grated coconut with 1/2 cup of water and take the extract.
  • After the keerai is cooked well, add coconut milk, salt and mix well. Make sure you don’t boil the keerai after adding coconut milk. Just heat it for few seconds in low flame and let it become warm.
  • Crush cumin seeds and add it to the cooked keerai.
manathakkali thanni saaru tile1
  • Check for taste, strain and drink the water. Consume the leaves with onions as such or by mixing with plain rice adding a tsp of ghee.


Note

U can directly pressure cook the leaves instead of keeping inside a vessel. I usually cook this along with rice or vegetables.. So I keep in a separate vessel.

U can follow the same procedure and make this using agathi keerai .

Healthy manathakkali keerai thanni saaru is ready to drink !
manathakkali-keerai-thanni- saaru

Do check out my Easy Manathakkali vatha kuzhambu if interested.

Continue Reading...


June 13, 2014

EASY PEANUT CHUTNEY RECIPE FOR IDLI DOSA - HOTEL STYLE GROUNDNUT CHUTNEY

Peanut chutney without coconut

Peanut chutney also known as groundnut chutney/ Kadlekai chutney/ Verkadalai chutney/ Palli chutney was in my try list for long time. Though I am not a big fan of it, I wanted to try it for Sendhil. I know he loves peanut a lot. So I got this recipe from my friend Megha who is an expert in cooking Andhra & Karnataka dishes.

 I learnt ragi mudde and so many typical Andhra , Karnataka recipes from her. I will share them one by one in future. And coming to this chutney, I have tried many times in my kitchen. Like Sendhil, I too started loving this chutney a lot. I am not sure whether this chutney is of Andhra style because I found different types of  Andhra style peanut chutney recipes on net. Whatever be its origin, it tastes great !

Sometimes I use little milk along with water to make the chutney super white in color  & it tastes more like the chutney that is served in road side hotels. It is a best side dish for idli, dosa. U can make “N” number of variations in this chutney. I have shared them in “Notes” section. So if you are a peanut lover, do try this easy groundnut chutney recipe. I am sure,u’ll make it more often like me.

Groundnut chutney recipe


Easy peanut chutney recipe


Easy peanut chutney recipe Peanut chutney for idli,dosa - Easy and tasty side dish!!
Cuisine: Indian
Category: Chutney
Serves: Serves 3
Prep time: 5 Minutes
Cook time: 10 Minutes
Total time: 15 Minutes


INGREDIENTS
1 cup -250ml
  • Peanuts/Groundnut - 1/2 cup
  • Green chillies - 3 to 4 
  • Garlic cloves - 4  ( small sized)
  • Cumin seeds - 1/4 tsp
  • Coconut – 1 tbsp ( 1 big finger size,optional)
  • Salt - as needed
  • Boiled,cooled Milk – 1/4 cup (optional)
  • Water - as needed
To temper
  • Cooking oil – 2 tsp
  • Mustard seeds – 1/2 tsp
  • Urad dal – 1/2 tsp
  • Red chillies – 1 no
  • Curry leaves - few
METHOD

  • Heat a kadai well for a minute. Simmer the flame and dry roast the peanuts till it turns golden brown. It crackles as soon as it is roasted. Switch off the flame and leave it in hot kadai to become crispy. After it is cooled down, take a handful of peanuts and rub them between your palms to remove its skin. Do in batches and set aside.
Peanut chutney step1
  • Now heat 1 tsp of oil in a kadai and saute the green chillies.
  • In a mixie jar, add cumin seeds, coconut, green chillies, peanuts, garlic cloves, salt and grind it once to crumble them. Then add little milk + water . Grind it to a smooth paste. Do not use milk if you want to use this chutney for 2 to 3 days storing in refrigerator. 
Peanut chutney step2
peanut chutney step3
  • Temper and add to the chutney ! Adjust its consistency by adding water.
    Serve with idli, dosa. Enjoy !


Note


For variations
  • U can use red chillies in place of green chillies
  • Add 1-2 small onions to the above recipe.
  • Using coconut is optional.
  • U can also add few stalks of coriander leaves while grinding.
  • Roast 1 tbsp of chana dal in little oil and add while grinding.
  • Adding milk is also optional. But it gives white color to the chutney.


Enjoy with idli and dosa. Tastes yummy !!

VERKADALAI CHUTNEY


Continue Reading...


June 11, 2014

NEER NELLIKAI | GOOSEBERRY PICKLE RECIPE–EASY PICKLE RECIPES

Neer nellikai
I learnt this from my MIL. As I mention in all my posts,she is an expert in making pickles. She is my inspiration to try oorugai on my own and that too this neer nellikai is very easy to prepare. Even a beginner who has zero knowledge in making pickles can make it easily. As you all know, gooseberries has innumerable health benefits. So we include it in our food regularly either as pachadi or pickle. Do include gooseberries in any form in your regular diet.It will really do wonders. Lets see how to make this easy nellikai oorugai ..
Neer nellikai

Gooseberry pickle


Gooseberry pickle Gooseberry pickle recipe
Cuisine: Indian
Category: Pickle
Serves: 12nos
Prep time: 10 Minutes
Cook time: 20 Minutes
Total time: 30 Minutes


INGREDIENTS

  • Gooseberry - 12 nos
  • Cooking oil – 1 tbsp
  • Red chillies - 10 nos
  • Asafetida/Hing - 1/4 tsp
  • Turmeric powder - 1/4 tsp
  • Crystal salt - as needed
  • Water - 2.5 cups
Dry roast n grind
  • Fenugreek seeds - 1 tsp
To temper
  • Sesame oil - 2 tsp
  • Mustard seeds - 1/2 tsp
METHOD

  • Dry roast methi seeds till golden brown and remove.In the same pan,heat oil in a pan.Saute gooseberries in oil for 2-3 minutes till it shrinks a bit.It helps the gooseberries to soak faster. 
  • Grind red chillies,methi seeds,salt & turmeric powder coarsely.
  • In a wide bowl, take the sauteed gooseberries.Add water to cover it.Add the ground powder.Mix well.Check for taste.Add more salt & chilli powder if necessary.
  • Temper all the ingredients & add to gooseberry.U can taste it on the same day.It will taste spicy n bitter.U will get the actual taste only after 3-5 days.
U can refrigerate & store for months.It stays fresh & good !


Note

  • Sauting gooseberries are optional but we usually do this for quick soaking.
  • Adjust the quantity of chilli powder as per ur taste buds.
Enjoy n have a healthy side dish for curd rice.
Gooseberry pickle
Continue Reading...


June 9, 2014

VAZHAKKAI CHIPS | RAW BANANA CHIPS RECIPE - HOMEMADE

raw banana chips recipe
Raw banana chips / Vazhakkai chips is a very easy to make homemade chips unlike potato chips. My MIL makes it very often for puliodharai. But my mom makes it only for Sodhi kuzhambu. Last weekend I prepared Tirunelveli style sodhi, ginger pachadi, potato poriyal along with this vazhakkai chips for our lunch. 

We had a nice Tirunelveli saapadu after a long time. Usually I make deep fried version for Raksha and baked banana chips for myself and Sendhil. I will make a separate post for baked chips.Both mom & MIL follows this method for  deep frying banana chips. Its a very easy one. Even a beginner can try ! Ok, Lets see how to make this green banana chips at home easily.

Vazhakkai chips recipe


Vazhakkai chips recipe Vazhakkai chips/Raw banana chips recipe - Homemade,easy to make!
Cuisine: Indian
Category: Snacks
Serves: 2-3 cups
Prep time: 10 Minutes
Cook time: 20 Minutes
Total time: 30 Minutes


INGREDIENTS

  • Raw banana - 1 no (medium)
  • Red chilli powder – 3/4 tsp  or pepper powder – 1 tsp
  • Salt - as needed
  • Cooking oil - to deep fry
  • Water - to soak the banana
METHOD

  • Wash and cut the banana into two horizontally. Keep immersed in water till use to avoid discoloration. Take a thin mandoline slicer. I use Everest brand slicer. Heat oil in a kadai to deep fry.
vazhakkai-chips
  • Once the oil is heated,check it by dropping a small piece of vazhakkai. If it rises to the top immediately, oil is heated. Now simmer the flame completely and carefully hold the slicer in one hand few inches above the kadai. Slice the banana directly in the oil.  Make sure the slices are thin and even.
vazhakkai-chips 1
  • After u sliced a batch,increase the flame to medium high and leave the chips for few seconds. Then flip it.
  • Cook till the bubbles and ‘sshhh’ sound ceases completely. Adjust the flame as & when needed. Keeping the flame high continuously burns the chips. So take care.
  • In the mean time, mix red chilli powder and salt and set aside.
  • Remove the chips in a tissue paper and drain the excess oil.
  • Transfer it to a plate or bowl and sprinkle the chilli powder+salt mix.
vazhakkai-chips 2
Serve with rice or as an evening snack with coffee or tea !!
Store the remaining in an air tight box. Its shelf life is one week.


Note

  • U can use pepper powder in place of red chilli powder.
  • Some people slice the bananas, keep them immersed in water and then deep fry in oil. In that case, you should pat dry the banana slices in a towel else it chips won’t come out crispy and sometimes color may change into black.
  • Do not fry the chips in high flame. It changes the color of chips.
  • Fry all the chips uniformly. Even if you make one batch soggy, it will spoil all the batches.
  • Store in a box only after the chips is cooled down.
Continue Reading...


June 8, 2014

HOW TO CHOOSE, CLEAN AND STORE MUSHROOM

 Mushrooms 
This is a very basic post on “"How to choose, buy and clean mushrooms before cooking “. Though most of you know this, I wanted to share this post for beginners who use mushrooms for the first time .Mushrooms have many health benefits.They are a good source of proteins, minerals, vitamins, amino acids and anti-oxidants. They are low in calories but high in fiber. It helps to reduce high cholesterol levels, improves immune system, aids weight loss and relief for diabetes too. But all these benefits are applicable only for edible mushrooms. Some mushrooms are poisonous which may lead to coma and several ill effects. Hence we should be careful while choosing and buying mushrooms. It is always better to buy mushrooms from well known brands and well sealed. It should be fresh and white in color. Read on to see the tips to choose and buy good quality mushrooms and how to clean them before cooking. Hope it would be useful.

Do check out this link to know about the different varieties of mushrooms.

How to buy mushrooms

HOW TO CHOOSE MUSHROOM
I have shared some tips for choosing a good quality mushrooms if you are a first time buyer.I got these tips from here and here
  • Look for firm, white mushrooms without any discoloration or bruises.
  • Choose the mushrooms that are free from spots and decay.The whiter the fresher it would be.
  • Button mushrooms have white caps but other mushroom varieties come in varying shades of brown and cream.
  • Choose the ones with with short,clean-cut stems and caps that are either closed around the stems or slightly open ( as shown in the above picture), and with pink or light-tan gills.
  • On the underside of the mushroom, the gills(black part) should be tight.Gills will spread open as mushrooms age.So buy closed ones.
HOW TO STORE MUSHROOM
  • For storage, refrigerate your mushrooms in a paper bag to make them last longer.Keep them covered. 
  • Use within a few days of purchasing.(1-2 days)
  How to clean mushrooms
HOW TO CLEAN MUSHROOMS
Though the cleaning process seems longer, it can be done in minutes. I referred sharmis passions and some more websites for this topic.
Mushroom outer layer peel

Mushroom gills


How to clean mushroom


How to clean mushrooms How to clean mushrooms before cooking
Cuisine: Indian
Category: How to
Serves: --
Prep time: 10 Minutes
Cook time: --
Total time: 10 Minutes


INGREDIENTS

  • Edible Mushrooms - 1 packet
  • Tissue paper
  • Water
METHOD


    • Take a mushroom and wipe it with a clean towel or tissue to remove the mud and dirt.
    How to clean mushrooms
     
    • Then remove the stem part which u can in the middle.When u look into the mushroom,u can c black hair like thing which are called Gills. If u wish, u can remove it using a knife. But this step is optional.
    How to clean mushrooms
     
    • Then peel the outer layer completely till u see the white cap.Mushroom will look white and clean.
    How to clean mushrooms
    • Now wash it under the running water and make sure all the dirt is washed off.Then cut into small pieces and use it as desired.
                     How to clean mushrooms


Button mushroom


Mushrooms are ready for cooking !
Mushrooms after cleaning

Do check out my MUSHROOM BIRYANI recipe if interested !

Continue Reading...


June 6, 2014

Peanut Rice Recipe / Verkadalai Sadam - Groundnut Rice Recipe

Peanut-rice-recipe
Last week when I was thinking about easy Indian lunch box recipes, I reminded about this peanut rice recipe (Groundnut rice, Verkadalai sadam in Tamil). As Sendhil loves peanuts, I tried this rice without any hesitation. I referred some websites for this verkadalai sadam recipe and came up with my own combination. Its a quick fix recipe for bachelors and working women to make it easily in busy mornings. Even kids would love to take this rice for their lunch box. Just a papad or vadam is enough to have a box full of this peanut rice. If you have roasted & de skinned peanuts ready in hand, this rice can be prepared very easily and quickly. It comes out flavourful and tasty too. Sendhil liked it very much. It can be made with leftover rice too. Friends, if you are looking for some easy lunch box ideas,do include this recipe.
To get a nice color for this rice, I used Byadgi chilli which is very famous here in Karnataka. It gives a bright red color to the dishes. So I use these chillies for my chutneys, kurma and bisibelebath. If you use normal red chillies, the color of this rice will vary but taste would be the same.
Ok, Lets see how to prepare this peanut rice with step by step photos.
I clicked this picture in a hurry while Sendhil was rushing to his office.So please bear with the clicks.

Lunch box ideas

Peanut rice recipe


Peanut rice recipe Easy peanut rice recipe for lunch box
Cuisine: Indian
Category: Lunch
Serves: Serves 2
Prep time: 15 Minutes
Cook time: 10 Minutes
Total time: 25 Minutes


INGREDIENTS
1 cup - 250ml

  • Rice - 1/2 cup
  • Cooking oil - 1.5 tbsp
  • Peanuts - 1/4 cup
  • Sesame seeds - 1/2 tsp
  • Urad dal – 1 tsp
  • Pepper corns - 1/4 tsp
  • Byadgi Red chillies – 4 nos  ( use 2-3 chillies for other varieties)
  • Grated coconut - 2 tbsp
To temper
  • Sesame oil or ghee - 1 tbsp
  • Mustard seeds - 1/2 tsp
  • Urad dal - 1 tsp
  • Cashew nuts – few
  • Peanuts – 1 tbsp
  • Big onion – 1 no  (optional)
  • Curry leaves - few
METHOD

  • Pressure cook the rice adding enough water and a drop of sesame oil. Rice should be grainy and separate.Spread in a plate and allow it to cool down.
  • Dry roast peanuts and remove the skin. Reserve a tbsp of peanuts. Keep it ready
Peanut rice
  • In a kadai, heat oil and roast sesame seeds,chillies,coconut,pepper corns & urad dal. Roast till golden brown. Roast coconut till it becomes dry.
Peanut rice 1
  • Then let it cool.Grind everything coarsely. To this add roasted peanuts, salt and run the mixie twice or thrice. It will become a coarse powder.
peanut rice 2
  • Heat ghee or sesame oil in a kadai and do the tempering adding reserved peanuts & cashews.Saute onions & set aside.
  • Add the ground powder,tempered ingredients to the cooked rice.Mix well.Add sesame oil or ghee while mixing.Check for salt.
Peanut rice 3
Serve with papad !


Note

  • U can prepare this rice using leftover rice too.
  • Roast the coconut well else the mixture will become a paste while u grind.U can also use dry coconut/Koppari instead of fresh coconut.
  • Do not run the mixie continuously for long time.Open every now and then,scrape the sides and grind.
  • Add sesame oil or ghee while mixing.It gives a nice flavour.
  • U can omit onions and make it as no onion no garlic recipe too.It tastes good.

I had this rice with over roasted papad.It was yummy !
peanut-rice


Continue Reading...


June 5, 2014

ONE MINUTE EGGLESS CHOCOLATE MUG CAKE RECIPE IN MICROWAVE

Eggless chocolate mug cake
I never thought one minute eggless chocolate mug cake in microwave comes out super spongy and soft. It can be made instantly within no time.Its really a one minute magic or wonder I would say. I tried this for the first time from this spaceI did some changes in the actual recipe based on the ingredients I had in hand & gave it to Raksha as an evening snack as she loves to have muffins and cakes more than deep fried snacks. When I made this cake in one minute, she was very much surprised and happy to see a cake inside a mug which was new to her. She enjoyed it saying “Mumma its very soft & chocolatey”. I immediately made another batch for myself and Sendhil. We too loved it a lot.

To make this picture interesting, I prepared this cake in our personalised mug printed with our photographs . How is it ??. We took this snap last year during our kodaikanal trip. Do try this cake for your kids and you can make them do it by themselves. Its so easy that anyone can bake it. I hope u can try in pressure cooker too. What are you waiting for?? Rush into your kitchen and make this one minute wonder. Please check out the full video recipe below for easier understanding :)

One minute microwave mug cake - Video

One minute microwave mug cake

Eggless chocolate cake in microwave


Eggless chocolate cake in microwave Eggless one minute chocolate mug cake in microwave - Very easy n super tasty cake!!
Cuisine: Indian
Category: Baking
Serves: 1
Prep time: 2 Minutes
Cook time: 1 Minutes
Total time: 3 Minutes


INGREDIENTS

  • Maida/All purpose flour - 2 tbsp
  • Sugar – 2 tbsp  OR sugar –2-3 tsp + Nutella / jam/Peanut butter – 1 tbsp
  • Cooking oil - 1 tbsp ( i used refined oil)
  • Milk – 2.5 tbsp
  • Cocoa powder – 1.5 tsp ( i used weikfield)
  • Baking powder – 1/4 tsp
  • Salt - a pinch
  • Vanilla essence- few drops
  • Choco chips - few
HOW TO MAKE EGGLESS CHOCOLATE MUG CAKE - METHOD

    In a mug,take all the dry ingredients. Mix well. Then add oil, milk & essence. Mix thoroughly without lumps & sugar should dissolve completely. Check for taste and add more sugar if needed.

    one minute microwave cake

    Microwave in 800w power for 1 minute. Cake will raise to the top and it may deflate. Check with a tooth pick .If it comes out clean,ur cake is ready. Else keep it for another 10-20 seconds. Mine took 1 minute 20 seconds.
    After taking out, stud in few choco chips & enjoy !!.

    one minute microwave cake1


Note

  • Adjust sugar as per the taste of cocoa powder else it may taste slightly bitter.
  • As it is an instant cake, serve immediately when warm.
  • As given in the original recipe, you can add a tbsp of nutella,peanut butter or jam. In that case, reduce the sugar to 1.5 tsp and adjust the chocolate powder to 1 tsp.
  • I used canola oil. U can replace with olive oil or any cooking oil.
  • Make sure you mix the batter well without lumps.

One minute microwave chocolate mug cake

One minute eggless chocolate mug cake is ready to enjoy with super soft texture and taste !

 One minute microwave chocolate mug cake

Do check out
Continue Reading...