Search Chitra's Food Book

November 26, 2014

Eggless Tutti Frutti Cake Recipe-Basic Vanilla Sponge Cake Recipe


Eggless tutti frutti cake recipe without condensed milk. Baking would be a fun & breeze if you have the perfect recipe in hand. Its so easy and most probably with just 2 steps.You don’t have to look for any consistencies like sweets. Even a beginner can make it without hassles. 

Though I know this very well, I bake once in a blue moon thinking about all the high calorie stuffs like maida, butter, sugar, condensed milk etc. If you are a controlled eater, you don’t have to worry about all these things. But in my family, no body knows what is controlled eating. Even If you give us a loaf of cake or bread, it would vanish within no time. We can’t resist our temptation to eat if it is a deep fried snack or cake. So to satisfy our cravings, I make one minute microwave cake recipes ( Refer side bar) very often in which the quantity of consumption would be greatly reduced. And When I plan to bake a conventional cake, I make sure to exclude at least one or the other ingredient from the above said ones. I always watch out for cake and cookies recipes that uses cooking oil and curd than butter and condensed milk.

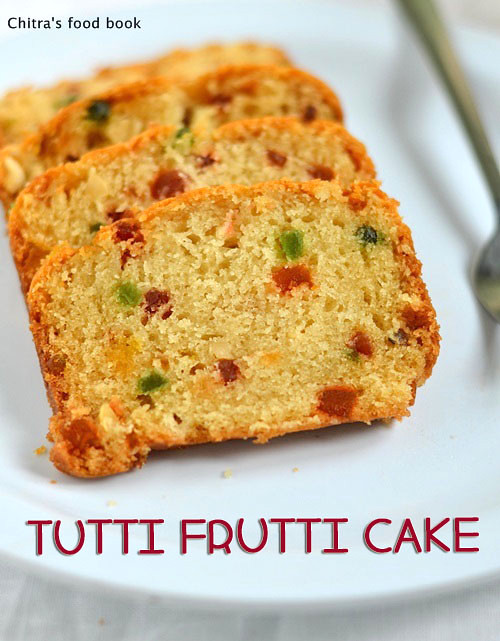
 Being a vegetarian it should be eggless too. As Christmas is around the corner, I wanted to share some yummy eggless, butterless cake recipes in my blog. Last year this time, I posted eggless vanilla cake recipe using fresh cream. It took one year for me to post yet another delicious,eggless basic vanilla sponge cake recipe.To make this cake interesting, I’ve used tutti frutti  & nuts here. Recently I bought a loaf pan to try whole wheat bread. 

I baked this cake in that pan. You can try this in a round, square or heart shaped pans too. Its one of the best eggless cake recipes I have ever baked & I adopted this recipe from here & hereThis recipe was a super duper hit among my friends and family. Its one of the best tea time cake recipes and you can keep this cake as a base for making birthday and anniversary cakes too. It tastes even more rich and tasty if you decorate this cake with icing !! 

Try this yummy tutti frutti cake for this Christmas and share your feedback with me. I am waiting!. Check out my eggless pressure cooker cake recipe too. 

You can refer this post, follow the same procedure and make this cake in pressure cooker too. I hope it comes out well. Lets see how to make this eggless vanilla sponge cake recipe with tutti frutti.

Tutti-frutti-cake-recipe

Eggless tutti frutti cake


Eggless tutti frutti cake Eggless tutti frutti cake using basic vanilla sponge cake recipe - The best sponge cake ever !
Cuisine: Indian
Category: Baking
Serves: 12
Prep time: 10 Minutes
Cook time: 40 Minutes
Total time: 50 Minutes


INGREDIENTS
1 cup = 200 ml
For sponge cake batter
  • All purpose flour - 1.5 cups
  • Fresh Curd - 1 cup
  • Baking powder - 1.25 tsp
  • Cooking soda/Baking soda - 1/2 tsp
  • Cooking oil - 1/2 cup (I used saffola oil,use any odourless oil)
  • Vanilla essence - 1 tsp
  • Fine sugar or powdered sugar - 3/4 to 1 cup ( I used 3/4 cup + 2 tbsp)
  • Salt - A pinch
For tutti frutti mixture
  • Tutti frutti - 1/2 cup( add more based on ur taste)
  • Raisins - 1 tbsp ( optional)
  • Cashew nuts - 5 nos ( chopped finely)
  • Maida – 1tsp
For greasing the pan
  • Cooking oil – 2tsp
  • Maida – 2 tsp OR Butter paper/Parchment paper
METHOD

  • First take the baking pan and grease with oil all over the bottom and sides till the rim of pan completely. Then sprinkle maida and rotate the pan. Maida should coat the pan in all the sides. If you don’t want to do this step, just line the pan with butter paper or parchment sheet. Make sure you cut the butter paper in proper size before lining the pan.
  • In a bowl, take the tutti fruit, nuts and raisins. Add 1tsp of maida and mix it well. This step is to avoid sinking of tutti frutti in the bottom of pan.
Tutti frutti cake recipe 1
  • In a big bowl, take the curd( my curd was slightly watery. I used nandini packet curd) and beat it with a whisk. Do not beat it vigorously. Just mix till it becomes smooth. To this curd, add baking powder and baking soda. Mix it slowly & gently. As you mix, you will see bubbles rising from it. Stop mixing and keep the bowl aside for 5 minutes. In the mean time, sieve the maida, a pinch of salt once or twice in a bowl and keep it ready.
Tutti frutti cake recipe 2
  • Now if you check the curd mixture, it would have risen well with foamy texture. Add the fine sugar or powdered sugar to it. Mix it with the whisk gently. Do not beat it. Just do it such that the bubbles should not subside. After mixing the sugar, add the vanilla essence and oil. Mix it slowly and nicely. The mixture should not lose its air particles. So be gentle.
Tutti frutti cake recipe 3
  • Add half of the sieved maida and fold it gently. Again add the remaining half and mix well. Lastly add the tutti frutti mix and fold it. Make sure there are no lumps formed. Batter should be of dropping consistency and not too thick. Transfer it to the cake pan and pat the pan well for uniform distribution.
Tutti frutti cake recipe 4
Tutti frutti cake recipe 5
  • Preheat the oven in convection mode for 10 minutes in 180c. Keep the cake pan and bake it for 35-40 minutes at 180c in convection mode. Remove the cake just 5 to 10 minutes before completion  and brush it with milk. This gives a golden crust . Keep an eye after 30 minutes and check with a skewer.If it comes out clean with little crumbs, your cake is done. Else keep it for another 5 minutes. Mine took exactly 42 minutes. It may vary slightly. After the cake is done, remove and let it cool. Run a knife all through the sides of pan and invert the cake in a plate. It will come off easily. Slice it and serve with coffee/tea or enjoy as it is !
Tutti frutti cake recipe 6


Note


  • This cake doesn’t come out white in color. It would be slightly yellowish in color.
  • Do not over bake the cake than the mentioned time. Keep an eye after 25 minutes. Brushing with milk is very important to get golden colored crust on top.
  • Adding cashews and raisins is completely optional. Tutti frutti alone gives you great taste to this cake. 
  • You can also make this cake plain without adding nuts & dry fruits and enjoy. For variations, you can add orange zest or lemon zest in the batter to make orange & lemon sponge cakes.
  • To make this as chocolate cake, add a tbsp of cocoa powder to the batter and mix well.
  • This cake stays good for 2 days without refrigeration.


tutti-frutti-cake-recipe

Try this yummy tutti frutti cake for this Christmas and enjoy !!

Continue Reading...


November 24, 2014

Beetroot Kootu Recipe-Side dish For Rice


I am planning to share this recipe for long time but i was not able to do it.This is one kootu recipe i make very often next to keerai kootu & mixed vegetable kootu.This is our family favourite recipe too.As Sendhil has fatty liver problem,i try to include beetroot in my cooking at least twice or thrice in a week.I make this kootu or one of these poriyals( my mom’s version & easy version).Even Raksha loves these recipes lot.Today she told me to prepare More kuzhambu & beetroot kootu for her lunch.So i made it along with Pirandai thogayal for our lunch.My MIL has the practice of mixing side dishes with rice adding a drop of ghee or gingely oil to make her Son & daughter eat vegetablesWinking
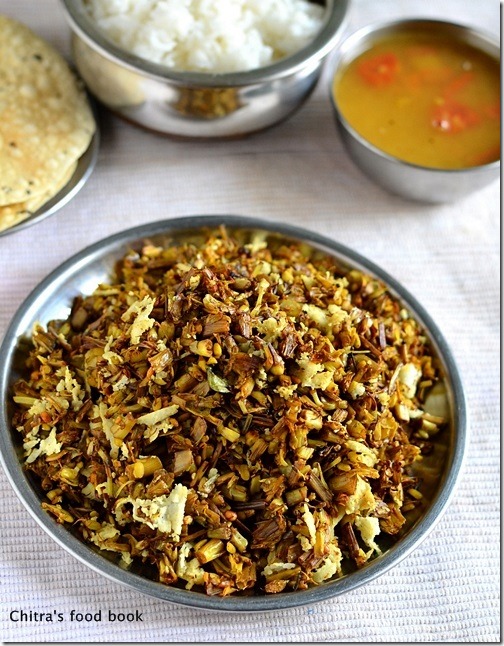
.So i too mixed this kootu with plain rice adding a tsp of ghee & packed for Sendhil’s lunch box.But Raksha loves to have this kootu as a side dish for more kuzhambu sadam like meTongue.It tastes great in either ways ! Here i have used moong dal following my MIL.You can also replace it with chana dal like in hotels.Do try it.Its a very simple and delicious kootu recipe with a mild sweetness of beets !


Beetroot kootu recipe


Beetroot kootu recipe Beetroot kootu recipe with moong dal
Cuisine: Indian
Category: Side dishes
Serves: Serves 4
Prep time: 10 Minutes
Cook time: 15 Minutes
Total time: 25 Minutes


INGREDIENTS
To pressure cook
  • Beetroot - 1 no ( very big) or 2 nos ( if medium sized)
  • Moong dal - 1.5 tbsp
  • Salt & water - as needed
To grind
  • Grated coconut - 1/4 cup
  • Green chillies - 2-3 nos
  • Small onions - 3 nos
  • Cumin seeds/Jeera - 1/2 tsp
  • Rice flour - 1/2 tsp
To temper
  • Coconut oil - 1 tbsp
  • Mustard seeds - 1/2 tsp
  • Urad dal - 1/2 tsp
  • Curry leaves - few
METHOD

  • Wash and peel the skin of beetroot and chop into small cubes.In a pressure cooker base,take the moong dal,chopped beetroot,salt & water.Mix well and pressure cook for one whistle in low flame.( I cooked it along with rice in cooker by keeping beetroot in a small bowl to save time).
  • Grind all the ingredients given under” to grind” to a smooth paste adding enough water.
Beetroot-kootu-recipe
  • Add this paste to the cooked beetroot and boil the mixture in a kadai till its raw smell goes off completely.Add some water if u find the kootu is very thick.
Beetroot-kootu-recipe-1

  • Lastly heat a small kadai and temper all the ingredients given under “to temper”.Add to the kootu and mix well.

Enjoy !

Note

  • You can replace moong dal with chana dal but u should soak the chana dal for 30 minutes before cooking.
  • Add more chillies if u want the kootu to be spicy.We like mildly spiced kootu.So i add only 2 chillies.
  • Adding coconut oil gives a nice flavor to this kootu.So don’t skip it.


Enjoy this healthy,colorful beetroot kootu with rice and any gravy !


Continue Reading...


November 22, 2014

EASY HOMEMADE GRANOLA(MUSELI)RECIPE-DIY


Homemade museli

Muesli/Granola is a popular breakfast dish based on raw rolled oats and other ingredients including grains,fresh or dried fruits,seeds and nuts,mixed with milk,soy milk, yogurt or fruit juice.It is available in a packaged dry form,ready made,or made fresh.There are slight differences between museli and granola.Please find them here.Recent days Sendhil is taking store bought museli & granola bars to his office to have it during break time.As u all know store bought brands are very costly.So i wanted to give it a try at home.When i browsed for the same, i found a very simple and easy recipe here.Its just a three step process.I did some changes in the original recipe and tried it.It came out very well and crunchy.Anyone can make it with easily available ingredientsCool 
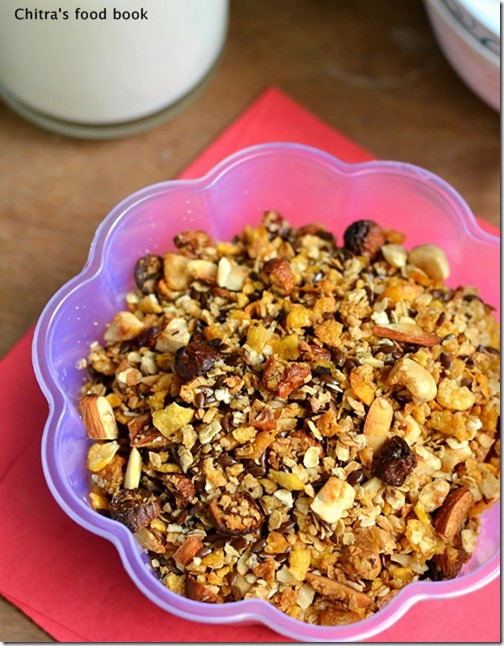
.Sendhil loved it a lot.Even i liked it very much and i am having it for my breakfast once in a week.Its really a healthy,tummy filling breakfast recipe for weight watchers like me and a good replacement for my regular plain(kellogs)corn flakes.Lets see how to prepare granola/Museli at home easily.

Homemade-museli-recipe

Homemade museli recipe


Homemade museli recipe How to make museli/granola at home easily at home
Cuisine: Indian
Category: Breakfast
Serves: 2-3cups
Prep time: 10 Minutes
Cook time: 20 Minutes
Total time: 30 Minutes


INGREDIENTS
To mix
  • Quick oats - 1 cup ( i used quaker)
  • Kellogs corn flakes - 1/2 cup ( crushed coarsely)
  • Flax seeds - 1/4 cup
  • Hazelnuts - a handful ( roughly chopped)
  • Raisins or dry grapes - A handful ( roughly chopped)
  • Almond/Badam - 1/4 cup ( chop into thin slices)
  • Cranberries or dates - 2 tbsp (optional) , chop roughly
  • Cinnamon powder – 1/2 tsp ( crush 2 inch cinnamon piece into fine powder)
  • Vanilla extract – 1 tsp
  • Honey - 2.5 tbsp
  • Cooking oil or olive oil - 1 tbsp
  • Condensed milk - 1/2 tbsp ( optional)
  • Salt - a pinch
METHOD

  • Chop the nuts and dry fruits finely and set aside.In a wide bowl,take the oats,flax seeds and coarsely crushed corn flakes.Mix everything well together.
Homemade-granola-recipe
  • To this,add honey,cinnamon powder,vanilla essence,cooking oil and condensed milk(optional).Mix well using your clean hands.Make sure there are no lumps in the mixture.
Homemade-granola-recipe-1
  • Grease a baking tray with little cooking oil and spread the museli mixture all over the plate.Pre Heat oven in convection mode at 180 c for 10 minutes.Then keep this plate and bake at 180 c in convection mode for 20 –25 minutes.Remove it once in 10 minutes,mix well with a spatula and again bake it.The color of raisins and cranberries would turn golden brown with a nice baked smell.The oats will turn crunchy.Remove after 20 minutes and let it cool completely.After it cools down,it will become super crunchy.Store in an air tight bottle and use as needed.
Homemade-granola-recipe-2

Enjoy it for your breakfast or lunch adding a cup of hot milk or munch as it is !


Yummy,crunchy homemade granola is ready to munch adding hot milk.Its a tummy filling breakfast recipe for weight watchers Smile.


Museli-recipe


Continue Reading...


November 20, 2014

VARAGU ARISI PONGAL RECIPE/KODO MILLET PONGAL-MILLET RECIPES

varagu arisi pongal recipe

Recently I started making upma & pongal varieties using millets. I tried Ven pongal using Varagu arisi( Kodo millet in English, Koden/Kodra in Hindi, Harka in Kannada, Arikelu in Telugu, Koovaragu in Malayalam- Source-Wikipedia) for the first time. It came out very well. 

As you all know Varagu rice/Kodo millet has amazing health benefits. It is basically a digestion friendly millet. It is rich in phytochemicals, Phytate that helps in reduction of cancer risks. It helps to reduce the body weight which is most needed for obese people. It helps to overcome irregular period problems in women. It helps to reduce knee & joint pains. It is good for diabetic people. It reduces nervous disorders especially in eyes. 

This varagu arisi pongal is a very easy and tummy filling breakfast recipe. Just 1/2 cup of varagu arisi is enough to serve 2-3 people because it doubles in quantity once its cooked. It tastes very similar to our regular rice pongal with full of flavors. My daughter Raksha loves pongal a lot. When I gave this for her breakfast today, she couldn’t identify its varagu rice pongal and not our usual one. We had with coconut chutney as side dish. It was yum. Do try this easy and healthy pongal recipe for your breakfast or dinner. I am sure your entire family would love it.

check out my other millet recipes here.

varagu arisi pongal

Varagu arisi pongal/Kodo millet pongal recipe


Varagu arisi pongal/Kodo millet pongal recipe Varagu arisi pongal recipe - Healthy millet recipe for breakfast !
Cuisine: Indian
Category: Breakfast
Serves: 3
Prep time: 5 Minutes
Cook time: 20 Minutes
Total time: 25 Minutes


INGREDIENTS

  • Varagu arisi/Kodo millet - 1/2 cup
  • Moong dal - 2 tbsp
  • Water - 2 to 2.5 cups
  • Salt - as needed
To temper
  • Ghee - 1 tbsp
  • Pepper corns - 1/4 tsp
  • Cumin seeds/jeera - 1/2 tsp
  • Hing/Asafetida - a small pinch
  • Ginger - 1/2 inch piece ( finely chopped)
  • Green chillies - 1 no ( small sized)
  • Curry leaves - few
HOW TO MAKE VARAGU PONGAL - METHOD

  • Wash the kodo millet ,drain and set aside. In a pressure cooker base, heat ghee and add the moong dal,pepper corns.Saute for a minute in low flame. Make sure the color of dal should not change. Then add the cumin seeds/jeera and saute till it turns light golden. Lastly add the curry leaves, green chillies & hing. Stir it. Add the measured water and required salt.
varagu-pongal-1
  • Add the washed & drained millet and ginger pieces. Close the cooker and cook for one whistle in low flame.It will take nearly 10-12 minutes.
varagu-pongal-2
  • Remove the lid and mix well. Add a tsp of ghee and serve hot !Tastes the best with coconut chutney !
Enjoy !


Note

  • Serve this pongal when its hot to enjoy its best taste. When it cools down, it will become slightly hard.You can reheat the pongal while serving by adding little water and mix well in high flame for few seconds.
  • You can follow the same method and make pongal with thinai & samai too. But the quantity of water may slighty vary.
  • Here I used 1: 5 ratio of millet and water. You can use 1:4 too.
  • Replace ghee with cooking oil if u are calorie conscious. But ghee gives  a great flavor.
  • Add a tsp of ghee while serving for kids.

Serve this healthy,easy varagu pongal with chutney and sambar. Tastes yummy !
Kodo millet recipes


Continue Reading...


November 19, 2014

VAZHAIPOO PORIYAL RECIPE-BANANA FLOWER CURRY/STIR FRY

Vazhaipoo poriyal recipe

Vazhaipoo poriyal has become one of our favourite vazhaipoo recipes. It is very easy to make when compared with vazhaipoo usili and super tasty without onion. I learnt this recipe from my MIL. Nowadays I am making this very often in my kitchen next to vazhipoo vadai & vazhaipoo kuzhambu.Check out my post on “How to clean vazhaipoo/Banana flower with stepwise pictures” to know how to clean, chop and store it in advance to make your morning job hassle-free.

Lets see how to make this healthy valaipoo poriyal/Banana flower curry recipe at home easily. It tastes the best with sambar sadam and paruppu rasam !

Vazhaipoo-poriyal

Vazhaipoo poriyal/Banana flower curry recipe


Vazhaipoo poriyal/Banana flower curry recipe Easy n delicious vazhaipoo poriyal recipe - Tasty side dish for sambar rice !
Cuisine: Indian
Category: Curries
Serves: 4
Prep time: 15 Minutes
Cook time: 15 Minutes
Total time: 30 Minutes


INGREDIENTS

  • Chopped banana flower - 2 cups
  • Moong dal - 2 tbsp
  • Turmeric powder - 1/2 tsp
  • Sambar powder - 1 tsp
  • Salt - as needed
To temper
  • Cooking oil - 1 tbsp
  • Mustard seeds - 1/2 tsp
  • Urad dal - 1 tsp
  • Grated coconut - 1/4 cup
  • Sugar - 1/8 tsp
HOW TO MAKE VAZHAIPOO PORIYAL - METHOD

  • In a wide bowl,take the chopped banana flower, moong dal, salt, turmeric powder and sambar powder. Mix well using your hands and set aside for 15 minutes.It will leave little water.
vazhaipoo-poriyal-recipe-1
  • In a kadai,heat oil and temper mustard,urad dal and curry leaves. After the dal turns golden brown, add the vazhaipoo mixture and mix well. Keep the flame low and cover cook for sometime.You don’t need to add water because the water in banana flower itself is sufficient. Keep the flame low and cook it with a lid for 10-15 minutes. Toss it once or twice in the middle.
vazhaipoo-poriyal-recipe-2
  • After the banana flower is completely cooked, add the grated coconut, mix well for a minute. Remove and serve. You can add few drops of lemon juice if you want tanginess. We don’t do it usually.
vazhaipoo-poriyal-recipe-3
Enjoy !


Note

  • Cleaning and chopping banana flower takes more time. So make it the previous day,keep the chopped flowers immersed in buttermilk and use it next day. Squeeze the buttermilk completely and then proceed as mentioned above.

Stay Connected  -     
 

I served this vazhaipoo poriyal recipe with rice,paruppu rasam and papad. It was lovely !

vazhaipoo poriyal

Continue Reading...


November 18, 2014

ONION TOMATO THOKKU RECIPE-SIDE DISH FOR IDLI DOSA

Tomato-thokku-recipe

Is there anyone in your house says NO to this simple yet yummy onion tomato thokku recipe when you make it as a side dish for idli, dosa and chapathi ? No One, right ?? But in my house, both dad & daughter says BIG NOOOOOO whenever I make this as side dish. 

Basically Iam a great fan of tomato recipes especially tomato thokku. I can have more than 10 idlis when my mom makes this as a side dish.After marriage,i have tried it many times following my mom’s recipe using Bangalore tomatoes. Sendhil & Raksha used to have it by showing odd faces. So I completely stopped preparing it for years.

Recently I watched Vijay tv’s samayal samayal with Chef Venkatesh Bhat in which he showed Neer dosa with this chutney (he mentioned this recipe as onion tomato chutney) as side dish. At that time, my in-laws were here in my place & they had brought ripe naatu thakkali ( Tangy tomatoes ) from Salem, Tamilnadu. My MIL told me to try this thokku for breakfast as they love it very much like me. I too tried hopelessly thinking Sendhil & Raksha won’t like it. But to my surprise, they both loved it a lot and Sendhil said “ Its good & tasty” for nearly 4-5 times and had two more idlis too. 

I was wondering what made the difference between this version & my mom’s version. Is it the addition of garlic or the tangy Tamilnadu tomatoes,something has made the magic and this recipe was a super hit among my family. Thanks a lot Chef. I have done it thrice so far but only with naatu thakkali (In Bangalore they call it as “Naatti”). 

Friends do try this recipe using naatu thakkali if you have in hand, even thokku haters would love it for sure. For tomato lovers, Bangalore tomatoes would do !!

Check out my Easy tomato thokku recipe without onion & garlic if interested !

Onion tomato thokku recipe

Onion tomato thokku recipe


Onion tomato thokku recipe Onion tomato thokku recipe - A very tasty side dish for idli,dosa n chapathi !
Cuisine: Indian
Category: Side dishes
Serves: Serves 3
Prep time: 10 Minutes
Cook time: 15 Minutes
Total time: 25 Minutes


INGREDIENTS

  • Ripe tomatoes - 3 nos
  • Big onion - 2 nos
  • Garlic cloves - 6 nos
  • Turmeric powder - 1/8 tsp
  • Red chilli powder - 1 - 1.5 tsp
  • Sugar - a pinch
  • Curry leaves - few
  • Hing/Asafetida - a big pinch
  • Salt & water - as needed
To temper
  • Cooking oil - 2 tbsp
  • Mustard seeds - 1/2 tsp
  • Urad dal -1 tsp
  • Red chillies - 2 nos ( pinch into 2 )
Coriander leaves – few ( finely chopped to garnish)

METHOD - HOW TO MAKE TOMATO ONION THOKKU

  • Wash and chop the tomatoes and onions very finely. Heat oil in a kadai and temper all the ingredients given under “ to temper” in the same order.
  • Add finely chopped garlic cloves and saute for few seconds. Then add finely chopped onions and saute till they turn transparent. Then add finely chopped tomatoes. Saute till tomato turns mushy adding the required salt
onion-tomato-thokku-step1
  • Add turmeric powder, red chilli powder, hing and sugar. Mix well for a minute. Then add 1/2 cup of water and let the mixture cook well for few minutes. Switch off the flame when the mixture is slightly wet with little water because it will become too dry when it cools down. So switch off  the flame at the right time. Remove and add chopped coriander leaves.
onion-tomato-thokku-step2
Enjoy with idli, dosa and chapathi !


Note

  • Use ripe tomatoes for best results.
  • Adjust the quantity of chilli powder as per your spice level.
  • Adding a pinch of sugar helps to balance all the taste.


Enjoy my favourite onion tomato thokku with hot idlis, dosa & chapathi. It tastes awesome !
Onion-tomato-thokku

Continue Reading...