Search Chitra's Food Book

September 28, 2015

Gobi Biryani / Cauliflower Rice Recipe

Cauliflower Biryani Recipe
Gobi biryani / South Indian Cauliflower rice is my recent try in biryani recipes. Cauliflower is one of the favorite vegetables for kids & adults.In my family,my daughter loves my Gobi 65.So I always opt for gobi manchurian or gobi 65 more than other cauliflower recipes.This Friday I came to Salem to my in-laws house.My FIL bought a big sized cauliflower as it is Raksha's favorite vegetable. I made crispy Gobi fry with half of the cauliflower and made this biryani for Sunday Lunch yesterday.It came out really well.I referred my MIL’s hand written cook book for the recipe.I tweaked it slightly to suit our family’s taste.Everyone gave thumbs up after tasting the biryani.This cauliflower rice can be made as lunch box recipe for your kids.I am sure they will love to have it with raita.Ok,Lets see how to make this week’s Sunday Lunch Recipes Series 31-Gobi Biryani aka Cauliflower Rice .

Do check my Biryani Series collection HERE.

Cauliflower Biryani Recipe

Gobi/Cauliflower biryani recipe


Gobi/Cauliflower biryani recipe Cauliflower rice / Gobi biryani recipe - Kids favorite Rice
Cuisine: Indian
Category: Lunch ideas
Serves: Serves 3
Prep time: 30 Minutes
Cook time: 20 Minutes
Total time: 50 Minutes


INGREDIENTS
1 cup - 200ml
  • Basmati rice - 1 cup
  • Water - 1.75 cups
  • Big onion - 1 no
  • Tomato - 1 no
  • Red chilli powder - 1/2 tsp
  • Garam masala powder - 3/4 tsp
  • Salt - as needed
  • Mint+coriander leaves - few
  • Curd - 1 tbsp
  • Lemon juice - few drops
To grind
  • Green chillies - 2 nos
  • Cashewnuts - 5 nos
  • Cinnamon - 1 inch
  • Cloves - 2 nos
  • Cardamom - 1 no
  • Fennel seeds - 1/2 tsp
  • Ginger -1 inch piece
  • Garlic - 5 cloves
METHOD
  • Wash and soak the basmati rice for 30 minutes.In the mean time,take the big sized cauliflower florets and wash in turmeric+salt mixed hot water to remove germs.( Tip : Do not use small sized cauliflower florets because it will become mushy while cooking in cooker.So use bigger florets) Slice the onion and tomato.I used steamed rice here.So i used 1:2.5 cups of water after soaking the rice for 30 mins.
  • Grind all the ingredients given under “to grind” to a smooth paste adding enough water. Set aside.
Cauliflower Biryani Recipe
  • Heat a pressure cooker with oil+ghee. Saute a bay leaf,black stone flower.Saute onion slices till transparent.Add the ground masala and tomato pieces.Saute till tomato turns mushy and raw smell of masala goes off completely.
Cauliflower Biryani Recipe
  • Add turmeric powder,red chilli powder,garam masala powder and salt.Now add the cauliflower pieces and mix well to coat the masala.
Cauliflower Biryani Recipe
  • Now add the washed & soaked basmati rice,water and pressure cook for 1 whistle in low flame. Open the cooker after the steam is released.Fluff the rice with fork and serve hot with raita!! Enjoy !
  • Cauliflower Biryani Recipe
Note

  • you can replace cauliflower with baby corn ,potato or meal maker/Soya chunks and make this rice.
  • For variations u can skip the grinding part and saute all the spices given under “To grind” in oil+ghee.

Enjoy Cauliflower biryani with raita.I made some Gobi 65 specially for my daughter on demand Happy
Gobi biryani
Continue Reading...


September 25, 2015

Anjaneyar Kovil Milagu Vadai | Hanuman Temple Vada Recipe

Anjaneyar kovil vadai
Anjaneyar kovil vadai/Hanuman temple vada is something very special than our usual urad dal vada with pepper. Its crunchy taste and its awesome pepper flavor makes anyone fall for it. More than all, it’s a special prasad prepared in temple kitchen/madapalli and offered in the form of Vadai malai for Anjaneyar. Prasadam given in temples always tastes great and unique with its own flavor. To mention specifically, Chennai Nanganallur Anjaneyar temple vadai malai is most famous in Tamil nadu.

 Generally South Indian temples are famous for its puliodharaisakkarai pongal and vadai. Most of us try to recreate Kovil puliodharai and kovil vadai at home. And if we get the taste close to temple version,we feel very happy and excited. I too got the same feel when I made this Anjaneyar temple vada successfully and that too in my very first attempt. I used to try temple puliogare very often in my kitchen but I couldn’t match the taste which was very disappointing for me. But when I prepared this vadai malai for Purattasi sani thaligai last week. I was completely satisfied with the output. Anyone even a beginner can make this crispy vada if you follow the steps carefully. So lets check out how to make this Hanuman temple style pepper vada with step by step photos.

Anjaneyar kovil milagu vadai malai

Anjaneyar Kovil Vadai Recipe


Anjaneyar Kovil Vadai Recipe Anjaneyar kovil milagu vadai with urad dal-Hanuman temple pepper vada
Cuisine: Indian
Category: Snacks
Serves: 12
Prep time: 20-60 Minutes
Cook time: 5 Minutes
Total time: 25-65 Minutes


INGREDIENTS

  • Round white or black urad dal - 1 cup
  • Rice flour - 1.5 tsp
  • Hot oil - 1 tsp
  • Milagu/Pepper corns - 1 tsp
  • Salt - as needed
  • Hing/Asafetida - 1/4 tsp
  • Water - add only if needed ( 1 -2 tsp)
HOW TO MAKE ANJANEYAR TEMPLE VADA - METHOD
  • Wash and soak the urad dal for 30 minutes to one hour. You can also soak it for 15 to 20 minutes and proceed if you have less soaking time.
  • After soaking drain all the water completely using a colander/Strainer. Make sure there is no water left in urad dal. Let it sit in colander for 5 to 10 minutes.
  • Now take the mixie jar, put the pepper corns, hing and then top with urad dal. If you put urad dal first and then pepper corns,pepper may not grind properly. So put the pepper and then add the urad dal. Grind it twice for short interval and grind the batter coarsely. Take care batter should not become too smooth. Add 1-2 tsp of water only if needed. Do not add salt.

    How to make anjaneyar vadai recipe

  • Remove the coarse paste into a bowl and add rice flour, salt and hot oil. Mix well. Take two thick polythene sheets or banana leaf or zip lock covers. Grease with oil generously. Take a big gooseberry sized ball and keep in it one greased sheet. Place the other sheet on top of it. Take a small bowl with flat surface and press the ball with it.
How to make anjaneyar vadai recipe
  • It will flatten to a thin roundel. Make a hole in the center using your finger. Pat it in uniform thickness else vada may turn crispy in thinner side and soggy in thick portions.
  • Grease the sheet every time you pat the vada else vada may break while you remove.If vada breaks while you remove it, grind it little more and proceed.
How to make anjaneyar vadai recipe
  • Heat oil in a kadai to deep fry the vada. Put a drop of batter to check the oil temperature. If it rises immediately, oil temperature is just right. Now simmer the flame completely and carefully remove the vada from the sheet. Drop in oil and fry in medium flame till it turns golden brown and crispy.
  • Flip the vada and cook the other side too. When the bubbles cease, remove the vada into a tissue and drain the excess oil. If the batter is properly ground without adding water,vada will not absorb oil.( Deep fry the vada patiently in medium flame because the color of vada turns black very soon and it remains uncooked when done in high flame)
How to make anjaneyar vadai malai recipe
  • I deep fried the vada one by one by keeping less oil. So its your choice of frying one by one or in a batch. Make 11 or 21 numbers and tie them in a thread. Make vada malai and offer to Lord Anjaneyar. Get his blessings !
How to make anjaneyar vadai malai recipe
Note

  • Soaking time of urad dal can be varied. 30 minutes minimum soaking time is needed. But you can get the same result even if you soak the dal for less than 30 minutes.
  • Crispness of vada completely depends on proper grinding of batter, thin size and frying the vada patiently in low to medium flame.
  • Never skip the rice flour & hot oil. It helps to make the vada crispy.
  • Add more pepper for spicy vada.
Offer this crunchy pepper vada to GOD and Enjoy !
Hanuman temple vada recipe
Continue Reading...


September 22, 2015

Peanut Onion Chutney Recipe For Idli Dosa

Peanut onion chutney recipe
 Basically I love to make different varieties of chutney for idli,dosa.So I keep hunting some interesting chutney recipes even after posting 40+ chutney recipes in my blog. I wanted to make variations in peanut chutney as Sendhil loves peanuts.I have tried Andhra style peanut chutney with coconut & peanut tomato chutney.But Peanut onion chutney without coconut was pending in my list.So I tried it last week for dosa.It was awesome.We all loved it.I am happy to include this yummy recipe in my chutney collection.I have not removed the skin of peanuts in this chutney after reading some health benefits of peanut skin HERE.So this chutney is quick and easy to make.Try this tasty side dish for idli,dosa.You will love it like us.Lets see how to make peanut onion chutney below.
Continue Reading...


September 21, 2015

Brown Rice Vegetable Biryani Recipe - Vegetarian brown rice biryani in pressure cooker

brown rice biryani recipe
Brown rice veg biryani is my recent try using Sona masoori brown rice. I usually make brown rice idli,dosa. But I have not used brown rice for our lunch.Yesterday I bought a pack of India Gate brown rice( Not brown basmati) for the first time and tried this biryani in a pressure cooker. I did not have any idea of how to cook brown rice.So I tried to cook the rice like our usual white rice biryani & it became a super flop after cooking for 20 minutes in pressure cooker.The outer bran of brown rice was not cooked at all.Then I browsed through some websites and came to know brown rice has to be soaked for a minimum of one hour.I added more water,kept for another 20 minutes and finally my rice was cooked soft and great. Biryani was very nice and flavorful. But it really tested my patience and I was not able spend time to click good pictures as our tummies were rumbling out of hunger.Cooking brown rice is very easy only if you soak it for more than an hour.You can also opt for frying the rice adding ghee to make it more flavorful.I will try to make a separate post on cooking brown rice using various methods.Here I have used mixed vegetables like carrot,beans and potato.U can also try with marinated chicken for non-veg options.So friends I have altered the recipe based on my experience.I hope u can make it perfect by following this recipe.I am happy to share this healthy brown rice biryani as my 30th post in Sunday lunch recipes series.Ok,lets see how to make this Indian style brown rice biryani.

Brown rice

Brown rice biryani recipe


Brown rice biryani recipe Healthy brown rice recipe adding mixed vegetables
Cuisine: Indian
Category: Lunch
Serves: Serves 4
Prep time: 120 Minutes
Cook time: 20 Minutes
Total time: 140 Minutes


INGREDIENTS
1 cup = 200 ml
  • Brown rice - 1 cup
  • Mixed vegetables -1/2 cup
  • Water - 3 cups
  • Salt - as needed
To grind
  • Grated coconut - 1 tbsp
  • Green chillies - 2 -3 nos
  • Mint leaves,coriander leaves -  2 tbsp
  • Big onion - 1/2 no
  • Fennel seeds/Soambu - 1/2 tsp
To saute
  • Cooking oil + ghee - 2 tbsp
  • Cinnamon,cloves,cardamom,bayleaf,black stone flower - 1 each
  • Big onion - 1 no( sliced)
  • Tomato - 1 no
  • G&G paste - 1/2 tsp
  • Red chilli powder - 1/2 tsp
  • Garam masala powder - 1/2 tsp
  • Turmeric powder - 1/4 tsp
  • Lemon juice - few drops
METHOD
  • Wash & soak the brown rice for minimum 1 hour.You can soak it over night too.Soaking helps the outer bran of brown rice softer and enhances quick cooking.Chop the vegetables and keep aside.
  • Grind the ingredients given under “ To grind” to a smooth paste.Set aside.
  • In a pressure cooker base,heat oil+ghee and saute the whole spices,g&g paste,sliced onions.Mix well till raw smell goes off.Now add the tomato and saute till mushy.Add turmeric powder,red chilli powder & garam masala powder along with ground paste.Mix well and saute for a minute.
brown rice biryani recipe

  • Lastly add 3 cups of water and soaked rice. Drizzle few drops of lemon juice and pressure cook in low flame for one whistle.It takes 10-15 minutes.
brown rice biryani recipe
  • Open the cooker after the steam is released.Fluff the rice and enjoy with raita ! Rice looks mushy when it is hot but it will separate as it turns warm.
brown rice biryani recipe
Note
  • If you don’t soak the rice,add more water say 4 cups and cook for nearly 40 minutes in low flame in pressure cooker.I did this way.
  • Adjust the quantity of spices as per your taste buds.
Healthy brown rice vegetable biryani is ready to serve !
brown rice biryani recipe

Continue Reading...


September 19, 2015

Purattasi Sani Thaligai, Date - How To Celebrate Purattasi Sani Pooja

Purattasi sani thaligai

Tamil month Purattasi is one of the very special months for Hindus. We Tamil people celebrate Purattasi sani in a grand manner by offering 5 rice varieties, sweet pongal, maa vilakku & Vada malai for Perumal. We call this offering as "Thaligai podrathu"( Thalu) . Purattasi month is called as Ashwin Month by North IndiansMahalaya Paksha or Pitru paksha and Durga Navratri falls in this month.

During this month, many people( especially Brahmins) strictly follow a No onion No Garlic menu. Non-vegetarians usually avoid eating non-veg food during this month. Purattasi month is very auspicious for Lord Venkateshwara as it is believed that Lord came to Earth on this month. So special Pooja & Mahotsava are performed in Tirupathi temple.

Purattasi Sani is very special, because on this day, Shri Saneeswara Bhagvan is said to reduce his negative power and praying him helps us to get more benefits. Pooja on this day is believed to bless all those who suffer from chronic illness, financial losses and delay in marriage. Shani grants good health, longevity, leadership, authority, ambition, wisdom and immense wealth to his devotees. Worshipping Vishnu, Fasting on Purattasi Saturday would please Sani graha.

This year 2023, Purattasi month starts on 18th September and it lasts till 17th October. This year there are 4 Purattasi Saturdays (Sanikizhamai). So you can make this thaligai and do the pooja on 1st or 3rd  of this month.

23 September 2023 – 1st Saturday
30 September 2023 – 2nd Saturday
07 October 2023 – 3rd Saturday
14 October 2023 – 4th Saturday

Last year we celebrated Purattasi Sani in my in-laws place. So I clicked the pictures and kept in draft to make this post. I hope beginners who look for Purattasi Pooja procedures would be benefitted by this post. And I consider this post as my record for future reference too.

Disclaimer : Pooja vidhanam/Procedures I have shared here is based on our tradition. It may vary from place to place. So please ask the elders of your family and make changes as per your practice.

Pooja & Neivedyam Requirements
  • One silver sombu/Pot or silver tumbler ( Use velli pathram) for drawing Namam, Sangu & Chakaram OR You can draw on walls too. It is assumed as the Lord. Invert the sombu and draw using Namakatti( a piece of chalk). Refer the picture for the idea.
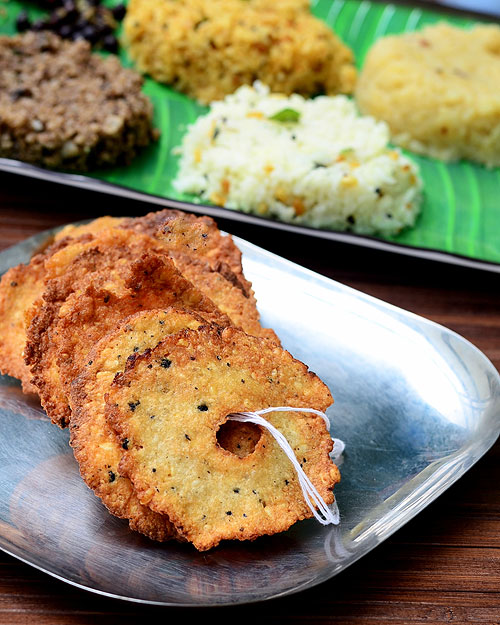
  • Vada malai with 11 or 21 pepper vadas (without onion)
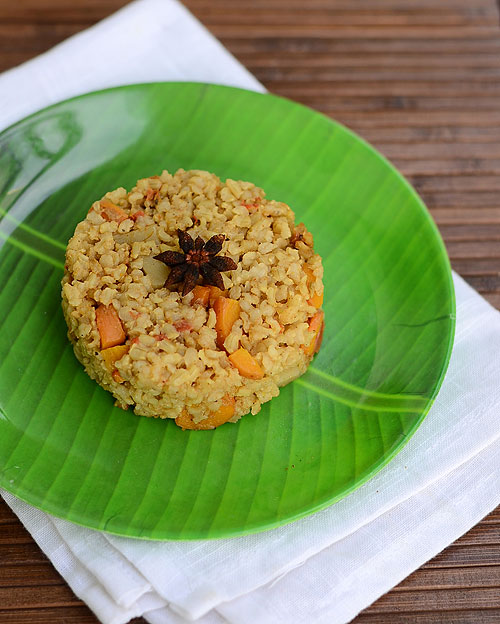
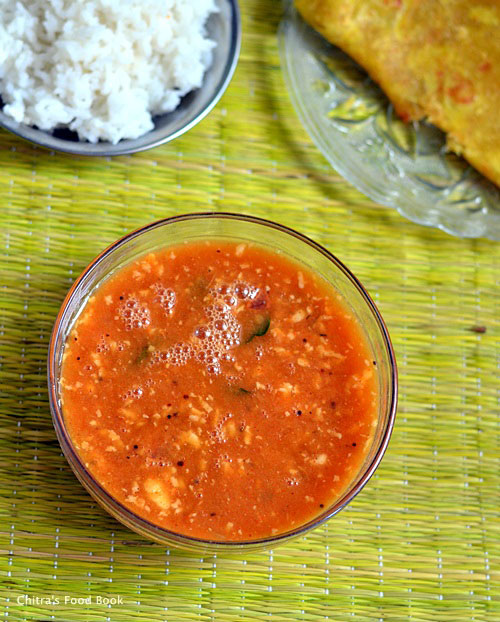
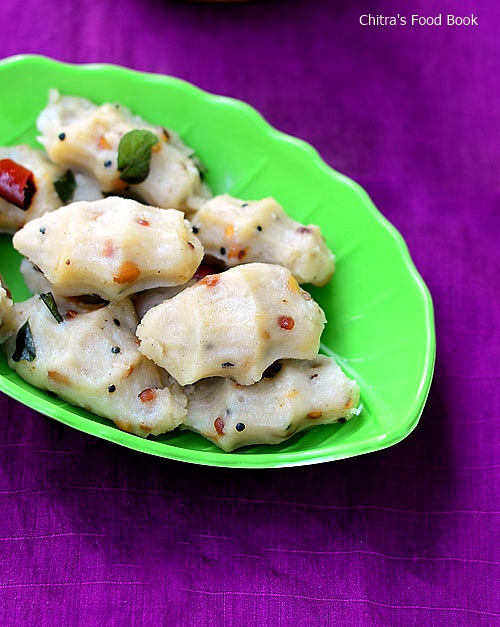
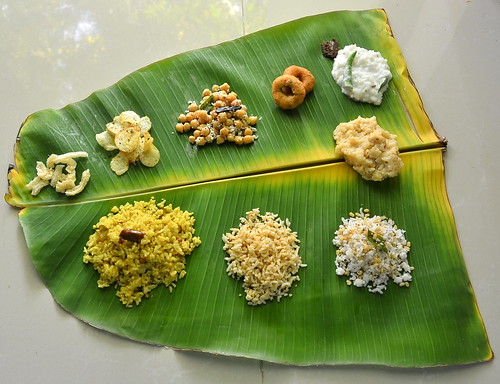
  • Raw rice for 5 Rice varieties ( Sweet pongal, Coconut rice, Tamarind rice, Black Sesame seeds/Ellu rice, Curd rice) OR No onion No garlic full meals
  • Sundal ( White or brown Chana OR Chana dal/Kadalai paruppu sundal)
  • Maavilakku
  • Fruits, Betel leaves & Nuts
  • Tulsi water for neivedyam ( Add tulsi leaves, crushed cardamom, cloves, a pinch of edible camphor (Pachai karpooram) to a cup of water)
  • Tulsi leaves or garland
  • Incense stick, camphor
  • Flowers


How to Plan for Neivedyam & pooja

You should undergo fasting till you finish the pooja on Purattasi saturday. Making rice varieties for neivedyam is very easy . You can prepare pulikachal paste, ellu podi the previous day night. Soak chana for sundal, Urad dal for vada and coconut rice. Grind the urad dal and make the vada batter. Store in refrigerator till next day’s use. Keep a sombu ready & draw the sangu, chakkaram, namam using namakatti or rice flour paste and let it dry.

Wash the lamps and keep it ready by keeping sandal & kumkum dots.The next morning draw the Kolam. We usually draw Sangu, Chakkaram and Namam in the entrance and in pooja room. Take a pressure cooker and cook raw rice/pacharisi & dal for sweet pongal. In a small bowl or plate, take the soaked chana and cook along with rice and dal.

In another cooker, cook the raw rice for puliodharai, coconut rice, ellu sadam and curd rice. Remove 3/4th of the cooked rice and spread in a plate to cool down. Drizzle some sesame oil. Mash the remaining rice for curd rice. Add boiled milk, curd and salt to the mashed rice. Mix well and temper it. Temper and make the sundal. Grind the urad dal adding little water and make pepper vada batter if you din't prepare the batter the previous night. Make 11 or 21 vada and tie in a thread to make vada malai. Do not use onions in this day for offering God. 

PLEASE WATCH THE RICE VARIETIES VIDEO GIVEN AT THE END OF THIS POST TO GET SOME IDEAS ON COOKING THIS LUNCH MENU.

Prepare maa vilakku by grinding grated jaggery & rice flour adding cardamom. Add ghee and make a ball. Put a dent, add ghee. Put a thread & kumkum dots. Keep it ready for pooja.
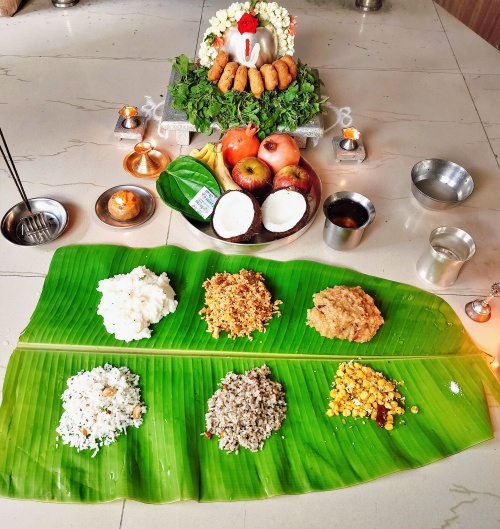
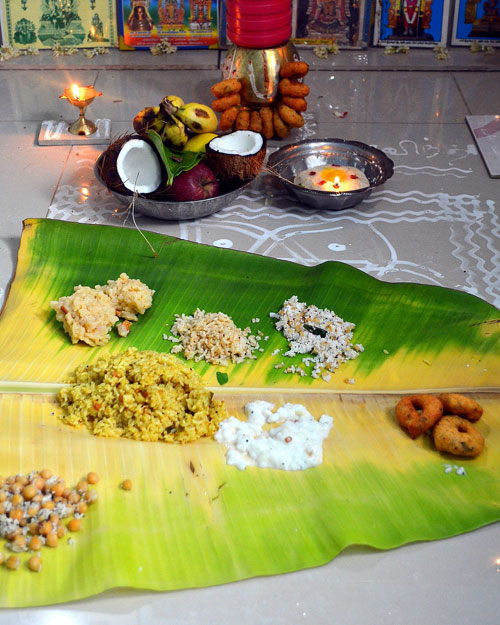
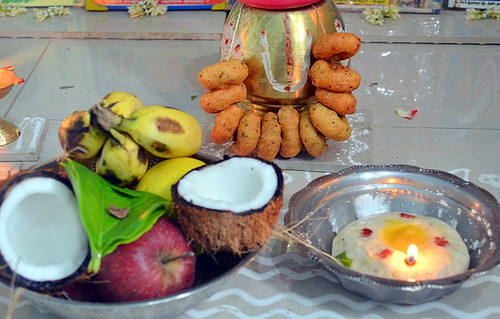

How to do pooja

You should do the pooja in the auspicious time of the day. Avoid Rahukalam and Yamagandam. So after preparing rice varieties, sundal, sweet pongal, vada malai and maa vilakku, arrange everything in a banana leaf or a plate and keep in front of silver pot/sombu. Place the fruits, betel leaves, nuts and coconut in a plate. Light the lamp. Keep tulsi water. Light maavilakku and do the neivedyam. Show dhoop & dheep. Finish the pooja and drink the tulsi water first. Then you can have the lunch. We enjoyed the variety rice with koozh vadam & potato chips.


Links for Neivedyam Recipes

Please refer the video below on how to cook these rice varieties easily. Please make tamarind rice instead of lemon rice for this festival.
Continue Reading...


September 18, 2015

Karnataka Style Easy Obbattu Saaru Recipe - Holige Saaru - Hoorna Saaru

Obbattu saaru recipe

Last year this day, I tasted Karnataka special Obbattu saaru for the first time in my (school moms group) friend Megha’s house. This title may sound new to some of you. Let me first tell you what it is. Obbattu saaru also known as holige saaru and hoorna saaru is nothing but a rasam kind of gravy that is prepared using leftover pooran/hoorna used for making obbattu. Its one of the most popular recipes in Karnataka. Usually Kannadigas make obbattu (Holige/Puran poli) for almost all the festivals like Ugadi,Varamahalakshmi, Gowri Ganesha etc. 

On those days, they never fail to make this obbattina saaru using the left over dal chana dal pooran. Everybody love this saaru equally as obbattu. Authentic version of this gravy requires freshly ground masala with rasam powder/Thili saaru powder, coconut and poppy seeds. 

As I don't have Karnataka style rasam powder in hand, I have not shared the traditional method of making obbattu saaru in this post. Instead I have given an easy ans simplified version without using rasam powder from my friend Mega. She taught me a very simple and quick recipe using readymade spice powders. Many thanks to Megha for teaching me this easy n quick version.

To be frank, I love this saaru more than obbattu. The combination of sweet and spicy taste is the highlight of this gravy. It tastes great when its reheated and used the next day. This morning I made obbattu saaru using the leftover chana dal pooranam I made for Ganesh chaturthi kozhukattai/modak.

 I am sure many of you would have made this pooran yesterday for Gauri Ganesha festival. So I thought of sharing this simple recipe for you to try if you have some pooran left over in hand. I will try to post the authentic obbattu saaru recipe soon. But before that, try this easy method and let me know how u liked it. .Lets see how to make this  Karanataka style easy Obbattu saaru with simple steps.

Do check out my Mysore rasam recipe if interested !

Obbattu saaru recipe

Obbattu Saaru Recipe


Obbattu Saaru Recipe Obbattu Saaru - Karnataka's delicacy using dal pooran
Cuisine: Karnataka
Category: Gravy
Serves: Serves 3
Prep time: 5 Minutes
Cook time: 10 Minutes
Total time: 15 Minutes


INGREDIENTS
1 cup - 250ml

  • Dal pooran/Holige pooran - 1/3 cup
  • Dal water - 1 cup
  • Tamarind - Big gooseberry size
  • Red chilli powder - 3/4 tsp (I used Kashmiri red chilli pwd)
  • Dhania powder - 1 tsp OR Karnataka rasam powder - 2 tsp
  • Turmeric powder - 1/8 tsp
  • Hing/Asafetida - a pinch
  • Green chillies - 2 nos ( slitted)
  • Big onion - 1 no ( finely chopped,optional)
  • Grated coconut – 2 tbsp 
  • Salt & water - as needed
To temper
  • Cooking oil or ghee - 1 tsp
  • Mustard seeds - 1/2 tsp
  • Cumin seeds - 1/2 tsp
  • Curry leaves - few
  • Coriander leaves - to garnish
METHOD
  • Take the tamarind extract using 1 cup of water. Mix 1 cup of dal water & 1/3 cup of pooran to it. Add finely chopped onion, slit green chillies, curry leaves, salt, turmeric powder, red chilli powder, dhania powder,hing and mix well. Check for taste and adjust the spices and salt accordingly. (Instead of red chilli powder + dhania powder, you can use Karnataka thili saaru pudi / rasam powder). 
Obbattu saaru recipe
  • Boil well for few minutes till it thickens slightly. Lastly temper mustard seeds, cumin & curry leaves. Add to the gravy. Garnish with coriander leaves & grated coconut.
Obbattu saaru recipe

Enjoy mixing with plain rice & ghee!
Note
  • Instead of Red chilli powder & dhania powder, you can use thili saaru powder i.e rasam powder if you have. You can also use sambar powder.
  • Adding grated coconut for garnishing is optional.
  • You can add a piece of jaggery for more sweet taste.
  • If you don’t have pooran in hand, pressure cook some toor dal or chana dal, mash it well and use it along with cooked water.  Add some jaggery to get sweet taste.

Try this simple version of Obbaattu saaru and enjoy with plain rice !
Obbattu saaru recipe


Continue Reading...


September 16, 2015

Kara Pidi Kozhukattai Recipe with Rice flour - Kara Kozhukattai Recipe

Kara pidi kozhukattai recipe
Kara pidi kozhukattai with store bought rice flour ( spicy kozhukattai recipe ) is my favorite kozhukattai recipes since my childhood. My mom makes it at least once in a month as an evening snack for me. Actually my mom makes this kara kolukattai by grinding soaked idli rice or instantly using store bought rice flour or idiyappam flour. 

Today I made an instant version using store bought rice flour. This is an easy version of spicy kozhukattai recipe. If you are not able to make Ulundu pooranam kozhukattai for Ganesh chaturthi, this kara kozhukattai is a good alternate option. You can eat this kozhukattai as such or with some coconut chutney or tomato chutney as side dish. Ok, Lets see how to make kara pidi kozhukattai recipe with step by step pictures.

Check out my entire collection of Ganesh Chaturthi Recipes HERE


Kara kozhukattai recipe


Kara Pidi Kozhukattai Recipe


Kara Pidi Kozhukattai Recipe Pidi kozhukattai recipe -  Kara kozhukattai / Spicy kozhukattai recipe
Cuisine: South Indian
Category: Festival recipes
Serves: 12
Prep time: 5 Minutes
Cook time: 10 Minutes
Total time: 15 Minutes


INGREDIENTS
1 cup = 250 ml
  • Store bought rice flour - 1 cup (Use idiyappam or kozhukattai flour)
  • Water - 2 cups
  • Salt - as needed
To temper
  • Coconut oil - 1 tbsp
  • Mustard seeds - 1 tsp
  • Urad dal - 1 tbsp
  • Chana dal - 1.5 tbsp
  • Red chillies – 3-4 nos ( pinched into small pieces)
  • Curry leaves - few
  • Asafetida/Hing - a big pinch
  • Grated coconut - 1/4 cup
HOW TO MAKE KARA PIDI KOZHUKATTAI - METHOD
  • Heat oil in a kadai and splutter mustard seeds, urad dal & chana dal. Saute till golden. Add pinched red chillies and curry leaves. Add hing. Mix well. Add water, grated coconut and salt.
Kara pidi kozhukattai
  • When the water starts to roll boil, simmer the flame completely and add the rice flour. Mix well without lumps. Rice flour absorbs all the water and becomes a whole mass. Gather it and remove in a plate. Let it become warm.
Kara pidi kozhukattai
  • Grease your hands with oil and make kozhukattai using your fingers.Take a big gooseberry sized ball and press it with your fingers to make it elongated. Kozhukattai will get the impression of fingers. Make all the kozhukattai and arrange them in a greased idli plate.
  • Heat water in a idli pot and let it roll boil. Now keep the idli plate and cook for 5 minutes. Switch off the flame and remove the kozhukattai when it becomes slightly warm. Enjoy !
Kara pidi kozhukattai

Note
  • You can use homemade rice flour if you have in hand.Water quantity may vary slightly.
  • Red chillies can be replaced with finely chopped green chillies too.
  • My mom makes this kozhukattai by reserving some idli rice batter while grinding for idli,dosa batter.You can also try that way.
  • You can also make it by soaking and grinding raw rice. It tastes even more better.

Make this easy, spicy kozhukattai for Ganesh Chaturthi and enjoy !
Easy kara pidi kozhukattai recipe

Continue Reading...


September 14, 2015

Thengai Poorana Kozhukattai - Coconut Poornam Kozhukattai Recipe

Mothagam recipe
Mothagam/ Modak recipe is a must to do for Ganesh Chaturthi. It can be prepared with chana dal pooranam or coconut pooranam. My mom makes Thengai poorana kozhukattai (coconut poornam kozhukattai) whereas my MIL makes chana dal pooranamLast year during Ganesh Chaturthi, I shared an easy, coconut pooran recipe (Thengai poornam). But I love this authentic version more than the instant ones. I make coconut pooran mostly for Kerala ila ada or puran poli. This year I wanted to make this mothagam post using thengai pooranam.Coincidentally, when I was browsing to find out the North Indian style Modak recipe also known as ukadiche modak, I found its ingredients and method of preparation are very similar to our South Indian Thengai pooranam kozhukattai. So I tried this modak recipe yesterday to share it here. It came out very well. Please click on this video link and this video link to check the dough making and for shaping the modak. Do try this easy, flavorful Mothagam recipe with coconut pooran if you are looking for a quick stuffing option.You will love it.I will try to share fried modak recipe in this week before Vinayagar Chaturthi. Lets see how to make modak with step by step picture and a video.

Please click THIS LINK for full Ganesh chaturthi recipes collection.


Mothagam/Modak recipe


Mothagam/Modak recipe How to make mothagam/Modak recipe with coconut pooran.
Cuisine: Indian
Category: Sweet
Serves: 12-14 nos
Prep time: 10 Minutes
Cook time: 20 Minutes
Total time: 30 Minutes
INGREDIENTS
1 cup - 250ml
For stuffing
  • Grated coconut - 1 cup
  • Grated jaggery - 1/2 cup + 2 tbsp
  • Cardamom - 2 nos ( crushed)
  • Water – little to cover jaggery 
For modak dough
  • Rice flour – 1 cup ( I used store bought idiyappam flour or kozhukattai flour)
  • Water – 1.75-2 cups ( as needed)
  • Salt – a big pinch
  • Ghee – 1 tbsp
HOW TO MAKE THENGA POORANA KOZHUKATTAI - METHOD
  • Grate coconut and jaggery. Heat a kadai and put the coconut & jaggery together. Add 1 tbsp of water if needed. Mix it well. Jaggery gets melted ( If you feel jaggery has mud, then you must melt jaggery adding little water. Make a syrup & strain it using metal filter. Then you can mix grated coconut and proceed). Mixture will become watery and if you keep stirring in medium flame, the mixture will become thick and start to leaves the sides of kadai. 
  • (Note: The quantity of coconut should be more than jaggery. So start with 1/2 cup of jaggery for one cup of coconut for mild sweetness)
Mothagam recipe
  • Switch off the flame as soon as the mixture starts to leave the sides. If you stir more, pooranam will become hard and chewy. So switch off the flame at the right time. Initially pooran will look wet. But when it cools down, it will thicken and becomes non-sticky. Transfer the pooran to another plate to avoid heating up more.
Mothagam recipe

  • To make the kozhukattai dough, heat water adding ghee & a pinch of salt in a pan. Here I used 1.75 cups of water for store bought rice flour. But this quantity may vary.so keep some hot water ready in hand so that you can add it while making dough.
Mothagam recipe

  • When the water starts to roll boil, simmer the flame completely and add the rice flour. Mix well without lumps. Do it quickly. Rice flours absorbs all the water and becomes a thick mass. Switch off the flame.
Mothagam recipe
  • When the dough becomes warm, grease your hands with oil and knead the dough. Make it smooth without cracks and cover the dough with a wet cloth till use.
Mothagam recipe
  • Take a big gooseberry sized ball from the dough and make a cup by pressing the sides. Stuff 2 tsp of pooran inside the cup and close to make a coconut shape. Grease the idli pot and arrange the modak. You can also use a mold to make modak.
Mothagam recipe
Mothagam recipe

  • Heat water in an idli pot and when the water starts to boil vigorously, keep the idli plate and cook the modak for 7-8 minutes. Switch off the flame and let it be in the idli plate for 10 minutes before you remove the modak. When the modak turns warm, carefully remove them into a plate. Offer to God !
Mothagam recipe


    TIPS FOR SOFT AND CRACK FREE KOZHUKATTAI
    1. Use good quality rice flour. If you are planning to make by grinding rice, buy raw rice ( in Tamil nadu we call as “maavu arisi) ie. the rice used for making rice flour. Its a different quality, not the one we use for pongal.It is cheaper in cost too.
    2. Always add the required water while making the dough. If the dough becomes sticky or dry, you’ll get cracks. Keep the unused dough covered with a wet cloth & then with a lid while you make mothagam.
    3. Its always better to prepare the outer covering after making pooranam/ stuffing to prevent the dough sitting for long time.
    4. U can refrigerate the unused dough by keeping in an air tight box & use the next day or the same evening.
    5. Pooranam can be prepared the previous day and refrigerated.
    6. Apply sesame/gingely oil in your hands every time when you make the shape.
    7. Last but not the least, do not cook the kozhukattai in idli pot for long time which may lead to cracks.( maximum of 8-10 mins is enough)
    8. Always place the idli plate arranged with kozhukattai after the water in the idli pot starts roll boiling. This helps for quick cooking & also the kozhukattai remains white in color and crack free..
    9. U can identify the cooked kozhukattai by its shining look. Always remove the kozhukattai after it becomes warm. Do not remove when it is hot. Kozhukattai may break.


Try this easy, flavorful coconut pooran modak for this festival and enjoy !


Continue Reading...