Poornam Boorelu/Poornalu/ Burelu (In Telugu) is one of the most important Neivedyam /Prasadam recipes for Varalakshmi Vratham in Andhra. Most of the people make this during Diwali and Ganesh chaturthi too. Boorelu is very similar to Tamil nadu style Suzhiyam/Suzhiyanrecipe but the ingredients used for the outer covering is different. In suzhiyan, maida and rice flour is used for the outer covering whereas boorelu needs rice + urad dal batter (Just like dosa batter) for the covering. Otherwise, the procedure for making Pooranam is one and the same. Pooranam ( Stuffing) can be made with Senaga pappu ( Chana Dal ), Pesarapappu ( Moong dal ) or Kobbari ( Coconut). This morning I tried it for pooja and of course to post this special recipe on this Varamahalakshmi festival day. Even though its my first attempt, it came out very well and I am happy with the result. For this recipe, I asked my neighbor Sowjanya who is from Andhra. She told, on Varamahalakshmi, they make a count of 9 boorelu/poornalu and offer to God. It should be consumed only by the family members after the pooja. So its a must and should sweet recipe to be made for them during this festival.She shared her recipe along with some useful tips too. Thank you Sowjanya for the perfect recipe. We all loved it. Do try this Andhra special sweet recipe for festivals and have a great celebration. Ok, Lets see how to make Pooranam Boorelu ( Poornalu) with step by step pictures.
Wash and soak the rice and dal together for minimum 4 hours. Over night soaking is also fine. Grind it to a slightly coarse paste in dosa batter consistency adding required water. Make sure batter is not too thin. Set the batter aside for one to 5 hours. But I used it immediately without resting time.
Wash and pressure cook chana dal adding enough water. Chana dal should be blossomed and retain its shape ( i.e when you press the dal, it should become mushy) Do not over cook the dal. Grind it to a coarse paste without adding water or mash it with a ladle.
In a pan, melt jaggery adding water. Strain it to remove the impurities using a metal strainer. Boil the syrup till it becomes frothy or reaches one string consistency. Add the ground chana dal paste, cardamom powder and grated coconut. Mix well till it becomes a whole mass and leaves the sides of pan. Switch off the stove and let it become warm. Make balls of golf balls size and arrange in a plate.
Heat oil to deep fry. Test the oil temperature by dropping a pinch of batter. If it rises to the top, oil heat is just right. Simmer the flame completely.Take the ground batter, add sugar, mix well. Dip a stuffing ball into the batter using a spoon. Wipe the excess batter in the sides of vessel and deep fry the balls in medium flame till it turns slightly golden with brown spots.Do not fry for long time. Remove in a tissue. Offer to GOD and get the blessings. Enjoy eating!
NOTE : You should make 9 or 5 balls and offer to GOD. It should be eaten only by the family members.Do not give this as prasad to others.
Tip 1 : Adding sugar in the batter gives a mild sweet taste to the outer covering too. So it won't taste bland.
Tip 2 : Poornam should be thick and there should not be any moisture content in it else it will disperse in oil when you deep fry the balls.So add besan flour if needed to make the stuffing thick.
Tip 3 : If the batter is thin, you can add some rice flour to bring the right consistency.
Note
You can use the remaining batter to make dosa or punugulu.
While cooking dal , if u add more water , drain the excess water and grind to a smooth paste.
If there is more moisture in the cooked dal, you can add some besan flour to thicken the stuffing quickly.
It stays soft and good for 1-2 days.
Enjoy this delicious traditional Andhra sweet at home !
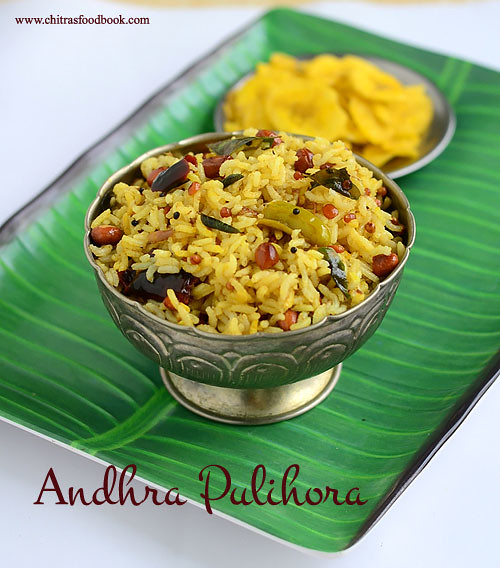
Andhra Pulihora also known as Chintapandu Pulihora in Telugu is a must try recipe during festival time. As Varalakshmi Vratham is fast approaching, I thought of sharing some Andhra style neivedyam recipes for this festival. This morning, I was asking my friend Megha about Varalakshmi Vratham special recipes as her MIL belongs to Andhra. She suggested recipes like Boorelu, appalu, Garelu and Pulihora. As our family is a big fan of tamarind rice, I started with this recipe. The ingredients and preparation of Andhra Pulihora is completely different from our Tamil nadu style Puliodharai. Its a very simple recipe without any grinding job. In the traditional temple style pulihora recipe, they add sesame seeds powder or mustard powder. But I made the basic version as told by Megha and watched Attammaa TV YouTube video recipe too for more reference. This Puliogare paste i.e. Pulihora Pulusu can be quickly made in minutes if you have readymade tamarind paste in hand. Its an ideal choice for quick lunch box recipe. Raksha loved it a lot and asked me for second serving as well. But this pulihora needs a standing time of minimum 2 hours for all its flavors to blend well. So friends do prepare this rice at least two hours before serving to relish its actual taste and flavor. Now lets see the step by step recipe of how to prepare Andhra Pulihora / Chintapandu pulihora in detail.
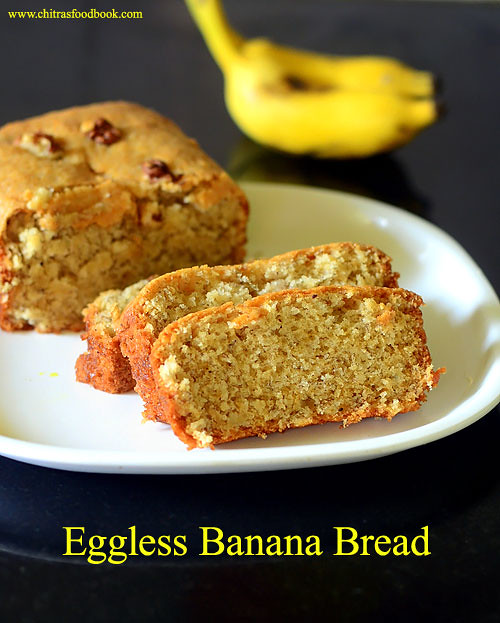
I had few over ripen banana in hand. First I thought of making banana appam for Aadi friday Neivedyam. But then I changed my mind to make an eggless, butter less, moist banana bread recipe with yogurt. I have already shared eggless banana walnut muffin and eggless vegan banana cake recipes. But still when I came across this cake recipe with yogurt and cooking oil, I got tempted to give a try. The result was a perfect, moist banana bread. The aroma of the bread while it bakes was awesome and we were badly waiting to taste it soon after baking.
As I expected, it was a very big hit with Sendhil and Raksha. I am so happy to share an easy, interesting, bread recipe with banana. You can replace maida with wheat flour, plain sugar with brown sugar and use walnut for healthy options. Do try this cake in this weekend and enjoy your teatime with this bread recipe! I have shared a quick, short video too. Check it out.. Ok, Lets see how to make eggless, butterless banana bread recipe with yogurt.
Video recipe
Eggless banana bread recipe
Eggless, butter less banana bread recipe with yogurt and cooking oil !
Maida/All purpose flour - 1 cup ( Wheat flour can be used)
Sugar - 1/2 cup ( Use brown sugar)
Baking powder - 1 tsp
Baking soda - 1/2 tsp
Cinnamon powder - 1/2 tsp
Salt - a pinch
Ripe banana - 3 nos ( Small)
Cooking oil - 1/4 cup
Yogurt - 1/4 cup
Vanilla essence - 1/2 tsp
HOW TO MAKE EGGLESS BANANA CAKE - METHOD
In a wide bowl, mix the dry ingredients – Maida, baking powder, baking soda, a small pinch of salt. You can either sieve them or just mix with a ladle well.
Take the banana, peel the skin and mash it well using your hands or back of spoon.Set aside.
In another bowl, mix the wet ingredients i.e. Cooking oil, yogurt, vanilla essence, mashed banana and mix well.
To this mixture, add the maida mix. Use a ladle and mix well thoroughly. The batter would be very thick, sticky and looks like a thick paste.
Grease a baking pan with cooking oil generously. Pour the batter and spread it evenly. Stud in some walnuts or choco chips if you wish.
Pre heat an oven in convection mode at 180c. Bake the bread for 30 minutes. Actual recipe called for 40 minutes baking time. But mine took just 30 minutes. So keep an eye after 25 minutes. Insert a toothpick or back of a spoon to check the cake. If it comes out clean, its done else bake for another 5 minutes. Remove the bread from the oven and let it cool down for 5-10 minutes. Loosen the sides of the bread using a sharp knife and invert the baking pan over a plate.Bread will come out easily. Make slices and serve it warm. Enjoy !
Note
You can replace maida with wheat flour and sugar with brown sugar or honey.
Adjust the quantity of sugar as per your taste. Check the sweetness of batter before baking and add more sugar if needed
Cinnamon powder gives an awesome aroma to this bread. Do not skip it.
Adding vanilla essence is optional.
Try this easy, eggless, butterless banana bread at home and enjoy with your family !
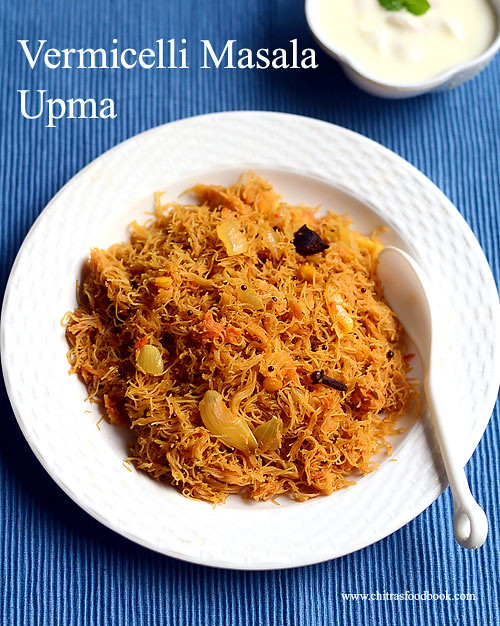
Most of us make kheer/Payasam using fine vermicelli. Me too no exception. Recently I bought a big pack of fine vermicelli to make sheer korma during Ramadan festival. I had nearly 1/2 kg of fine vermicelli leftover in hand and I wanted to try some interesting and a different recipe with it. I asked our blogger friend Lubna Karim to suggest some fine vermicelli recipes. She shared Khara vermicelli masala upma recipe from her blog. I tried it for our breakfast and shared the picture in my Instagramand facebookpages too. After that, I have made this upma twice but I couldn’t make a post here. This morning I made it just for blogging sake. The list of ingredients may seem more. But its very easy to make and cooks faster than our regular vermicelli. So you can prepare this upma for breakfast or dinner in just 10 minutes. This dish is ideal for bachelors and working women. It tastes like semiya pulao and resembles Idiyappam(Rice noodles) with mild masala flavor. You can add mixed vegetables and make it more colorful and healthy. You can try this upma with thick vermicelli too. But water quantity varies.This upma stays soft for hours.So it can be packed for lunch box too. Kids would love it for sure. I liked it with coconut chutney as side dish whereas Sendhil & Raksha loved it with onion raita. Do try this masala upma with fine vermicelli and share your feedback. Soon I must try fine vermicelli kesari too. Also check out my Fine vermicelli Payasam Recipe.
NOTE : In Bangalore, you can find Fine vermicelli in Nilgiris, Jayanagar 4th block BDA complex Pooja materials shops, MK Ahmed stores.
Fine vermicelli Masala Upma Recipe
Vermicelli masala upma recipe - Easy and quick breakfast recipes
Mixed vegetables - 1/4 cup ( Carrot, peas, potato)
Turmeric powder - 1/4 tsp
Red chilli powder - 1 tsp
Garam masala powder - 1/4 tsp
Salt - as needed
Ghee – 2 tsp
Coriander leaves – to garnish
Lemon juice - few drops (optional)
METHOD
I have tried this upma with & without vegetables.So the step by step pictures slightly differs from the main picture.
Wash and slice the onion, chop the tomato, slit the chilli and finely chopped vegetables ( If adding).
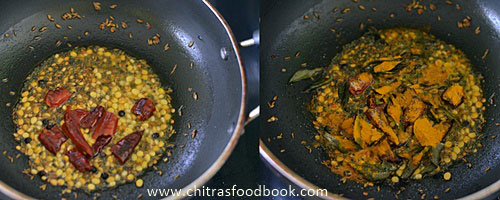
Heat a kadai with oil. Splutter mustard seeds, urad dal, Chana dal, Cinnamon, cloves and fennel seeds. Saute and add sliced onion, green chilli and ginger-garlic paste. Saute well till the raw smell of g&g paste goes off.
Now add the chopped tomato pieces,mixed vegetables ( If using). Saute until tomato turns mushy and veggies are half cooked.
Add turmeric powder, red chilli powder, garam masala powder, required salt and mix well. Add 1.25 cups of water and cover the kadai. Let the vegetables cook for 2 minutes.
Break the fine vermicelli strands into two.Add them to the boiling water and mix well. You may feel water quantity is less for vermicelli. Don’t worry. As soon as you mix the vermicelli with the water, it will absorb all the water and becomes soft. So keep tossing and flipping it gently. If possible, use a fork like ladle to avoid vermicelli turning mushy. Keep the flame minimum and cover the kadai. Let it cook for 2 minutes. If you feel the vermicelli looks too dry and not cooked properly, you can add 1/4 cup of water at this stage and mix well. ( Water quantity is the key to get perfectly cooked,fluffy upma. If you add more water, it will turn to vermicelli khichdi. So please use less water and add more only if needed). This vermicelli turns fluffy and separate when it cools down. Lastly add 2 tsp of ghee and garnish with coriander leaves. Sprinkle some lemon juice if you like. Mix well and serve hot.
Enjoy with coconut chutney & onion raita !
Try this easy to cook, yummy fine vermicelli masala upma for breakfast/dinner. You will love it like me.
Aadi 18/ Aadi Perukku is a festival observed on the 18th day in Tamil month Aadi. It is also known as Pathinettam perukku or aadi perukku in Tamil. This year 2023, it falls on August 3rd, Thursday. Aadi perukku is a unique South Indian festival that marks the beginning of Tamil festivals in Tamil nadu. It is observed on the 18th day of Tamil month Aadi. In this post, I have shared the significance of Aadi 18, What to do on Aadi 18, its rituals, how to perform aadi pooja and how to celebrate this festival at home along with the list of Aadi 18 recipes lunch menu / Neivedyam recipes links and our celebration pictures in detail for your reference.
Last year I shared the celebration procedures for most of the important Hindu festivals to help beginners and to keep a record for my future reference. But I couldn’t make a post about our first festival, Aadi perukku celebration in a detailed manner. So this year I wanted to share it with my last year’s celebration pictures. Please go through them and have a happy aadi 18 celebration. Hope beginners would find this post useful.
Wish you all a very happy Aadi 18 !!
Disclaimer :All the pictures & celebration procedures I have shared is based on my family's tradition. It may vary from place to place. Beginners, please keep this as reference. Consult the elders in your family and follow it :)
SIGNIFICANCE OF AADI 18 Aadi 18/ Perukku is a festival observed on the 18th day in Tamil month Aadi. It is also known as Pathinettam perukku or aadi perukku. In Tamil, ‘perukku’ means ‘rising'. The rising here indicates the overflowing of Kaveri river due to the monsoon rains. It is celebrated near river basins, water tanks, lakes and wells of Tamil Nadu. Devotees take bath in the river & worship mother cauvery in the form of Amman.
I have heard about the grand Aadi 18 celebration in Kooduthurai, Bhavani. This festival is celebrated by farmers and people who depend on the rivers and monsoon rains for their life. Special prayers and puja are done in temples. People pray to River Cauvery and Rain God Varuna Bhagavan for a good harvest, constant supply of water and hassle free monsoon.
On this day, all the family members along with their friends and relatives make a trip to the riverbank by preparing a special lamp using rice flour and jaggery (maavilakku), mulaipari and several rice varieties ( Chitranna). Maavilakku is placed on mango leaves along with flowers, turmeric and a yellow thread. Then the lamp it is lit by the women and they float the lamps along with the mango leaves and other accompaniments in the river. The riverbank or seashore picnic is a major event in some districts of Tamil Nadu on this day. We call this as Vandi katti poradhu in Tamil :)
Some regions in Tamilnadu have the tradition of inviting the newly married couple to home and son-in-law is given gifts on the day. Some people also have the practice of adding a gold coin in the thali of bride. During Aadi month, the newly wed girl spends the month at her parent’s home for some scientific reasons.
Thread greased with turmeric powder( Yellow rope/Manjal kayiru)
Raw Rice & Jaggery
Coconut,betel leaves & nuts
Banana & Locally available Fruits
Blouse bit, new dress(Saree or any girls dress)
1 Mirror
Bangles, gold jewels, Kaatholai Karugamani ( Small black bangle, refer the above pic)
1 Lemon
Banana leaf for keeping neivedyam
Other pooja items like oil, ghee, camphor, incense stick and sambrani/Dhoop.
Ingredients for making Rice varieties like Ellu sadam, Tamarind rice, Sweet Pongal, Curd rice, coconut rice & Sundal.
Check out my in-laws blog “Learn Kolam”for kolam ideas. OUR CELEBRATION
Usually Aadi 18 is celebrated in River banks or near water bodies. So my MIL celebrates this festival near water tank in Salem house by drawing a square shaped box with sand ( We call it as “Manal veedu”). Make small Pillayar with sand, keep all the Pooja items in front of Pillayar and do the neivedyam. Refer the picture shared below from my in-laws blog "Learn Kolam". Then she drops the flowers, lemon, turmeric into the water tank. But I celebrate in my apartment in my pooja room in a simple manner as suggested by my MIL.
HOW TO CELEBRATE AADI PERUKKU / AADI 18 AT HOME
The previous day to the festival, wash all the lamps. Keep turmeric, kumkum dots, put oil, threads /wicks and keep the lamps ready. Clean the house. Wipe the doors, windows clean and keep turmeric, kumkum dots. Prepare Pulikachal / Puliogare paste, Ellu podi, coconut rice mix for making variety rice the next day. Draw Rangoli/Kolam at night. Draw with rice flour paste/ Arisi Maakolam or rangoli powder/Kolam maavu. Check out my in-laws blog “Learn Kolam”for kolam ideas.
The next day early morning around 5 am, take bath and get things ready for doing pooja. We should do the neivedyam before 6am or at least before 7am. You can also do in the auspicious time in morning as per the calender ( Nalla neram) or panchangam. Decorate the pooja room with flowers. For morning pooja, make 2 manjal pillayar ( One as Lord Ganesh and other one as Amman) and place it in a wooden plank, light two lamps on the sides. Keep this setup in front or inside your pooja room.
To make manjal pillayar, take 1 tbsp of turmeric powder, add little water and make 2 small cones. Keep a kumkum dot. In front of the manjal pillayar, place coconut, betel leaves, betel nuts, all fruits, flowers, Yellow rope in a plate or banana leaf. In another plate, keep turmeric, kumkum, sandal powder or tablet, one mirror, bangles, one lemon, your gold jewelries, one new blouse bit, a new dress ( saree or any girls dress) if you have in hand, Katholai karugamani( small black bangles, available in pooja stores). You can also keep some new dress and jewels ( new or used ones) if you have in hand. Please refer the below picture for reference.
In a bowl/Sombu, fill water till its brim ( Its considered as Kaveri water) & keep it. In a small bowl, mix raw rice and jaggery. This is for neivedyam. Light lamps and do the pooja by showing Dhoop, dheep and mangala harathi. After doing the pooja, tie the yellow rope around your neck by yourself. Tie the rope in hands for small girls at home. Take the manjal pillayar, mix with some water, put the katholai karugamani, lemon, flowers and pour everything in a plant pot or tree. After sometime, take the lemon after sometime & use it in your cooking. This is our morning pooja.
In the afternoon, in an auspicious time ( avoid rahu kalam & Yama gandam), do the pooja with 5 rice varieties and pepper vada/Milagu vadai. I make chana sundal too. AADI 18 LUNCH MENU / AADI PERUKKU LUNCH RECIPES
Every year I prepare Lemon rice, tamarind rice, Coconut rice, sweet pongal & curd rice. Sometimes we make payasam with jaggery instead of sweet pongal and make Ellu sadam or milagu jeeraga sadam to make a count of 5. My mom used to say we have to make 18 rice dishes for aadi 18 ;). I don’t know how far it is true & is it possible to make 18 rice varieties.
I have shared the links of all variety rice recipes , sweet pongal & payasam recipes & vadai ( two versions) below. Please check it. Making this aadi 18 lunch menu is very easy if you have prepared Pulikachal paste, ellu podi, lemon rice paste on the previous day. You can also grind the vada batter and refrigerate it till use. Please refer the video given below on how to prepare 5 rice varieties for Aadi 18 easily.
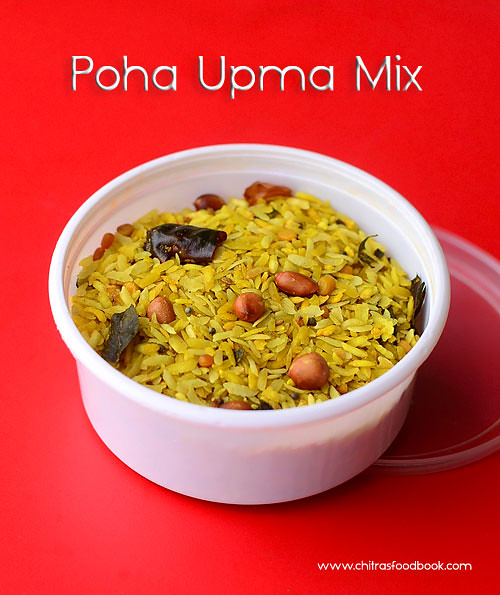
When we think about quick breakfast recipes, Rava & Poha comes to our mind ( Poha = Rice flakes in English, Poha in Hindi, Aval in Tamil, Avalakki in Kannada). Poha recipes are easy to cook & a very healthy option for diabetic people too. In my kitchen, Rava upma and poha upma makes its appearance at least twice in a week.
Sendhil loves Poha upma very much. So I keep making variations in poha upma like mixed vegetable poha upma, lemon poha, Kanda Poha, Batata Poha, Gujarati Poha, Karnataka Chitranna etc. When Sendhil went for an abroad trip, I packed homemade Instant Rava upma mix and poha mix for him. No soaking and chopping is needed. Just boil some water and cook. It will be ready to eat in few minutes just like noodles.
You can enjoy this mix as teatime snack like chivda/Poha mixture. This mix was very useful for him and he loved it too. So I started making Instant mix recipes very often in my home. I make use of this mix whenever I feel lazy to cook after coming back from a trip. For this recipe, I referred this & this blogs, made some additions and tried it.
Bachelors, working women and students who stay in hostel, PGs can try and keep this mix in bulk quantity. It will really help you to make quick, hassle free breakfast or dinner.Try this and share your feedback. You can try this upma mix with Red aval, Brown aval or even thin rice flakes. But cooking time and water quantity may vary slightly. See to it. Ok, lets see how to make Instant Poha upma mix recipe.
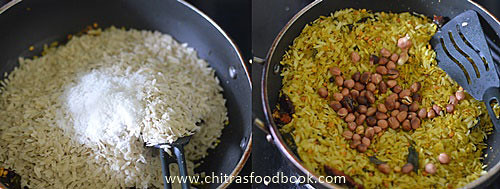
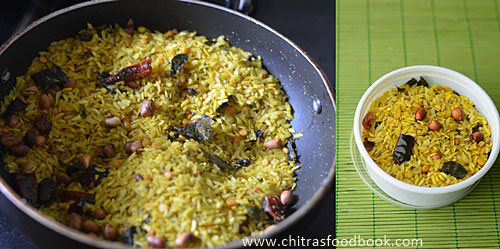
Clean the poha if needed but without washing in water. Heat oil in a kadai and splutter mustard seeds, Urad dal, chana dal, pinched red chillies, curry leaves, hing and turmeric powder. Add poha, salt, sugar and pepper powder. Saute well until poha turns crispy. Keep the flame medium to high and roast patiently by staying nearby. Add roasted peanuts and mix it. Switch off the flame and let it cool in the kadai itself.
Once its cool, store in an air tight box or ziplock cover. No need to refrigerate. It stays good for weeks even without refrigeration.
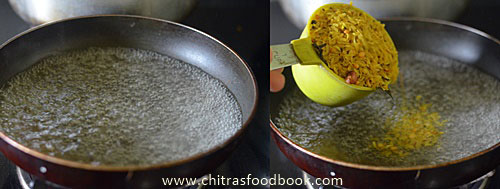
To make poha upma with this mix, boil 1.5 cups of water. Add 1 cup of poha mix and keep mixing till it absorbs 3/4th of the water. Cover the kadai and let it cook in low flame for few minutes. Open the kadai and stir it once in the middle. After its cooked well, sprinkle some lemon juice and garnish with coriander leaves. Mix well and serve hot !!
For variations, Soak this mix in hot water for few minutes and then cook it with little water. You can saute one finely chopped big onion in 1 tbsp of oil and then add water. Add poha mix and follow the above procedure. You can add chopped and cooked potatoes along with onions like North Indian “Kanda batata poha” OR saute finely chopped vegetables along with onions, cook for few minutes and add poha mix. This makes the poha mix more healthy. You can even add some garam masala powder and make a twist from the usual upma.
NB: Add more chillies or chilli powder as per your taste buds. Add 1/2 tsp of lemon peel powder in this mix if you have in hand. I din’t use it. If you have potato flakes in hand.
Make your own instant poha upma mix at home and enjoy !
Ven pongalalso known as Khara pongal is one of the most important South Indian breakfast recipes which is very popular in Tamil nadu. I have already shared my MIL’s easy, Venn pongal recipein a pressure cookerwith a video. Today I have come up with my mom’s version of making ven pongal. My parents are with me in Bangalore and I am having a great time with them. I am enjoying my mom’s special recipes. This morning amma made ven pongal and coconut chutney for our breakfast.
Most of us avoid eating pepper corns if its added as whole ones. So my mom adds coarsely powdered pepper corns just like the ones served in some hotels. And she adds more quantity of moong dal to make the dish more healthy. It doesn't look like hotel style ghee dripping pongal but sure its tasty. Do try this version. You will love it. Ok, Lets see my mom’s style South Indian Ven pongal recipe for breakfast.
Ven pongal recipe
Ven pongal/Ghee pongal/Khara pongal - South Indian breakfast recipes
Water - 5 cups ( add more based on your desired consistency)
Ghee - 4 tbsp
Pepper corns – 1 tsp
Cumin seeds - 1.5 tsp
Curry leaves - few
Chopped ginger - 2 tsp
Asafetida/Hing - 2 pinches
Cashew nuts - few
Salt - as needed
HOW TO MAKE VEN PONGAL - METHOD
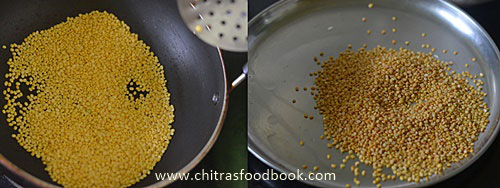
Heat 1 tsp ghee and roast moong dal in a kadai till nice aroma arises. Do it patiently without burning them. Remove in a plate. For variations, you can skip roasting the dal and wash it with rice.
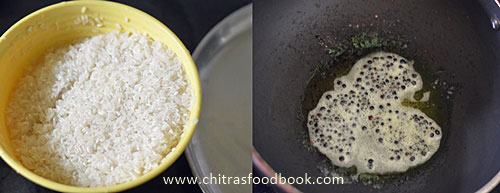
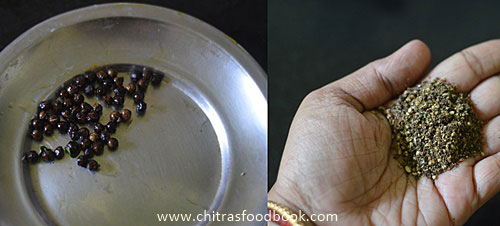
Wash the rice and set aside. In a kadai, heat 2 tbsp of ghee and roast the pepper corns. Let it crackle. Remove half of them and powder it coarsely. If you want, you can powder all the roasted pepper corns. I powdered half & added the remaining as it is for photographic attraction. But my mom usually powders all the pepper corns.
Add cumin seeds to the remaining pepper corns and roast the jeera for few seconds without burning. Switch off the flame and set aside. In a cooker base, take the washed rice and roasted moong dal. Add 5 cups of water and required salt. Mix well and add the roasted pepper + cumin mixture, chopped curry leaves, ginger and hing. Mix everything and pressure cook in high flame for 7 to 9 whistles. Remove the weight valve after the steam is released.
Heat 1tbsp of ghee and roast cashew pieces till golden brown. Open the cooker and add the roasted cashews and powdered pepper corns. Mix well till mushy and add the remaining 1 tbsp of ghee. Mix and serve.


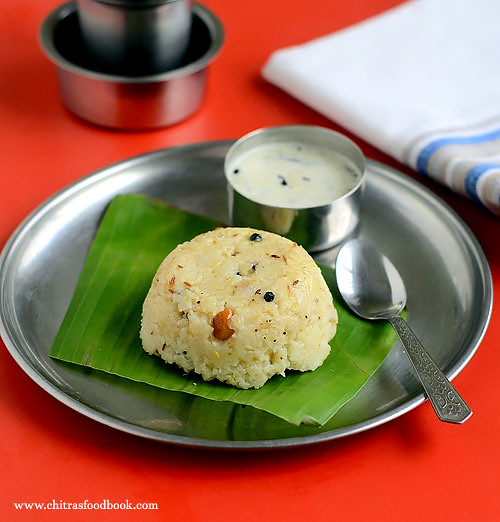
 Pooranam Boorelu - Andhra style senagapappu boorelu recipe