Search Chitra's Food Book

February 23, 2022

Raw Banana Curry – Vazhakkai Curry Recipe

raw banana curry

I love raw banana curry with full of masala flavor. Especially the vazhakkai curry that is served in Tamil nadu weddings / marriages. I was looking for one such recipe for long time. Recently I came across one in an YouTube channel. But the recipe called for deep frying raw banana pieces before adding the masala. I was hesitant to deep fry it. So I shallow fried the raw banana pieces in little oil, covered and cooked it till soft. Then roasted it in masala. Addition of fennel seeds, onion, garlic and ginger in the masala took this poriyal to the next level. Though it doesn’t taste like original kalyana veedu vazhakkai curry, it came out so well and flavourful. We all loved it. I started making this curry often these days.

Friends, do try this masala flavoured raw banana curry for your lunch. It tastes great with sambar, rasam and curd rice. You will love it for sure.  I have also captured the video for this recipe. I will try to edit and share it soon. Now , lets see this yummy vazhakkai curry with step by step pictures. 

vazhakkai curry


Raw banana curry recipe / Vazhakkai curry


Raw banana curry recipe / Vazhakkai curry

Raw banana curry recipe / Vazhakkai curry for rice


Cuisine: Tamil nadu
Category: Side dish
Serves: Serves 4
Prep time: 10 Minutes
Cook time: 20 Minutes
Total time: 30 Minutes


INGREDIENTS

  • Raw banana - 2
  • Cooking oil - 2 tbsp ( to shallow fry banana pieces)
  • Big onion - 1
  • Fennel seeds - 3/4 tsp
  • Ginger - 1 inch piece
  • Garlic cloves - 5
  • Turmeric powder - 1/4 tsp
  • Sambar powder - 1 tsp
  • Tamarind - 1 small piece ( optional)
  • Salt and water - as needed
To Temper
  • Cooking oil - 1 tbsp
  • Mustard seeds - 1/2 tsp
  • Curry leaves - few
HOW TO MAKE RAW BANANA CURRY
  1. Wash and peel the skin of raw banana. Chop into small cubes.
  2. Heat oil and shallow fry the pieces. Cover and cook till it become soft.
  3. Remove in a plate. Grind onion, garlic, ginger, fennel seeds, tamarind, sambar powder and salt to smooth paste adding water.
  4. Heat oil and splutter mustard seeds, curry leaves. Add the masala paste and saute for few minutes.
  5. Now add the raw banana pieces. Mix well and cook till raw banana is roasted well with nice flavor.
  6. Switch off the flame and serve with rice . Enjoy !
METHOD - STEP BY STEP PICTURES
  • Wash and peel the skin of raw banana. Chop into small cubes. Keep immersed in water till use.

  • Heat 2 tbsp oil and shallow fry the pieces till light golden. Cover and cook till it becomes soft. Remove in a plate.
  • Raw banana curry
  • Grind onion, garlic, ginger, fennel seeds, tamarind, sambar powder and salt to a smooth paste adding required water.
  • Raw banana curry
  • Heat oil and splutter mustard seeds, urad dal and curry leaves. Add the ground masala paste and saute for few minutes.
  • Raw banana curry
  • Now add the raw banana pieces and mix well. Cook in low flame till raw banana pieces are roasted well, becomes dry with nice masala flavor. Raw banana turns soft.
  • Raw banana curryRaw banana curry
  • Switch off the flame. Remove in a plate and serve hot with sambar, rasam and curd rice. Tastes yummy !
  • Raw banana curry
    Enjoy !

Note

  • Adjust the quantity of chilli powder as per your need.
  • Make sure masala is well coated in raw banana pieces.
  • Saute till raw banana turns golden in color with nice masala flavor else it tastes bad


Try this easy, yummy raw banana curry and enjoy with rice.

raw banana curry

Continue Reading...


February 14, 2022

Pressure Cooker Rasam Rice – One Pot Rasam Rice | Rasam Sadham

Rasam rice

One pot rasam rice / Rasam sadam in pressure cooker is one of my favourite when it comes to one pot recipes. Usually I make it for Raksha and Sendhil whenever I go out for monthly shopping. I prepare potato curry and appalam / papad along with this rasam rice as side dish. Tastes yummy and great. We love this combo. I have been making this rice for years but somehow I din’t post in my blog. So today I thought of sharing this simple and yummy one pot rasam rice as it would be helpful for packing lunch box and for a short trip /picnic during this summer holidays.

I followed this recipe from Yogambal Sundar’s YouTube channel. I made some small changes in the recipe as per my needs. Every time it comes out so well. Consistency of this rasam rice can be varied as per your liking. I like it slightly goey and watery. So I used rice and water in 1:5 ratio.

Friends, come lets see how to make this easy and yummy one pot rasam rice in a pressure cooker. You can make the same in an Instant pot as well by setting in pressure cook mode.

Do check out my One pot Sambar rice too. 

Pressure cooker rasam rice - One pot rasam rice recipe


Pressure cooker rasam rice - One pot rasam rice recipe

Pressure cooker rasam rice - One pot rasam rice recipe - Tamilnadu style rasam sadam.


Cuisine: Tamil nadu
Category: Main course
Serves: 3
Prep time: 10 Minutes
Cook time: 20 Minutes
Total time: 30 Minutes


INGREDIENTS
1 cup = 250ml
  • Raw rice or Steamed rice - 1/2 cup
  • Toor dal - 1 tbsp
  • Water - 2.5 cups
  • Salt - as needed
  • Ripe tomato - 1 (finely chopped)
  • Tamarind - Small gooseberry size
  • Turmeric Powder - 1/4 tsp
  • Rasam Powder or sambar powder - 1/2 tsp
To temper
  • Ghee - 1 tbsp
  • Mustard seeds - 1/2 tsp
  • Asafoetida / Hing - 1/4 tsp
  • Pepper Cumin Powder - 1 tsp
  • Crushed garlic – 4 cloves
  • Red Chilli - 1
  • Green Chilli - 1
  • Curry Leaves - Few

  • Coriander Leaves - to garnish
HOW TO MAKE RASAM RICE
  1. Wash the rice and toor dal. Add water and soak till use or around 30 minutes.
  2. Heat ghee in a pressure cooker base. Splutter mustard seeds, hing, curry leaves, red chilli and green chilli.
  3. Add a tsp of pepper cumin powder, garlic and saute for a minute.
  4. Now add the tomato and saute till mushy. Add sambar or rasam powder.
  5. Add 1/2 cup of tamarind extract. turmeric powder, salt and mix well. Lastly add the soaked rice and toor dal. Add  2.5 cups water and required salt.
  6. Pressure cook in low flame for 2 whistles. Switch off the flame and allow the pressure to release naturally.
  7. Open the cooker and mix well. Garnish with coriander leaves.
  8. Enjoy with potato curry and papad.
METHOD - STEP BY STEP PICTURES
  • Wash and soak raw rice or steamed rice along with toor dal. Add 2.5 cups of water and soak it for 30 minutes.

  • Grind equal quantity of pepper and cumin seeds to a fine powder. Set aside.
  • rasam sadam
  • Heat ghee in a pressure cooker base. Splutter mustard seeds, hing, curry leaves, red chilli and green chilli. Add 1 tsp of pepper cumin powder and crushed garlic. Saute for a minute.
    • rasam sadam
  • Add tomato and saute till mushy. Add tamarind extract, sambar powder or rasam powder, turmeric powder and salt. Mix well.
  • rasam sadamrasam sadam
  • Add the soaked rice and toor dal. Add water and mix well. Check for taste.
  • rasam sadam
  • Pressure cook in low flame for 2 whistles or cook till rice becomes mushy. Switch off the flame. Open the cooker after the steam is released. Mix well and serve with papad and potato curry.
  • rasam sadam

    Enjoy !

Note

  • Adjust the quantity of water as per your need. I love mushy rasam rice. So I used more water.
  • Do not skip pepper cumin powder. It helps to give nice flavor.
  • Add rasam powder for typical rasam rice taste. I used sambar powder.

Easy, yummy, one pot rasam rice is ready to enjoy !

one pot rasam rice


Continue Reading...


February 6, 2022

Bamboo Rice Idli dosa Recipe | Moongil Arisi Idli Dosa

Bamboo rice idli

Bamboo rice / Moongil arisi is a super healthy and nutritious rice variety. It is actually the seed that is produced by a flowering bamboo at the end of its life span. Its flowering pattern may vary up to 100 years. Bamboo rice is considered to be a forest produce and in most places only the local tribals are allowed to collect these seeds.

Bamboo rice is a miraculous grain with lots of health benefits like high protein content than regular rice and wheat, good for joint pains, lowers cholesterol, manage blood pressure, good source of Vitamin B6 and it has anti diabetic properties.

There are no visible side effects for this rice but people who has thyroid disorders or people who take medicines for Thyroid should avoid taking this rice as it may interfere with the action of medicine and decrease its levels too much.

Moongil arisi dosa

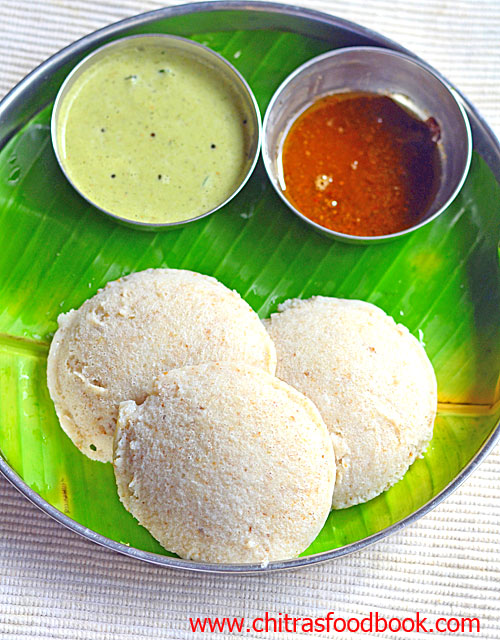
Friends, Bamboo rice is versatile just like other rice varieties. We can cook it and consume as plain rice or make tiffin varieties like idli, dosa, pongal, upma and some dessert recipes like payasam / kheer.

Today I have shared a super healthy and tasty Bamboo rice idli and dosa batter recipe which gives you soft, spongy idli and crispy dosa. Soon I will try to make kheer/ payasam with it and share here. 

Ok, now lets check out Moongil arisi idli dosai recipe with step by step pictures and video.

Bamboo rice idli

Bamboo rice idli dosa recipe - Moongil arisi idli dosa recipe


Bamboo rice idli dosa recipe - Moongil arisi idli dosa recipe

Bamboo rice idli dosa recipe - Moongil arisi idli dosa recipe


Cuisine: Indian
Category: Main course
Serves: 30
Prep time: 18 Hours
Cook time: 20 Minutes
Total time: 18H 20 Minutes


INGREDIENTS
1 cup = 250ml
  • Bamboo rice / Moongil arisi - 1 cup
  • Idli rice - 1 cup
  • Urad dal - 1/2 cup
  • Thick poha / Rice flakes - 1/4 cup
  • Fenugreek seeds / Methi seeds - 1/2 tsp
  • Salt & water - as needed
HOW TO MAKE BAMBOO RICE IDLI DOSA
  1. Wash the bamboo rice thrice till water runs clear. 
  2. Add the idli rice, urad dal, poha and methi seeds. Wash everything.
  3. Soak it for 5 hours. Grind to smooth paste adding required salt and water.
  4. Transfer to a big vessel and cover it. Ferment it overnight or minimum 12 hours.
  5. Grease idli mould and pour batter. Steam it for 10 to 15 minutes.
  6. Rest for 2 minutes and then remove it. Serve hot with chutney or sambar.
  7. To make Bamboo rice dosa, take the required batter in a vessel. Add little water and dilute the batter. Mix well and spread dosa on a hot tawa.
  8. Make it thin or thick as you wish. Serve hot with chutney or sambar. Enjoy !
METHOD - STEP BY STEP PICTURES
  • Wash the Bamboo rice first till water runs clear. Then add idli rice, urad dal, methi seeds and poha. Wash everything together along with Bamboo rice for twice. Add required water and soak it together for 5 hours.
    • Bamboo rice idli
  • Grind everything together to a smooth paste by adding required salt and water. Transfer the batter to a big vessel and cover it with a plate.
  • Let the batter ferment overnight or minimum 12 hours based on the weather. The next morning, batter would have raised well. Mix gently.
  • Bmboo rice idli
  • Boil water in idli pot. Grease idli plate with sesame oil or place a wet cotton cloth. Pour the idli batter. Place the idli plate and steam it for 10 to 15 minutes till the back of spoon or tooth pick comes out clean. Rest the idli plate for 2 minutes and then remove the idli. Serve hot with chutney or sambar. 
    • Bmboo rice idli
  • To make Bamboo rice dosa, take the required idli batter in a bowl. Add little water and dilute the batter. Mix well. Heat a dosa tawa. Pour a ladleful of batter and spread the dosa thin or thick as you like. Let it cook for a minute in medium flame. Then drizzle oil around the dosa and cook till it turns golden in color. Flip the dosa and cook the other side too. Remove and serve hot with chutney or sambar.


Enjoy !

Note

    1. Wash the Bamboo rice well till water runs clear because it has dust and debris.
    2. Do not skip Aval / Poha. It gives soft, spongy idli and golden colored dosa.
    3. This batter gets fermented quickly. So adjust the fermentation time based on the weather condition in your place.

      
      Enjoy this healthy Bamboo rice idli dosa with your favorite chutney and sambar.

    Bamboo rice dosa


    Continue Reading...


    January 27, 2022

    Coconut Dosa Recipe – Karnataka Style Kayi Dosa – Thengai Dosai

    Kayi dosa

    Karnataka style coconut dosa / Kayi dosa (Thengai dosai in Tamil) is a flavourful, yummy dosa variety. It is prepared with rice, poha and coconut as main ingredient. It comes out super soft and spongy without adding urad dal.

    Last week when I was looking for dosa batter recipe without urad dal, I came across this coconut dosa in Veg recipes of Karnataka blog. I loved its soft and porous texture. So I tried it by doubling the recipe. As expected, it came out very well. We all loved it. I served it with red coconut chutney and garlic chutney. Both went well with this dosa.

    Friends, do try this Karnataka style Coconut dosa / Kayi dosa recipe and share your feedback with me.

     coconut dosa


    Coconut dosa - Kayi dosa | Thengai dosai recipe


    Coconut dosa - Kayi dosa | Thengai dosai recipe

    Coconut dosa - Kayi dosa | Thengai dosai recipe for breakfast and dinner.


    Cuisine: Indian
    Category: Main course
    Serves: 20
    Prep time: 10 Minutes
    Cook time: 20 Minutes
    Total time: 30 Minutes


    INGREDIENTS
    1 cup = 250ml
    • Dosa rice / Raw rice -2 cups
    • Thin Pressed rice / Thin Poha - 1 cup  (Use 3/4 cup for thick poha)
    • Grated coconut - 1 cup
    • Fenugreek seeds / methi seeds - 1/4 tsp
    • Salt & water - as needed
    HOW TO MAKE COCONUT DOSA
    1. Wash and soak rice, poha and fenugreek seeds together in water for 4 hours.
    2. Grind everything together adding grated coconut and required water.
    3. Grind the batter till smooth and semi thick like dosa batter. Transfer to a vessel and ferment it over night.
    4. The next day morning, batter would have raised well. Add required salt and mix well.
    5. Heat a dosa pan and pour a ladleful of batter. Do not spread it thin.
    6. Let it be small and thick. Cover and cook in medium flame for few minutes.
    7. Dosa will be cooked well and soft with lots of pores. Remove and serve hot with chutney.
    8. Tastes best with tomato chutney, garlic chutney or spicy coconut chutney. 
    METHOD - STEP BY STEP PICTURES
    • Wash and soak the dosa rice, poha and fenugreek seeds together in water for 4 to 5 hours.

    • Grind the rice mixture in a wet grinder or mixie adding some water. When it is half ground, add the grated coconut and grind the batter till smooth and semi thick like dosa batter in consistency. Make sure you do not grind the batter thin because dosa will become flat and thin if the batter is thin.

    • Transfer the batter to a vessel and cover with a plate. Let it ferment over night or minimum 10 to 12 hours based on the weather.
    • The next day morning, batter would have raised well. Add required salt and mix well. If the batter is too thick, add little water to bring dosa batter consistency.

    • Heat dosa tawa. Pour a ladleful of dosa batter and do not spread it. Make it small and thick. Drizzle oil and cover cook in medium flame till its cooked well. No need to flip it.

    • Remove the dosa and serve hot with spicy coconut chutney or tomato chutney or garlic chutney.


    • Enjoy !

    Note

    • Do not make the batter thin. Grind it semi thick like dosa batter consistency.
    • No need to use cooking soda / baking soda or Eno to the batter.


    Try this Karnataka style coconut dosa for breakfast / dinner and enjoy !

    coconut dosa recipe


    Continue Reading...


    January 19, 2022

    Nendran Chips Recipe At Home - Kerala Nendran Banana Chips Recipe

    Kerala nendran banana chips

    Kerala Nendran Banana chips is our family favorite. Usually I buy from Kerala stores nearby my house and give it for Raksha’s school snacks box. This time, I saw some fresh, raw nendran banana in the shop and took few to try this chips at home.

    Traditionally, this Nendran chips is fried in coconut oil whereas I used refined oil. As its my first try, I told my MIL to make it for me. I took a short video and uploaded it in my Youtube channel too. Please watch it for your reference.

    It stays good for a week if properly fried. Addition of turmeric powder gives a nice color to the chips. So do not skip it. Make sure you toss the chips every now and then for uniform cooking. Also make sure the bubbles stop before you remove from oil. This helps you to make a perfect Nendran banana chips at home. Ok, lets see how to make Kerala special Nendran banana chips at home with step by step pictures. 


     Nendran chips recipe

    Nendran chips recipe


    Nendran chips recipe

    Kerala Nendran chips recipe - How to make Nendran Banana Chips at home


    Cuisine: Indian
    Category: Snacks
    Serves: Serves 4
    Prep time: 10 Minutes
    Cook time: 20 Minutes
    Total time: 30 Minutes


    INGREDIENTS

    • Raw Nendran Banana - 2
    • Turmeric powder - 1/2 tsp
    • Water - 2 tbsp
    • Salt - as needed
    • Cooking oil - to deep fry
    HOW TO MAKE NENDRAN CHIPS AT HOME
    1. Wash and peel the raw nendran banana.
    2. Mix turmeric powder and salt in water. Set aside.
    3. Heat oil and slice the banana over the hot oil using a thin slicer.
    4. Cook both the sides till bubble cease. Keep tossing and cook in medium flame.
    5. Lastly sprinkle the turmeric water and mix well to coat all the chips.
    6. Remove when bubbles cease. Drain in a tissue paper and store in a box after it cools down.
    7. Stays good upto one week. 
    METHOD - STEP BY STEP PICTURES
    • Wash and peel the skin of raw nendran banana. Trim the edges and keep immersed in water till use to prevent discoloration.
    • Nendran banana chips recipe
        Nendran banana chips recipe
      • In a small bowl, mix turmeric powder, salt and water. Set aside. Heat oil to deep fry. Take a slicer.
      • Nendran banana chips recipe
      • Slice the banana over the hot oil in batches. Toss and cook in medium flame. Cook both the sides till bubbles cease.

      • Lastly sprinkle turmeric water and mix well to coat all the chips. Toss till bubbles cease and then remove from oil.
      • Nendran banana chips recipe
      • Drain in a tissue paper and set aside. Kerala nendran banana chips is ready to serve. Store in a box once cools down. Enjoy with sadya or as a evening snack ! Stays good upto a week.


      Note

      • Adjust the quantity of turmeric powder based on the color.
      • After sprinkling the turmeric water, toss well to coat in all the chips.
      • Do not remove before bubbles cease. Chips will become soggy.

      Kerala special Nendran banana chips is ready to enjoy with rice !
      Nendran banana chips recipe

      Continue Reading...


      January 11, 2022

      Hagalakayi Gojju – Karnataka Bitter gourd curry recipe

      Hagalakayi gojju recipe
      Karnataka brahmin style bitter gourd curry / Hagalakayi gojju is an yummy gravy for rice. This is the first time I am trying this recipe. It came out so well and yummy. There are many versions for this recipe. But this is a no onion, no garlic Udupi Brahmin style Hagalakayi gojju. I followed this recipe from a YouTube channel.

      I am happy to include this recipe in my bitter gourd recipes list. I am sure I will make it often. Even Raksha had this gojju without any complaints as it has a mild sweet taste. Friends, if you are a bitter gourd lover, you must try this recipe for sure. Ok, lets see how to make Karnataka Brahmin style Hagalakayi gojju /Bitter gourd curry recipe with step by step pictures.

       Hagalakayi gojju recipe

      Bitter gourd curry - Hagalakayi gojju recipe


      Bitter gourd curry - Hagalakayi gojju recipe

      Bitter gourd curry - Hagalakayi gojju recipe


      Cuisine: Indian
      Category: side dish
      Serves: Serves 4
      Prep time: 10 Minutes
      Cook time: 20 Minutes
      Total time: 30 Minutes


      INGREDIENTS
      Ingredients for dry roasting and grinding
      • Urad Dal - 1/2 tbsp
      • Sesame seeds - 1 tbsp
      • Cumin seeds - 1/2 tbsp
      • Fenugreek seeds - 1/4 tsp
      • Grated coconut - 3/4 cup ( I used fresh)
      • Red chilli - 8 (Byadgi chilli)

      • Bitter gourd - 1 (Finely chopped)
      • Tamarind - Small lemon size
      • Jaggery - 1 tbsp
      • Salt & water - as needed
      For Tadka:
      • Cooking oil - 3 tbsp
      • Mustard seeds - 1/2 tsp
      • Red chilli - 1
      • Hing (asafetida) - 1/4 tsp
      • Curry leaves - few

      • Coriander leaves - to garnish
      BITTER GOURD CURRY / HAGALAKAYI GOJJU
      1. Wash and chop bitter gourd finely.
      2. Heat a kadai and dry roast all the ingredients giver under “ roast and grind”.
      3. Cool down and grind to a smooth paste. Set aside.
      4. Heat oil in a cooker. Splutter mustard seeds, red chilli, hing and curry leaves.
      5. Add finely chopped bitter gourd and saute for few minutes.
      6. Add the ground masala, tamarind extract, jaggery, salt and water. Pressure cook in low flame for 2 whistles.
      7. Open the cooker and check the consistency. Boil till it becomes thick but pourable.
      8. Serve with plain rice adding ghee and enjoy !
      METHOD - STEP BY STEP PICTURES
      • Wash and chop bitter gourd finely. Heat a kadai and dry roast all the ingredients given under “roast and grind”. Lastly add coconut, roast for few minutes and switch off the flame.
      • Hagalakayi gojju recipe
      • Cool down and grind to a smooth paste. Set aside.
      • Heat oil in a pressure cooker base. Splutter mustard seeds, red chilli, curry leaves, hing and asafetida.
      • Hagalakayi gojju recipe
      • Add finely chopped bitter gourd and saute for few minutes till bitter gourd shrinks in quantity. Now add tamarind extract, jaggery, salt and ground masala paste. Add required water and mix well.
      • Hagalakayi gojju
      • Pressure cook in low flame for 2 whistles. Open the cooker after the steam is released naturally. You can see a layer of oil floating in top. Check the consistency. If its watery or thin, boil for few minutes to become thick but pourable.
      • Hagalakayi gojju
      • Serve with plain rice adding few drops of ghee. Enjoy !

      Note

      • Adjust the quantity of tamarind and jaggery as per the bitterness of bitter gourd.
      • Consistency of this gojju should be thick.You can adjust it as per your preference.


      Try this Karnataka, Brahmin style Hagalakayi / Bitter gourd gojju.

      Hagalakayi gojju recipe

      Continue Reading...