Every year during Diwali, my MIL makes Maida Burfi without fail. She calls it as Maida cake (All purpose flour sweet cake in English). Usually Tamil people mention burfi recipes as cake. For Diwali, many people especially South Indians love to try sweets recipes made from maida like burfi, badusha, sweet samosa, sweet maida biscuits etc.
Few years back, I posted an easy maida burfi with milk powder without using ghee during Diwali. Today I have shared my MIL’s version of maida burfi which has melt in mouth texture and tastes great. This is a beginners sweet that gives fool proof results if you use good conditioned non-stick pan.
It can be made with simple ingredients that are easily available at home like maida, sugar, ghee and cardamom powder. I have used green food color as we see in sweet stalls. But my MIL never uses food color. So this burfi comes out pale white without adding food color. Addition of food color is purely optional. If you are looking for an easy burfi recipe to try for this Diwali, you must try this maida burfi. I am sure anyone can make it easily and perfectly. I have made a full video recipe to help beginners.
Hope you will try it and share your feedback with me. Once you make it perfect, you can easily make chocolate maida burfi. I will post that recipe next week. Ok, lets see how to make maida burfi recipe with step by step pictures and video !
Heat ghee in a good non-stick pan and roast maida till nice aroma wafts.
In another non-stick pan, melt sugar adding water and boil till 1 string consistency.
Switch off the flame. Add food color and cardamom powder to sugar syrup.
Mix well and add roasted maida paste.Keep mixing without fire.
Mixture becomes thick and starts to leave the sides of pan.
Remove and spread in a greased tray.Level it and make pieces when warm.Remove after it cools down.
Remove after it cools down. Store in a box. Stays good for 10 days!
Maida burfi Recipe - Step by step photos
Heat 1/4 cup of melted ghee in a non-stick pan.Add maida/all purpose flour and roast in medium flame without burning it. It becomes a smooth paste leaving a nice aroma.
Remove the pan from the flame and keep aside. No need to remove the maida paste from pan.
In another non-stick pan or kadai, melt 1 cup of sugar adding 1/2 cup of water. Stir well and melt the sugar completely. Scrape the sides as well.
Boil the syrup in medium flame till frothy. Lower the flame completely and check for one string consistency.
To check it, take little syrup in your pointer finger from the back of ladle and slide it between your thumb and pointer finger.When you release the fingers, you will get single thin string without breaking.
If it doesn't form one string, boil the syrup for one more minute and check it again.
Switch off the flame. Add food color and cardamom powder, mix well and remove the kadai from stove. Add roasted maida paste and mix well without lumps.
Initially the mixture looks watery but when you keep mixing, it thickens and becomes a paste. It starts to leave the sides of pan and becomes thick but pourable paste.
As soon as it becomes a thick paste, remove from the kadai and spread it in the ghee greased plate OR a bowl lined with butter paper.Do not wait to become thick dough. Use a square shaped plate or bowl to make uniform pieces.Immediately spread the burfi mixture with a ghee greased bowl. Press it really well and seal the cracks if any using your fingers . Act quickly before it sets completely.
Let it rest for 20 minutes to become warm. Invert into a plate. Remove the butter paper. Then cut into square shapes with a sharp knife greased with ghee. Remove the pieces after its cooled completely.Store in an air tight box and enjoy for one week to 10 days.
Notes
Do not reduce or increase the quantity of sugar and ghee. Burfi becomes hard if the sugar or ghee is reduced. It will become too soft and break if you add more ghee or sugar. So please follow the same measurement.
One string consistency is most important for this burfi. If you are unable to check it, just boil the syrup till frothy and pour it using a ladle. The last drop falls slowly by forming a string. This is also an indication for one string sugar syrup.
You should add the roasted maida only after switching off the flame. Heat of the kadai is sufficient for the mixture to thicken.
Remove the burfi mixture as soon as it becomes thick and pourable. Do not wait for the paste to become thick dough. Burfi will get more cracks.
Try this easy, yummy melt in mouth Maida burfi for this Diwali and enjoy the festival !
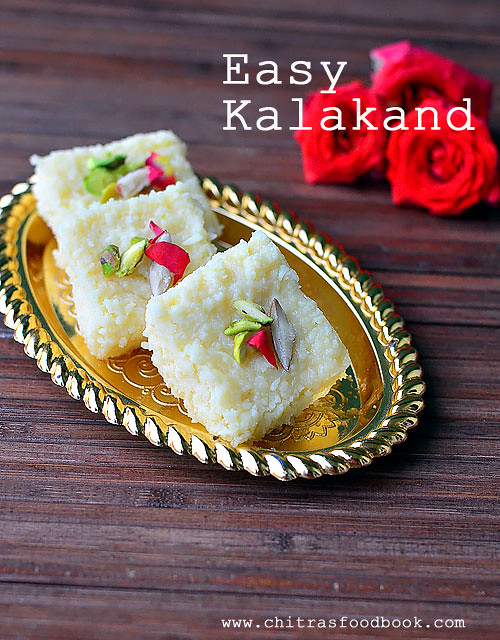
Last year during Diwali, I tried this easy kalakand recipe using paneer and condensed milk ( Milk Maid) by watching YouTube video. Kalakand recipe is nothing but a rich milk cake. It is one of the popular desserts in West Bengal, Rajasthan, Delhi and some places in North India. Traditionally it is prepared by boiling and thickening milk with sugar. It takes hours to prepare.
This easy and instant kalakand recipe calls for just 3 ingredients namely Paneer/Chenna, Condensed milk and cardamom powder. For variations, it can be prepared with ricotta cheese instead of paneer and rose water or kewra essence can be added instead of cardamom powder. It can be prepared so easily and quickly. Its ideal for beginners. In North India, I heard people make Kalakand for Janmashtami as it is a milk based sweet. So I thought of sharing this easy and instant kalakand recipe for this Gokulashtami. Do try this easy, Instant Kalakand recipe using condensed milk and store bought paneer. Lets see how to make it with step by step photos.
Kalakand recipe with condensed milk
Easy, instant kalakand recipe with condensed milk / milk maid
Paneer / Indian Cottage Cheese - 1 cup ( I used Milky mist brand)
Milk maid or Amul condensed milk - 200 ml tin
Cardamom powder - 1/2 tsp
Butter or ghee - 1 tsp
HOW TO MAKE KALAKAND
Crumble or grate the paneer.
In a kadai, heat 1 tsp ghee and add the condensed milk. Mix well.
Add grated paneer, cardamom powder and mix well.
When the mixture thickens and leaves the sides of pan, switch off flame.
Transfer to a greased or butter paper lined bowl. Refrigerate for an hour. Cut into pieces.
Garnish with chopped nuts. Serve !
METHOD - STEP BY STEP PICTURES
Take the store bought paneer and grate it. Measure 1 cup from it ( loosely packed) and keep aside.Line a pan with butter paper or grease it well with ghee and set aside.
Heat ghee in a non-stick kadai and add the condensed milk. Mix well in very low flame.
Add grated paneer, cardamom powder or rose water and mix well. Paneer absorbs condensed milk and it will thicken initially. But if you keep mixing in low flame, mixture will become loose and watery.
Keep the flame medium and stir well. After 3 to 4 minutes, it will start to thicken and leave the sides of pan. Mix for a minute. You will see the mixture becoming grainy and thick. Switch off the flame and remove the pan immediately.
Pour it to the butter paper lined pan for 2 inch thickness. Level it and refrigerate it for 1 to 2 hours till its well set. Garnish with chopped nuts and stud it well. Cut into pieces and serve chilled for best taste.
Enjoy !
Note
You can add some sugar ( say 1tbsp) if you feel sweet is less.
Fresh chena tastes the best. But I used store bought paneer.
If you mix for long time, kalakand may become chewy.So remove at the right time.
If you are not able to cut into pieces, refrigerate for more time.
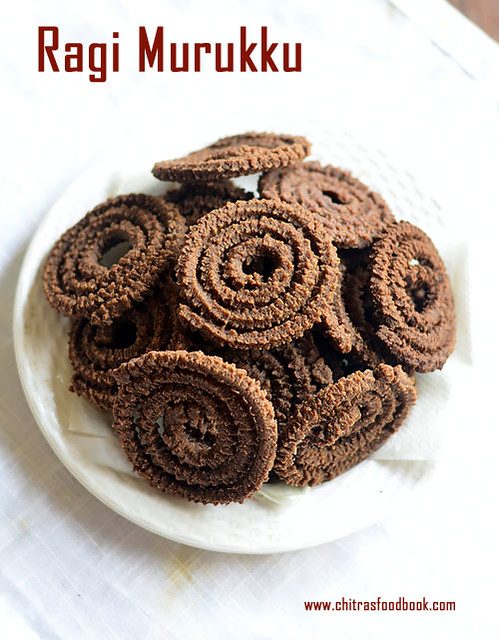
Ragi murukku known as ragi chakli in Kannada, Kezhvaragu murukku in Tamil, Finger millet flour murukku in English is an interesting murukku variety. Basically ragi is a healthy, diabetic friendly millet which is very rich in calcium.So I try to include it in our regular diet in the form of idli, dosa or porridge. Even though I have tried so many recipes with ragi flour, ragi murukku was always challenging to me. Last year during Diwali, I tried ragi murukku without rice flour but I couldn’t make proper shapes.
Recently when I saw ragi murukku recipe from Mullai (Spiceindiaonline) in my Instagram feed, I got tempted to try again. I used the same ingredients as per the original recipe except I used ghee instead of butter. Murukku came out really well, crispy with a nice flavor of ghee. I din’t find any big difference in taste and flavor of this murukku except its color.
Friends, if you are looking for any snacks with ragi flour, you must try this recipe. I am sure you will love its result. You don’t have to wait till Diwali to try this murukku. It took just one hour for me to make this murukku. So you can make it anytime and enjoy your evening teatime with this crispy ragi flour chakli. Ok, Lets see how to make ragi murukku with step by step photos and video.
Add water gradually and make sticky, smooth dough.
Cover with a wet cloth till use.
Take star mould in murukku press. Fill the dough.Make shape in ladle.
Deep fry the murukku in batches.Cook both sides till bubbles cease.Store after cool down.Enjoy !
Ragi Murukku Recipe - Step by step pictures
Sieve ragi flour, rice flour and besan in a wide bowl.
Add red chilli powder, sesame seeds or cumin seeds, hing and salt. Add melted ghee and mix well till crumbly.You can also use soft butter at room temperature. Make sure ghee or butter is well spreaded in the flour.
Add water gradually and make soft, slightly sticky dough.Cover the dough with wet cloth till use.Take star mould in murukku press.
Fill the press with dough. Make shapes in back of ladle.If dough cuts or breaks while pressing, you should sprinkle little water in the dough,make it slightly sticky. Now you can make shapes perfectly.This murukku dough absorbs more water.So sprinkle water whenever needed and make shapes.
Heat oil to deep fry. Put a pinch of dough and if it rises to the top immediately, oil temperature is right. Now drop 2 to 3 murukku per batch. Fry both sides till bubbles cease completely. Keep the flame medium else murukku becomes black.Remove in a tissue paper and cool down. Store in a box and enjoy for months.
Notes
Add more chilli powder for spicy taste.
Do not add more ghee or butter because murukku may disperse in oil while frying.
This murukku dough absorbs more water.So sprinkle water in the dough whenever needed and keep it slightly sticky.This helps to draw shapes perfectly without breaking.
Deep fry this murukku in medium flame till bubbles cease completely. If oil temperature is more, murukku becomes black and get burnt smell.
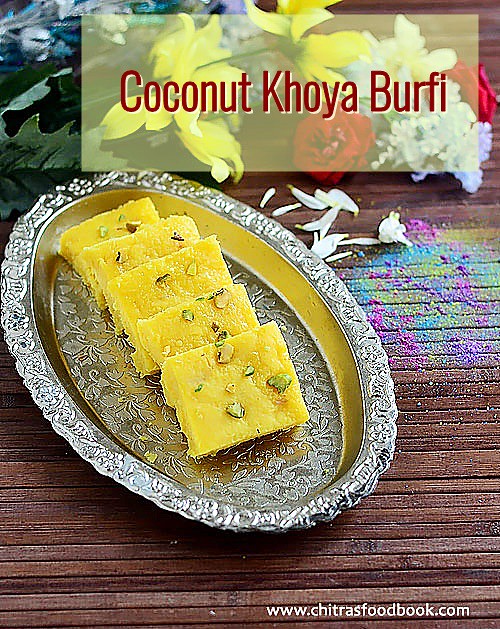
I must thank my reader friend Harini for requesting me to try Chennai Ganga sweets shop style coconut burfi with khoya ( Thengai burfi in Tamil, Nariyal Ki burfi in Hindi). When she told me, I had no clue about its taste and texture. Recently I bought that coconut burfi from Ganga sweets during my Chennai trip. When I tasted it, I found the barfi is made with coconut and khoya. I browsed for the recipe and tried it by watching Dr.Shalini’s YouTube video. Even though its my first attempt, I am quiet happy with the results.I won’t say it came out 100% close to the sweet shop ones but it tasted similar.
Usually South Indian coconut burfi is made by cooking freshly scraped coconut in sugar syrup of one string consistency. But this coconut burfi with khoya is prepared by cooking khoya/mawa, desiccated coconut, sugar and water together till it reaches the burfi consistency. You don’t have to check for one string sugar syrup. But this burfi takes long time to cook and set as it has khoya in it.
I have not used milk, milk powder or condensed milk in this recipe as I had used yellow food color to resemble the sweet shop burfi. If you want to make white colored coconut burfi, use milk instead of water. I am happy that I could try this North Indian style nariyal ki burfi successfully at home. I am sharing this colorful recipe as my contribution for Holi festival. Do try this easy and yummy coconut mawa burfi at home for this festival and have a great celebration. Lets see how to make coconut khoya burfi with step by step photos and a VIDEO !
Do check out my Holi special recipes COLLECTION for more sweets and snacks ideas!
Coconut khoya burfi recipe - Nariyal Ki barfi with mawa
How to make coconut khoya burfi recipe at home - North Indian style coconut burfi with khoya !
Desiccated coconut - 1.5 cups ( I used store bought dry coconut)
Unsweetened Khoya / Mawa - 1 cup ( I used 200gms of Milky mist khoya)
Sugar - 1 cup
Water - 3/4 cup
Saffron threads - Few
Yellow food color - A pinch
Cardamom powder - 1/4 tsp
Chopped pistachios – 2 tbsp ( To garnish)
Ghee – 1 tsp ( to grease the plate)
METHOD
Grease a tray with ghee and keep it ready. Mash the khoya well and measure 1 cup. Keep aside.In a kadai, take 3/4 cup of water, add saffron threads, food color and cardamom powder. Mix well and let it start to boil. Add 1 cup of mashed khoya and mix well without lumps. It resembles condensed milk after mixing.
When it starts to boil with bubbles, add sugar and mix well.Sugar melts and the mixture starts to roll boil. Let it boil for a minute.
Then add 1.5 cups of desiccated coconut and mix well. Mixture will start to thicken. Keep mixing till the burfi mixture is thick and leaves the sides of pan completely. It becomes a whole mass with nice coconut smell. Stay nearby and keep stirring to prevent burnt bottom. It takes nearly 10–15 minutes to reach the final stage if mixing in medium to high flame. Make sure there is very less moisture. It should not be too wet. Remember over mixing makes the burfi too hard and chewy.So remove it at the right time.
Grease the bottom of a small bowl with ghee. Put the burfi mixture to the greased tray and press it well with a greased bowl. Level it and sprinkle the chopped pista pieces. Press it well.
Freeze the burfi mixture for one hour OR refrigerate it for 2-3 hours. It helps to set the burfi quickly and make shapes perfectly. Mark square shape using a greased knife.As the burfi mixture is cold and frozen, it would be difficult to handle. So press it hard to mark shapes. Remove it after few minutes. It tastes slightly chewy when consumed on the same day. Tastes perfect the next day. This burfi needs a setting time of 8 hours. Be patient. Leave over night and taste it the next day to know its actual taste.
Enjoy ! This burfi stays good for 2 days in room temperature and 4 – 5 days under refrigeration.
Note
If you want to use fresh coconut, you can use instead of desiccated coconut. But it takes longer time to cook and reach the final stage as fresh coconut has some water content.
Shelf life of the sweet reduces if you use fresh coconut.
Try this easy, yummy coconut khoya burfi at home and enjoy the festival !
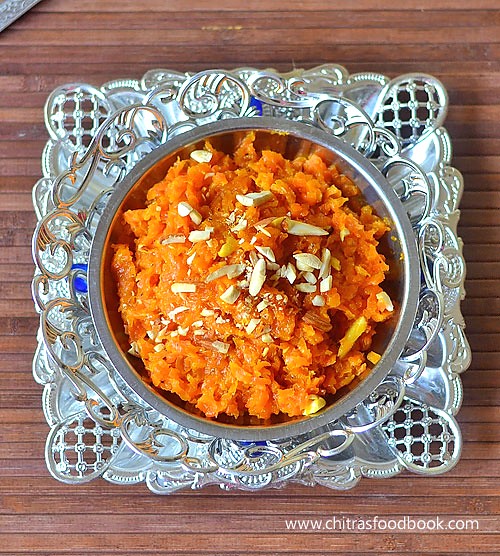
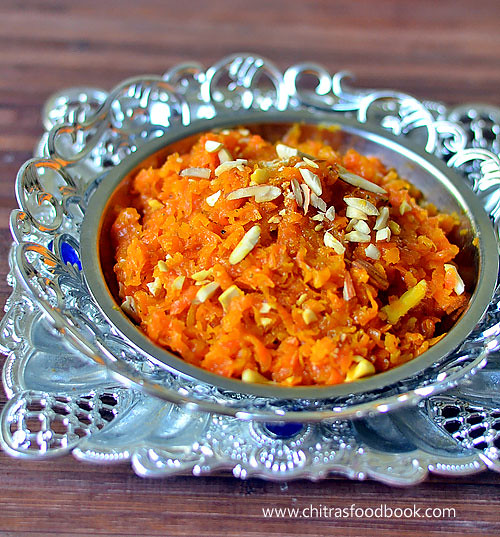
Carrot halwa recipe cooked in a kadai with step by step photo and a video !
Carrot halwa (Gajar Ka halwa In Hindi) is one of the most popular Indian desserts that is loved by all. Long back I had shared “How to prepare carrot halwa in pressure cooker”. That’s my go-to recipe for making easy and quick carrot halwa.
Yesterday for a change, I prepared this traditional method of making carrot halwa in a kadai by using milk, sugar and ghee. I offered it as prasadam for my Friday Lakshmi Pooja. For making carrot halwa, Delhi carrots are mostly used by North Indians whereas I made it with our South Indian orange carrots(Ooty carrot).
Traditionally it is prepared in a big iron kadai but I used my non-stick kadai that suits my Induction stove as I wanted to make a video recipe as well. So there are mild deviations from the perfect traditional ones but this one tastes and looks equally good. I have not used condensed milk ( Milk maid) Or Khoya/ mawa. So the preparation time and cooking time takes a bit longer than pressure cooker version. Still the final result makes you forget all the pain. Lets see how to make carrot halwa/ Gajar Halwa at home with step by step photos and video !!
Carrot Halwa Recipe - Gajar Ka Halwa
How to make carrot halwa - Gajar Halwa Recipe using milk
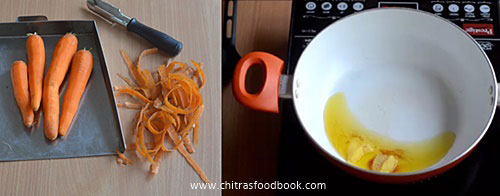
Wash and peel the skin of carrots. Grate it using a big sized holes grater. Do not use a small hole grater because halwa turns mushy and the end of cooking. Grate and keep in a plate.
In a kadai, heat 2 tbsp ghee and add the grated carrot.Saute well till the raw smell goes off and color of carrot changes to pale orange. It takes nearly 3-5 minutes.
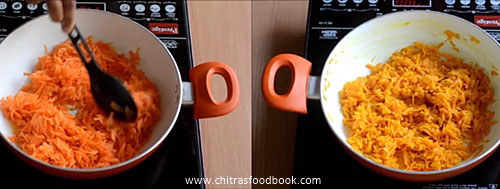
Now add 1 cup of milk and mix well.Keep the flame medium and cover the kadai with a lid. Carrots get cooked in milk. Wait till all the milk is absorbed by the milk. Open the kadai every now & then, stir till bottom to avoid burning. Cooking takes nearly 10-15 minutes.
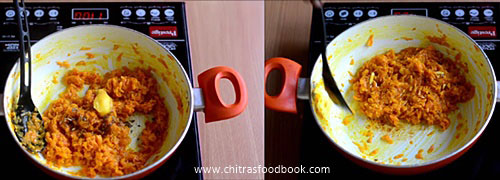
Now add 1/2 cup (heaped)sugar and mix well. Sugar melts and mixture will become watery.Check for taste and add 2 tbsp more sugar if needed. Keep the flame medium and keep stirring till 3/4th of the moisture is lost. When the halwa becomes thick and starts to leave the sides of kadai, add cardamom powder, 1tbsp ghee and mix well. When the halwa becomes thick, gathers in the center with very little moisture, remove it and sprinkle chopped nuts. Serve warm with ice cream or cold !
** Do not stir the halwa for long time to become thick & dry because when the halwa cools down, it will become hard & chewy.So remove it when there is very little moisture content. This halwa can be refrigerated and stored for a week.Reheat in a microwave for 1 minute and serve warm if needed.
Enjoy !
Note
Add more sugar ( 2 tbsp extra) for more sweetness.Sugar can be added any time while cooking carrot halwa.
You can use Delhi carrots instead of the regular orange carrot for bright color.
Serve warm with your favorite ice cream to enjoy its best taste !
Enjoy this delicious carrot halwa with a scoop of vanilla ice cream. Its a blissful combo !!