Search Chitra's Food Book

Showing posts with label NO ONION NO GARLIC RECIPES. Show all posts

June 18, 2015

Cabbage Vada Recipe | Urad Dal Vada With Cabbage - Muttaikose Vadai

Few years ago I posted Mixed vegetable Urad dal vada. But I have not tried Urad dal vada adding cabbage alone / Muttaikose vadai in Tamil. Yesterday I made this cabbage vada for our No moon Day No onion No garlic lunch menu. I was scared whether vada would get the raw smell of cabbage. But to my surprise, it was so crispy and superb in taste. It’s a nice tea time snack. I couldn’t even find the trace of cabbage smell in it. Infact cabbage acted as a binding agent and made the batter thick enough to shape the vada easily too. It’s a great replacement for onion. Just give a try. You will come to know. Lets see how to make cabbage vadai in detail.


Please refer my urad dal vada/Medhu vadai video recipe for better understanding of grinding and shaping the batter.

check out this recipe with video for grinding vada batter using grinder.

Cabbage Vada Recipe


Cabbage Vada Recipe Cabbage vada recipe - Urad dal vada adding cabbage
Cuisine: Indian
Category: Snacks
Serves: 10 
Prep time: 40 Minutes
Cook time: 10 Minutes
Total time: 50 Minutes


INGREDIENTS

  • Round Urad dal - 1/2 cup
  • Finely chopped Cabbage - 1 cup
  • Curry leaves - few
  • Green chilli - 2 nos ( finely chopped)
  • Coriander leaves - few
  • Ginger - 1/2 inch piece
  • Hing /Asafetida - 1/4 tsp
  • Salt & water- as needed
  • Cooking oil - to deep fry
HOW TO MAKE CABBAGE  VADA WITH URAD DAL - METHOD
  • Wash and soak the urad dal for at least 45 minutes and maximum 4 hours. Drain all the excess water and take the urad dal in a mixie jar. First grind the dal adding very little water( 2 tbsp). Grind the dal to the maximum by wiping the sides of jar. No need to add salt. Wipe the sides of jar and add a tbsp of water. 
  • Again grind the dal till it turns smooth and thick. Add water only in a tbsp at a time. So add more if needed. The batter should be stiff and smooth. Just drop a pinch of batter in a bowl of water. If the batter floats, the consistency is right. If it drowns, it shows you have added more water. Please refer my Urad dal video grinding for better understanding.
  • Remove the batter in a bowl. Add little water to the mixie jar and grind it. Collect that water and use it for dipping your hands before shaping the vada. 
  • Beat the batter with your hands for few minutes to remove air bubbles. This helps to prevent vada from bursting in oil. To the batter, add finely chopped cabbage, green chillies, curry leaves, coriander leaves and ginger bits. Mix well. Add the required salt. After you mix all these ingredients, batter would become thick and you will be able to shape the vada easily.

  • Heat oil to deep fry. Drop a pinch of batter in oil. If it rises immediately to the top, oil is just right. Now keep the flame medium. Take a golf sized ball from the vada batter. Pat it slightly and make a hole in the center.
  • Drop the vada in the oil and deep fry till cabbage turns golden brown. The color of vada may vary based on the time you cook. I love to take my vada golden brown. So I always cook the vada in high flame for few seconds before removing from oil.
    Serve hot with chutney.Enjoy !
Note
  • Grinding urad dal in mixie yields less batter than grinding in grinder. But you can make 10 medium sized vada for this quantity.
  • You can also add coarsely ground pepper along with other ingredients.
  • For kids you can grind green chillies along with ginger and add to batter.
  • If u feel the batter is too watery and if you are not able to make shapes, add little rice flour. But consume the vada when it is hot because adding rice flour makes the vada hard when it cools down.
  • My MIL adds a tsp of toor dal while soaking urad dal to avoid oil absorption. But proper grinding of batter with right amount of water gives you oil free vada.


Try this no onion Urad dal vada recipe for your tea time. Tastes yummy !


Continue Reading...


May 26, 2015

Udupi Sambar Recipe-Hotel Style-No Onion No Garlic Sambar

Udupi hotel sambar
Last week I tried this Udupi hotel sambar recipe for idli and that too without onion,garlic brahmin version after years.I came across this recipe in “The Hindu” Food safari section.The recipes I have tried from that section is always a super hit in my home.The best example is my soft kulcha recipe.The taste & cooking method of this udipi sambar is very close to my Hotel idli sambar using freshly ground sambar powder.So Sendhil & myself liked it a lot and relished with idli,dosaHappy
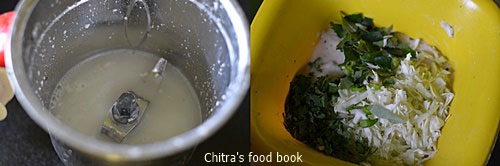
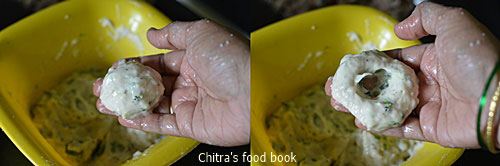
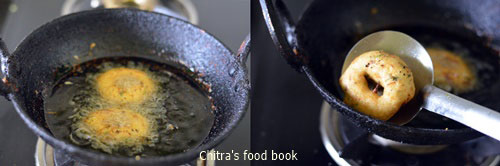
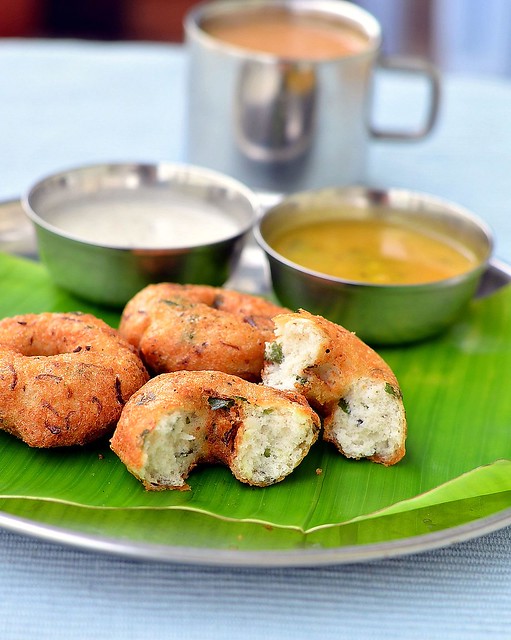
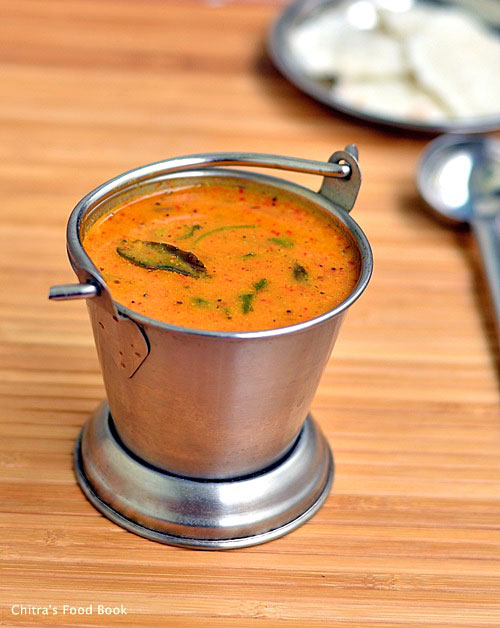
.Try this recipe if you are looking for a no onion no garlic side dish for idli,dosa & pongal.You will love it !Lets see how to make this Karnataka Udupi's most popular sambar recipe with step by step pictures.
Continue Reading...


March 22, 2015

Ugadi Lunch Menu-Karnataka Style

Karnataka lunch menu
Friends, this week I have shared a Karnataka style Ugadi lunch menu instead of Sunday biryani recipe.  Yesterday I made this simple yet delicious lunch menu for Ugadi celebration. So I thought of sharing that platter here. Its been my long time wish to post a Karnataka style lunch menu in my blog. So I took Ugadi festival as an opportunity and made a simple lunch menu.

After I prepared Holige successfully, I asked my friends to suggest me an easy lunch menu idea for Ugadi festival. Based on their suggestions, I made Obbattu, Obbattu saaru, Mavinakayi chitranna, Mysore Bonda, Beans palya, Shavige payasa, dal, plain rice and the most popular Kosambari recipe. Also Megha suggested me a very easy recipe for Obbattu saaru.

As I had made Obbattu in the previous day, making this menu was easy for me. In this post, I have shared the recipes of Kosambari( using moong dal ) and beans palya. I have made a separate post for Obbattu saaru and Mavinakayi chitranna. I have given links for all these recipes below. Please check it. Ok, Now lets see this yummy Karnataka lunch menu recipes for Ugadi festival.

Check out my other lunch menu posts here . 

Wish you all a very happy Ugadi !!

 Ugadi lunch menu

Ugadi Lunch Menu


Ugadi Lunch Menu Ugadi Lunch Menu Recipes-Karnataka style
Cuisine: Indian
Category: Lunch menu
Serves: 2
Prep time: 30 Minutes
Cook time: 1 Hour
Total time: 1H30M


INGREDIENTS
Kosambari recipe
  • Yellow moong dal - 2 tbsp
  • Carrot - 1 no small
  • Green chilli - 1 no
  • Cucumber- a small piece
  • Coriander leaves - 2 tbsp
  • Grated coconut - 3 tbsp
  • Salt - as needed
To temper
  • Cooking oil - 1 tsp
  • Mustard seeds - 1/4 tsp
  • Curry leaves - few
  • hing/asafetida - a pinch ( optional)
Beans palya recipe
  • Beans - 20 nos
  • Grated coconut - 1/4 cup
  • Green chillies - 2 -3 nos
  • Salt & water - as needed
To temper
  • Cooking oil - 1 tbsp
  • Mustard seeds - 1/2 tsp
  • Urad dal - 1 tsp
  • Curry leaves – few
Click these links for other recipes
METHOD

  • I assumed that you have made obbattu/Holige the previous day and shared the procedure of making other dishes below.
  • Wash and soak moong dal for 30 minutes to make kosambari. Wash and soak urad dal for mysore bonda for 45 minutes in enough water.  You can also make vada instead of bonda. 
  • To make this menu, pressure cook one cup of rice along with moong dal in a small closed container. Soak tamarind in water for 20 minutes. Pressure cooking rice and dal will be done in 15 minutes.
  • In another burner, boil the vermicelli and let it cook. In the mean time, wash and peel the skin of raw mango. Grate it and finely chop the green chillies. Heat a pan and do the tempering, add green chillies and grated mango.
  • Saute well adding salt and turmeric powder. Mix well till mangoes get cooked. Lastly add the grated coconut, saute for a minute and switch off the flame. After the pressure is released, spread the rice in a plate and let it cool. Add this maavinakayi paste and mix well adding sesame oil. Adjust salt and garnish with coriander leaves. Please refer my mavinakayi chitranna recipe post for another method.
  • Now vermicelli will be cooked well, add milk, sugar and roasted nuts and remove from the flame. Set aside.
  • To make kosambari, take the soaked moong dal, drain the water completely and add grated coconut, grated carrot, finely chopped cucumber, green chillies and coriander leaves. Mix well. Add salt just before serving otherwise this mixture will leave more water while serving. So add salt only before serving. Lastly do the tempering and Kosambari is ready.
  • For beans palya,wash and chop the beans into small circles. Heat oil in a kadai and temper mustard seeds, urad dal and curry leaves. Add finely chopped green chillies and beans. Add the required salt and saute well for few minutes. Sprinkle some water and cover cook the beans till its done. Mix it once or twice in the middle. Add the grated coconut in the end, give a stir and switch off the flame. Beans palya is ready.
  • Lastly you can do the obbattu saaru by using the reserved holige pooran dal water. Please check the link for obbattu saaru recipe above. By now, urad dal would have been soaked well. Grind the batter and make bonda. Serve saaru and bonda really hot to enjoy its best taste. So I made it at the end.
You can finish the entire process within an hour if  you plan it right. Serve everything hot and enjoy !

Try this easy yet yummy lunch menu and enjoy Habbada Oota on this auspicious day !

 Ugadi lunch menu
Continue Reading...


March 14, 2015

Kuthiraivali Upma Recipe/Barnyard Millet Upma-Millet Recipes

Kuthiravali upma recipe
Its been few weeks I posted a millet recipe in my blog. Last month I posted varagu idli, dosa recipe. After that, I couldn’t try any interesting recipes using millets. Nowadays I started trying some instant upma, kichadi recipes using millets. I will try to share them one by one here. Today I am sharing a simple and easy one pot upma recipe using Kuthiraivali/Barnyard millet. Kuthiraivali is called as barnyard millet in English, Jhangora in Hindi, Odalu in Telugu, Kavadapullu in Malayalam, Oodalu in Kannada. It has 6 times high fiber content when compared with wheat.Its a gluten free millet with high calcium, phosporous & fiber. It is high in carbohydrates & fat too. It improves metabolism.It helps to maintain the body temperature.It acts as a good anti oxidant too. 

I usually make puli upma with kuthiravali. Recently I tried a plain upma recipe just like my noi arisi upma/broken rice upma.It came out very well. I served it with moong dal sambar and we loved that combo.Its a healthy replacement for our regular rice upma and tastewise there is no compromise at all. You can add finely chopped onions & vegetables to make it colorful and healthy. As it is an easy one pot meal,its an ideal recipe for working women & bachelors to prepare breakfast & dinner during busy morning hours or lazy & tired night hours. If you like the taste of this upma,u can experiment the same with other millets like samai, varagu and thinai too. Procedure, quantity of water and ingredients are one and the same. 

Ok, Lets see how to make this healthy barnyard millet upma recipe in detail!
Check out my moong dal sambar here. It is the best side dish for this upma I feel. You can also have it with coconut chutney or thogayals.

Barnyard millet upma

Kuthiravali upma recipe


Kuthiravali upma recipe Barnyard millet upma-Healthy breakfast/dinner recipe using millets
Cuisine: Indian
Category: Millet recipes
Serves: 2
Prep time: 5 Minutes
Cook time: 15 Minutes
Total time: 20 Minutes


INGREDIENTS
1 cup - 240ml
  • Barnyard millet/Kuthiravali - 1 cup
  • Water - 2.5cups
  • Salt - as needed
To temper
  • Coconut oil - 2 tbsp
  • Mustard seeds - 1/2 tsp
  • Urad dal - 2 tsp
  • Chana dal - 1 tbsp
  • Red chillies - 1 no ( pinched)
  • Green chillies - 2 nos ( slitted)
  • Curry leaves - few
  • Hing/Asafetida - 1/4 tsp
  • Ginger - 1 inch piece( chop finely)
  • Big onion - 1 no ( chop finely) optional
  • Mixed vegetables - 1/2 cup ( carrot, beans, potato and peas) Optional.
HOW TO MAKE KUTHIRAVALI UPMA - METHOD

  • Wash the millet and drain the water. Keep it aside. Chop the onions & vegetables finely if using.

  • Heat oil in a cooker base and add the coconut oil or any cooking oil. Coconut oil gives a nice flavor.  After the oil is heated, splutter mustard seeds, urad dal and chana dal. Add the chillies, hing and few torn curry leaves. Saute well.( If using onions & vegetables, add in this stage and saute them for a minute). Now add the required water and salt.Add the finely chopped ginger pieces and few more curry leaves & 2 pinches of hing in the water. Adding raw ginger, curry leaves & hing will give a nice flavor to the upma. Now when the water starts to roll boil, check for taste and add more salt if needed.

  • Simmer the flame and add the washed millet. Mix well and close the cooker. Cook it for one whistle in low flame.Usually it takes 7-9 minutes in my cooker. Timings may vary though. Switch off after one whistle and open the lid after steam is released. Fluff the upma with a fork. 
  • Do not mix it vigorously when the upma is hot because, upma will turn out mushy. So mix it gently. As the upma cools down, it will become separate and grainy. Enjoy with sambar/chutney or coriander leaves thogayal. My personal choice is sambar than chutney : ))
kuthiravali upma


Enjoy !


Note

  • For variations, you can add finely chopped onions & some vegetables like carrot, beans, peas etc. It makes the upma colorful and healthy too.
  • Adding 2.5 cups of water gives a mushy look to the upma when it is hot. But it will turn separate and grainy as it cools down.
Check out my easy, one pot moong dal sambar here !

Enjoy making this easy, healthy one pot millet upma for your breakfast/dinner !
Kuthiravali upma recipe
Continue Reading...


September 29, 2014

KARAMANI SUNDAL RECIPE WITHOUT SOAKING - THATTA PAYARU SUNDAL

Instant Karamani sundal recipe


Generally sundal varieties with lobia / karamani / Black eyed peas/ thatta payaru, green gram/pacha payaru and lima beans/mochakottai can be prepared without soaking. We can make sundal instantly by roasting them. Roasting gives a nice flavour to these legumes and makes the sundal tastes yummy too. 

I won't say it cooks super soft at the same time it won't be hard to chew. Last year I shared Instant white karamani sweet sundal with jaggery using the same method. Here you go, spicy instant karamani sundal for this year Navaratri. Lets see how to make this easy navratri sundal recipe today ! Do try this easy,instant sundal and offer for today's neivedyam.

Karamani-brown


Instant Karamani sundal recipe


Karamani sundal recipe Instant karamani sundal / thatta payaru sundal for Navarathri naivedyam
Cuisine: Indian
Category: side dish
Serves: 4
Prep time: 5 Minutes
Cook time: 15 Minutes
Total time: 20 Minutes


INGREDIENTS
1 cup - 250ml
  • Karamani/Lobia/Black eyes peas/thatta payaru - 1/2 cup( white or brown)
  • Grated coconut- 1/4 cup or 3 tbsp
  • Water and salt-As needed
To temper
  • Cooking oil - 1 tbsp
  • Mustard seeds-1/2 tsp
  • Urad dal-1/2 tsp
  • Red chillies - 2 nos
  • Curry leaves-few
  • Lemon juice - few drops
  • Coriander leaves-few
  • Hing - 2 big pinches

METHOD

  • In a pressure cooker base,heat a tsp of oil and roast the karamani till it crackles. Keep the flame medium. The color turns dark and skin cracks with a noise. Press the grains well using the back of ladle. Add the required water & a pinch of cooking soda(optional to cook soft, but I dint add) and pressure cook in   low flame for 3 whistles.
Karamani sundal


  • After the steam is released, open the cooker and keep aside. Do not drain the excess water. Heat oil in a kadai and temper as said above.
Karamani sundal

  • Add the cooked karamani along with water. Let it boil for sometime. Leave little water behind( say 1 tbsp) and add the grated coconut. Mix well till water drains. Switch off the flame and drizzle lemon juice as needed ! Garnish with coriander leaves. 
Instant karamani sundal


Offer God n Enjoy !


Note

  • U can replace brown karamani with white ones.
  • If u want to make very soft sundal,soak karamani for 2-3 hours after roasting and before pressure cooking.


Black eyed peas sundal


Make this healthy karamani sundal instantly and offer God !

Karamani sundal

Continue Reading...


April 29, 2013

Pottukadalai Chutney Recipe | Roasted Gram Dal Chutney Recipe For Paniyaram

pottukadalai chutney
Pottukadalai chutney / Fried gram dal chutney ( roasted chana dal chutney) post was lying in my drafts for long time.As I dint prepare any new dishes, I thought of posting this simple and yummy chutney. My mom makes this chutney as a side dish for leftover dosa batter paniyaram.I think most of u would have seen this watery chutney ( thanni chutney) in road side hotels. After tasting this chutney in a Kai yeandhi bhavan (road side hotels), my mom started making this at home. It tastes great for paniyaram , dosa and idli. This chutney can be made using fried gram dal without coconut but my mom adds coconut for getting white color and togetherness & adds more water at the end to make it runny. Do add more number of chillies otherwise the chutney will be bland after adding water. Try this pottukadalai thanni chutney also called as Udacha kadalai chutney. U’ll like it for sure. For variations u can try adding fried gram dal alone or equal quantity of dal and coconut.Please adjust the quantity of water as u wish !

pottukadalai chutney plate

Pottukadalai chutney recipe


Pottukadalai chutney recipe Watery chutney using fried gram dal / Pottukadalai chutney - Road side hotel chutney
Cuisine: Indian
Category: Chutney
Serves: Serves 3
Prep time: 5 Minutes
Cook time: 5 Minutes
Total time: 10 Minutes


INGREDIENTS
1 cup - 200ml

  • Grated Coconut – 2 tbsp 
  • Fried gram dal / Pottukadalai – 1/2 cup
  • Green chillies – 4 – 5 nos ( adjust based on the size of chilli)
  • Garlic cloves - 3 nos
  • Tamarind – A small piece
  • Salt – As needed
  • Water – 1/2 cup for grinding + 1 cups for mixing ( adjust as needed)
To temper
  • Cooking oil – 2 tsp
  • Mustard seeds – 1/2 tsp
  • Curry leaves – few
  • Hing – A big pinch
METHOD

  • Take all the ingredients and grind to a smooth paste adding 1/2 cup of water. Add 1 cup or more of water to make it watery and temper at the end. Check for taste.Serve with paniyaram , idli , dosa !
pottukadalai chutney tile

Enjoy with hot idli,paniyaram !
Note
  • For variations,u can add little milk while grinding the chutney along with water to get white color.But adding milk will reduce the shelf life of chutney.so keep it refrigerated.
  • Adjust the quantity of chillies as per your spice level.Generally my mom makes this chutney spicy.
  • Also reduce the quantity of coconut to 1 tbsp or use fried gram dal alone if u wish & make chutney.It also tastes good.
  • It tastes the best with hot idlis & paniyaram.

Continue Reading...