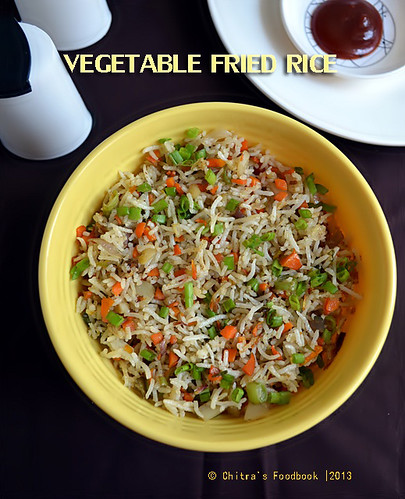
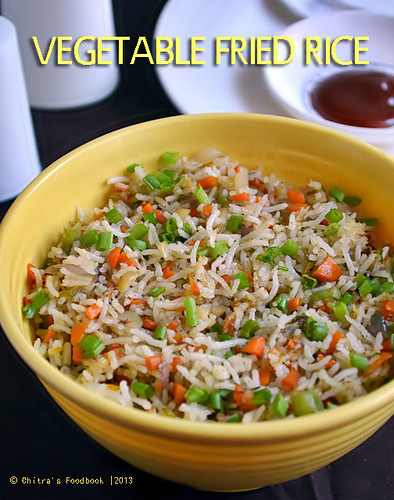
Vegetable fried rice is our favourite Chinese rice recipe. When my husband was in US for a short period , he used to have this rice for lunch in which the quantity of vegetables was more than rice. After he came from the trip, he told me to make fried rice adding more vegetables than rice. I started making the same way and it made the rice more healthy. I used to add ajinomotto but after knowing its ill effects I stopped using it. But It din’t make any difference in taste and flavour. The only part I feel lazy/difficult is to chop the vegetables finely. Otherwise its an easy to make dish. It will come out very flavourful too. Make sure you add all these vegetables to get the exact taste of fried rice.
Wash and soak the rice in water in for 30 minutes. Mean while chop all the vegetables finely.For spring onion , cut the stem part & leaves part separately..
Pressure cook the rice adding a drop of oil .. Rice should be separate & fluffy. Spread the rice in a plate and cool down completely..
In a wide kadai , heat oil till it slightly fumes ..Now add all the finely chopped vegetables including onions ,capsicum, stem of spring onions ,ginger & garlic pieces.. I don’t follow any order..I just add everything together..
Add sugar, salt and toss in high flame for 2-3 minutes by mixing continuously.Keep stirring , adjust the flame to low if necessary..Adding sugar helps to maintain the color of vegetables and salt helps to sauté quickly.
.After the vegetables shrink into half , add soya sauce, rice and mix well.Mix well and add white pepper powder.Toss for few seconds and switch off the flame..Garnish with leaves part of spring onions..
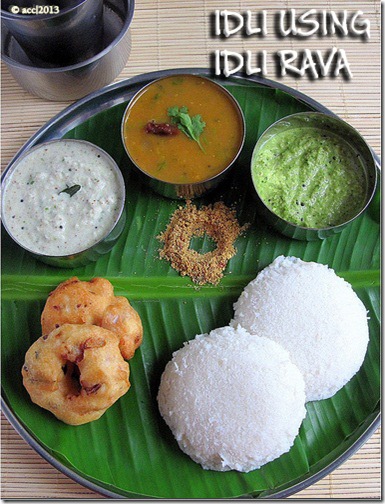
In this post, lets see how to make soft idli and crispy dosa batter using idli rava in mixie with step by step pictures and video. I must thank my neigbour for introducing idli rava to me. I din't know that there is something called idli rava until she told me. She used to tell me to try idli, dosa using idli rava but I was hesitant because idli is our staple food. I dint want to take risk using idli rava. Then she gave me some to taste and after that I started making it in my kitchen. Now I am very much comfortable with this idli rava idli. Not only soft idli, we can make crispy dosas too. U could have tasted this type of idli in Karnataka hotels/ restaurant. But in this method, idli wont be crumbly or coarse like in hotel.
First thing I liked in this method is very less soaking time , just 45 mins is sufficient. It takes the soaking time of urad dal. Total process (soaking + grinding) takes 1 hour. But it needs 8 - 15 hrs of fermentation time depending on the weather in your place. I grind the batter in the afternoon ( around 2 pm) & make idlies the next day morning (7 am).The batter will be fermented well.Second good thing is I grind the batter in mixie ( NO grinder cleaning). I have shared a Full video recipe on how to make these idlis. Please have a look.
People usually don’t grind this idli rava and they add it as it is(after soaking) to the ground urad dal batter. I too tried the same way initially but i felt the idli was very crumbly like rava idli and we dint like that taste. I wanted to bring the same taste as of our normal idli. So I grind the idli rava along with urad dal batter at the end till it becomes slightly coarse. Even then I felt the idli was slightly sticky while eating. I changed the ratio of dal & idli rava, I soaked it together and grind in mixie adding ice cold water. Now Iam getting the best idli out of it. I am very happy with the result.
Earlier my husband used to scold me whenever I prepare idli with idli rava. Nowadays he couldn’t find any difference in the texture and he is eating silently. There is no much difference in the cost of idli rava & idly rice. Friends, try this idli for a change and you’ll start making it often like me.. Lets see how to make soft idli and crispy dosa using Idli Rava.
Idli using Idli Rava - Video Recipe !
Idli using Idli Rava
How to make Idli using Idli rava easily at home. Not just soft idli, you can make crispy dosa too.
Cuisine:Indian
Category:Breakfast recipes
Serves:-
Prep time:15Min+8Hrs
Cook time:10 Minutes
Total time:8hrs25Min
INGREDIENTS
1 cup - 250ml
Idli rava – 2 cups
White round urad dal – 1/2 cup ( If you follow the video recipe, please use 1/3 cup)
Water – 1-1.25 cups ( Use Ice cold water)
Salt – As needed
METHOD
Wash and soak the Idli rava and urad dal together in a bowl for 45 minutes. Drain the soaked water completely before grinding. ( In the video I have mentioned to soak them & grind separately. Add 1/3 cup of urad dal in that case. This method needs less urad dal. )
Grind half of its amount in mixie adding 1/2 cup of ice cold water & the required salt for 3-5 minutes.After 2 mins , open the lid , wipe the sides & grind again. Add little more water if its necessary.
Again grind the remaining mixture adding 1/2 cup of water. ( Note : Batter will be slightly coarse even if you grind for long time , no need to worry) Mix both the batter using your hand. (Mixing by hand helps for fermentation). Keep the bowl closed & allow the batter to ferment for 8- 15 hrs based on the weather in your place.
The next morning, batter would have raised well . Mix it well before making idlies. Pour the batter in idli plate , steam it for 6-8 mins & enjoy with ur favourite chutney !!
Enjoy !
Note
The maximum amount of water it consumes while grinding is 1.25 –1.5 cups. Adjust as per your mixer. I used ice cold water to avoid the mixer getting heated. Plain water can also be used.
Fermentation is very important to get soft, non-sticky idlies.
People suggest idli rava & dal ratio as 3:1. But 4:1 is enough for soft idlies.
If you want, you can add a tsp of soaked fenugreek seeds too to make it healthy.
U can also make crispy dosa using the same batter.
Enjoy this easy Idli recipe for your breakfast !
Here is a picture of Crispy dosa made using the same batter.
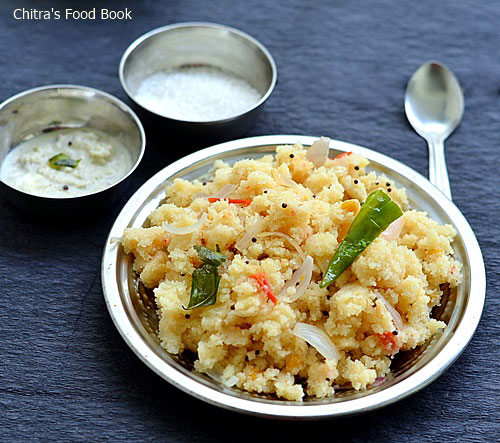
Rava upma (suji ka upma) is one of the most popular South Indian breakfast/dinner recipes. It’s a bachelor friendly dish as it is fast to cook and easy to make. I am not a big fan of rava recipes but Sendhil loves anything made with rava/semolina.He likes rava upma if its fluffy( uthir uthiraa) whereas I love it with small lumps here and there (Undaium urulaiumaa).
The consistency of this upma is completely dependent on the quantity of water.Before marriage,my mom makes rava upma only in weekends.My dad & sis enjoy it adding grated coconut. I hate that combo. So my mom makes dosa especially for me by reserving some batter,how sweet. Now I crave for my mom’s rava upma and coconut combo. So this time I added some grated coconut in my upma plate and enjoyed a lot.
After marriage tables turned. I am making rava upma or kichadi at least once in a week for Sendhil’s breakfast as it is his most favorite. My MIL makes different types of upma and she is a pro in making rava upma. When I was new to cooking, I struggled a lot to get soft & flavourful upma. Usually I don’t roast rava properly and the end result would be a sticky, hard upma. I have even tried with store bought roasted rava. But it was also a super flop show. Then Sendhil taught me how to roast rava properly, quantity of oil, water etc.
When he was a bachelor, he used to prepare this rava upma often and he is an expert too. Now after many successful attempts, I thought of posting the recipe here. Of course making rava upma is not a big deal for most of you. But for beginners, its always a night mare and most of the time it will be with lumps.
This post is purely for beginners and bachelors. We love to have rava upma with sugar. So I don’t make any side dish likechutneyorsambar. It makes my job very simple. This upma stays soft for some hours. So I pack it for my hubby’s breakfast when he leaves to office early from home. But it tastes the best when served hot. U can make rava upma in microwave and add some vegetables like carrot, potato and peas to make it healthy. Sometimes I add tomato too as you see in the above picture. Soon I will share wheat rava upma.
Rava upma/Semolina upma - Easy South Indian breakfast recipe !
Cuisine:South Indian
Category:Breakfast/Dinner
Serves:Serves 2
Prep time:10 Minutes
Cook time:10 Minutes
Total time:20 Minutes
INGREDIENTS
1 cup = 250 ml
Semolina / Rava – 1 cup
Water – 2.5 cups ( Add 2.25 cups for fluffy upma)
Salt – As needed
To temper & saute
Cooking oil – 2 tbsp
Mustard seeds – 1 tsp
Urad dal – 2 tsp
Chana dal – 1 tbsp
Big onion – 1 no ( slice cut) OR Small onions – 1/2 cup ( chopped roughly)
Tomato - 1 small ( optional)
Green chillies – 3 nos ( for less spice,add 2)
Curry leaves – few
Ginger – 1 inch piece
Coconut oil – 1 tbsp ( Must add)
METHOD
Dry roast the rava in a kadai in very low flame for 5-7 minutes without changing the colour. Keep on mixing well to avoid discoloration in certain areas. Remove & keep it in a plate.
In the same kadai , heat oil , splutter mustard seeds , urad & chana dal . After the dals turn golden brown , add the sliced onions ,green chillies, curry leaves & ginger bits. Saute well till onion turns transparent . Add tomato and saute till mushy(Optional step). Finally add the required water , salt. Cover it and allow it to roll boil for 5 mins.
Now simmer the flame completely and add the rava in one hand and mix well with a ladle using other hand ( Use a whisk to mix if u have). This step is very important to avoid lumps.
Stir till the mixture becomes thick and all the water is absorbed by the rava. Close the kadai with a lid for 5 minutes. Open the lid and mix well and again close it for 2 minutes.
Rava will be well cooked , switch off the flame & add the coconut oil.. Mix well and serve hot immediately!!
Adding small onions instead of big onions gives a nice flavour & taste.
The amount of oil mentioned here should be added to get the softness & flavour.
Roasting rava without changing color is very important to get a white colored upma. Otherwise it will be slightly yellow.Upma looks yellow even if you add tomatoes.
Please add more water if you want mushy upma.
If you are afraid of getting lumps , this step can be followed. i.e. switch off the flame after the water starts to roll boil. Remove the kadai , add the rava little by little by stirring in one hand slowly . Mix well and make sure there are no lumps. Then again keep it on the stove and mix well till all the water is absorbed. This method can be followed for making sweet kesari too.
My FIL likes to have this upma adding little lemon juice. It also tastes great. U can also add lots of grated coconut before eating to make it more rich & tasty. My sister loves this combo a lot : ))
Enjoy this easy breakfast/dinner recipe with coconut chutney or sugar !
Today I relished it adding grated coconut. It was yum !
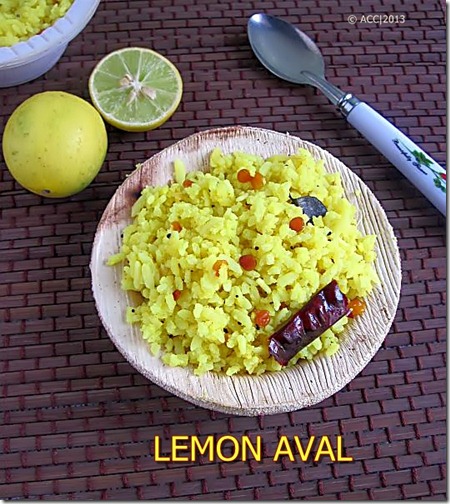
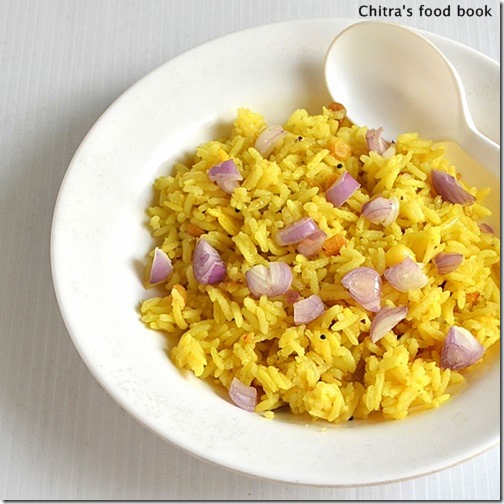
This is a simple & healthy breakfast recipe which comes to my mind when I run short ofidli/dosa batter.
I make this at least once in a week either for breakfast or for dinner. We like this very much. We usually have this topped with sesame oil. I learnt this recipe from my MIL.It can be made in jiffy..If u want to make it fluffy , please add the water quantity which I mentioned in ingredients. Add more water to make it mushy.
INGREDIENTS
Thick Aval / Thick poha – 2 cups
Lemon juice – 4 tbsp ( adjust acc to tanginess of lemon)
Water – 1.5 cups
Turmeric powder – 1/2 tsp
Curry leaves – few
Asafetida / Hing – 1/2 tsp
Salt – as needed
To temper
Sesame / gingelly oil – 2 tbsp
Mustard seeds – 1 tsp
Urad dal – 2 tsp
Channa dal – 2 tbsp
Red chillies – 2 nos
Green chillies – 2 nos
Coriander leaves – To garnish (optional)
METHOD
Wash the poha once or twice to remove the debris and drain the water.
In a wide bowl take the poha & add lemon juice , salt , turmeric powder , hing and curry leaves. Add the mentioned amount of water ( OR ) water to soak the poha ( i.e the level of water should be 1/2 inch above poha)..Let it soak for 30 minutes.
Then in a kadai , heat oil and temper with the above given ingredients in the same order.
Finally add the soaked poha and mix well using a fork like ladle to avoid turning mushy. Cover & cook for 5 minutes.
Serve hot. Add sesame oil before serving and enjoy!!
NOTE
Sesame oil is a must for this recipe as it gives a nice smell & taste to this recipe. It is also good for health.
U can also add roasted ground nuts for crunchy taste while tempering.
Please adjust the amount of lemon juice based on the tanginess of lemon. U can always add any time (even after cooking) if u require.
It will be initially tangy to eat but it levels down after it is warm..
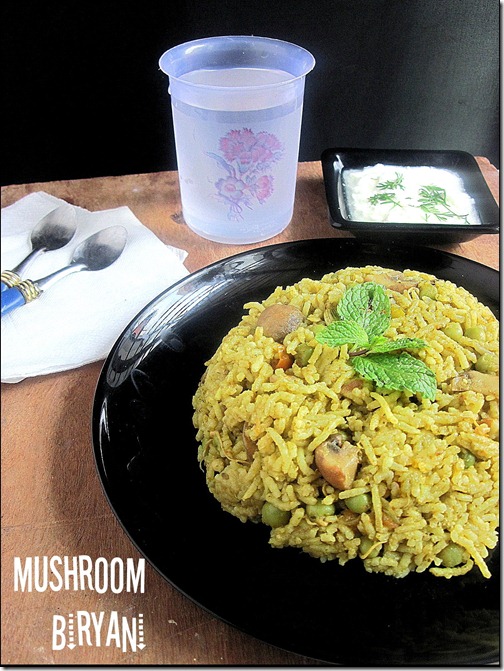
This is my first post on Indian mushroom recipes. I started with a simple and easy mushroom biryani recipe in pressure cooker. We call it as Kalan biryani in Tamil. When I was young , I used to think mushroom is a non-veg food. So I never thought of eating mushroom recipes. But after marriage , I tasted mushroom Manchurian in a vegetarian restaurant and loved it. I loved its softness. I tried the same for my daughter. She too liked it a lot. I’ll post that recipe later.
This time I wanted to try a rice variety with mushroom to pack for my husband’s lunch box. I googled so many recipes, got the idea and tried in my own way. It tasted great. My husband and his friends liked it a lot. I felt very happy that my first mushroom recipe is a huge success. Soon I will try to update this post with step by step pictures.
INGREDIENTS 1 cup - 250ml
Mushroom – 5 nos (big)
Green peas – 1/4 cup (optional)
Cinnamon – 1 piece
Cloves – 2 nos
Cardamom – 1 no
Biryani leaf – 1 small
Big onion – 1 no
Tomato – 2 nos ( very small.. if big use one)
Ginger & garlic paste – 1 tsp
Red chilli powder – 1 tsp
Salt - as needed
Basmati rice – 1/2 cup ( soak rice in required water for 10 mins)
Water – 1 cup
Cooking Oil & ghee – 1 tbsp each
To grind:
Coriander leaves – 1/8 cup
Mint leaves – 1/8 cup
Cashews – 4 nos
Fennel seeds – 1/2 tsp
Lime juice – few drops
METHOD
Wash and clean the mushroom pieces by keeping little water in a bowl.
Take the pieces out and wipe it with a clean cloth.
Cut each mushroom into 3-4 pieces of medium size. Set aside..
Wash & Soak rice in the required water till use (1:2 ratio) ( say for 10 mins).
Grind all the items given under “to grind” to make a smooth paste.
In a cooker base heat oil and add cinnamon, cloves , cardamom and biryani leaf. Then saute onions , ginger & garlic paste till its raw smell disappears..
Now add the tomato pieces and saute till it turns mushy.
Add red chilli powder , salt and turmeric powder.
Add the mushroom pieces and the ground masala paste.
Mix well and finally add the soaked rice with the required water.
Cook for 1 whistle in low flame by adding a tbsp of ghee.
Fluffy , yummy biryani is ready to serve with a simple raita !!
NOTE
For variations , lime juice can be added at the end before serving instead of adding tomatoes.
U can also fry the basmati rice in ghee before soaking in water..
For cooking basmati rice , Rice and water quantity of 1:2 would be sufficient if you don't soak the rice for 30 minutes. I used 2.25 cups which made the rice little mushy. My husband likes that way. So I used more water.
If served for guests, add more ghee while sautéing.
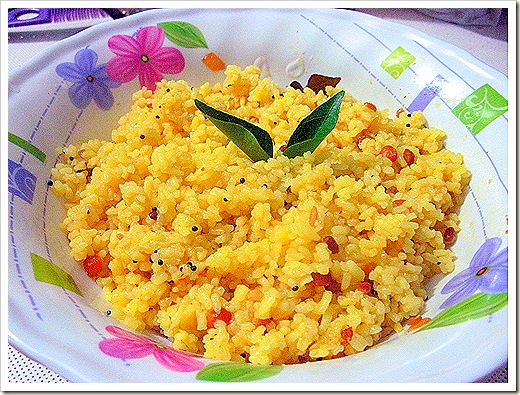
I learnt this from my MIL. Its a very tasty one pot meal recipe.I usually make it for dinner.I use noi arisi ( broken rice ) to prepare this upma. Its available in all grocery stores. If u don’t get this rice, u can just break the raw rice by running in the mixie once or twice. No side dish is needed. If neede it can be served with chopped onions. It can be made in jiffy.Apt for bachelors and working women!
Puli upma recipe
Puli upma recipe using broken rice/Noi arisi
Cuisine:Indian
Category:Dinner
Serves:Serves 2-3
Prep time:5 Minutes
Cook time:15 Minutes
Total time:20 Minutes
INGREDIENTS
1 cup - 200ml
Broken rice / Noi – 1 cup (If you don;t get broken rice,Grind raw rice in a mixie, just pulse it twice)
Tamarind - A big gooseberry size ( soak & extract )
Turmeric powder – A pinch
Salt – As needed.
Water – 2.5 cups
To temper
Mustard seeds – 1 tsp
Urad dal – 2 tsp
Chana dal-1.5 tsp
Curry leaves – A few
Red chillies – 4 nos ( adjust)
Hing / Asafetida – 3 - 4 pinches
METHOD
In a cooker base, add oil and temper the mustard seeds followed by urad & chana dal , pinched red chillies & hing. In a bowl , soak the tamarind in warm water for 10 mins and take the extract using 2.5 sups of water mentioned above. ( if u take the extract with 1 cup of water, add the remaining 1.5 cups of water as it is.)
Then add the tamarind extract to the cooker base and the turmeric powder & required salt. Add a dash of hing again. Add fresh curry leaves too. ( these two items adding at the end gives a spl flavor for this upma ) Now add the washed & drained rice into the cooker.
Mix it well & close the lid.Keep it for 10-15 mins or 3 – 4 whistles. Once the steam is released , serve it hot. U can make the same in rice cooker too. For rice cooker,u need to add 3-3.5 cups of water.Enjoy eating hot topped with sesame oil.
Note
If u don’t have broken rice in hand,just grind the raw rice in mixie very coarsely. Run the mixie once or twice to break the rice.Then use as mentioned above.
Adjust the quantity of red chillies based on ur spice level.
Do not add more water than the mentioned quantity.Upma will become mushy.
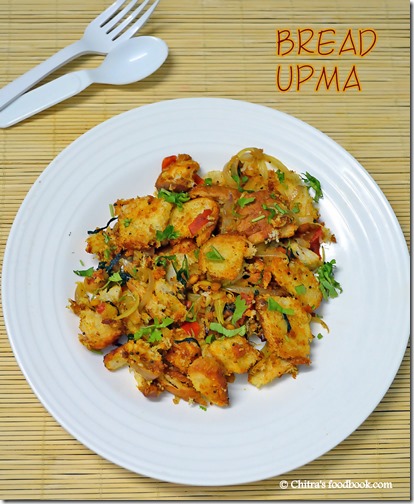
Bread upma also known as Bread seeyali in South India is one of the most popular tiffin varieties with leftover bread. Usually I make this bread upma during weekends for dinner and sometimes in the weekdays for my daughter's snacks box. We like South Indian style bread upma very much.
Lime juice – Few drops (if you omit tomato, u can add lime juice before serving)
Method
Finely chop or slice the onion, green chilly , tomato and set aside.
Take 3 days old bread and check if its not too soft. If the bread is too soft and fresh, you need to toast both sides before cutting into small pieces. If the bread is old, you can cut the into 4 small squares without toasting. Keep aside.
Heat a pan with oil and splutter mustard seeds, cumin, urad dal and chana dal.Saute till dals turn golden.
Then add the onion slices, green chilly, ginger garlic paste,curry leaves and saute till onion turns transparent.Add tomato pieces and cook till it turns mushy.
Add the red chilli powder, garam masala, turmeric powder. Sprinkle little water to make a wet paste. You can add 2 tbsp to 1/4 cup water. Please do not more water because bread will be soggy.
Mix well and finally add the bread pieces .Toss it well. Make sure the bread pieces do not get crumbled. So toss gently till masala gets coated the bread very well.
Switch off the fire and add the lemon juice if desired.
Puli sundal is an easy one pot meal which we make for dinner usually. Many of you call this as puli upma but my MIL named this as puli sundal. It is an authentic dish that is made in Kumbakonam, Mayavaram areas of Tamil nadu. I learnt this recipe from my MIL. It tastes the best with chopped pearl onions/Sambar onions as side dish :) Also you should top it with gingely oil before eating. Tastes great.
Bachelors & working women can try this recipe to make an easy dinner after coming home late from the office OR make this for lunch box during busy morning hours. You can finish the entire process within 15 minutes in a pressure cooker. Do try it and let me know how you liked it.
Puli sundal recipe
Puli sundal-Easy one pot dinner/breakfast/lunch box recipe
Cuisine:Indian
Category:Dinner
Serves:Serves 2
Prep time:5 Minutes
Cook time:15 Minutes
Total time:20 Minutes
INGREDIENTS
1 cup - 250ml
Steamed Rice / Saapaatu arisi (Puzhungal rice used for lunch) – 1 cup ( I used puzhungal arisi)
Toor dal – 1.5 tbsp
Water – 3 cups or less ( depending on your rice )
Tamarind - Small lemon size
To temper
Oil – 2 tbsp
Mustard seeds – 1/2 tsp
Urad dal – 1 tsp
Asafetida /Hing – 1/2 tsp
Curry leaves – a sprig
Red chillies – 3 to 4 nos
Salt – to taste
Gingely oil & Finely chopped sambar onions – to serve
METHOD
Soak tamarind in warm water for 10 minutes. In the mean time, heat a kadai and dry roast toor dal till it turns light golden brown with a nice smell. Remove and keep in a plate. In the same hot kadai, dry roast the rice till it turns white and puffs up slightly. Remove and keep it with toor dal. Now wash the roasted rice and toor dal and keep it ready.
Extract tamarind juice using 3 cups of water as mentioned above. Its not necessary that you should use all the 3 cups for extracting the juice. You can use how much ever you want. Remaining water you can add as it is. Total water should be 3 cups.
In a pressure cooker base, heat oil and splutter mustard seeds, urad dal, pinched red chillies, curry leaves & half of the hing. ( ie 1/4 tsp). Add the tamarind extract,turmeric powder, salt, curry leaves & remaining hing. Pressure cook in low flame for one whistle. It takes 12-15 minutes based on the size of cooker.
Remove and serve by adding a tsp of gingely oil. Tastes the best with chopped small onions.
Enjoy !
Note
Adjust the quantity of water as per the rice you use. U can also try with raw rice but water quantity varies.
Adjust the number of chillies based on spice level. The quantity I have given here gives medium spiciness.
Hing/Asafetida is the star ingredient here. So don’t avoid it.
Hot , Yummy Puli Sundal is ready. U can eat this as it is!! If needed u can have this with coconut chutney!! But chopped pearl onions is the best side dish for this rice. Pickle will also do !
We do this rice dish in the weekend.U all know this is Karnataka's special dish.We make sambar and rice separately & mix them..Here is the recipe,
Check out my latest Karnataka style Bisi bele bath recipe
Ingredients
Vegetables – ALL or ANY(Carrot,beans,potato,peas,raddish,brinjal,chow-chow,raw banana,drumstick,broad beans etc)
Wash and Pressure cook rice with required water.Keep it for 2 –3 whistles and till it is overcooked & mushy.Set aside.Cut all the vegetables for 1 inch size.
Then pressure cook toor dhal with a drop of oil and a pinch of turmeric powder.Keep it for 2 whistles. Hand blend it. Mix well to become mushy.Soak tamarind in water and extract pulp from it.
Heat a kadai with 1 tsp of oil and roast all the items given under “To roast & grind” table and lastly add the grated coconut , roast it well and grind in a powdered form.Keep it aside.
Heat oil in a pan,add the tempering items,sambar onions and green chilly.Saute till they are transparent.Add the tamarind extract, all the raw vegetables and a pinch of asafetida.Close the pan with a lid .It should boil till the vegetables get cooked.
Now add the cooked toor dal and sprinkle the ground powder. Mix well to avoid lumps.
Let it come to a boil. Finally,add the curry leaves and coriander leaves.
Delicious SAMBAR IS READY !!!
Now take the rice in a big vessel and add the required amount of sambar to it with ghee.Mix it well.
Sprinkle coriander leaves and serve hot with Papad or Vadaam!!!
NOTE:
As we prepare the sambar separately,u can use the same for dinner too!!.It tastes excellent with idly,Pongal & dosa!!So no need to prepare any side dish for dinner.U can take rest and enjoy the weekend!!
I’ve mentioned 2 cups of vegetables for just 1/2 cup of rice because this is the easiest way to make the children to eat vegetables :).Please reduce the amount of vegetables based on ur wish..
In karnataka, they add cloves and cinnamon while grinding the spices but i don’t add. I make it in our style .So if u need the authentic bisibelebath , roast the cinnamon and cloves along with spices , Powder them and add..
Add more sambar while u mix with rice because the rice absorbs all the sambar by the time u eat. Keep some sambar in reserve.I always mix the rice & sambar just before eating and serve hot..
At last, add little ghee to enhance the taste and flavour.
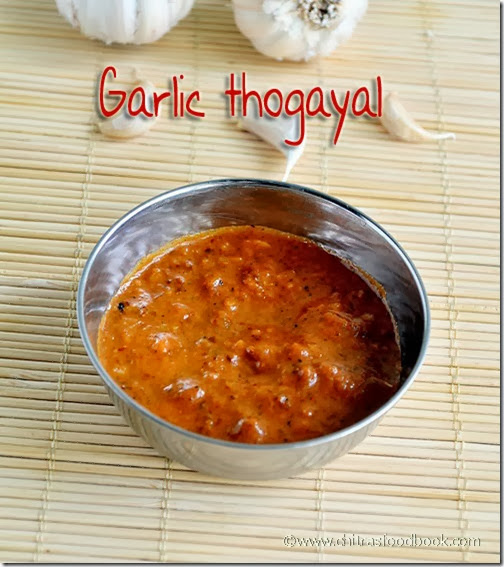
This garlic thogayal tastes excellent with rice. It doesn't go well with idli, dosa. Poondu thogayal is a very simple & healthy thogayal recipe. We make it at least once in a week. It tastes great when mixed with hot rice adding few drops of ghee. I usually pack this for my husband’s lunch box. He loves it a lot. Do try this simple n easy poondu thogayal recipe. U’ll love it for sure.
Poondu thogayal/Garlic thogayal recipe
Garlic thogayal recipe for rice.Tastes great when mixed with rice n ghee.
Cuisine:Indian
Category:Thogayal
Serves:Serves 4
Prep time:10 Minutes
Cook time:10 Minutes
Total time:20 Minutes
INGREDIENTS
To saute and grind
Garlic bulbs - 2 nos (approx 30 pods)
Red chillies - 4 nos ( use 2 for less spice)
Tamarind - Small gooseberry size
Salt and water - as needed
Cooking oil - 1 tbsp
METHOD
Heat 1 tbsp of oil in a pan and fry the red chillies and garlic cloves till golden brown and nice aroma arises. Keep it aside.While sauting garlic,u may get the skin of garlic separated from it.Remove them.Soak tamarind in little water.Remove and let it cool down.
Grind everything to a smooth thick paste adding required water. Garlic thogayal is ready!! It can be had with hot rice mixed with ghee..
Tastes great mixing with hot rice adding a few drops of ghee with papad as side dish.
Making a super soft idli batter at home using idli rice in Indian wet grinder is a tedious task for beginners. But its not a big deal if you follow the right proportion for making idili batter. Idli is the staple breakfast recipe of our family. Before marriage , I have seen my mom grinding batter in alternate days and that too using a big wet grinder.Thank god we have got table top wet grinder nowadays. We used to eat idli twice a day for breakfast as well as dinner. Most of the times I carry idli and milagai podi for my lunch in school and college. My friends used to call me "idli " ;)). I love idli like anything. I am crazy about soft idli and spongy uthappam .I don’t like crispy dosa, strange is it??. Soft idli is a must for my dad . My mom doesn’t add methi seeds/vendhayam. She uses only idli rice and white urad dal in the ratio of 6:1.
After marriage , its the same case in my husband's family too. So I enjoy idli thrice in a week. Usually my in-laws buy 10kgs of urad dal and 25 kgs of idli rice (salem rice/ parboiled rice/ puzhungal arisi) for the whole year's use in the month of february from Lee Bazaar , Salem. Usually fresh, new, good quality of groceries will be available in the month of february - march.We buy in lots , store in an air tight box and use it for the whole year.The quality of dal will be too good , price is also very less.We use 8:1 ratio of rice and urad dal for making idli batter for few months.Idli comes out really soft. After 4-5 months as the dal gets old ,we use 6:1 ratio. Based on the quality of dal , we adjust the ratio.In addition to rice and dal , we also buy mustard seeds, methi seeds, jeera, pepper, red chillies and stock it for the whole year. So, if u want to buy fresh groceries , buy it in the month of february - march from a whole sale market in ur place, sun dry them and stock it for an year. It stays good for more than 6 months.Ok,enough of my stories.Lets see how to make soft idli & crispy dosa at home with tips & tricks!!
How to make Soft idli and crispy dosa recipe at home
Cuisine:South Indian
Category: Breakfast recipes
Serves:-
Prep time:10 Hours
Cook time:10 Minutes
Total time: 10H10Min
INGREDIENTS
1 cup = 240ml
Idli rice/ Parboiled rice /Puzhunghal arisi – 3 cups ( the ratio of rice & dal is 6:1)
Urad dal – 1/2 cup
Fenugreek seeds – 1/2 tsp
Crystal Salt/Kallu uppu – 1 handful (to taste)
Water – As needed
METHOD
Wash and soak the rice.Wash and soak urad dal & methi seeds together. Soak for 4 hrs .
Grind urad dal with fenugreek seeds first by adding enough water in between.Make sure u add water every now & then so that the urad dal rises well and u'll get a light , fluffy batter. Please do not add all the water in the beginning.For grinding urad dal , u need 1.5 - 2 cups of water in total .
Grind till it comes out like a ball(should be a paste) (It takes nearly 15-20 mins in table-top wet grinder).Now remove it .Keep it in a big vessel such that it can hold double the quantity of batter.
Now add the rice & crystal salt with 1/2 cup of water while the grinder is running.
Add water in the middle (Whenever necessary).It should become a smooth paste (May take 20-25 mins in table-top). The water it consumes will be around 2- 2.5 cups.Adjust the water quantity. Now remove the rice and put it in the same vessel.
Mix it thoroughly with your hand.(This helps for fermentation) .Let the batter ferments overnight or at least for 12 hrs.
The next morning , don’t mix the batter again. You can mix till half way through the batter if its too light. Suppose if the batter is over flown, take the extra batter in a separate vessel. Use a ladle, mix the batter till half the way. Quantity of batter reduces. Now add the overflown batter, mix well and keep it aside. Start taking the batter from one corner and pour it into the idli mould. Even the next day,take the batter from the same side.IDLI remains very soft up to 3 days.
Steam it in the idli pot for 10-15mins and serve hot with sambar!!
If u want to make dosa with the same batter , take the required quantity of batter separately in a bowl and add little water( 1/4 cup) to make it thin and make dosas. U'll get a crispy dosa for sure !!
NOTE: Poha/Aval is optional.U can use based on the quality of rice & urad dal.Add 1/4 cup of poha for the above recipe if u wish to use it..
Follow this method and enjoy eating soft idlies:)
Enjoy !
For getting the golden crust for dosas, add little sugar or pinch of jaggery in the dosa batter. Add some poha/aval or cooked rice while grinding to get golden brown dosa.
To get crispy dosas with less oil : after pouring the dosa batter , spread it well, keep the flame medium high for 2 mins. The sides will lift. Now flip the dosa , cook in sim flame. Remove.
One more method is , just keep the flame high after spreading the batter, drizzle a tsp of oil. Close the dosa tawa with a lid and cook for sometime. No need to flip.Just remove n serve hot.By this way , u'll get a nice golden colored crispy dosa !!
Enjoy Soft idli & crispy dosa with your favorite chutney & sambar !