Search Chitra's Food Book

April 10, 2013

UGADI PACHADI,OBBATTU - UGADI RECIPES

Obbattu recipe
I wish all my friends a very happy Ugadi. Though we don’t celebrate this festival at home , I love Ugadi pachadi and poli with coconut stuffing.. We tamilians celebrate Tamil new year which falls on 14th of this month. We prepare Mango pachadi and rice payasam along with other lunch recipes. My friends here and in Andhra celebrate this festival in a grand manner. I asked them about their lunch menu for ugadi and they gave me a big list.  But I thought of trying this famous ugadi pachadi and obbatu recipe among them. I got these recipes from my friend Megha. She said obattu and ugadi pachadi will be in their menu for sure.. Other than this they prepare Mango rice / puliohara , Vada, sambar , Sundal ,chitranna ( Variety rice) and it goes on.

I’ll start with Ugadi pachadi. Its the easiest pachadi I’ve ever made. We too make mango pachadi on Tamil new year day but its a bit time consuming process. But this recipe needs no cooking. Its a mixture of 6 tastes that signifies all kinds of emotions in life i.e sweet , salt , spice , sour, tangy and bitter.. I liked it very much. Adjust the quantity of ingredients based on your liking. I have also shared bobbatlu / obbattu recipe with step by step pictures. Do try these recipes and enjoy the Ugadi festival !

ugadi pachadi

INGREDIENTS
1 cup -250ml
  • Raw mango – 1/4 cup
  • Grated jaggery – 3 tbsp
  • Tamarind – Big gooseberry size or 2 tsp extract
  • Red chilli powder – 1 tsp
  • Crushed Neem flower – 1 tbsp (I used dried one, fresh would be fine)
  • Coconut bits – 1 tbsp (optional)
  • Water – as needed
  • Salt – little

Ugadi pachadi ingredients
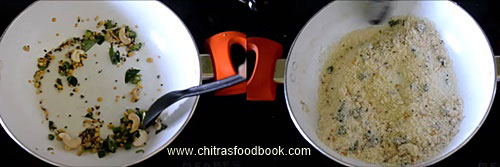
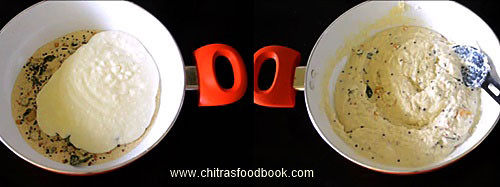
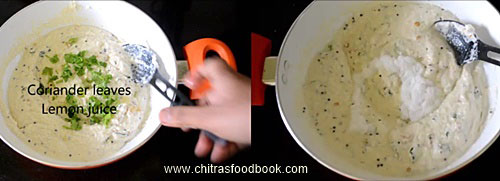
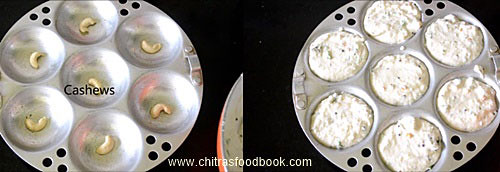
HOW TO MAKE UGADI PACHADI - METHOD
  • Wash and chop the raw mango pieces finely. Soak tamarind in water and take the extract ..
  • In a bowl , take the raw mango pieces  , tamarind extract , red chilli powder , grated jaggery , salt, neem flower and mix well.
  • Add little water to adjust the consistency based on your liking..
  • Some like it to have it thick and some likes to be thin. Please add water accordingly.
How to make Ugadi pachadi

OBBATU / BOLI / PURAN POLI/BOBATTU

Click here to see my latest detailed post on Obbattu

Usually I make poli using the left over channa dal puran. Yesterday when I went for shopping I saw a newly opened stall for selling obbattu and other snacks for Ugadi especially.. I bought some to taste. It was very nice. The thing is they make obbattu in front of us and they serve it really hot. So I was able to see how they rolled , the consistency of dough , puran etc. With that help, I tried it. It was very tasty ..We loved it a lot. It came out soft and thin.

Oil is the most important ingredient here. The more oil you add, the more tasty poli.. Use sesame oil / Gingely oil to get a nice taste. So no need to worry about adding more oil as it is is good for health. Also the consistency of dough should be loose.. It should not be sticky, adding more oil make it non sticky. I have tried to give the quantity of water and oil what I used. Try and adjust if more quantity is needed. Keep the dough covered for 1 hour minimum which also helps to get soft poli. I used obbattu sheet to roll them. In india, you can get in all stores. It costs just 2 rs.. If you don’t get it , you can use either banana leaf , ziplock cover or good quality polythene sheet. Grease it with oil and make the shape.


INGREDIENTS

Click here to see my latest detailed post on Obbattu
For dough
  • Maida / All purpose flour – 1 cup
  • Gingely oil/Cooking oil – 1/4 cup + 3 tbsp
  • Water – 1/2 cup (little less , may be 1 tbsp)
  • Salt – 1/4 tsp
  • Turmeric powder – 1/4 tsp
  • Cooking soda – a pinch (optional)
For stuffing / Puran
  • Grated coconut – 1 cup
  • Grated jaggery – 3/4 – 1 cup
  • Cardamom powder – 1/4 tsp
  • Water – Very little
Poli / Obattu sheet  - 1 no ( cut into round shape)
Ghee – 1 tbsp ( for greasing the poli , optional)

METHOD

Click here to see my latest detailed post on Obbattu
  • In a wide bowl , take the flour , salt , turmeric powder , soda , oil and mix well.Add water and make a sticky dough. Then add 1 tbsp of oil over the dough and knead well for 5 minutes to make the dough non-sticky. Add one more tbsp of oil if necessary. Lastly add 3 tbsp of oil and cover the dough. Keep it covered for minimum of 2 hours to maximum 8 hours. The more time you keep the dough the more soft it would be. Click here to see my latest detailed post on Obbattu
poli tile1
  • Start making puran now. Grate coconut and jaggery. Grind the coconut in Mixie to make it a fine powder. In a non-stick pan, melt the jaggery adding little water just to cover it.. Strain the impurities using a metal strainer if necessary.
poli tile3
poli tile2
  • Again boil the syrup till it becomes frothy and raw smell of jaggery leaves it. It will take 5-8 mins in low flame.. Then add the grated coconut and mix well till it becomes thick.
  • Switch off the flame and add the cardamom powder. Mix well and allow it to cool..
poli tile4
  • Now take the dough, knead well for 10 minutes. The dough should be loose , elastic and pliable. Add more oil if it sticks..
  • Take a small lemon sized ball of dough and equal sized ball of puran. Pat the dough to make a thick small circle and keep the puran in the middle.
poli tile5
  • Bring all the corners to the middle and close the ball. Roll it well.
poli tile6
  • Cut the obbattu sheet into round shape and grease it with oil. Place the ball and press it with your hands to make it very thin. Press it to make it round as per the size of the sheet.
poli tile8
  • Heat dosa tawa , drizzle little oil and put the obbattu along with the sheet and remove the sheet alone in a second . Cook the poli for few seconds , flip it and again cook for another few seconds. Make sure you don’t over cook it. It will be roasted and becomes like an papad. Cooking has to be done very fastly.
poli tile9
  • After removing from the tawa , grease it with ghee for additional taste and flavour.. Enjoy !

Note : After it cools down , you can store them in a box for 2-3 days.

Continue Reading...


April 8, 2013

MUSK MELON (CANTALOUPE) JUICE | MULAM PAZHAM(KIRNI PAZHAM) JUICE

Mulam pazham juice

Cantaloupe Or Musk melon in English , Mulam pazham or Kirni pazham in Tamil , Kharbooja in Hindi , kannada – It comes in various colors. But tastes similar..
This is my father’s most favourite summer drinks.When I was a kid , my dad used to buy this juice and compelled to me to try once. But me a stubborn girl , never touched it. Now being a food blogger, I try & taste varieties of food and juices. Earlier I used to have only black grapes and pomegranate.. But now I started to make juice with all seasonal fruits. I wanted to try this musk melon juice for a long time. Recently when I went to my in-laws place, my MIL made this juice for us. For the first time I had that juice and I loved it. Then I felt very bad that I missed this healthy , tasty juice in my childhood days. This is one of the best coolants and thirst quencher for summer. My MIL makes thick juice/ concentrate and stores it for 2-3 days by refrigerating it. She adds ice cold water to adjust the consistency at the time of drinking. Its very easy to make and tastes great.

Mozhampazham juice


INGREDIENTS
  • Mulam pazham / musk melon – 1 no  (Big sized)
  • Sugar or palm jaggery or honey – 1/4 cup (adjust as per taste)
  • Water – 2 cups

METHOD
  • Wash and remove the outer skin of musk melon using a knife or aruvaamanai.( we use aruvamanai) .
kirni juice1
  • Cut them in to four halves and remove all the seeds using a spoon or ladle..
kirni juice tile2
  • Now chop them into cube sized pieces. Add sugar and grind well to a smooth paste. Add the required water as per the desired consistency and store in a bottle.
kirni juice tile3
  • Refrigerate it . Add ice cold water , mix well , adjust sugar / jaggery and drink when needed !!


musk melon

Continue Reading...


April 7, 2013

THENGAI SADAM | COCONUT RICE


coconut rice

Thengai sadam/Coconut rice is Sendhil's favourite rice variety.I am not a big fan of this rice . So I make this only for my husband..Its very easy to make and very flavourful too..My Mom & MIL makes it very well.They make in a slightly different way.My MIL adds lot of soaked & roasted urad dal. But my mom adds roasted urad and channa dal without soaking them.I combine both their methods and it comes out very tasty.When u make this rice , ur house will be filled with nice aroma of coconut oil. The roasted smell of coconut , crunchy urad and channa dal, nice flavour of ginger and coconut oil  are the highlights of this rice. Smile.Over to the recipe,

coconut rice1

INGREDIENTS
  • Cooked rice – 1/2 cup ( Boiled rice or raw rice would be fine)
  • Grated coconut – 1/2 cup
  • Salt – As needed
To temper
  • Coconut oil – 2 tbsp
  • Mustard seeds – 1 tsp
  • Urad dal – 2 tbsp (soak for 30 minutes – optional)
  • Channa dal – 1 tbsp
  • Jeera / Cumin seeds – 1/2 tsp
  • Red chillies – 1 no
  • Green chillies – 1 no
  • Finely chopped Ginger – 1 – 2  tsp
  • Curry leaves – few
Ghee – 1 tsp
Cashews – 5 nos

METHOD
  • Cook the rice adding 1:2 rice n water till fluffy .Add a tsp of oil or ghee while u cook the rice to get it separate and fluffy.Spread the cooked rice in a plate..
  • In a kadai , heat coconut oil and temper all the items given under “ To temper” in the same order..Then add the grated coconut ,salt and mix well.. Roast everything in a low flame till u get a nice aroma of dals and coconut.But roast the coconut without changing its color.
COCOnut rice tile
  • Finally add the mixture to the cooked rice ,check for salt ..
  • Roast the cashews in a tsp of ghee and  add to the rice.Mix well.
coconut rice tile1
  • Serve !!

Note My MIL makes it in a slightly different method by soaking the urad dal for 1 hour and roast them till golden brown and proceed in the above mentioned way. I too follow this method sometime. But when i forget to soak the dal , i use the above method. Both of them tastes ‘very nice.Do try any based on ur liking and the preparation time Smile .. Please don’t skip adding ginger . It adds a nice flavour to the rice and it helps for digestion as well..

Continue Reading...


April 1, 2013

PEPPER PULIYODHARAI | MILAGU PULIYODHARAI


pepper puli sadham
I wanted to try this pepper puliodharai recipe for long time. I usually follow my MIL’s method for making tamarind rice / puliyodharai . It comes out very well. This time I tried the same recipe with pepper. 

As I mentioned in my pepper idli post, my hubby is very much fond of pepper dishes.. So I tried this pepper puliogare on my own.. It came out very well. It had a nice flavour of pepper in it. I packed it for my hubby’s lunch box. He liked it very much. There is no much difference in the method and the ingredients.

U can prepare the paste the previous night and make the rice the next day.  Adjust the amount of pepper powder based on your taste. This paste stays well for 1 week even without refrigeration.  I also feel for making puliyodharai, mixing the paste in raw rice or boiled rice tastes well more than basmati. Add few tsps of sesame oil / gingely oil while mixing the rice & paste to get the additional flavour and taste. As we all know, this rice is apt for travel too.

Pepper puliogare

INGREDIENTS
1 cup - 250ml
Serves 2 people
  • Rice – 1/2 cup ( Raw rice or boiled rice)
  • Tamarind -  Medium gooseberry size
  • Jaggery – A small piece
  • Salt , water – As needed
To roast & grind
  • Oil – 1/2 tsp
  • Methi seeds – 1/2 tsp
  • Pepper corns – 1 tsp
  • Chana dal – 1 tsp
  • Hing/Asafetida -  A big pinch
To saute
  • Gingely oil – 2 tbsp
  • Mustard seeds – 1/2 tsp
  • Urad dal – 2 tsp
  • Chana dal – 1 tbsp
  • Red chillies – 2 nos (pinched)
  • Curry leaves – few
  • Hing /Asafetida-A pinch
Crushed Pepper powder – 1.5 tsp
Sesame oil /Gingely oil – 1 –2 tbsp

HOW TO MAKE PEPPER TAMARIND RICE
  • Pressure cook the rice and spread in a plate adding a tbsp of gingely oil. Let the rice cools down and becomes fluffy.
  • Soak tamarind in warm water for 20 minutes and take the extract adding 2 cups of water.
  • Heat gingely oil in a pan and temper mustard, urad dal, chana dal, red chillies, curry leaves, hing. Saute well. Now add the tamarind extract, salt, turmeric powder, little hing and curry leaves. Allow to boil well. In the middle add the jaggery.
pepper puliodharai tile1
  • Add 1/2 tsp of oil and roast the ingredients given under “To roast&grind”. Roast till the pepper corns splutter. Powder them and set aside.
pepper puliodharai tile2
  • When the tamarind extract reduces to half in quantity, add the roasted & ground powder.  After you add the powder, give a boil. The mixture thickens. Let it roll boil well for few seconds. After  you get salangai satham ( gala gala sound), switch off the flame.
pepper puliodharai tile4
  • Finally add the crushed pepper powder in the paste, mix well. Set aside. Tamarind paste is ready. Mix the required paste in the rice adding gingely oil.
pepper puliodharai tile3

pepper puliodharai tile5

Note
  • If you want more spicy, add more pepper powder at the end.

Continue Reading...


March 30, 2013

Tomato Mint Chutney Recipe - Thakkali Pudina Chutney - Side Dish For Idli Dosa

Tomato mint chutney
I got this tomato mint chutney recipe (thakkali pudina chutney) from Mrs. Mallika badrinath’s chutney varieties book. I tried for idli , dosa. It tasted great for both. We loved it very much. I have included this pudina tomato chutney in our routine side dishes. Its very simple. It uses little coconut though. For variations, you can add both coriander leaves and mint leaves as well.  The color of this chutney may vary depending on the number of tomato you use. If you use more tomato, red chillies and less mint leaves, it will be on the reddish shade as you see in this picture. I have tried adding more mint leaves, green chillies and less tomatoes too. It comes out in green color. But whatever may be the color , its tastes  Thumbs up . Do try this recipe , u’ll love it for sure !! For variations, you can try this tomato mint chutney without onion, garlic. Instead you should add more coconut and urad dal. Lets see how to make tomato mint chutney for idli,dosa with step by step photo.

Check out my coconut mint chutney/Pudina chutney too.

Tomato- mint chutney

Tomato mint chutney recipe


Tomato mint chutney recipe Tomato mint chutney recipe -Yummy side dish for idli,dosa
Cuisine: Indian
Category: Side dish
Serves: Serves 2
Prep time: 5 Minutes
Cook time: 10 Minutes
Total time: 15 Minutes
INGREDIENTS
1 cup - 250ml
  • Tomato – 2 nos (Big)
  • Mint leaves – 1/2 cup
  • Small onion – 10 nos OR Big onion – 1 no
  • Tamarind – 1 small piece (soak in little water)
  • Green chilli Or Red chilli – 4 -6 nos (use Kashmiri chilli for bright color)
  • Grated coconut – 1 tbsp
  • Urad dal – 1 tbsp
  • Cooking oil – 1 tbsp
  • Salt, water – As needed
To temper
  • Cooking oil – 1 tsp
  • Mustard seeds – 1/2 tsp
  • Hing – 2 pinches
METHOD

  • Wash the mint leaves , chop tomatoes roughly , peel the onions and slit the green chillies.
  • Heat a tsp of oil in a pan and roast the urad dal,chillies ( I used green + red chilli) till dal turns golden brown.Before switching off the flame,add the coconut , mix well and remove in a plate.  ( I sauteed tomato,onion ,mint leaves in the same pan in low flame)
Tomato mint chutney

  • Again add 2 tsp of oil and add the small onions , tomatoes , mint leaves and saute them together till tomato turns mushy.Allow it to cool.
Tomato mint chutney

  • Grind everything together adding the tamarind , salt and water.Now temper the mustard seeds and hing and add to the chutney. Serve with idli , dosa !!
Tomato mint chutney


Enjoy !

Note Adjust the amount of green chillies as per your taste.Coriander leaves can be used instead of mint leaves. Also red chillies can be used in place of green chillies. You can also use mint & coriander leaves in equal quantity.


Continue Reading...


March 29, 2013

SHARJAH SHAKE RECIPE/ KERALA MILKSHAKE/ SHARJAH BANANA SHAKE


sharjah copy
Sharjah shake is nothing but banana milkshake which is commonly found in Kerala juice shops and bakeries. I came to know about this drink from my neighbour. She makes this very often for her sons during summer. She suggested me to try once. As I had some ripe banana lying in the pantry I tried this milk shake ..We loved it. It tasted slightly different from the usual banana milkshake. Not only the taste, but also the color. Addition of boost and Chikki/Cashew/Badam makes the difference here. One more important thing in this recipe is, it uses frozen milk cubes. It can be made in a jiffy and adding ice cream is optional. It comes out thick without adding ice cream. It is a refreshing and a filling drink too.. Adjust the amount of sugar based on ur liking. .Do try this Kerala Sharjah shake, you’ll fall in love with it !

sharjah milkshake

INGREDIENTS

  • Frozen Milk – 2 cups (400 ml )
  • Ripe small size banana – 2 nos ( 3 if very small) ( use poovan , kadili . I used yelakki)
  • Sugar – 1 tbsp
  • Peanut chikki  or crushed peanuts – 2 small pieces/ 2 tbsp 
  • Almond or cashews – 5 nos
  • Boost / Bournvita / Chocolate Horlicks – 1- 1.5 tbsp
  • Instant coffee powder - 1/4 tsp ( optional )
  • Vanilla ice cream - 1 scoop

HOW TO MAKE SHARJAH SHAKE - METHOD

  • Take 2 cups of milk and freeze it well..
  • In a mixie jar, chop and add the ripe banana, sugar,  peanut chikki or crushed peanuts, cashew or badam, boost/bournvita and coffee powder (optional)
sharajah shake tile1
  • Break the frozen milk with a rod and add as small cubes to the mixie jar. Add vanilla ice cream ( optional) . Grind everything well till it becomes frothy.
Sharjah shake tile2
  • Serve in a glass !!

sharjah  - shake glass

Continue Reading...


March 28, 2013

Rava Idli With Eno and Curd - Instant Rava Idli With Video

Rava idli

 In this post lets see how to make Instant Rava idli / Sooji idli /Semolina idli at home with ENO fruit salt and curd/yogurt with step by step photos and Video.

Rava idli ( Suji idli in Hindi/Semolina idli in English) is a popular breakfast recipe in South India. As we all know Rava idli was invented by MTR( Mavalli Tiffin Room) hotel, Karnataka. You can find rava idli in all the hotels. Its so easy to make with simple ingredients. Its an instant South Indian breakfast recipe that helps me when I run short of idli dosa batter. Very recently I started making this  suji idli at home and I have made this several times so far. Sendhil loves this soft and spongy rava idli a lot and I too  started loving it because its so easy to prepare, comes out very soft and spongy and above all it can be made instantly ;)

I got this recipe from Aval vikatan’s restaurant style recipes supplementary book. Its cooking procedure is very simple.The softness of this idli lies in the consistency of batter, proportion of curd & addition of  ENO fruit salt or cooking soda. Please do not attempt this recipe without curd or Eno/Soda. To make this a healthy breakfast recipe, my MIL adds vegetables like grated carrots, cabbage and cooked peas. So I too make this way sometimes. 

Rava idli tastes the best when served hot with coconut chutney. In some hotels, it is served with kurma. In Karnataka, rava idli is served with sagu or potato masala. Try this simple, easy, Instant rava idli recipe and let me know how you liked it. Lets see how to prepare this easy, instant rava idli recipe at home !


Rava idli

Rava Idli recipe - How to make rava idli at home


Rava Idli recipe How to make soft,spongy Rava idli at home - Easy, Instant breakfast recipe
Cuisine: Indian
Category: Breakfast
Serves: 8-10
Prep time: 10 Minutes
Cook time: 10 Minutes
Total time: 20 Minutes


INGREDIENTS
1 cup - 250ml
  • Sooji / Rava – 1 cup ( use upma rava, not the fine chiroti rava)
  • Fresh curd – 1 cup
  • Plain ENO fruit salt – 1 tsp OR Baking soda – 1/2 tsp
  • Salt & water – As needed
To temper
  • Oil – 1.5 tsp
  • Ghee – 1.5 tsp
  • Mustard seeds – 1/2 tsp
  • Urad dal – 1 tsp
  • Chana dal – 2 tsp
  • Crushed Pepper corns – 1/2 tsp ( optional)
  • Jeera/Cumin seeds – 1 tsp
  • Finely chopped ginger – 1 tsp
  • Finely chopped green chilli – 1 - 2 nos
  • Cashew nuts – 5 nos
  • Coriander leaves – few (chopped)
  • Lemon juice – Few drops (optional)
 HOW TO MAKE INSTANT RAVA IDLI - METHOD

  • Set aside.In a wide kadai or cooker base , add oil and ghee. Temper mustard seeds , urad dal, chana dal, Cashews, pepper corns, jeera, finely chopped ginger, green chillies and curry leaves. Saute well till pepper corns starts to splutter. Add the roasted rava , mix well. If using unroasted rava, roast it for 3-4 minutes in the kadai in medium flame without burning the rava.
  • Switch off the flame and allow it to cool completely. After the mixture cools down completely , add the curd, salt, coriander leaves, lemon juice and the required water. Mix well. The consistency of the batter should not be too thick or too thin. It should be pourable like idli batter. The mixture takes 1/2 cup – 3/4 cup of water to get the right consistency. Please adjust it as per your need. But do not make runny batter. 

  • Before making idli, add the eno fruit salt. Eno should be active such that as soon as u add ENO, you should see bubbles as shown in the video. Mix well and make idli immediately.Grease the idli plate and pour the batter. Steam it for 8-10 minutes. Check with the back of a spoon. Remove and enjoy eating hot with coconut chutney or kurma !
  • Enjoy !

Note
  • Adjust the quantity of water to reach the consistency.
  • If using roasted rava, just mix well with tempered items. No need to roast it again.
  • Please do not attempt this recipe without curd or ENO/Cooking soda. As this is an instant recipe, you should add ENO or soda to achieve softness.
  • You can add grated carrots and cooked peas.
Enjoy Soft, spongy rava idli for breakfast with sambar or chutney !
Rava idli recipe
Continue Reading...


March 26, 2013

Carrot Halwa Recipe In Pressure Cooker - Gajar Halwa in Pressure cooker - How To Make Carrot Halwa

carrot halwa plate

Carrot halwa | Gajar ka halwa is the easiest and delicious sweet recipe that can be made jiffy. The best thing about this sweet is it takes very less ghee unlike other halwa recipes. I made this for my daughter’s birthday. This is one of her favourite sweets.

We love to have this dessert with a scoop of vanilla ice cream. Usually carrot halwa is prepared with khoya or condensed milk (milk maid). But I made it in a very simple way with milk and sugar using a pressure cooker. I followed my cookbook recipe for the preparation and it came out very well. If  you want, you can cook the carrots in milk in low flame in an open pan which gives more taste. As I wanted to make it quick I followed the pressure cooker version. 

For more rich taste , a paste of almonds and cashews can be added at the end..Try this easy version , you’ll love it for sure.
carrot halwa bowl copy

INGREDIENTS
 1 cup - 250ml
  • Grated carrots – 2 cups (levelled)
  • Milk – 1/3 cup
  • Sugar – 1/2 cup
  • Ghee – 2 tbsp
  • Cashews – few
  • Elachi – 3 nos powdered
METHOD - HOW TO MAKE CARROT HALWA IN PRESSURE COOKER
  • Wash and grate carrots using a big size grater and set aside.
  • Heat 1 tbsp of ghee in a pressure cooker base and roast the cashews till golden brown. Remove the cashews alone leaving ghee in the pan. Now add the grated carrots and saute till the raw smell of carrot emanates. Saute for 3-4 minutes. Carrots will turn slightly pale orange in color.
         Carrot halwa tile1
  • Then add the milk and pressure cook in high flame for 2-3 whistles. Do not worry  that the milk is less. Its enough to cook the carrots. Remove the lid after the steam is released. There will be no milk or very less milk in the cooked carrot. No problem. 
        carrot halwa tile2
  • Now add the sugar and mix well till sugar dissolves. Mixture will become liquid. Keep stirring in medium flame. When it starts to thicke,  add the elachi powder and mix well. The halwa thickens and it starts to leave the sides of the cooker. 
  • Now add the remaining 1 tbsp of ghee & roasted cashews, mix for a minute and serve. Make sure the mixture has some moisture, do not make it dry else it will become very thick and dry after it cools down..
        carrot halwa tile3
It tastes the best when served warm with ice cream !!


carrot halwa with icecream 1


Continue Reading...


March 21, 2013

Spring Onion Chutney Recipe ( For Idli Dosa )


spring onion -  chutney

I adapted this recipe from tarla dalal’s site .I made few changes in the original recipe. We liked it very much. It was a nice combo for idli, dosa..I’ve given the variations for this chutney in ingredients list.

INGREDIENTS
1 cup - 200ml

  • Spring onion – 1 cup (chopped)
  • Tomato – 1 no
  • Green chillies or red chillies – 4 - 6 nos
  • Chana dal or urad dal – 1 tbsp
  • Grated coconut – 2 tbsp
  • Tamarind – 1 small piece
  • Coriander leaves – 2 tbsp
  • Salt & water – As needed
  • Cooking oil – 1 tbsp
To temper
  • Cooking oil – 1 tsp
  • Mustard seeds – 1/2 tsp
  • Urad dal – 1/2 tsp
  • Hing – A generous pinch

METHOD

  • Chop the spring onions , tomato. Grate coconut..Soak tamarind in little water.
  • Heat 1 tbsp of oil in a kadai and roast the dal with hing. Remove the dal alone and keep it in a plate..
  • In the same oil , saute the spring onions , tomato , chillies , Grated coconut and salt.. Saute well till the onion shrinks and tomato mushes.. Cool & grind it to a smooth paste adding the soaked tamarind with water.. Make a paste..
spring onion chutney tile
  • Finally add the coriander leaves & grind again to a paste..
  • Temper with the above ingredients..Add to chutney
Serve with idli , dosa  topped with sesame oil !!

spring onion chutney


Continue Reading...