Search Chitra's Food Book

November 27, 2013

Poori Recipe / How To Make Puffy Poori – South Indian Puri Recipe

poori recipe
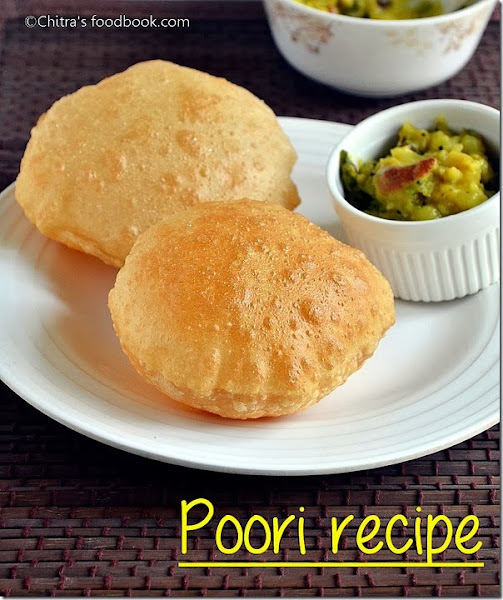
Poori/Puri is an yummy Indian breakfast recipe that is loved by all irrespective of their ages. I usually make poori recipe for guests and in weekends. Raksha loves to eat this more than chapati. As we all know making puffy, crispy as well as soft poori is a bit tricky. It has to be puffy at the same time it should be soft. So I have used rava(suji) and ghee along with wheat flour. Rava/semolina helps to give crispy, puffy poori and ghee makes it soft. 

Apart from the ingredients, consistency of the dough, rolling thickness of puri, oil temperature everything matters here. So I have shared the South Indian style poori recipe with tips and tricks based on my observation & from the cookbooks I read. I have also shared a full video recipe for better understanding. Hope it will be useful for beginners.Lets see how to make puffy poori at home with a video !
Over to the recipe with a full video :)


poori recipe

Poori recipe


Poori Recipe Poori/Puri recipe- South Indian deep fried flat bread,kids favourite recipe!
Cuisine: Indian Category: Breakfast Yields: 8-9nos
Prep Time: 10 Minutes Cook Time: 5 Minutes Total Time: 15 Minutes


INGREDIENTS
1 cup =250ml
For dough
  • Wheat flour/atta - 1 cup
  • Melted ghee - 1/2 tsp
  • Sooji/rava /Semolina - 1/2 tsp
  • Sugar – A pinch (optional)
  • salt - as needed
  • Water - as needed ( I used around 1/3 cup)
  • Cooking oil - to deep fry
HOW TO MAKE POORI - METHOD
  • To make perfect poori, wheat flour and water is enough. But here I have given a fool proof recipe to make soft poori for beginners with the above given ingredients. In a wide bowl,take the flour. Add salt, a pinch of sugar, rava, ghee and mix well to make a crumbly mixture. Add water little by little and make the dough. Dough should not be sticky, wet or too soft like chapati dough. It should be smooth and stiff but not hard.
Puffy poori step by step
  • I used around 1/3 cup plus 1- 2 tbsp of water.It may vary based on the flour you use. Keep this as reference. Initially you may feel the dough little bit hard.knead well in between ur palms for few minutes. It will become smooth and soft. Do not allow the dough to sit for long time. Start rolling.
  • Make small lemon sized balls. Dust the balls in flour and make small sized poori of palm size. Use less flour for dusting. The thickness should be medium, not too thin like chapati. If you make it thin, puris won’t puff up. Arrange the pooris in a paper or a greased plate without overlapping each other.
poori step by step
  • Heat oil to deep fry. To check the right temperature of oil,put a small piece of dough. It will rise immediately at the same time it should not be browned. This is the perfect heating of oil. Immediately slide the poori and after a second, press it with a slotted ladle. It will puff up well. Flip it carefully and allow it to cook for few seconds till  the bubbles cease. Remove and lower the flame till you drop the next poori .Drain in a tissue paper. Keep the flame high and repeat the same for remaining pooris.
Puffy poori step by step
POINTS TO NOTE
  • Addition of ghee keeps the poori soft and gives a nice flavour. But do not add more than the mentioned quantity.
  • Adding sooji/rava is to maintain crispness. The puffed poori won’t break till u break it with your hands.Some people soak the rava in little water before adding. If you add more quantity of rava, it would be good. But here it is not necessary as we are adding negligible quantity. U can also omit rava and try. It is completely optional.
  • Adding a pinch of sugar gives a nice golden color to the poori. But it is optional to use.
  • Dough consistency is more important. If you make it too hard or sticky, poori will be too  hard. If the dough is too soft, poori will become very soft.
  • If you feel, you have added very less water and the dough is too tight,beat the dough well for few minutes. It will become soft.Then make pooris. It will come out well.
  • Do not rest the dough. Make puris immediately else it will drink more oil.
  • Always use less flour for dusting else the dusted flour will spoil the oil and will be settled as sediments. So dust only once. U can apply oil on the rolling board and make pooris.
  • Thickness should be medium ie slightly thicker than chapati and it should be even. Else poori will puff only in some places where it is thick. Make sure there are no holes while you roll. Pooris won’t puff up if there is a hole.
  • Right temperature of oil is more important. Never allow it to fume or smoke. Poori will turn dark brown in color. Check the oil as mentioned above and proceed.
  • After you make 2 –3 puris, adjust the flame,check the oil temperature again & fry the pooris. If the oil is too hot, switch off the flame for few minutes to reduce the heat. Else add some more fresh oil to reduce the heat. By doing this way, you can make pooris of even color till the end.

Puffy poori

Check out the side dishes for poori :)
Enjoy puffy pooris with potato masala or kurma. 
puri recipe

 
Continue Reading...


November 25, 2013

Easy Rasam Recipe With Easy Rasam Powder

rasam recipe
As I mentioned in my post, my appa makes rasam very well. When my father was in mumbai, he used to do this rasam with an easy homemade rasam powder. For this recipe, store bought rasam powder  is not needed. We love this rasam more than my mom’s version. So we (me & my sis) used to tell our dad to make rasam in weekends and we enjoy with mom’s potato poriyal.

This is a very simple rasam recipe using freshly ground rasam powder with just 2 ingredients. U can replace this rasam powder with store bought or your own rasam powder too. It comes out well. It can be made in few minutes. We call this as bachelor’s rasam. U can even drink this rasam. I love to mix with buttermilk & drink. 
The flavour of pepper and jeera waft around your house when you make this rasam. Try this easy rasam during busy mornings. Tastes great with simple potato curry and papad !

Easy rasam powder

Rasam recipe


Rasam recipe Easy rasam recipe with freshly ground easy rasam powder
Cuisine: Indian Category: side dish Yields: 3
Prep Time: 10 Minutes Cook Time: 10 Minutes Total Time: 20 Minutes


INGREDIENTS
For rasam powder
  • Pepper corns - 1 tbsp
  • Cumin seeds - 2 tbsp
For rasam
  • Tamarind - Medium gooseberry size
  • Tomato - 1 no
  • Turmeric powder - 1/4 tsp
  • Rasam powder - 3 tsp (mentioned above)
  • Crushed garlic cloves - 5 nos
  • Sugar - A pinch
  • Salt - as needed
  • Water - 3 cups
To temper
  • Oil or ghee - 2 tsp
  • Mustard seeds - 1/2 tsp
  • Jeera/cumins seeds - 1/2 tsp
  • Red chillies – 1 or 2 nos
  • Curry leaves - few
  • Coriander leaves - 2 tbsp (to garnish)
HOW TO MAKE RASAM - METHOD

  • In a bowl, soak tamarind in half cup of hot water for 5 minutes. In the mean time, prepare rasam powder by grinding the pepper corns and cumin seeds together. Store in a box.Set aside.
Rasam powder step by step
  • Extract tamarind juice using 2.5cups of water. Totally it should come to 3 cups. Add salt, sugar, turmeric powder & rasam powder. Mix well. Check for taste. U’ll feel the rasam tasteAdd more salt & rasam powder if necessary. Now crush the tomatoes well using your hands and add to this tamarind water.
Rasam recipe step by step
  • In a kadai, heat oil or ghee and temper the mustard seeds, jeera/cumin seeds, pinched red chillies, curry leaves. Add the tamarind mixture. Let it boil for a minute. Then add 1/4 cup water and add the crushed garlic pods. Give a full roll boil only once and it becomes frothy. (alternately you can just boil the rasam and add the tempering at the end. It gives a nice flavor). 
Rasam recipe step by step
  • When it becomes frothy, add chopped coriander leaves and switch off the flame. Transfer to a bowl. Close it with a lid immediately.
Rasam recipe step by step
Rasam is ready to enjoy with plain rice !

Note
  • The quantity I have given for rasam powder can be used for making rasam thrice. Store it in an air tight box and use a clean, dry spoon.
  • U can also use sakthi, priya, aachi rasam powder. Use 1 tsp for 1 cup of water. Check for taste. Add more or less based on your need.
  • Dal water can be added for more taste. For variations, you can saute the tomato while tempering instead of adding it raw..
  • Adding Sugar gives a clear rasam.
  • Garlic cloves and coriander leaves is a must for this recipe.
  • Tempering can be done at the end too. It will give a different flavour. Using ghee is optional but it smells good while you eat.

 Easy rasam powder
Yummy , flavourful rasam is ready to eat with plain rice!
Easy rasam recipe

Continue Reading...


November 22, 2013

FOOD PANDA - Order delicious food online | Review

unnamed (1)foodpanda_large_web
Dear all,
Today I have come up with the review about FOOD PANDA, an ONLINE SITE FOR ORDERING FOOD from favourite restaurants in your Location.We can order the food in 4 easy steps. Login, Select the city/location,find ur favourite restaurant,order ur food.Food will be at ur doorstep in some minutes at discounted rates !
food-panda

They are offering attractive discounts  as well as cash back on selected cards.I was surprised to find an advertisement showing “ Buy One Briyani and get One free” Winking smile..
foodpanda
Some of the features of this Online Site which I admired are given below
1.Food panda started in March-12 just completed one and half years but marked a significant strides in the online food market internationally.
2. Where ever u are, in which part of the world u are, u can order your favourite dish from your favourite hotel nearby u.
3.It can be useful for the techies who cant afford to cook or have time to go to a restaurant of their choice.
4.It can be helpful for the retired and old persons who find cooking little difficult due to  unforeseen health problems.
5.Tourists also can use this site for ordering their favourite dish at places where they are new.
6.We housewives, can use this site for ordering food when we need a change from the routine work of cookingWinking smile.
7. During this monsoon, it will be difficult to travel to our favourite restaurants.We can use this site to order our favourite dishes.
All u have to do is just login/register into this site.Choose your favourite cuisine from your favourite restaurant in your location.Order the food and enjoy !
Here are some more screen shots of this site for ur information.

x3P8b4zG

They do have their own app for mobiles and iPhones.Download it for free and use it as needed.They provide Live chat facility apart from phone helpline.
AP
So to sum up, i can say Food Panda helps you to find restaurants. They provide the service of ordering food online and avail home delivery services.
Disclaimer : Friends,Please share your experience with Food panda if any.As i have not personally experienced their service,the above mentioned points are just my opinion. So friends, do try your own and share below.
unnamed
Thanks for visiting. Have a happy weekend.Catch u all with my recipe post on monday Smile

Technorati Tags: ,
Continue Reading...


November 21, 2013

Eggless Vanilla Sponge Cake Recipe Without Condensed Milk, Curd

 Eggless sponge cake recipe

Eggless vanilla sponge cake recipe was in my try list for long time. Usually eggless sponge cake is prepared using condensed milk, curd and butter. But this egg free vanilla cake recipe is without condensed milk and curd. This recipe uses fresh cream and milk instead.  I had planned to try this cake recipe during Christmas. But I was forced to make it yesterday. I had a packet of fresh cream which was about to expire and I wanted to use it without wasting. When I was thinking of what to do with it, two recipes flashed in my mind. 

One was methi mutter malai and the other one was cake using fresh cream. I made both and somehow I finished the whole packet on the same day. For this cake, I google searched and got this recipe from Parita’s blog. I followed that recipe to the ‘T’ but I followed an easy method to make the cake batter. The result was awesome.The cake came out very soft and spongy. Raksha loved it to the core and she finished all the cake herself in two days. We got only one piece to taste.

Check out this link if you wish to try the same using pressure cooker.You can just follow the same method.Hope u will get it right. Try and let me know how it turned out for you.

Eggless sponge cake recipe using fresh cream


Eggless vanilla sponge cake recipe


Eggless vanilla sponge cake recipe Easy to make eggless vanilla flavoured sponge cake recipe using fresh cream. Kids would be pleased with this cake recipe :)
Cuisine: Indian Category: Sweet Yields: 8-10 pieces
Prep Time: 5 Minutes Cook Time: 40 Minutes Total Time: 45 Minutes


INGREDIENTS

1 cup=200ml
To make the cake batter
  • Powdered Sugar - 1 cup
  • Fresh cream - 3/4 cup ( I used amul)
  • All purpose flour /Maida - 1 1/3 cup ( 1 + 1/3 CUP)
  • Baking powder - 1 tsp
  • Cooking soda/ baking soda - 1/2 tsp
  • Milk – 3/4 cup
  • Vanilla essence - 1 tsp
HOW TO MAKE EGGLESS VANILLA SPONGE CAKE - METHOD

  • In a big mixie jar, take the sugar and powder it nicely. Add fresh cream to it and beat twice or thrice to make a smooth paste OR take a bowl and beat the sugar & cream with a hand whisk. To this add the maida mixture as mentioned below. Do not beat the batter, mix gently. Follow this method if you don't want to use mixie.
eggless sponge cake step by step recipe
  • Then add the maida, baking powder, baking soda, vanilla essence and beat twice. U’ll get a thick paste. Wipe the sides. Now add the milk and run the mixie in low speed. Do not over beat the mixture. U’ll get the batter in flowing consistency like a ribbon.
eggless sponge cake step by step
eggless sponge cake recipe step by step
  • Grease a baking pan with oil & sprinkle maida all over the pan and pour the cake batter. Pat the bottom of pan to break the air bubbles.
  • Pre heat the oven at 180c or 10 minutes in convection mode. Keep the baking pan and bake for 35-40 minutes and bake in convection mode at 180 c.Please keep an eye after 25 minutes and check with a toothpick. Check with a skewer/toothpick or knife for doneness. If it comes out clean,cake is done.
  • Cool completely. Run the knife through the sides of the pan and then invert it on a plate. Cake will come out easily.
eggless sponge cake recipe step by step

Cut into pieces.Serve n Enjoy !


Note

  • I am unable to say the shelf life of this cake because it got over by two days.
  • If you don’t want to use mixie, you can mix the powdered sugar and fresh cream together in a bowl to make a smooth paste. In another bowl, mix maida, baking powder, soda and add this to the fresh cream mixture in one direction. Add essence and milk. Make a batter and proceed as above.
  • Preheating is essential.Use Convection mode at 180c.

Wanna bite?? : ))
eggless sponge cake piece

eggless vanilla sponge cake recipe piece


Continue Reading...


November 19, 2013

Brinjal Curry | Kathirikai Poriyal - Poriyal Recipes

kathirikai poriyal recipe
Kathirikai poriyal recipe is one of my favourite poriyal recipes. I love to have this South Indian style brinjal curry with hot sambar sadam and more kuzhambu.This is my mil’s version. Before marriage , I used to enjoy my mom’s kathirikai podi curry with rasam. But this is a very easy & flavourful poriyal in Tamil nadu style. We make potato poriyal using the same method which I’ll post soon.
Brinjal curry

Kathirikai poriyal recipe


Kathirikai poriyal recipe Flavourful Brinjal curry recipe - A best side dish for sambar and curd rice!
Cuisine: Indian Category: Curries Yields: Serves 2
Prep Time: 10 Minutes Cook Time: 20 Minutes Total Time: 30 Minutes


INGREDIENTS

  • Brinjal - 5 nos (medium sized)
  • Sambar powder - 1 to 1.5 tsp
  • Tamarind - Berry size (soak in little water)
  • Turmeric powder - 1/4 tsp
  • Salt & water - as needed
To grind
  • Grated coconut - 3 tbsp
  • Big onion -1 no
  • Cumin seeds/jeera - 1/2 tsp
To temper
  • Cooking oil - 2 tbsp
  • Mustard seeds - 1/2 tsp
  • Urad dal - 1tsp
  • Curry leaves - few
HOW TO MAKE KATHIRIKAI PORIYAL - METHOD

  • Cut brinjal into two vertically. Again cut this into two cubes. Soak in water till use to prevent color change.
kathrikai poriyal step by step
  • Cook brinjal adding the required water, salt , tamarind extract and sambar powder. Make sure the brinjal is not over cooked. It should retain its shape. After the brinjal is cooked well, remove and drain the excess water. U can use this water for making sambar. (I usually pressure cook the brinjal along with dal by keeping it in a separate bowl inside the cooker. I keep it after the cooker starts steaming so that by the time it whistles, brinjal will be cooked properly without losing its shape). 
kathrikai poriyal step by step 1
  • In the mean time, grind the grated coconut in the mixie without adding water. Then add the cubed big onions and jeera. Run the mixie twice so that onions will be coarsely ground. Do not over grind to make a paste. This is most important for this poriyal to give a nice flavour.
kathrikai poriyal step by step 3
  • Now mix this paste with the cooked brinjal. Add turmeric powder and pinched curry leaves. In a kadai, heat oil and temper all the ingredients given under”to temper”.
kathrikai poriyal step by step 2
    • Add the brinjal mixture and mix it well. Make sure brinjal doesn’t break. Simmer the flame and allow it to roast in oil till all the moisture leaves it. It gives a nice masala smell. Takes nearly 10-12 mins in low flame to get ready. Flip every now and then to avoid burning in the bottom.

kathrikai poriyal step by step 4

Enjoy !

Note
  • U can replace brinjal by pumpkin or potato and make this poriyal.
  • Make sure masala coats the brinjal well. Leave the masala in low flame for 10-15 minutes to get a nice flavour.

kathirikai poriyal

Continue Reading...


November 16, 2013

Maa Vilakku Recipe - Maavilakku Maavu Recipe Using Rice Flour | Karthigai Deepam Recipes

Maa vilakku

Maa vilakku /  Rice flour Lamp in English is an edible lamp made using rice flour, jaggery, honey and ghee. Maavilakku is a must and should neivedyam recipe in all our households for Karthigai deepam and Aadi month to offer Amman. My mom and mil makes different naivedyam recipes to God for karthigai deepam but offering maavilakku maavu is a common practice for both of them. Not only for Karthigai deepam , we make it during tamil month Aadi, Thai and Purattasi sani. Actually maavilakku maavu has to be made by mixing jaggery with home made processed wet rice flour

My MIL follows this procedure. But my mom makes it very simple using store bought rice flour. It can be done in minutes. Though I follow my MIL’s procedure, I thought of sharing my mom’s easy version with simple decoration in my blog. I have shared some tips and tricks from my mom to make a perfectly shaped maavilakku without losing its shape. For people who are not able to soak and grind the raw rice, this version would be useful. Do try this easy maavilakku maavu recipe with step by step pictures and video. Let me know your feedback.

I wish you all a very happy karthigai deepam, enjoy the festival of lights.

Do check out my other Karthigai Deepam Recipes too.


Maa vilakku

Maavilakku recipe


Maavilakku recipe Maavilakku maavu recipe using store bought rice flour for karthigai deepam.It can be done in minutes.
Cuisine: South Indian Category: Sweet Yields: 2
Prep Time: 5 Minutes Cook Time: 5 Minutes Total Time: 10 Minutes


INGREDIENTS
1 cup - 250ml
To make the maavilakku maavu
  • Store bought rice flour/ arisi maavu/ idiyappam flour  - 1/2 cup
  • Grated jaggery – 1/2 cup
  • Ghee – 2 to 3 tbsp (6 tsp, unmelted,thick ghee)
  • Honey - 1/2 tbsp ( 1.5 tsp)
  • Cardamom powder - 1/2 tsp
To make lamp
  • Thread/thirinool - 1 no
  • Ghee - 2 tsp(melted)
  • Kumkum and turmeric - little
METHOD

  • Take the rice flour and grated jaggery in a mixie jar. Pulse it 3-4 times. Do not grind continuously. But make sure, they are mixed well without any lumps. ( I got this tip from sharmi’s blog, thank you sharmi .) As the rice flour is dry, it will absorb all the water from jaggery.
maavilakku maavu step by step
  • Remove in a plate. Make a dent and add the thick, unmelted ghee.(The key here is if you use melted ghee, you can shape it easily but later on as the ghee hardens, maavilakku will also become hard. So if you use unmelted ghee, maavilakku will stay soft without losing its shape and taste). Initially add 1 tbsp and mix well. Again add 1/2 tbsp more, mix well. Add 1.5 tsp honey and mix well. Try to make a ball. Roll it tight between two hands. If it cracks, seal it with fingers. As you roll tight, jaggery will melt because of the heat of your hands and it will make a smooth ball. 
maavilakku maavu step by step 1
  • Make a smooth ball without cracks. Make a small dent in the center using your pointer finger for pouring ghee. Seal with fingers if any crack appears.( I used overall 2 tbsp unmelted ghee)
maavilakku maavu step by step 2
  • Apply turmeric and kumkum on all the sides. Put the thread and lit the lamp. Keep a flower nearby and offer to God.
Note
  • Maavilakku stays good for  a week in room temperature. I have seen people keeping it for months by freezing it. When you freeze the dough, bring it to room temperature before u consume.
  • My mom never use water or milk to make the dough as it reduces the shelf life. But if  you are concerned about adding ghee OR if you can consume it immediately, you can add water or milk to make the dough.
  • You can add more honey if you want to reduce ghee. But reduce the quantity of jaggery accordingly. 
  • Using unmelted, paste like ghee is more important for maavilakku to hold its shape for long time.
  • If you add more jaggery, it may leave water and maa vilakku will lose its shape.
  • For making home made wet rice flour, wash and soak the raw rice/maavu arisi for 30 minutes. Drain the water and spread it on a paper for few minutes. Remove and powder it nicely. Sieve the flour and proceed as mentioned above. 
  • To see the step by step pictures, please click this link. Remember if you are using homemade rice flour, quantity of jaggery and ghee used would be less. 

Maavilakku

Enjoy maavilakku with chopped coconut pieces. Tastes heavenly !

Maavilakku recipe


Continue Reading...