Search Chitra's Food Book

October 7, 2015

Butter Badusha Recipe / Balushahi With Video - Diwali Sweets Recipes

Badusha recipe
Badusha/Balushahi recipe is one of the must try sweets recipes during Diwali or any occasions. Most of the people in India make badusha for Diwali. So I thought of starting my diwali recipes with this most popular sweet recipe.

Basically I am not a big fan of sweets. But there are very few sweets for which I don’t say NO. Badusha is one among them. I love it for its flaky, layered texture with mild sweetness. Every year during Diwali, my MIL makes Maida burfi and Badusha without fail. She is my inspiration to try sweets on my own. She usually adds Dalda/Vanaspati or butter to make badusha. 

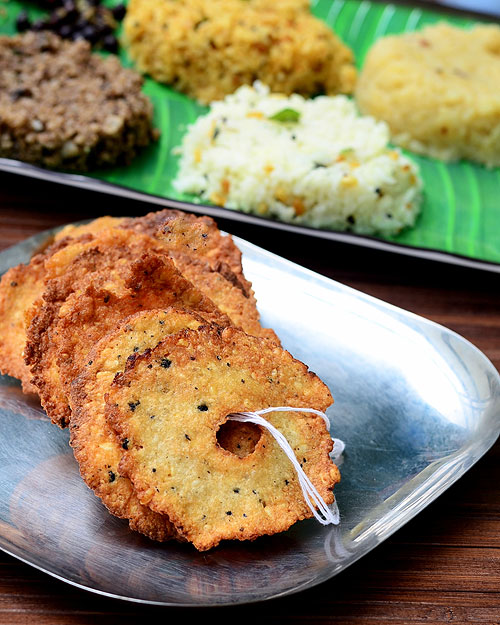
Based on my MIL’s recipe and after few trial & errors, I am making badusha successfully for the past two years. I have shared some tips, do’s & don’ts below for beginners. I took a complete video for badusha preparation and shared the same below. I love the traditional doughnut shaped badusha more than the swirled ones. But still swirled badusha looks more attractive like suryakala. 

In this post, I have just shared a small video of how to make badusha swirls for beginners to learn. Hope it is easily understandable. Lets see how to make the most popular Indian sweet balushahi aka badhusha in detail with a video on how to shape the badusha.

How to shape badusha

Badusha recipe

TIPS TO MAKE PERFECT BADUSHA
  • Generally beginners complaint about badusha disperses/dissolves in oil. It is due to the addition of more cooking soda or fat content ( ghee or butter). If the oil temperature is too low, badusha may dissolve in oil.
  • Sometimes you may get more cracks in badusha after frying. It may become shapeless too. It is also due to the quantity of cooking soda.So please be very careful while adding soda.
  • The secret of getting flaky, layered badusha lies in slow deep frying in low flame. Adding curd doesn’t make the difference. My MIL never add curd. Still it comes out flaky. But curd helps to give softness to Badusha. So do not skip it. 
  • You can replace butter with melted ghee. But use melted ghee or butter only at room temperature. It should not be hot.
  • No need to knead the dough very hard or beat as you do for chapathi dough. Its enough to make a soft, crack free dough to get good badusha.
  • The recipe I have shared here gives badusha which may be slightly hard as soon as you prepare. But it will become soft the next day and tastes much better.
butter badusha

Butter badusha recipe


Butter badusha recipe How to make butter badusha - Diwali sweets recipes
Cuisine: Indian
Category: Sweets
Serves:
Prep time: 30 Minutes
Cook time: 20 Minutes
Total time: 50 Minutes


INGREDIENTS

  • All purpose flour/Maida - 1 cup (tightly packed & levelled)
  • Melted butter - 1/4 cup ( at room temp, butter should not be hot)
  • Curd - 1 tbsp
  • Cooking soda / Baking soda - 1/8 tsp 
  • Water - as needed ( I used 2-3 tbsp)
  • Salt - a small pinch
For sugar syrup
  • Sugar - 3/4 cup
  • Water - 1/3 cup
  • Cardamom powder - 1/2 tsp
  • Lemon juice - 1/2 tsp
  • Saffron threads & dessicated dry coconut,nuts - for decoration
HOW TO MAKE BADUSHA - METHOD
  • Take a wide bowl and add the melted butter,cooking soda & curd. Mix well with a whisk till it becomes a creamy paste.It will take 1-2 minutes. Take sugar in a bowl and add water. Mix well & set aside. Let it dissolve for making syrup.
badusha recipe
badusha recipe
  • To this paste, add maida and a pinch of salt. Mix well and make a crumbly mixture. Butter & curd mixture should spread well with the flour. The mixture should resemble bread crumbs. Sprinkle some water and make a soft, non-sticky dough ( I used around 2-3 tbsp of water. It may vary based on the water content in curd)
butter badusha recipe

  • Rest the dough for 30 minutes. After the resting time, the dough would be very soft. Smoothen it using your hands to remove cracks by just pressing it gently. Do not knead it. Take small ball sized dough and make a crack free smooth ball. Flatten it using your palm and make a dent in the center using your pointer finger. Make a deep impression.
butter badusha recipe
  • For making swirl shaped badusha, take a ball from the dough and pinch in a corner. Fold it and again pinch the swirled end. Repeat this to make a circle. Refer video for more reference.
butter badusha recipe

  • Heat oil in a kadai and when it gets heated, drop a pinch of batter. As soon as the batter rises to the top, drop 3-4 badusha and switch off the flame. Let the badusha cook in off fire till it floats on top of oil. After it starts to float, flip the badusha and switch on the flame. Keep the flame medium and cook the badusha till it turns golden in color. One batch takes nearly 8-10 minutes.
butter badusha recipe
  • The swirled badusha takes more time to cook and looks dark in color compared to the donut shaped ones. Don’t panic.It also tastes little more crispy compared to the round ones. Deep frying patiently is more important to get layers in badusha. So please follow this carefully.
  • While frying badusha, you can make sugar syrup. Boil the syrup till one string consistency. i.e when you take a drop of syrup between your fingers & release, it will form a single string. Add cardamom powder & lemon juice and switch off the flame. Lemon juice prevent crystallization of sugar syrup. Refer this post for detailed sugar syrup consistencies.
  • Remove the badusha in a tissue. Drop them into the warm syrup. Let it soak for 5-10 minutes. Flip them in the syrup for even coating.  In the mean time, deep fry the next batch of badusha. Remove the badusha from the syrup and arrange in a plate. Once it cools down, sugar syrup with crystallize and make a nice coating. Store it once badusha is cooled down completely. Enjoy ! It stays good for 3-4 days if properly done.
If the sugar syrup is crystallized while you soak the badusha, add few drops of water, heat it. Bring the one string consistency & then drop the badusha.
Try this yummy sweet for Diwali and have a great celebration !
Butter badusha recipe


Continue Reading...


October 5, 2015

Mug Biryani Recipe - Veg Dum Biryani ( Baked)

Mug biryani recipe
Recently I came across  veg biryani recipe in a coffee mug. I loved the idea and tried it for our Sunday lunch yesterday. Mug biryani is nothing but the usual layer biryani assembled and baked in a microwave safe mug. I followed my vegetable layer DUM biryani for gravy recipe and adapted the outer covering recipe from HERE. Raksha was so happy and fascinated to see the biryani in a bowl. She was eagerly waiting with me in the kitchen to see the output.

As I wished, the result was awesome. We all loved it. I reserved a bowl of biryani for myself & had it for dinner too. Friends, do try this biryani for a change & attract your family members. Lets check out this week’s Sunday Lunch Recipes Series no 32– Flavorful Mug biryani adding mixed vegetables!!

Check out my other SUNDAY SPECIAL BIRYANI RECIPES

Mug biryani recipe

Mug biryani recipe-Dum biryani


Mug biryani recipe-Dum biryani Vegetable biryani in a coffee mug-Sunday lunch recipes series 32
Cuisine: Indian
Category: Lunch ideas
Serves: Serves 3-4
Prep time: 30 Minutes
Cook time: 30 Minutes
Total time: 60 Minutes


INGREDIENTS
1 cup = 200 ml
  • Basmati rice - 1 cup
  • Water - 5 cups
  • Whole spices ( 1 cinnamon,2 cloves,1 black stone flower,1 bayleaf,1cardamom)
  • Salt - as needed
  • Cooking oil or ghee - 1 tsp
For gravy
  • Cooking oil + ghee - 1 tbsp+1 tbsp
  • Whole spices -1 each
  • Big onion - 1 no
  • Green chilli - 1no
  • G&G paste - 1/2 tsp
  • Mixed vegetables ( 1 carrot,a handful of green peas,1 potato) - 1/2 cup
  • Curd - 1/2 cup
  • Turmeric powder - 1/8 tsp
  • Red chilli powder - 1 tsp
  • Biryani masala powder - 1 tsp
  • Salt & water - as needed
For dough
  • Maida/All purpose flour - 1/2 cup
  • Salt – a pinch
  • Baking powder – 1/4 tsp
  • Baking soda – a pinch
  • Warm milk – 1 tbsp
  • Water -as needed to knead the dough
For layering
  • Mint+coriander leaves - 2 tbsp
  • Browned onions - a handful
  • Saffron soaked milk - 1/4 cup
  • Cooking oil or ghee - to grease the mug
METHOD
  • Wash and soak the basmati rice for 30 minutes. In a wide kadai or vessel, boil 6 cups of water adding cinnamon, cloves, cardamom and black stone flower. Add some salt.  When the water comes to a roll boil, add lemon juice. Drain the water from the soaked basmati rice and add to the boiling water.
  • Cook the rice in open pan for nearly 8 minutes. Stir it once or twice in the middle. Make sure you don’t over cook the rice. Rice should be firm and soft. It should be 3/4 th cooked.
  • Remove the kadai and pass it through a colander/sieve. Run the tap water over the rice to stop cooking process. Drain all the excess water and keep the rice in the colander. Spread it in a wide plate and let it cool completely.
Mug biryani recipe

  • Heat 2 tbsp of oil and caramalize the onions by sauting in high flame for a minute. Remove in a plate.
  • Now prepare the gravy. Heat oil+ghee in a wide kadai and saute the cinnamon, cloves, cardamom and bayleaf. Add the ginger-garlic paste and saute for a minute till raw smell goes off. Now add sliced onions and saute till transparent.
  • Add the mixed vegetables and saute well. Add salt.
Mug biryani recipe

  • Now add the curd and mix well in low flame. Add the red chilli powder, turmeric powder, biryani masala powder and salt.  Mix well.Lastly add some water and cook the mixture very well till veggies are completely cooked and oil floats on top. It will become a semi solid gravy.
Mug biryani recipe
  • Remove the kadai and keep the gravy aside. Take a bowl and make the chapathi dough adding the ingredients given under “ For dough” OR make a plain chapathi dough using wheat flour & salt to seal the mug.
  • Take the microwave safe mugs and grease with a tsp of oil.
Mug biryani recipe
  • Spread a small ladle of cooked rice as first layer. Now layer the gravy over the rice and sprinkle some chopped mint+coriander leaves.
Mug biryani recipe
  • Layer with rice now. Repeat the same till the brim of mug. Lastly sprinkle some saffron soaked milk and caramelized onions. Seal the mug with a small round disc made of dough. Preheat the oven in 180c and bake the biryani for 15 minutes. Remove & serve hot !
Mug biryani recipe
Mug biryani recipe

Enjoy with raita !


Note

  • Adding green chillies is optional. U can add more red chilli powder for spicy biryani.
  • You can replace  biryani masala powder with garama masala powder too.
  • Addition of mint+coriander leaves is very important.
  • Replace curd with lemon juice for variations but add lemon juice only before putting in DUM. In that case, add 2 tomatoes along with onions and saute until mushy.

Enjoy this yummy Mug biryani with your family !
Mug biryani recipe

Continue Reading...


October 3, 2015

Grilled Cheese Sandwich Recipe-Sandwich Recipes For Kids

Grilled cheese sandwich
Grilled Cheese Sandwich is one of the sandwich recipes I make often for my daughter’s breakfast, mostly on Sunday mornings. She loves it a lot. For my daughter I use milk bread and mozzarella cheese whereas I make the same for myself and Sendhil using cheddar cheese & whole wheat bread. My family likes this  sandwich in Indian style adding chopped green chillies, coriander leaves and chat masala powder. Sometimes I add tomato ketchup and mayonaise too. This sandwich can be prepared with many variations as per our family’s preference. Whatever be the stuffing, it’s finally the cheese that make the kids love this sandwich.
Before going to the recipe, I would like to mention a few lines about online grocery shopping. Recent days I have been purchasing groceries Online Via Bigbasket. Mostly I buy the ingredients which are not found near my house. Recently I bought cheddar cheese , blueberries, Flax seeds, millets , millet flour and some organic foods. I am very much satisfied with their customer service. You too give a try.
Lets see how to make this yummy Indian style perfectly grilled Cheese Sandwich recipe. Also check out this comprehensive article on how to choose the grill in Globo surf.  If you don’t own a grill sandwich maker, you can try the same in oven or tawa.

Grilled cheese sandwich

Grilled Cheese Sandwich Recipe


Grilled Cheese Sandwich Recipe How to make grilled sandwich recipe using sandwich maker
Cuisine: Indian
Category: Breakfast
Serves: Serves 3
Prep time: 10 Minutes
Cook time: 5 Minutes
Total time: 15 Minutes

INGREDIENTS

  • Wheat bread or milk bread- 16 nos (Makes 8 pairs)
  • Grated Cheddar cheese or mozarella cheese-2 cups (200gms)
  • Finely chopped Green chillies - 2 nos
  • Chat masala powder - 2 tsp (Adjust as per the taste)
  • Coriander leaves - 2 tbsp
  • Tomato sauce & Mayonnaise - as needed(optional topping)
  • Salt - as needed
  • Butter - to brush the bread
HOW TO MAKE GRILLED CHEESE SANDWICH - METHOD
  • Grate the cheese and mix the chopped chillies, coriander leaves , salt and chat masala powder. Replace green chillies by pepper powder or red chilli powder as per your taste. Add as per your taste.
Grilled cheese sandwich
  • Take 2 bread slices and brush one side of the bread with butter at room temperature.Spread the cheese mixture on the other side of one bread slice.Cover it with another slice.Make sure the buttered side is facing up.
Grilled cheese sandwich
Grilled cheese sandwich  
  • Take the grill sandwich maker and place the sandwich with buttered side touching the hot plate.
Toast the slices till its done.Serve hot !
Grilled cheese sandwich
Note
  • You can add an additional topping of tomato sauce or mayonnaise.
  • You can skip chillies or pepper powder and use chat masala alone if making for kids. 

Enjoy this yummy,cheesy grilled sandwich for your breakfast !
Grilled cheese sandwich

Continue Reading...


September 30, 2015

Sabudana Vada With Chutney Recipe / Javvarisi Vadai / Sago Vada

Javvarisi vadai
 Sabudana vada with peanut chutney is one of the most popular vrat / fasting dish in North IndiaNavratri is around the corner. I am sure most of you would look for no onion no garlic fasting recipes. Sago/Tapioca pearls(Sabudana in Hindi, Javvarisi in Tamil) is considered to be one of the most important ingredient used for cooking vrat recipes.
People usually make Sabudana khichdi, Kheer in North India and Javvarisi Upma, Payasam in South during fasting days either for breakfast or for dinner. I always wonder why sabudana is consumed on Vrat days even though it is high in carbohydrates & Calories. I browsed few websites and found some health benefits like Sabudana gives quick energy. It is very easy to digest & gives a cooling effect on the system. It is quite low in fat, protein and does not have any minerals or iron. So  milk, peanut & potatoes are added with sago to increase its nutrtious value.
Basically I love sabudana kheer /Javvarisi Payasam prepared with sugar or jaggery more than other sabudana dishes. But this year during this Navratri festival, I wanted to explore varieties of sabudana recipes. So I started with Maharashtrian style Sabudana vada/Sago fritters and made a quick video along with step by step pictures. Even though I tried it for the first time, its result made me felt as if I am making it regularly at home
Yes, it came out super crispy and tasted great with this easy peanut curd chutney. This chutney is one of the best side dishes for sabudana vada as mentioned HERE. I too loved this combo very much. I have tasted sabudana vada only once in GOLI VADA PAV outlet. But its taste and appearance was completely different than this one. I will try to experiment that vada and post it here. 
Now lets see how to prepare Sabudana Vada recipe for Vrat snacks. You can try shallow frying or Air fry it for diet version. Serve & eat it hot to enjoy its best taste !
Check out my Javvarisi vathal/Vadam & Mango Sago Pudding


Sabudana vada recipe


Sago vada / Sabudana Vada- Javvarisi Vadai


Sago vada / Sabudana Vada- Javvarisi Vadai How to make crispy Sago vada/Sabudana vada for vrat and teatime snacks.
Cuisine: North Indian
Category: Sweet
Serves: 4
Prep time: 10 Minutes
Cook time: 15 Minutes
Total time: 25 Minutes

INGREDIENTS
1 cup = 240ml
  • Sago/Sabudana/Javvarisi - 1/2 cup ( Big variety,NO nylon)
  • Medium sized potato - 1 no
  • Roasted peanuts - 2 tbsp
  • Arrowroot powder or rice flour or corn flour - 1/2 tbsp ( I used corn flour)
  • Green chillies - 1 no ( Finely chopped)
  • Ginger - 1/2 inch piece ( -do-)
  • Coriander leaves - 2 tbsp (-do-)
  • Cumin seeds/Jeera - 1/2 tsp
  • Sugar-1/4 tsp
  • Lemon juice – 1/2 tsp
  • Salt - as needed
  • Oil - to deep fry
Peanut chutney for sabudana vada
  • Fresh curd – 1/4 cup
  • Roasted Peanut powder – 2 tbsp
  • Red chilli powder – 1/2 – 1 tsp
  • Turmeric powder – 1/8 tsp
  • Cumin powder – 1/4 tsp
  • Sugar – a pinch
  • Salt – as needed
 HOW TO MAKE SABUDANA VADA - METHOD
  • Wash & soak the sabudana overnight Or 4-5 hours adding enough water to cover it. Soak till it becomes soft. Drain all the excess water & squeeze the sabudana. Take in a bowl.
how to make sabudana vada
  • Pressure cook potato, peel the skin and mash it well. Powder the roasted peanuts coarsely. Chop the green chilli, ginger & coriander leaves.
how to make sabudana vada
  • Take the squeezed sabudana,mix the mashed potato, peanut powder, Corn flour or arrowroot powder, chopped green chilli, ginger, coriander leaves, sugar & salt ( Use arrow root powder during fasting days). Mix it well & make a dough. DO NOT ADD WATER. Soaked sabudana & mashed potato along with rice flour makes a non-sticky dough.(TIP: If sago has more water content,vada will absorb more oil. If sago is too dry, vada may crumble or dissolve in oil. So take care and bind the mixture well)
how to make sabudana vada
  • Take a small ball sized batter and make a round. Pat it to bring vada shape. Arrange in a plate.
how to make sabudana vada
  • Heat oil in a kadai and put a pinch of batter. If it rises to the top, Oil is right. Keep the flame medium. Now drop the vada and cook in batches. Flip the vada and cook both sides till golden brown. This vada takes more time to turn golden brown. So keep flipping it until u get the color (TIP: Deep fry the vada patiently in medium flame else it may turn brown faster leaving the inner portion uncooked. Slow frying helps to bring crispy exterior. Make sure the temperature of oil is correct, else vada will absorb more oil)
how to make sabudana vada
Keep the unused batter in refrigerator because vada may absorb more oil if kept outside for long time.

PEANUT CHUTNEY FOR SABUADANA VADA

Powder the roasted peanuts.Take the curd,powdered peanuts, red chilli powder, turmeric powder, salt, sugar. Mix well and check for taste. Serve hot vada with peanut chutney !
Note
  • For variations replace green chilli with a tsp of red chilli powder.
  • You can skip rice flour/corn flour with arrow root powder during fasting days.
  • Add more green chillies for spicy vada.
  • You can also add garam masala powder for more spicy flavor. But its not the authentic recipe.

Enjoy crispy sabudana vada with peanut curd chutney ! Tastes yum !!
Sabudana vada with chutney


Continue Reading...


September 28, 2015

Gobi Biryani / Cauliflower Rice Recipe

Cauliflower Biryani Recipe
Gobi biryani / South Indian Cauliflower rice is my recent try in biryani recipes. Cauliflower is one of the favorite vegetables for kids & adults.In my family,my daughter loves my Gobi 65.So I always opt for gobi manchurian or gobi 65 more than other cauliflower recipes.This Friday I came to Salem to my in-laws house.My FIL bought a big sized cauliflower as it is Raksha's favorite vegetable. I made crispy Gobi fry with half of the cauliflower and made this biryani for Sunday Lunch yesterday.It came out really well.I referred my MIL’s hand written cook book for the recipe.I tweaked it slightly to suit our family’s taste.Everyone gave thumbs up after tasting the biryani.This cauliflower rice can be made as lunch box recipe for your kids.I am sure they will love to have it with raita.Ok,Lets see how to make this week’s Sunday Lunch Recipes Series 31-Gobi Biryani aka Cauliflower Rice .

Do check my Biryani Series collection HERE.

Cauliflower Biryani Recipe

Gobi/Cauliflower biryani recipe


Gobi/Cauliflower biryani recipe Cauliflower rice / Gobi biryani recipe - Kids favorite Rice
Cuisine: Indian
Category: Lunch ideas
Serves: Serves 3
Prep time: 30 Minutes
Cook time: 20 Minutes
Total time: 50 Minutes


INGREDIENTS
1 cup - 200ml
  • Basmati rice - 1 cup
  • Water - 1.75 cups
  • Big onion - 1 no
  • Tomato - 1 no
  • Red chilli powder - 1/2 tsp
  • Garam masala powder - 3/4 tsp
  • Salt - as needed
  • Mint+coriander leaves - few
  • Curd - 1 tbsp
  • Lemon juice - few drops
To grind
  • Green chillies - 2 nos
  • Cashewnuts - 5 nos
  • Cinnamon - 1 inch
  • Cloves - 2 nos
  • Cardamom - 1 no
  • Fennel seeds - 1/2 tsp
  • Ginger -1 inch piece
  • Garlic - 5 cloves
METHOD
  • Wash and soak the basmati rice for 30 minutes.In the mean time,take the big sized cauliflower florets and wash in turmeric+salt mixed hot water to remove germs.( Tip : Do not use small sized cauliflower florets because it will become mushy while cooking in cooker.So use bigger florets) Slice the onion and tomato.I used steamed rice here.So i used 1:2.5 cups of water after soaking the rice for 30 mins.
  • Grind all the ingredients given under “to grind” to a smooth paste adding enough water. Set aside.
Cauliflower Biryani Recipe
  • Heat a pressure cooker with oil+ghee. Saute a bay leaf,black stone flower.Saute onion slices till transparent.Add the ground masala and tomato pieces.Saute till tomato turns mushy and raw smell of masala goes off completely.
Cauliflower Biryani Recipe
  • Add turmeric powder,red chilli powder,garam masala powder and salt.Now add the cauliflower pieces and mix well to coat the masala.
Cauliflower Biryani Recipe
  • Now add the washed & soaked basmati rice,water and pressure cook for 1 whistle in low flame. Open the cooker after the steam is released.Fluff the rice with fork and serve hot with raita!! Enjoy !
  • Cauliflower Biryani Recipe
Note

  • you can replace cauliflower with baby corn ,potato or meal maker/Soya chunks and make this rice.
  • For variations u can skip the grinding part and saute all the spices given under “To grind” in oil+ghee.

Enjoy Cauliflower biryani with raita.I made some Gobi 65 specially for my daughter on demand Happy
Gobi biryani
Continue Reading...


September 25, 2015

Anjaneyar Kovil Milagu Vadai | Hanuman Temple Vada Recipe

Anjaneyar kovil vadai
Anjaneyar kovil vadai/Hanuman temple vada is something very special than our usual urad dal vada with pepper. Its crunchy taste and its awesome pepper flavor makes anyone fall for it. More than all, it’s a special prasad prepared in temple kitchen/madapalli and offered in the form of Vadai malai for Anjaneyar. Prasadam given in temples always tastes great and unique with its own flavor. To mention specifically, Chennai Nanganallur Anjaneyar temple vadai malai is most famous in Tamil nadu.

 Generally South Indian temples are famous for its puliodharaisakkarai pongal and vadai. Most of us try to recreate Kovil puliodharai and kovil vadai at home. And if we get the taste close to temple version,we feel very happy and excited. I too got the same feel when I made this Anjaneyar temple vada successfully and that too in my very first attempt. I used to try temple puliogare very often in my kitchen but I couldn’t match the taste which was very disappointing for me. But when I prepared this vadai malai for Purattasi sani thaligai last week. I was completely satisfied with the output. Anyone even a beginner can make this crispy vada if you follow the steps carefully. So lets check out how to make this Hanuman temple style pepper vada with step by step photos.

Anjaneyar kovil milagu vadai malai

Anjaneyar Kovil Vadai Recipe


Anjaneyar Kovil Vadai Recipe Anjaneyar kovil milagu vadai with urad dal-Hanuman temple pepper vada
Cuisine: Indian
Category: Snacks
Serves: 12
Prep time: 20-60 Minutes
Cook time: 5 Minutes
Total time: 25-65 Minutes


INGREDIENTS

  • Round white or black urad dal - 1 cup
  • Rice flour - 1.5 tsp
  • Hot oil - 1 tsp
  • Milagu/Pepper corns - 1 tsp
  • Salt - as needed
  • Hing/Asafetida - 1/4 tsp
  • Water - add only if needed ( 1 -2 tsp)
HOW TO MAKE ANJANEYAR TEMPLE VADA - METHOD
  • Wash and soak the urad dal for 30 minutes to one hour. You can also soak it for 15 to 20 minutes and proceed if you have less soaking time.
  • After soaking drain all the water completely using a colander/Strainer. Make sure there is no water left in urad dal. Let it sit in colander for 5 to 10 minutes.
  • Now take the mixie jar, put the pepper corns, hing and then top with urad dal. If you put urad dal first and then pepper corns,pepper may not grind properly. So put the pepper and then add the urad dal. Grind it twice for short interval and grind the batter coarsely. Take care batter should not become too smooth. Add 1-2 tsp of water only if needed. Do not add salt.

    How to make anjaneyar vadai recipe

  • Remove the coarse paste into a bowl and add rice flour, salt and hot oil. Mix well. Take two thick polythene sheets or banana leaf or zip lock covers. Grease with oil generously. Take a big gooseberry sized ball and keep in it one greased sheet. Place the other sheet on top of it. Take a small bowl with flat surface and press the ball with it.
How to make anjaneyar vadai recipe
  • It will flatten to a thin roundel. Make a hole in the center using your finger. Pat it in uniform thickness else vada may turn crispy in thinner side and soggy in thick portions.
  • Grease the sheet every time you pat the vada else vada may break while you remove.If vada breaks while you remove it, grind it little more and proceed.
How to make anjaneyar vadai recipe
  • Heat oil in a kadai to deep fry the vada. Put a drop of batter to check the oil temperature. If it rises immediately, oil temperature is just right. Now simmer the flame completely and carefully remove the vada from the sheet. Drop in oil and fry in medium flame till it turns golden brown and crispy.
  • Flip the vada and cook the other side too. When the bubbles cease, remove the vada into a tissue and drain the excess oil. If the batter is properly ground without adding water,vada will not absorb oil.( Deep fry the vada patiently in medium flame because the color of vada turns black very soon and it remains uncooked when done in high flame)
How to make anjaneyar vadai malai recipe
  • I deep fried the vada one by one by keeping less oil. So its your choice of frying one by one or in a batch. Make 11 or 21 numbers and tie them in a thread. Make vada malai and offer to Lord Anjaneyar. Get his blessings !
How to make anjaneyar vadai malai recipe
Note

  • Soaking time of urad dal can be varied. 30 minutes minimum soaking time is needed. But you can get the same result even if you soak the dal for less than 30 minutes.
  • Crispness of vada completely depends on proper grinding of batter, thin size and frying the vada patiently in low to medium flame.
  • Never skip the rice flour & hot oil. It helps to make the vada crispy.
  • Add more pepper for spicy vada.
Offer this crunchy pepper vada to GOD and Enjoy !
Hanuman temple vada recipe
Continue Reading...


September 22, 2015

Peanut Onion Chutney Recipe For Idli Dosa

Peanut onion chutney recipe
 Basically I love to make different varieties of chutney for idli,dosa.So I keep hunting some interesting chutney recipes even after posting 40+ chutney recipes in my blog. I wanted to make variations in peanut chutney as Sendhil loves peanuts.I have tried Andhra style peanut chutney with coconut & peanut tomato chutney.But Peanut onion chutney without coconut was pending in my list.So I tried it last week for dosa.It was awesome.We all loved it.I am happy to include this yummy recipe in my chutney collection.I have not removed the skin of peanuts in this chutney after reading some health benefits of peanut skin HERE.So this chutney is quick and easy to make.Try this tasty side dish for idli,dosa.You will love it like us.Lets see how to make peanut onion chutney below.
Continue Reading...