Search Chitra's Food Book

Showing posts with label SOUTH INDIAN BREAKFAST RECIPES. Show all posts

August 3, 2017

Paniyaram Recipe With Idli, Dosa Batter – Instant Kuzhi Paniyaram Recipe

Paniyaram recipe with dosa batter
Paniyaram recipe with leftover idli, dosa batter is my most favorite South Indian breakfast and dinner recipes. I can have it 24x7. My mom calls it as idli dosa maavu paniyaram. In Tamil nadu, people make kuzhi paniyaram at least once in a week. Not only in Tamil nadu, this paniyaram recipe is very popular in Karnataka and Andhra as well. 

In Kannada, it is called as Paddu or Guliyappa. In Telugu, it is Gunta ponganalu. In Kerala, it is kuzhi appam in malayalam. There may be slight variations in the paniyaram batter recipe but the taste and preparation is almost the same. Generally people say kara chutney ie. Red chutney is the best side dish for paniyaram but I love my mom’s watery coconut-fried gram dal chutney( Pottukadalai chutney) that tastes like road side hotel chutney. You can find the same in the pictures.

Before marriage, my mom reserves some leftover sour dosa batter and make ghee paniyaram especially for me. Yes, Kuzhi paniyaram tastes the best when prepared with sour dosa batter more than fresh idli,dosa batter. It would be crispy outside and soft inside. The flavor of ghee and smell of sour batter takes this dish to next level. 

Sometimes my mom adds a pinch of cooking soda if the batter is too sour. I love to have this paniyaram as evening snack too. So my amma makes it after I come from college. After marriage, I follow my mom and make ghee paniyaram for Raksha and rarely for myself and Sendhil.

 
Long back, I made a post on Paniyaram varieties in which I had shared my MIL’s style sweet paniyaram, Kara paniyaram and masala paniyaram recipes. At that time, many readers asked me whether it can be prepared without paniyaram pan. I don’t think so. Deep frying in oil is the only alternative. But the shape and texture will change. Moreover it absorbs more oil and make the dish high in calories. 

If you want to taste this delicious paniyaram in a healthy way with low calorie, you need to buy a non-stick paniyaram pan. Just a few drops of oil or ghee would be enough to make this yummy delicacy. 

 In South India, you can find this pan commonly in all the vessel shops. If you are in abroad, you can buy it online as well.  Ok, lets see how to make this most popular Paniyaram recipe with step by step photo.

Paniyaram recipe

Paniyaram recipe / Kuzhi paniyaram recipe with idli, dosa batter

Ellu sadam recipe

How to make Kuzhi paniyaram recipe using leftover idli, dosa batter

South Indian
Breakfast/Dinner
20 

Ingredients (1 cup - 250ml)

  • Leftover idli,dosa batter - 2 cups
  • Big onion - 1 no (Finely chopped)
  • Green chilli - 2 nos (slit or finely chopped)
  • Curry leaves - Few
  • Coriander leaves - 2 tbsp (finely chopped)
  • Salt - as needed
  • Water - very little if batter is thick
  • To Temper

  • Cooking oil - 2 tbsp
  • Mustard seeds - 1/2 tsp
  • Urad dal - 2 tsp
  • Chana dal - 1 tbsp
  • Ginger - 1/2 tsp ( finely chopped)
  • Asafetida/Hing - 1/8 tsp

How to make the Paniyaram recipe

  1. Take the dosa batter in a bowl. Add little water if its too thick.
  2. Temper mustard seeds, urad, chana dal, hing.
  3. Saute onion, green chilli, curry leaves and coriander leaves.
  4. Add to the batter. Check for salt.
  5. Heat paniyaram pan with 1 tsp oil in each hole.
  6. Pour the batter.Cover the pan.Cook both sides and remove.
  7. Enjoy with coconut chutney or kara chutney !

Paniyaram recipe / Kuzhi paniyaram recipe - Step by step photo

  • Take the leftover dosa batter in a wide bowl. Add little water, say 1/4 cup if the batter is too thick.
  • Heat oil in a kadai.Temper mustard, urad dal, chana dal and hing. After dals turn golden, saute the finely chopped onion, green chilli, ginger, curry leaves, coriander leaves and little salt. Saute till onion becomes transparent.
    Paniyaram recipe with dosa batter
  • Add to the dosa batter. Mix well. Paniyaram batter is ready. Check for taste, add salt only if needed. If the batter is too sour, you can add a pinch of cooking soda. Mix well and rest the batter for 10 minutes.
    Paniyaram recipe with dosa batter
  • Heat paniyaram pan adding 1 tsp oil or ghee in each hole. Pour the batter and keep the flame medium high. Cover the pan and cook for sometime.
    Paniyaram recipe with dosa batter
  • Use a stick like pointed tool or spoon to flip the paniyaram. Cook the other side. Remove in a plate. Serve with your favorite chutney !
    Paniyaram recipe with dosa batter

Notes

  • To make it more healthy, you can add grated carrot, cooked peas to the paniyaram batter.
  • You can add finely chopped chilli to make the paniyaram taste spicy.
  • Adjust the flame from medium to high to cook the paniyaram with golden tint on top as shown in the picture.
  • Adding coriander leaves is optional but it adds a nice flavor.
  • Add ghee instead of oil if you are making for kids. I make this way and pack for Raksha's lunch box
Try this easy, yummy Kuzhi paniyaram recipe with leftover dosa batter.

Enjoy with pottukadalai chutney like I did.

Kuzhi paniyaram recipe
Continue Reading...


July 27, 2017

Raw Rice Idli Recipe | Pacharisi Idli Recipe | Idli Using Raw Rice

Raw rice idli ( Pacharisi idli in Tamil) is one of the important festival recipes of Tamilnadu and Andhra. My friend Shalini told me about this idli using raw rice and pappu unta( Paruppu urundai) when I was asking for Varalakshmi Pooja recipes. Many people (especially Tamil brahmins) prepare this pacharisi idli for Varalakshmi vratham and Ganesh Chaturthi neivedyam. Basically steamed rice or boiled rice idli (Puzhungal arisi) is not offered to God. So people make idli with good quality raw rice / ponni rice ( sona masoori) and offer to God on festival days. I followed my mixie idli,dosa batter recipe, altered the quantity of ingredients and tried it. To make a perfectly soft raw rice idli, we should add more urad dal and give more time for fermentation. Ratio of rice and dal should be 2:1. Its always better to use grinder for making idli. But I used mixie to grind the batter as I made very less quantity. I used ice cold water to prevent the heating of jar. So if you are using mixie like me, use ice cold water to get soft and spongy idli else idli may come out hard.

Raw rice idli recipe
Raw Rice Idli - Pacharisi Idli Recipe

Its taste and texture reminded Kanchipuram idli to me. I tried making dosa with this batter but it was not so great in taste. It tasted like varagu dosa. I will try to upload a dosa picture soon. Tomorrow I will share pappu unta recipe.  Friends, do try this idli recipe for varalakshmi viratham, offer God and get her blessings. Now lets see how to make raw rice idli recipe with step by step photos !

Check out my 15+ Idli varieties recipesSponge dosa using raw riceIdiyappam using raw rice floursweet pidi kozhukattaikara kozhukattai using store bought rice flour.

Pacharisi idli recipe
Idli using Raw Rice


Raw Rice Idli / Pacharisi Idli Recipe

Raw rice idli recipe

How to make soft idli using raw rice - Raw rice idli recipe / Ponni pacharisi idli


South Indian
Festival recipes
12 nos


Ingredients (1 cup - 250ml)

  • Raw rice – 1 cup (Use good quality sona masoori/Ponni rice)
  • Urad dal - 1/2 cup
  • Methi seeds - 1/4 tsp
  • Poha / Thick Aval - 1.5 tbsp (optional)
  • Salt - as needed
  • Water - as required ( I used 1.25 cups)
  • Gingely oil - to grease idli plate

How to make the recipe

  1. Wash and soak raw rice, urad dal, poha and methi seeds for 3 to 4 hours.
  2. Grind to a smooth paste adding ice cold water.
  3. Collect the batter in a bowl. Ferment for 12 to 15 hours.
  4. This batter won't double in quantity but rise slightly.
  5. The next morning,mix the batter well and make idli.
  6. Steam for 10 minutes till done, remove after 5 minutes.Serve with chutney,sambar.Enjoy !

Raw Rice idli - Step by step pictures

  • Wash and soak rice, urad dal, aval and methi seeds together for 3 to 4 hours.
    Raw rice idli | Pacharisi idli
  • Grind in a mixie jar adding ice cold water. I used approx 1.25 cups of water. Grind to a smooth paste.
  • Collect the batter in a bowl. Ferment it for 12 to 15 hours or overnight based on the weather. This batter won't double in quantity but rise slightly.
    Raw rice idli | Pacharisi idli recipe
  • The next morning, mix well with a ladle.Grease idli plate with sesame oil and pour the batter.
  • Steam in an idli pot for 10 minutes. Remove after its done. Rest for 5 minutes and then remove the idli. For offering God, drizzle a tsp of ghee over the idli as shown in the picture. Finish the pooja, serve with sambar & chutney!
    Raw rice idli | Pacharisi idli recipe

Notes

  • Adding poha is optional. You can skip it.
  • You can grind the batter in a grinder. Idli comes out even more soft.
  • For variations, you can soak the urad dal separately. Grind to a smooth paste, remove in a bowl.Then grind the soaked rice+ poha + methi seeds to a smooth batter. Mix both the batter and ferment it.


Try this raw rice idli for festivals and offer God. Enjoy with your favorite chutney, sambar

Raw rice idli
Pacharisi idli recipe

Continue Reading...


July 17, 2017

Masala Idli Recipe – How To Make Masala Idli Fry – Leftover Idli Recipes

Masala idli fry is an easy, kids friendly recipe that can be made using leftover idli.We can prepare this idli fry with fresh mini idli too. It can be served as breakfast, dinner or as an evening snack for kids. Usually I make South Indian, Tamilnadu style masala idli fry. This time I prepared it in North Indian style adding Pav bhaji masala powder.Actually speaking, recipe of masala idli varies from place to place.It can also be prepared in a simple way adding garam masala powder or fennel powder.

masala idli recipe
As this is my first attempt in North Indian style, I followed this recipe from Spice up the curry & Red Chilly and tried for our breakfast. I adjusted the spice level as per my family’s taste. It came out really well.  Sendhil & myself loved it a lot. I hope Raksha will like it too. If making for kids, you can try the same with deep fried idli pieces. This recipe is a great way to use the leftover idli. You can also add vegetables like finely chopped carrot, cooked peas along with capsicum  to make this dish more healthy and colorful ! Now lets see how to make Indian style masala idli at home using leftover idli with step by step photos & video.

Do check out my other leftover idli recipes like Chilli Idi, Idli manchurian, South Indian style masala idli, Pepper idli and Idli upma recipe.


How to make masala idli


Masala idli - How to make masala idli - Leftover Idli recipes

Masala idli / how to make masala idli

How to make masala idli recipe using leftover idli

Indian

Main

2


Ingredients  (1 cup = 250ml)

  • Idli – 5 nos
  • Big onion - 1 no (Finely chopped)
  • Capsicum - 1/4 no (Finely chopped)
  • Ginger - 1/2 tsp (-do-)
  • Garlic - 1/2 tsp (-do-)
  • Ripe tomato - 2 nos
  • Salt & water - as needed
  • Cooking oil – 2 tbsp
  • Cumin seeds - 1/2 tsp
  • Turmeric powder - 1/4 tsp
  • Red Chilli Powder - 1/2 tsp
  • Pav bhaji masala powder - 3/4 tsp to 1 tsp
  • Coriander leaves - to garnish
  • Lemon juice - If needed
  • Sugar - a pinch (optional)
  • Ghee - 2 tsp

How to make the recipe

  1. Chop the leftover idli into big cubes.
  2. Heat oil in a kadai. Temper cumin seeds. Saute onion, ginger, garlic and tomato.
  3. Add all the spice powders, salt and mix well.
  4. Add 1/4 cup of water to the masala and boil for a minute.
  5. Lastly add the idli cubes, mix gently to coat the masala.
  6. Garnish with coriander leaves. Sprinkle ghee & lemon juice if needed.Serve hot !

Masala idli recipe - How to make masala idli fry - Step by step pictures

  • Take the leftover idli and chop into big cubes. You can chop each idli into 8 or 9 pieces.Set aside.
    Masala idli recipe
  • Heat oil in a kadai. Splutter cumin seeds. Saute onion, capsicum, garlic and ginger pieces. After onion becomes transparent,add tomato and saute for a minute.
    Masala idli recipe
  • Add turmeric powder, red chilli powder, pav bhaji masala powder, sugar and mix well. Saute till tomato becomes mushy. Add 1/4 cup of water and boil for 2 minutes till masala becomes semi dry.
    masala idli recipe
  • Lastly add the idli cubes, mix gently without breaking.Coat the idli with masala. If masala has more water content, idli will break. So make sure masala is almost dry. Mix idli & cook for a minute.Switch off the flame. Garnish with chopped coriander leaves, few tsp of ghee and sprinkle some lemon juice. Mix well and serve hot!
    Masala idli recipe
  • Mash few banana pieces and cook for 2 minutes in low flame. Switch off the flame, sprinkle lemon juice and garnish with coriander leaves if desired.I did not add it.Remove and serve with rice.

Note:

  • Adjust the quantity of pav bhaji masala powder as per your spice level.
  • Make sure the tomato masala mixture is semi dry before adding idli pieces.


Try this easy, kids friendly recipe at home and enjoy :)
Masala idli recipe

Continue Reading...


June 29, 2017

Palak Chapathi – Spinach Chapati – Pasalai Keerai Chapathi Recipe

Palak chapathi (Spinach chapati, Pasalai keerai chapathi in Tamil) is an easy, healthy paratha recipe that can be served with onion raitha or boondi raita and pickle as the side dish.
Palak chapati recipe

I make this easy palak chapathi for our dinner usually. I followed my soft chapati recipe and added masala powders to make this spinach chapathi flavorful and soft. Curd & oil is the major ingredient that helps to make it soft. You can roll it thin or thick and pack it for lunch box if you like. You should eat it hot to enjoy its best taste. For variations, you can add finely chopped palak leaves and add it to make the job easier. Lets see how to make easy palak chapati with step by step photos !
Spinach chapathi

Palak Chapati / spinach chapathi recipe


Palak Chapati / spinach chapathi recipe Easy , healthy palak chapathi / Spinach chapathi recipe with step by step photos - Easy, instant dinner recipes
Cuisine: Indian
Category: Dinner Recipes
Serves: Serves 14 nos
Prep time: 30 Minutes
Cook time: 5 Minutes
Total time: 35 Minutes


INGREDIENTS

1 cup - 250ml
  • Wheat flour / atta - 2 cups
  • Palak leaves - 2 cups
  • Ginger - 1 inch piece
  • Green chilli - 1 no
  • Curd - 1 tbsp
  • Cooking oil - 1 tbsp
  • Ajwain/ Carom seeds OR cumin seeds - 1 tsp
  • Garam masala powder - 1 tsp
  • Salt & water - as needed

METHOD

  1. Wash and clean the palak leaves. Grind the leaves, green chilli and ginger to a smooth paste adding required water. Set aside.
    Palak chapati/ spinach chapathi
  2. In a wide plate or bowl, take the whole wheat flour, ajwain, ground palak, curd, cooking oil, salt, garam masala powder and mix well.
    palak chapati recipe
  3. Add little water only if needed. Make a smooth dough.Knead for 5 minutes. Grease with oil. Cover & rest for 30 minutes.
    palak chapati recipe
  4. After 30 minutes, make ball sized dough and dust in wheat flour.Roll it thin or thick as you like. I rolled it medium thick.
    palak chapati recipe
    palak chapati recipe
  5. Heat a dosa pan. Put the chapati and cook in low to medium flame. When bubbles start to appear, flip the chapati and cook the other side. Apply oil on both the sides by flipping the chapathi.
    palak chapati recipe
  6. Remove and serve hot with onion raita or boondi raita.
    Enjoy !
Note

  • Adjust the quantity of masala powder as per your taste.
  • For variations, you can add finely chopped palak leaves, grated ginger & green chilli instead of grinding them.
  • You can use cumin seeds instead of ajwain.


Easy, healthy palak chapathi is ready to relish with boondi raita & pickle.
Palak chapathi recipe
Continue Reading...


June 24, 2017

Rava Pongal Recipe – Sooji Pongal– How To Make Rava Pongal

Rava Pongal is one of the easy to make South Indian breakfast recipes. It is very popular in Tamil nadu. Rava khara pongal recipe ( sooji pongal) is prepared with  roasted semolina ( Sooji in Hindi) and  pressure cooked yellow moong dal as major ingredients. Its cooking method is very similar to our Ven pongal recipe/Ghee pongal but semolina is used instead of rava.
Rava pongal recipe
Even though rava pongal is not widely available in Tamil nadu hotels, this must be a favorite breakfast recipe to many of us. In my home, Sendhil loves rava recipes a lot more than me & Raksha. So I try to make rava upma, rava dosa or this rava pongal at least once in a week. I started making this recipe after watching a cookery show by our beloved Chef Damu. After making it several times, I started preparing in my own comfortable way. I have shared the same in this post. Quantity of water, little oil and more ghee is the key for soft pongal. If you have cooked moong dal in hand, rava pongal can be prepared quickly and easily. Bachelors and working women can try this for breakfast. Ok, lets see how to make sooji pongal/ Tamil nadu style rava pongal with step by step photos and a video ( Video is under editing). I will try to share it soon.
How to make rava pongal

Rava Pongal Recipe - Sooji Pongal


Rava Pongal Recipe - Sooji Pongal How to make rava pongal recipe - Easy, yummy South Indian breakfast recipe
Cuisine: Indian
Category: Breakfast
Serves: Serves 2
Prep time: 10 Minutes
Cook time: 20 Minutes
Total time: 30 Minutes


INGREDIENTS

1 cup - 250ml
  • Semolina / Sooji / Rava - 3/4 cup ( Upma rava)
  • Yellow moong dal - 1/4 cup (roast in 2 tsp ghee)
  • Water - 1.5 cups ( for dal) + 2.5 cups ( for rava)
  • Salt - As needed
To temper
  • Ghee + cooking oil - 3 tbsp + 1 tbsp
  • Pepper corns - 1 tsp
  • Cumin seeds - 1 tsp
  • Cashew nuts - 5 nos ( break into two)
  • Ginger - 1 inch piece ( chopped finely)
  • Curry leaves - Few
  • Asafetida/ Hing - A pinch

METHOD

  1. In a pressure cooker base, heat 2 tsp of ghee and roast the moong dal till nice aroma comes out. Add 1.5 cups of water and pressure cook in very low flame for 2 whistles. Open the cooker once its done and mash the dal.
    How to make rava pongal
  2. Heat a kadai and dry roast the rava in medium flame for 5 minutes. Take care, Rava should not burn. Transfer it to a plate.
    How to make rava pongal
  3. In the same kadai, heat 2 tbsp ghee + 1 tbsp oil and add pepper corns.When the pepper corns starts to splutter, add finely chopped ginger, cashews and curry leaves. When the cashews start to turn golden, add cumin seeds and hing.
    How to make rava pongal
  4. Mix well and add water 2.5 cups of  water immediately ( I used 1:3 ratio of rava & water). Add the required salt, cooked moong dal in the water.

  5. When the water starts to roll boil, simmer the flame completely or switch off the flame if you are a beginner. Add the roasted rava slowly in one hand while mixing the water in other hand. This is most important to avoid lump formation.
    How to make rava pongal
  6. After the rava is mixed well with water, it becomes thick. Cover & cook for 5 minutes in low flame. Open the lid and mix it once. Again cover cook for 2 minutes till rava becomes soft and well cooked.
     How to make rava pongal
  7. Add 1tbsp of ghee at the end, mix well and switch off the stove. Initially, when the pongal is hot, it looks mushy. But it will become non-sticky and stay soft when it becomes warm. Serve with your favorite side dish like coconut chutney or gosthu.
How to make rava pongal
Enjoy !


Note
  • Do not reduce the quantity of ghee mentioned in the recipe. U can always add more if you want. Oil helps to keep the pongal non-sticky.
  • You can add more water for cooking rava. 1:4 ratio of rava & water is also fine.
  • Use upma rava/coarse sooji not chiroti/fine rava.

Enjoy this easy, yummy South Indian breakfast Rava pongal at home !
Rava pongal - How to make rava pongal
Continue Reading...


June 15, 2017

Bread Pizza Recipe On Tawa,Oven, Microwave With Video

Bread pizza recipe on tawa, oven, microwave(with video)
Vegetable Bread Pizza is an easy and quick breakfast and snack recipes for kids.It tastes good with or without cheese.Actually Bread pizza can be made in 3 ways.It can be made without oven ie. in dosa tawa ( Stove top) or it can be baked in convection oven or microwave if you have at home. All are easy to make and tastes good in its own way.Its a great idea to use the leftover bread slices. I feel tawa and microwave options are easier as it takes less time to cook than baking in convection oven. But we should do it carefully as the chances of burning is more.This morning I prepared bread pizza recipe on stove top, oven and microwave just to make this post. I have shared all of the 3 methods below with a short video. Choose & try whichever is convenient to youHappy
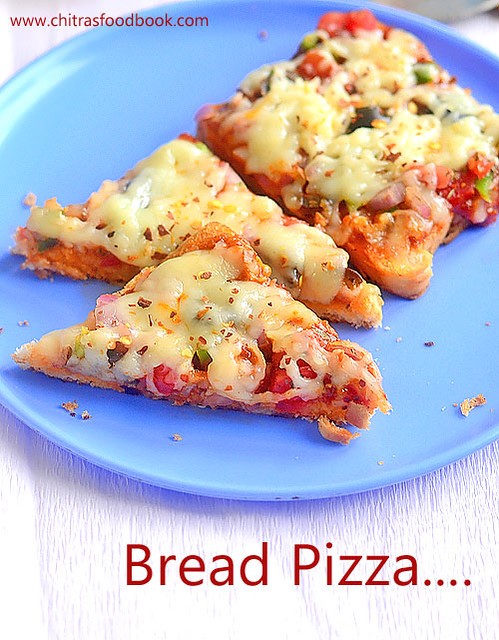
. I have used store bought pizza sauce and pizza seasoning/ spice mix. You can make it  just by using tomato ketchup & pepper powder. To make a pucca Indian version, sprinkle some garam masala powder or tandoori masala powder, marinated paneer cubes if you have in hand. You can top with lots of cheese for kids & without cheese if making for you & your husband ( If you are calorie conscious)Winking.Adding grated mozzarella cheese is just for attracting kids because taste of this pizza comes from the sauce, mixed vegetables and spice mix.Just play around with your favorite veg and non-veg toppings and enjoy it. Now lets see how to make this easy and simple recipe for vegetable bread pizza without oven( on tawa), microwave and convection methods with step by step photos and video.

Bread pizza on tawa

How to make bread pizza on tawa, oven and microwave


How to make bread pizza on tawa, oven and microwave Easy, yummy, kids friendly bread pizza recipe on tawa/stove top, convection oven and microwave methods
Cuisine: Indian
Category: Kids Recipes Indian
Serves: 5
Prep time: 10 Minutes
Cook time: 10 Minutes
Total time: 20 Minutes


Ingredients

1 cup - 250ml
  • Bread slices - 5 nos
  • Grated Cheese - 1/2 cup to 1 cup ( I used Amul Mozzarella cheese)
  • Capsicum - 1 no ( finely chopped)
  • Big onion - 1 no ( finely chopped)
  • Ripe tomato - 1 no ( finely chopped)
  • Black Olives - 5 nos ( sliced)
  • Boiled Sweet corn - 1/4 cup ( optional)
  • Pizza sauce or paste sauce or schezwan chutney - as needed ( I used pizza sauce around 3-4 tbsp)
  • Pepper powder - 1/2 tsp
  • Salt - a pinch
  • Chilli flakes - 1 tsp ( optional)
  • Oregano mix or pizza seasoning mix - 1 tsp

  • Butter - to grease the tawa & bread

Method

  1. To make bread pizza, wash and chop all the vegetables finely. Grate the cheese and keep aside.Take a bread slice and apply butter on both the sides.Keep in a plate.
    Bread pizza recipe without oven
  2. In a wide bowl, mix all the finely chopped vegetables, pepper powder, salt and pizza seasoning mix.Keep it ready.
    Take the bread slice and apply the pizza sauce on one side.Spread the mixed vegetables. Top with grated cheese. You can either cook them on tawa/pan, microwave or bake in convection oven.
    Bread pizza recipe without oven
  3. Bread pizza in tawa : Heat a dosa tawa and apply some butter. Keep the loaded bread slice.Cover cook in very low flame for 3-4 minutes or until the cheese melts.Remove in a plate and serve hot. Cover cook is very important. If you don’t cover cook, cheese won’t melt and bottom of bread slice may burn.
    Bread pizza on tawa / Bread pizza without oven
  4. Bread pizza in microwave : Place the bread slice in microwave and cook in high power( mine is 800w) for 1 minute or until cheese melts.If the power is less, it may take 1.5 to 2 minutes. If power is more, it can be done under 1 minute.So keep an eye.
    Bread pizza in microwave
    Bread pizza without oven
  5. Bread pizza in convection oven : Preheat convection oven in 180c. Keep the bread pizza in a baking tray. Bake it for 5 minutes at 180c. Cheese melts and the sides of bread slice turns slightly crispy. Remove and enjoy !
    Bread pizza baked in oven


Note

  • The quantity of chilli flakes, pizza mix and pepper powder depends on our taste.
  • You can add any number of toppings like paneer, mushroom, jalapeno, sweet corn etc..
  • Do not cook the pizza on open tawa, it takes long time for the cheese to melt.
  • Microwave bread pizza takes very less time to cook.If you keep for more time, pizza would burn.
Enjoy this easy, yummy bread pizza at home ! Kids would love it for sure !!
Bread pizza in oven


Continue Reading...