Search Chitra's Food Book

Showing posts with label Tirunelveli Recipes. Show all posts

December 26, 2014

Eggless Vettu Cake Recipe | Tea Shop Sweet Bonda | Vedi Cake | Muttaikose recipe

sweet bonda

Eggless Vettu cake recipe / Tea kadai sweet bonda / Vedi cake / Muttaikose - People in and around Tamil nadu, Kerala knows very well about this tea time snack and call by different names. For people who are new to this recipe, let me tell you what it is.This vettu cake aka vedi cake is nothing but sweet bonda/deep fried dumplings made using maida, sugar and eggs. Its one of the famous tea shop snacks recipe in Tamil nadu as well as Kerala just like samosa and besan bonda. 

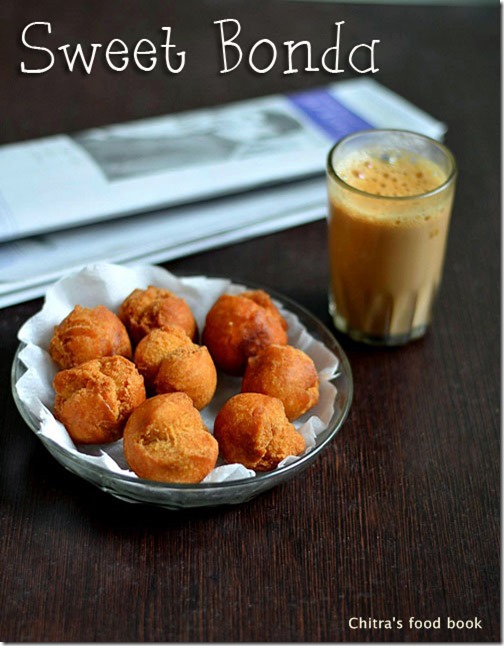
When I shared tea shop style besan bonda recipe, our fellow blogger friends were asking me about this vedi cake recipe in the comments section. At that time, I wasn’t aware of this recipe. I vaguely remembered seeing this sweet bonda in Tirunelveli/thoothukudi tea shops which is called as "Muttaikose"( Info by my sister Radha ;)). Then I started hunting for this recipe to try on my own. But most of them were with eggs. Of course the authentic version uses eggs but being a vegetarian, I was looking for eggless version and finally I found it from Kurinji's blog

When I saw the picture in her blog, I was so excited as it resembled the one we get in Tamil nadu tea shops. Not just the picture, her recipe is also perfect. I have tried it twice so far and it came out very well. She also shared some tips with me when I mailed her asking some queries :) So I made some slight changes and shared the recipe here. Do try it this weekend and enjoy your tea time with your family. 

Also don’t forget to try out my instant besan bonda-tea shop style for a spicy accompaniment. But remember you should serve everything hot to enjoy its best taste.

Vettu cake

Vettu cake/Sweet bonda recipe


Vettu cake/Sweet bonda recipe Vettu cake/Sweet bonda recipe - Tea shop style !
Cuisine: Indian
Category: Sweet
Serves:
Prep time: 45 Minutes
Cook time: 5 Minutes
Total time: 50 Minutes


INGREDIENTS
1 cup - 200ml
  • Maida / all purpose flour - 1 cup
  • Cooking soda - 1/4 tsp
  • Powdered sugar - 1/2 cup + 2 tbsp ( refer notes)
  • Water - as needed
  • Butter- 1/2 tbsp (softened,optional)
  • Cardamom - 2 nos
  • Salt - a pinch
  • Cooking oil - as needed
HOW TO MAKE VETTU CAKE - METHOD

  • Powder 1/2 cup of sugar and cardamom together to a fine powder. Remove and measure 1/2 cup + 2 tbsp from it. Take the powdered sugar in a bowl and add little water to cover it ( say 3-4 tbsp). Let the sugar dissolve well. Then strain the syrup and set aside.
vettu-cake-1

  • In another wide bowl, sieve maida, cooking soda and salt. To this add the softened butter and mix well. Add the sugar water and mix well. Check for sweetness. If you want more, add 1-2 tbsp of powdered sugar extra. Add few tbsp of water only if necessary and make a non-sticky dough. Knead the dough for 2-3 minutes.
  • Then cover the dough and set aside for 30-45 minutes. Do not make a sticky dough Or add more flour after kneading the dough. So making a non-sticky ans soft dough is very important.
vettu-cake-2
  • After the resting time, take the dough and pinch into golf balls size. Heat oil in a kadai to deep fry.
vettu-cake-3

  • Put a pinch of batter in oil and as soon as it rises, simmer the flame completely and drop 3-4 balls in oil based on its size. Let it cook in slow flame. Toss it once or twice in the middle. Cracks will form automatically. Hence its called “Vedi cake/Vettu cake”. 
  • Cook till the balls turn golden color. Remove in a tissue. It may be soft while you remove but it becomes hard and crispy as it cools down. Store in an air tight box after it cools down and enjoy with your tea/coffee !
vettu-cake-4

vettu-cake-5

NOTE: Do not deep fry for long time because bonda may turn hard and chewy. Also adjust the quantity of sugar based on taste. This recipe will give you mild sweetness. So add 2-3 tbsp more if you want. Here I used butter. In shops they add dalda/vanaspati.

Deep fry only in low to medium flame for uniform cooking.


Enjoy this crispy tea shop sweet bonda with your tea/coffee ! It tastes yum!

sweet bonda recipe

Continue Reading...


October 3, 2014

TIRUNELVELI THUKKADA RECIPE - WHEAT FLOUR SNACKS - DIWALI SNACKS RECIPES

spicy-thukkada-recipe
Thukkada is a Tirunelveli special tea time snack made with wheat flour. I came to Salem two days back to celebrate Saraswathi pooja & having a great time here. Yesterday I went to my mom's place for half a day. I had my mom's lunch happily after a long time. I told her to prepare this easy, Tirunelveli famous snack recipe,Thukkada. 

Thukkada is nothing but spicy wheat flour chips. Yes, its made of wheat flour spiced with chilli powder. I saw some versions using garlic and Red chillies paste. But my mom makes it very simple just by adding red chilli powder to wheat flour. She usually make this spicy snack at the time of Diwali along with Thenkuzhal. When I was thinking about easy savories recipes for Diwali, I reminded about this crispy, guilt free snack and thought of sharing here.  You can make it in square or diamond shapes as you wish. 

My MIL also makes a similar snack recipe using maida called as spicy diamond cuts. You can even make sweet thukkada adding powdered sugat. I will share that version soon. Do try this easy, crispy, yummy thukkada  this weekend & to crack this Diwali :) Its very easy to make and comes out crunchy too ! Don't forget to check "Notes" section.

Check out my sweet maida biscuit too.

THUKKADA

Easy, Nellai famous thukkada recipe


Spicy thukkada recipe Easy,spicy Nellai famous thukkada recipe for Diwali !
Cuisine: Indian
Category: Savory
Serves: 50 nos
Prep time: 5 Minutes
Cook time: 15 Minutes
Total time: 20 Minutes


INGREDIENTS
1 cup = 250ml

  • Wheat flour/Atta – 1 cup
  • Red chilli powder – 1 tsp ( heaped ) Levelled for low spice
  • Water and salt - As needed
  • Hot oil or melted butter – 1 tbsp 
  • Cooking oil - to deep fry
  • Hing - a big pinch

METHOD

  • In a wide bowl, take the wheat flour, salt, red chilli powder and oil. Mix well, Then add water little by little and make a tight dough.( Add water carefully. If u make the dough sticky n soft, u won't get crispy thukkada & also do not add more flour if the dough becomes sticky, thukkada will become very hard).
thukkada-1

    Let the dough sit for 10 minutes.Then make uniform balls,dust with wheat flour and roll it like a thin chapathi. Use a knife or pizza cutter and cut into diamonds or squares. Place all the pieces in a news paper. No problem if the pieces stick to each other. Just sprinkle gradually. It will separate while frying.
    thukkada-2
     
    Heat oil and deep fry them in batches till bubbles cease completely. U will get golden brown thukkada. Remove in a tissue and let it cool. Deep fry all the batches uniformly .If you don’t fry one batch properly, it will become soggy and it will spoil the entire snack.
    thukkada-3
    Store in a box n enjoy with tea or coffee!  It stays good for months if properly done.


Note

  • U can replace red chilli powder by garlic,chilli paste. To make this paste,grind 5 cloves of garlic along with 4-5 red chillies to a smooth paste.
  • The most important thing to make perfect thukkada lies in the dough. If the dough is too soft n sticky, thukkada will become either hard or soggy. So make the dough tight & perfect. Do not use more flour for dusting. Dust once or twice.

ENJOY THIS SPCIY THUKKADA WITH TEA/COFFEE ! ITS ADDICTIVE !
thukkada-recipe


Continue Reading...


June 17, 2014

TIRUNELVELI SODHI KUZHAMBU LUNCH MENU RECIPE

Tirunelveli sodhi kuzhambu

In Tirunelveli (Nellai), Sodhi kuzhambu, Inji pachadi/Ginger pachadi, Potato poriyal with chips would be the special lunch menu for newly married couples when they are invited for feast.So it is also called as “Mappillai sodhi” as it is considered to be most special. Sodhi saapadu is a must and should in all Tirunelveli marriages. 

Usually our marriage function takes place for three days. First day evening would be reception/Maapillai azhaippu, Second day would be the marriage and third day is for maruveedu. This sodhi kulambu should be served on third day maruveedu function on behalf of maapilai veedu. Most of the relatives stay back all the three days of marriage function just to enjoy this sothi kuzhambu. Even though my marriage was held in Salem, my dad arranged sodhi saapadu for our Nellai relatives on the last day of my marriage function. It is very very special for our nellai people. 

Ginger pachadi / Inji pachadi, potato curry and chips are the best side dish for sodhi kuzhambu. As sodhi is completely made out of coconut milk, ginger pachadi helps for easy digestion . So If you prepare sodhi, make sure you keep inji pachadi as a side dish which is helpful for digestion too. It tastes very similar to kerala style puli inji. I usually make sodhi whenever I have lots of coconut in hand. Last time when I went to salem, my MIL gave me 3-4 coconuts. I made coconut burfi and sodhi with it.

 After a long time, I prepared and enjoyed a nice Tirunelveli lunch menu at home. U can find so many variations for this particular sodhi recipe on net. The one I have shared here is my mom’s authentic version which she has been following for more than 25 years. Lets see how to prepare sodhi saapadu easily at home.

Do check out my Nellai style ulutham paruppu sadham, ellu thogayal, avial lunch menu if interested.

sodhi

Sodhi - lunch menu


Sodhi - lunch menu Tirunelveli lunch menu- sodhi,inji pachadi,chips,potato curry
Cuisine: Indian
Category: Lunch
Serves: Serves 4
Prep time: 20 Minutes
Cook time: 60 Minutes
Total time: 80 Minutes


RECIPE LINKS
METHOD

  • Soak tamarind in water for pachadi.Wash the potatoes for poriyal. Pressure cook potatoes along with moong dal for sodhi.It would be done in 15 minutes.
  • In another cooker,pressure cook rice adding required water.
  • In the mean time, you can chop onions for poriyal and onion, garlic cloves, drumstick, green chillies & potato cubes for sodhi. Chop ginger into roundels for pachadi.
  • Let the moong dal dal & potatoes pressure cook for one whistle in low flame. Switch off the stove and after the steam is released, open the cooker and remove the boiled potatoes with a tong. Let it cool. Peel the skin and cut into small cubes. Mash the dal with a ladle and set aside.
  • Now grate coconut or slice the coconut with a back of ladle as shown in the picture. It makes your job easier. Grind it with water and take three milk. Set aside
  • Next grind green chillies with salt and make a paste.
  • Cook all the veggies in third milk in a big bowl. It takes nearly 10 minutes.In the mean time, heat oil in a pan, temper & saute onions for potato poriyal. Add the cubed potatoes, chilli powder, turmeric pwd & salt. Get it done. Remove in a plate. Poriyal is ready now!
  • Wash the kadai and again heat with 1 tbsp of oil.Saute the onions, chillies, garlic cloves & ginger bits. By now vegetables will be cooked well in thrid coconut milk.
  • Now you can add the second milk, mashed dal, sauteed veggies & green chilli paste. Let the gravy boil well for 5-8 minutes.
  • In that 7 minutes, heat oil in a pan in another burner and saute ginger bits, dhania and red chilli for pachadi till you get nice aroma. Grind it to a smooth paste adding little water.
  • Mix the paste with tamarind extract and set aside. By now, sodhi will be thickened. So add the third coconut milk and boil for 2-3 minutes. Adjust the salt . Switch off & let it become warm. Keep aside.
  • Now heat oil in a pan and temper, saute onions for pachadi. Add the tamarind extract mixture, salt, jaggery & allow it to boil till it thickens a bit. Pachadi is ready !
  • Take raw banana or potato for chips. Wash it well & peel the skin. Keep a bowl full of water ready. Take the slicer & slice the veggie. Drop into the water bowl & let it soak till you deep fry. This is to avoid discoloration.
  • Now pat them in a towel & deep fry in batches. Sprinkle salt and chilli pwd & toss well. Chips is ready to munch !
  • By this time, sodhi would be warm. So squeeze the lemon & mix well. Check for taste.
Serve everything in a plate and enjoy this yummy Tirunelveli feast !!


Note

As I had prepared potato poriyal, I made raw banana chips. Usually potato chips is served with sodhi. So instead of potato poriyal, you can also make mixed vegetable poriyal. In that case, you can make potato chips.

sodhi-lunch menu

Enjoy this yummy Tirunelveli style sodhi, ginger pachadi, potato curry and chips. Tastes divine !!

sodhi for lunch
Very good recipes Tags: , ,
Continue Reading...


April 22, 2014

KOOTANCHORU RECIPE / கூட்டாஞ்சோறு-TRAVEL LUNCH IDEAS


Kootanchoru rice
Tirunelveli famous Kootanchoru @ kadamba sadam is one of the signature recipes of my mom.Mostly Nellai people make this rice for picnic/trips and for guests.This is one of the best foods for travel.It stays good for one to two days without refrigeration.When(me & my sis) we were young,we used to go to thatha,aachi’s house in Nellai for every summer vacation.My periamma and chithi also comes with their family.We go for a one day trip to tiruchendur & kutralam every year.Amma,periamma and chithi together prepare this rice in early morning in a big eeya paanai traditionally for 10-12 people and pack in a big vaali(thooku chatti) for travel.We have this rice for lunch in a  piece of vazhai ilai(banana leaf) after a nice bath in five falls,kutralam. With the awesome smell of banana leaf,it tastes great & we all have minimum of two servingsSmile with tongue out.Vathal/vadagam or  appalam  is the best side dish for kootanchoru.This rice tastes the best after it cools down.
Kootanchoru
Last week my mom was with me for two days.I told her to prepare this rice for our lunch and of course for blogging because some of my Nellai readers asked me to share kootanchoru recipe after trying my uluntham paruppu sadam.I asked my mom to prepare using pressure cooker but mom said making this rice in eeya paanai or indalium vessel or kadai gives the right consistency to the rice,vegetables and tastes great.As she said,it was very flavourful and tasty.But she also told the method on how to make in pressure cooker if needed.I have shared it below .Kootanchoru is very easy to prepare if u have chopped onions & vegetables ready in hand.It takes just 20 minutes to prepare this rice.I personally feel,it is better to do chopping & grinding work the previous night if u plan to make this rice for next day travel.
Sendhil had it for the first time and loved it.We had this rice for lunch and the leftover for dinner too.My mom & dad packed this rice in a foil box & took it for their train journey.Friends,if u plan for a picnic,do prepare this rice.I am sure u can have a delectable lunch.Thumbs up
kadamba-sadam-recipe

Kootanchoru recipe


Kootanchoru recipe Tirunelveli style kootanchoru recipe – Ideal & tasty food for travel !
Cuisine: Indian
Category: Lunch
Serves: Serves 6-7
Prep time: 20 Minutes
Cook time: 30 Minutes
Total time: 50 Minutes


INGREDIENTS
To chop
  • Carrot - 2 nos
  • Beans -  10 nos
  • Potato - 1 no (big)
  • Broad beans - 10 nos
  • Raw banana - 1/2 no
  • Raw mango - 1/2 no
  • Brinjal - 3 nos
  • Drumstick - 1 no
  • Drumstick leaves & arai keerai – a handful
To cook
  • Rice - 1.5cups
  • Toor dal - 1/2 cup
  • Water - 12 cups
  • Tamarind – Small lemon size( use big lemon size if u don’t add raw mangoes)
To grind
Paste -1
  • Red chillies – 12-14 nos
Paste-2
  • Small onions – 30-40 nos (3/4 cup)
  • Garlic cloves - 2 bulbs(small) or 1 bulb if big variety
  • Jeera- 1 tsp
To saute
  • Cooking oil -  1 tbsp
  • Small onions - 15 nos
  • Green chillies – 2 to 4 nos ( adjust)
Grated coconut – 1/2 cup
To temper
  • Gingely oil - 2 tbsp
  • Mustard seeds - 1 tsp
  • Urad dal – 1 tsp
  • Vadagam – 2-3 tbsp (OR)Small onions-20 nos(finely chopped)
  • Curry leaves – half handful
METHOD

  • Grind red chillies adding required water to make a smooth paste.This is paste-1.Set aside.
Kootanchoru step2
  • Wash and peel the small onions,garlic cloves and grind with jeera& water to make paste-2.
Kootanchoru step1
  • Soak tamarind in enough water.Take the extract using 1.5 cups of water and mix the paste-1 & paste-2,turmeric powder and salt.
Kootanchoru step3
  • Wash and chop all the vegetables of uniform size and keep the raw banana & potato cubes immersed in water till use.Chop drumstick,chop raw mango into big cubes as shown in the picture.
Kootanchoru step4
  • In a big vessel(preferably, eeya paanai or indalium vessel) take the mentioned quantity of water.When the water starts to boil,add toor dal,turmeric powder.Allow it to cook till the dal blossoms.It should be mashable.
Kootanchoru step5
  • After the dal is 3/4th cooked,add all the vegetables & keerai(greens) except raw mango pieces.It takes 10 minutes for all the vegetables to cook.Keep stirring whenever necessary.
  • After 10 minutes,wash and add the rice.Again boil for 10-15 minutes and check whether rice is done.Rice absorbs all the water and gets cooked.Add the required salt.
Kootanchoru step6
  • Check if the rice is cooked properly.Use back of the ladle to mix the rice to avoid it turning too mushy.In the mean time,heat 1tbsp oil in a kadai and saute onions,green chillies & add to rice.
Kootanchoru step7
  • Now add mango pieces.It takes 5 minutes & mango pieces will be half cooked.
Kootanchoru step8
  • Now add the tamarind extract mixture and allow it to boil for 5 minutes in medium flame.Keep stirring every now & then to avoid burnt bottom.
  • Remove the mango pieces alone after it is cooked yet firm in shape else mango will become mushy & mixed with the rice completely leaving the skin.It makes the rice tangy.
Kootanchoru step9
  • Use back of the ladle or fork like ladle to mix the rice.Lastly add grated coconut & mix well. 
Kootanchoru step10
  • Finally, temper all the ingredients given under”to temper” and add to the rice.Rice looks mushy initially but its consistency will get adjusted after it cools down.
Kootanchoru step11
Just before serving,add the cooked raw mango pieces & mix well.
  • Give a standing time of minimum one-two hours because it takes this time for all the taste to blend well with the rice.
Serve with koozh vathal/Vadam..!! Tastes great !!
**Do not use ur hands at any cost while serving.Rice will be spoiled very soon.So always use a ladle.


Note


PRESSURE COOKER METHOD
  • Take toor dal with 2 cups of water in pressure cooker and cook in high flame for 2-3 whistles.
  • Remove the lid and add the rice and chopped vegetables except raw mango.Cook it adding 6 cups of water & salt.
  • After rice is cooked,open the lid and add the sauteed onions,chillies,tamarind extract mixture & raw mango pieces & salt if needed.
  • Allow the raw mango to cook well. Rice absorbs all the tamarind extract mixture.Use fork like ladle to mix the rice.Simmer the flame & boil for few minutes.
  • Lastly add grated coconut & tempered ingredients.Mix well,check for taste.Give a standing time of 1-2 hours & serve with vathal/vadam.
TIPS TIPS
  • If the rice is too spicy,add little tamarind extract & grated coconut.It balances the taste.
  • If the rice is too tangy,add some chilli powder mixed in water & boil for sometime with rice.Add little salt if needed.
  • Adding a handful of drumstick leaves & arai keerai is suggested for this rice.But i din’t add both as i din’t have the stock.
  • Raw mango is purely optional but it gives a nice flavour to this rice.If u don’t add raw mango pieces,use big lemon size tamarind.
  • Adjust the quantity of red chillies based on ur taste buds.But use tamarind in correct quantity if u reduce chillies.

Pack this rice in a foil box for ur travel and enjoy with vadagam/Vathal & appalam.It tastes great !!!
kootanchoru-recipe
Very good recipes Tags: , , ,
Continue Reading...


March 21, 2014

ELLU PODI|SESAME SEEDS POWDER RECIPE FOR IDLI,DOSA


This is my Tirunelveli Aachi’s recipe which I got from my mom.Its a great side dish for idli,dosa.It has a nice flavour of black sesame seeds and garlic.I guess this recipe may be new to most of u.Its very easy to prepare compared to Idli milagai podi.Just 3 ingredients are needed.Usually my Mil makes Ellu podi for rice and its completely a different recipe.Soon i’ll post that one.But this podi goes well only for idli,dosa and not with rice.If u are a sesame seeds lover,u must try this recipe.U’ll love its flavour.Over to the recipe with a picture Smile.

Ellu podi for idli,dosa


Ellu podi for idli,dosa Ellu podi/Sesame seeds powder recipe for idli,dosa
Cuisine: Indian
Category: Sidedishes
Serves: Serves 2
Prep time: 5 Minutes
Cook time: 5 Minutes
Total time: 10 Minutes


INGREDIENTS

  • Black sesame seeds - 3 tbsp
  • Cooking oil – 1/2 tsp
  • Red chillies - 5 nos (use 7-8 if u want more spicy)
  • Garlic cloves - 5 nos
  • Salt - as redq
METHOD

  • Dry roast sesame seeds in a kadai in medium flame till it splutters with a nice aroma..Do not burn it.Please be careful else it will spoil the entire recipe.
  • Now add oil in the kadai and roast the pinched red chillies.
ellu podi recipe step 1
  • After it cools down,grind the chillies along with salt to a powder.Then add roasted sesame seeds and chopped garlic cloves.Grind to a powder.
ellu podi recipe step 2
Serve with hot idlies adding sesame oil ! Tastes yum !!


Note


  • If this podi tastes bitter,u need to add more chillies.Do not burn the sesame seeds while u roast.
  • Chop the garlic cloves and then grind with sesame seeds else it won’t grind properly.Do not add whole garlic cloves .
  • Tastes good only for idli,dosa..
Serve with hot idli adding gingely oil/Sesame oil.It tastes yum !
Continue Reading...


March 9, 2014

Sambar Powder - Homemade Sambar Powder Recipe / Tamil nadu Style Sambar Podi ( 2 versions)

Sambar-powder-recipe

Tamil nadu style sambar powder recipe (sambar podi) in 2 versions with bulk and small quantity. In this post, I have discussed “How to prepare Sambar powder at home”. Every South Indian family has their own version of  homemade sambar powder. It stays fresh and flavourful equal to store bought ones. Here, I have shared two versions of Tamilnadu style Kuzhambu milagai thool recipe. 

One from my MIL and one from my Mom(Tirunelveli style). My MIL's Sambar masala powder is an all rounder podi for me. I add in Poriyal, KootuSambar , Vathakuzhambu and even paruppu rasam. I don’t need red chilli powder (Milagai thool) at all when I have my MIL's sambar podi in hand. At the same time, my mom’s Nellai sambar powder can be freshly prepared in small quantity and use whenever we need. I use the same for idli sambar too. So both the versions has its own taste and flavour.

 I have given the sambar powder ingredients in bulk as well as smaller quantity. Bulk quantity comes for 3 months and small quantity is for 2 to 3 days. If you like its taste, you can grind in more quantity and store it for a week.  I hope small quantity would help you all to grind in mixie, if  you don’t have mill option near your house. Ok, Lets see how to make sambar powder at home in 2 versions.

Sambar-powder-recipe-homemade

sambar powder ingredients

Homemade Sambar powder (MIL's Version)


Homemade Sambar powder (MIL's Version) My MIL's Tamilnadu style homemade sambar powder recipe - Multipurpose powder recipe to use in sambar, vathakuzhambu, kootu, poriyal and even rasam.
Cuisine: Indian
Category: Homemades
Serves: 2 cups
Prep time: 10 Minutes
Cook time: 20 Minutes
Total time: 30 Minutes


INGREDIENTS
1 cup - 250ml
For bulk quantity ( for 3 months use)
  • Dhania / Coriander seeds – 1/4 kg ( 250gms/1.25cups )
  • Red chillies – 1/4 kg ( 250gms)
  • Methi seeds - 50 gms(1/4 cup)
  • Toor dal – 50 gms(1/4 cup)
  • Chana dal – 50 gms(1/4 cup)
  • Turmeric powder – 50 gms (1/4 cup)
  • Pepper corns – 50 gms (1/4 cup)
  • Cumin seeds / jeera – 2 tbsp
For small quantity(for 3-4 days)
  1. Red chillies - 12 nos
  2. Dhania - 2 tbsp
  3. Methi seeds - 1 tsp
  4. Toor dal - 1 tsp
  5. Chana dal - 1 tsp
  6. Pepper corns - 1 tsp
  7. Jeera - 1/2 tsp
  8. Turmeric powder - 2 tsp
METHOD

For bulk quantity
  • Sun dry all the ingredients for 4-5 hours till it becomes crispy. Grind in a mill.
  • Spread in a news paper,cool down completely, mix turmeric powder and store in a box. Use a clean plastic spoon every time.Stays good for 6 months.( If you want this powder to be more flavourful, dry roast methi seeds alone for 2-3 minutes and grind with other sundried ingredients. Do not dry roast for long time till it turns brown. It may lend a burnt taste.)
For small quantity
  • Heat a kadai in high flame for few minutes. Switch off the flame and add the pinched red chillies. Roast for a minute and immediately add all the other ingredients, stir them for few minutes till it gets heated. Leave in the kadai for sometime. All the ingredients will be cooled &crispy. Now grind them in mixie, sieve and store.
 
SAMBAR-POWDER

HOMEMADE SAMBAR POWDER ( My mom’s version)

Homemade Sambar Powder Recipe (mom's version)


Homemade Sambar Powder Recipe (mom's version) Homemade sambar powder -Mom's Tirunelveli style recipe
Cuisine: Indian
Category: Homemades
Serves: 3 cups
Prep time: 30 Minutes
Cook time: 20 Minutes
Total time: 50 Minutes


INGREDIENTS
1 cup - 250ml
For bulk quantity
  • Dhania - 1/2 kg
  • Red chillies - 1/2 kg
  • Chana dal/kadalai paruppu - 1/4 kg
  • Methi seeds - 100 gms
For small quantity ( for 2 days use)
  • Oil – 2 drops
  • Dry coriander seeds – 1.5 tsp
  • Chana dal – 2 tsp
  • Fenugreek seeds/Methi seeds – 1/2 tsp
  • Red chilli – 4-6 nos
METHOD

For bulk quantity
  • Sun dry or dry roast all the ingredients one by one in a hot kadai, cool and grind in a mill. Actually roasting the ingredients is optional. We sun dry them if the ingredients are moist. Spread in a news paper till it cools down and store in a box. Use a clean spoon every time. Keep this sambar powder in freezer in an air tight box.Take small quantity and store in another box for daily use.
For small quantity
  • Roast all the ingredients in 2 drops of oil, cool and grind to a powder. U can use for making sambar twice or thrice.
U can  also use this powder for making idli sambar ! Check out my mom's Tirunelveli style sambar for rice.


Store in an air tight bottle and use a clean spoon always !
SAMBAR POWDER


Continue Reading...