Search Chitra's Food Book

May 27, 2013

TAMILNADU LUNCH MENU 2 - SOUTH INDIAN LUNCH MENU IDEAS

Tamilnadu lunch menu

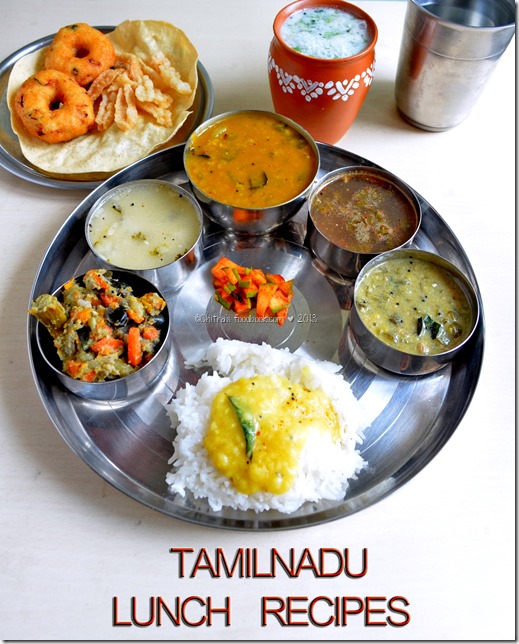
In my attempt in posting other state recipes, I have successfully tried & posted Andhra , kerala and punjabi , Kongu lunch recipes. It will be unfair if I don’t post my own state lunch recipes.. So here is a platter of Tamilnadu lunch recipes I made for my parents and bro. Everything came out really well & tasty. Like you all , we tamilians prepare varieties of recipes either for occasions or for guests. Serving in banana leaf is a must for us which is considered as a way of showing our respect and gratitude to our guests. But here I dint present them in banana leaf as I couldn’t get it . 

Very soon i’ll post another set of Tamilnadu lunch recipes served in banana leaf with authentic serving order.In the above plate u can see ( Left to right) Rice , Dal , Avial , Morkuzhambu , Mullangi Sambar , Rasam , Vendakkai mangai kathrikai pachadi , Instant mango pickle along with papad , Urad dal vada , Rice vadam, Spiced buttermilk ( Neer mor) & water. I have posted all the above recipes except dal and Pachadi. So I have shared them in this post. Sorry I couldn’t post step by step pictures as I was hurry in making recipes on time.

Do check out my Tamilnadu lunch recipes post which I made some years ago if  you are interested !

lunch - plates


DAL FOR RICE / PARUPPU

INGREDIENTS
1 cup - 200ml
  • Toor dal OR moong dal – 1/2 cup
  • Turmeric powder – 1/4 tsp
  • Water & salt – As needed
  • Cooking oil – Few drops
To temper
  • Mustard seeds – 1/2 tsp
  • Urad dal – 1 tsp
  • Hing – 1/4 tsp
  • Curry leaves - few
Ghee – to add while serving

METHOD
  • Pressure cook dal adding turmeric powder & required water and a drop of oil in low flame for 1-2 whistles.
  • Now open the cooker & mash the dal nicely with a ladle.Temper all the ingredients given under”to temper” and add to the dal. Mix well , add salt and serve with hot rice adding a tsp of ghee.. It tastes great with a papad , pachadi and potato poriyal.

VENDAKKAI MANGAI KATHRIKAI PACHADI / OKRA RAW MANGO BRINJAL PACHADI
This is my mom’s recipe.This pachadi will surely make its appearance in our home during mango season.It’s a sweet pachadi variety . So we add less salt..Our guests love this pachadi a lot..It tastes great with paruppu sadam /Dal rice. 
INGREDIENTS
1 cup - 200ml
  • Cooked toor dal – 1/4 cup
  • Ladies finger / okra - 10 nos
  • Brinjal – 5 nos (small)
  • Raw mango – 1 no (Small, cut into cubes)
  • Grated Jaggery - 1/8 – 1/4 cup
  • Hing – 1/4 tsp
  • Salt & water  - as needed
To grind
  • Grated coconut - 1/4 cup
  • Green chilli -  2-3 nos
  • Small onion - 4 nos
  • Jeera / cumin seeds - 1/4 tsp
To temper
  • Mustard seeds - 1/4 tsp
  • Urad dal - 1/2 tsp
  • Curry leaves - few

METHOD
  • Pressure cook toor dal, mash & set aside.
  • Cut okra into tiny pieces , peel the mango skin and cut into small slices . Cut brinjal into very small pieces and keep immersed in water to avoid discoloration.
  • Grind all the ingredients given under”to grind” and make a smooth paste.
  • In a kadai , heat oil and saute the okra pieces for few minutes.
  • Pressure cook mango , brinjal and okra pieces together adding required water & salt.
  • After the steam is released add the cooked & mashed toor dal , ground coconut paste and hing. Mix well and allow it to boil for few minutes. Finally add the grated jaggery. Give a boil and check for salt & sweetness. Add more jaggery if u want more sweet.
  • Finally temper all the ingredients given under “to temper” and add to the pachadi. Tastes best with dal rice and rasam rice.
Continue Reading...


May 24, 2013

MULLANGI SAMBAR | RADISH SAMBAR - SAMBAR RECIPE FOR LUNCH

This is my MIL's basic sambar recipe for rice. I make this sambar adding one of these vegetables like radish/ mullangi, drumstick,  ladies finger, brinjal , broad beans and cluster beans. I adjust the quantity of tamarind & chilli based on the vegetables you use. But the other ingredients are same. For radish , we should use little less tamarind than the usual quantity because radish has a tendency to absorb the tanginess of tamarind and it spoils the taste of sambar.
 
Usually I pressure cook radish with toor dal and make sambar. One of my aunties suggested me to saute radish in little oil because it helps to suppress the raw smell of radish and also adds a nice smell to sambar. So I started preparing that way. If you like the smell of radish  you don't have to saute it. Lets see how to prepare Mullangi sambar !

Mullangi sambar / Radish sambar recipe


Mullangi sambar / Radish sambar recipe

Mullangi sambar / Radish sambar recipe for rice


Cuisine: Tamil nadu
Category: Side dish
Serves: 4
Prep time: 10 Minutes
Cook time: 20 Minutes
Total time: 30 Minutes


INGREDIENTS
1 cup = 250ml
  • Tamarind – Big gooseberry size
  • Sambar powder – 1 tsp
  • Big onion or sambar onion – 1 no/ 10 nos
  • Tomato – 1 no (optional)
  • Green chilli – 3 nos
  • Red chilli – 2 nos
  • Hing / Asafetida – 2-3 generous pinches
  • Jaggery – a pinch
To pressure cook
  • Toor dal – 1/2 cup
  • Radish – 1 no (big - 250 gms)
  • Turmeric powder – 1/4 tsp
To temper
  • Cooking oil – 1 tbsp
  • Mustard seeds – 1 tsp
  • Methi seeds – 1/4 tsp
  • Curry leaves- few
  • Red chilli -1 no ( pinched into 2)
  • Coriander leaves – to garnish
  • Ghee – 2 tsp (for flavour)
HOW TO MAKE RADISH SAMBAR
  1. Wash and peel radish and cut into roundels. Saute in a tbsp of oil.
  2. Pressure cook toor dal adding radish. Mash dal and set aside.
  3. Heat oil in a kadai. Splutter mustard, methi seeds and red chilli.
  4. Saute onion, curry leaves and green chilli. Saute till transparent.
  5. Add tamarind extract, sambar powder, turmeric and salt.
  6. Boil for few minutes. Lastly add mashed dal along with radish.
  7. Adjust water and boil sambar for few minutes. Garnish with coriander leaves.
  8. Serve with plain rice adding ghee.
HOW TO MAKE MULLANGI SAMBAR - METHOD
  • Peel the skin of radish and cut into 1/2 inch round slices. Saute them in a tbsp of oil. Peel and roughly chop the onions, slit the green chilli , pinch the red chilli and set aside. Soak tamarind in water and take the extract.
  • Pressure cook the toor dal and sautéed radish adding turmeric powder and the required water. Cook for 1-2 whistle in low flame. Open the cooker and mash the dal well along with radish. Radish won’t dissolve.
Mullangi sambar
 
mullangi sambar
  • In a pan, heat oil and splutter mustard seeds & methi seeds. Methi seeds should not be burnt, take care..Then add the onions , curry leaves , green chilli , red chilli and saute well till onion turns transparent. If you are using tomato, chop and add it now. Saute till mushy.
  • Then add the tamarind extract , sambar powder , turmeric powder ,salt. Allow it to boil. When it starts to roll boil, add pinched raw curry leaves , 2-3 generous pinches of hing & jaggery. Let it boil for few minutes.
mullangi sambar
  • Now add the mashed dal with mullangi and some water if necessary. Check for salt and let it boil for 2-3 minutes. Finally add the coriander leaves, give a boil and switch off the flame. Transfer the sambar to a bowl and add 2 tsp of ghee. Cover it with a lid.
Mullangi sambar
 
Enjoy this yummy Radish sambar with rice adding few drops of ghee !
 
Continue Reading...


May 21, 2013

RAW ONION CHUTNEY RECIPE | CHUTNEY RECIPES


I love raw onion chutney / Pacha vengaya chutney. I have already posted my MIL’s and Mom’s onion chutney recipes . I got this recipe from Yummytummy.Thank u Aarthi for this yummy side dish :).Its a very simple & delicious chutney recipe that goes well with idli and dosa. As Sendhil is not fond of raw onion chutney , I usually make it only for me. I love onion chutney with uttapam a lot .. Its my favourite combo :)

INGREDIENTS

  • Big onion (or)  Small onion – 2 nos / 15 nos
  • Red chillies – 5 nos
  • Tamarind – A small berry size
  • Garlic – 5 cloves
  • Salt & water – as needed
To temper
  • Gingely oil – 1 tbsp
  • Mustard seeds – 1/2 tsp
  • Urad dal – 1/2 tsp
  • Curry leaves – few

METHOD

  • Grind onions , chillies , garlic , tamarind , salt & water to a smooth paste.
  • Temper all the ingredients given under “to temper” .. Serve with idli , dosa.

NOTE

  • Use small onions for best taste..Add more red chillies if u want more spicy..Adjust tamarind accordingly..U can also use cooking oil or olive oil to temper.

Continue Reading...


May 20, 2013

Leftover Rice Kuzhi Paniyaram Recipe|Paniyaram Varieties - Leftover Rice Recipes

Leftover rice kuzhi paniyaram
I got this kuzhi paniyaram recipe using leftover rice from my friend Shalini. I had some leftover rice lying in my pantry. I asked her to suggest me some interesting recipes using it. She immediately told me about this kuzhi paniyaram recipe. I ground the batter in the afternoon and prepared paniyaram for dinner. It was very nice, crispy outside, puffy and very soft inside. We loved it very much.

 I used mixie to grind the batter which made my job much more easier.In this recipe I used sour curd. So the batter takes less time to ferment ( For me it took 4 hours). Based on the weather in your place , the fermentation time differs.It may need maximum of 6-8 hours.

 If you grind the batter in the morning / afternoon (around 1pm) , you can use it for dinner. But my friend told this paniyaram can be made immediately/ instantly after grinding the batter. Thank you so much Shalini for this yummy recipe. 

Do try this friends , you’ll love it a lot. Adding cooking soda is a must for this recipe. U can also try ENO fruit salt instead of cooking soda. Hope it gives the same result. :)

If you r interested, do check out my
Leftover rice kuzhi paniyaram

Leftover rice Kuzhi paniyaram


Leftover rice Kuzhi paniyaram Leftover rice Kuzhi paniyaram - How to make instant kuzhi paniyaram using leftover cooked rice
Cuisine: South Indian
Category: Breakfast/dinner
Serves: 4
Prep time: 120 Minutes
Cook time: 5 Minutes
Total time: 125 Minutes


INGREDIENTS
To grind
  • Raw rice ( Good quality sona masoori) – 2 cups
  • Leftover cooked rice – 1 cup (Sadham)
  • Sour curd – 1/2 cup
  • Green chillies – 2 to 3 nos
  • Salt – As needed
  • Water – as needed
To add in the batter
  • Cooking soda / baking soda – A big pinch
  • Big onion – 2 nos (finely chopped)
  • Curry leaves – few (-do-)
  • Ginger – 1/2 inch piece (finely chopped)
  • Coriander leaves - few
METHOD

  • Wash & Soak the raw rice and leftover rice together for 2 hours. Then drain all the soaked water and grind it to a smooth paste adding sour curd , green chillies , salt using required water. Consistency should like dosa batter.

  • After 4 hours  ( skip cooking soda if you leave the batter for over night or 8 hours fermentation. You should add soda if you leave for 4 hours), add cooking soda, finely chopped onions, ginger, curry leaves and coriander leaves. Mix well. 
  • Heat paniyaram pan. Add 1 tsp oil in each hole and pour the batter till 3/4th of the pan. Cover it with a lid and cook for few minutes in low to medium flame. Then flip the paniyaram and cook the other side for few more minutes.

  • Remove using a fork / spoon and serve it hot with chutney !
Leftover rice paniyaram


Enjoy !


Note

  • Urad dal & methi seeds are not necessary for this recipe. Still paniyaram comes out fluffy and soft.
  • Please add the cooking soda just before you make paniyaram. If you leave the batter for overnight fermentation or 12 hours, soda is not necessary.
  • Tastes the best when served hot !!
Enjoy this easy, yummy leftover rice paniyaram for your dinner or breakfast!! 
Technorati Tags: ,,,,,,,,,,,
Continue Reading...


May 17, 2013

IDLI UPMA RECIPE | LEFTOVER IDLI RECIPES

idli upma bowl
Idli upma is my most favourite South Indian tiffin recipes.If u ask me, i would say it is the tastiest breakfast/dinner recipe in this world Winking smile . I can have it all through the day.I can live with it. My mom makes it specially for me (by reserving some idlies)in the evenings or the next day morning with left over idlis. I like to have it with less oil , more onions & dals and mildly spiced.I love my mom’s upma very muchSmile..Some people make it yellow in color adding turmeric powder but we make it white.. I should say about my MIL here. She knows i am crazy about this upma.So she used to prepare it for me every alternate days when i was pregnant. She adds coconut oil as her own touch.I am really blessed to have such a caring & loving MIL like my mom(Touchwood Winking smile ).Now after tasting this upma from my mom& mil’s hands, i feel bad to try on my own Eye rolling smile.. But i wanted to post my favourite recipe in my blog. So i prepared it yesterday for breakfast and enjoyed every mouth to the core Open-mouthed smile.Please refer “Note’ for variations..Adding more onions gives a nice taste :)

idli upma1

INGREDIENTS
  • Left over idli – 5 nos
  • Big onion – 2 nos OR small onion – 20 nos.
  • Green chilli – 1 no (slit)
  • Ginger – 1/2 inch piece
  • Curry leaves – few
  • Salt – as needed
To temper
  • Cooking oil or coconut oil – 1 tbsp
  • Mustard seeds – 1 tsp
  • Urad dal – 2 tsp
  • Chana dal – 1 tbsp
  • Red chilli – 1 no (pinched into 2)
METHOD
  • Crumble the idlies well and set aside.
  • Usually left over Idlies are slightly dry.. For crumbling easily, just dip the idli in water for just 3 seconds and then try. U can easily crumble and it will be soft too..
  • U can also freeze the leftover idlies in an air tight box for easy crumbling.But after crumbling sprinkle some water & add salt to make it soft..
  • One more way is just crumble the idli well ( without freezing) and sprinkle some water over it . It helps to keep it soft... Add salt to it, mix well and set aside. My mom follows this method..
  • In an iron wok, add mustard seeds .Let it splutter completely. Then add the urad & channa dal and saute till golden brown..Now add the pinched red chilli ,finely chopped onions , ginger , slit green chilli and curry leaves.Saute till onion turns transparent.
idli upma tile1
  • Lastly add the crumbled idli and mix well. Keep it in low flame for 10 minutes till it forms a burnt layer in the bottom. ( We call it as adai/ porukku).. It tastes very nice and crispy ..But adai/ porukku forms only if u use iron or aluminium kadai not in the non-stick pan..
  • Check for salt and switch off the flame. Garnish with coriander leaves if desired!
idli upma tile2
Serve hot !!

NOTE
  • For variations u can add turmeric powder while sautéing onions.U’ll get a nice yellow colored upma.
  • One of my friends suggested me to sprinkle idli podi for an extra spicy punch.
  • To make it more healthy , add finely chopped or grated carrots , peas , potato etc..
Technorati Tags: ,,,,,,,
Continue Reading...


May 16, 2013

KEERAI KOOTU – KOOTU RECIPE

keerai kootu

Keerai kootu is our family favourite kootu recipe. We make it at least once in a week.I make it for my husband’s lunch box paired with vatha kuzhambu/ puli kuzhambu.It tastes great.I learnt this recipe from my MIL. I’ll post my mom’s version soon..Usually vengaya vadagam is used for seasoning this kootu. I love that combination very much . But my husband hates it.. So I saute the small onions till dark brown ( as u see in picture) & season this kootu.It tastes equivalent to vadagam..My husband likes to have this kootu mixed with plain rice & ghee.. Try this healthy accompaniment for lunch & enjoy . We follow the same procedure and make kootu with mulai keerai , siru keerai  etc..

Keerai kootu bowl

INGREDIENTS
1 cup - 250ml
  • Amaranthus/arai keerai – 2 small bunch OR 2 cups
  • Moong dal – 2 tbsp
  • Turmeric powder - 1/8 tsp
  • Sambar powder – 1 tsp
  • salt & water – As needed
To grind
  • Grated coconut – 1/4 cup
  • Rice flour –1  tsp
To temper
  • Mustard seeds – 1/2 tsp
  • Urad dal – 1 tsp
  • Fenugreek seeds – 1/4 tsp
  • Cumin seeds / jeera – 1/2 tsp
  • Small onion – 5 nos or Big onion – 1/2 no 
OR
  • Vengaya vadagam – 1.5 tbsp or 1 no

METHOD
  • Wash & chop the keerai finely. In a pressure cooker base , take the chopped keerai , moong dal  , sambar powder , salt and water. Cook it for 1 –2 whistle in low flame. Grind the coconut with rice flour adding little water to make a smooth paste.Set aside.
keerai kootu tile1
  • After the steam is released from the cooker , mash the mixture well till moong dal becomes mushy..Now add the coconut paste ,mix well and allow it to boil till kootu becomes semi thick in consistency..
  • In a kadai , temper all the ingredients given under” to temper” in the same order. Saute till onion turns dark golden brown with a nice smell..Add to the kootu ..
Mix with plain rice & ghee  or enjoy as an accompaniment!

NOTE
  • My mil cooks the keerai  & dal separately and mix them .But  i pressure cook everything together. But make sure dal should be mushy.
  • This kootu can be made with mulai keerai / thandu keerai and siru keerai ..
  • Adding vengaya vadagam for seasoning gives a great taste. Do try if u have in hand..But u should saute it till dark brown in low flame and add to kootu..

Continue Reading...


May 14, 2013

Kerala Paal Payasam Recipe In Pressure Cooker

paal payasam copy

I had noted down this Kerala style Paal payasam recipe using pressure cooker from Vanitha magazine with my neighbour’s help. When I posted Onam sadhya recipes , I couldn’t try this one. This is also one of the most important payasam recipe which Keralites prepare on Onam day. Its a very simple recipe but very rich & tasty. I loved it a lot. It tasted more like “sweetened condensed milk “.. Just a handful of rice is enough to make payasam for 4 – 5 people. In Kerala, they make this payasam in a wide opened uruli using unakkari (broken red rice).  But I tried in pressure cooker. Usually I make paal paysam for gokulashtami by roasting & grinding the rice. But this has a very simple procedure. I used good quality raw rice but I heard broken red rice would be the best. Do try this payasam for your guests. They will love it for sure.. It can be served warm or cold, it tastes the best either ways ! Lets see how to make Kerala style paal payasam recipe in a pressure cooker.


paal payasam 1

INGREDIENTS

1 cup - 250ml
  • Raw rice (good quality) – 1/2 cup  (Use Kerala broken rice / Unakkari)
  • Milk – 4 + 1.25 cups ( 1.25 litres)
  • Water – 2 cups ( 500 ml)
  • Sugar – 1/2  - 3/4 cup (Adjust as per your sweetness )
  • Cardamom – 2 nos (optional)
  • Ghee – 1 tsp
  • Cashews & dry grapes – few to roast & garnish

HOW TO MAKE KERALA PAAL PAYASAM - METHOD
  • In a pressure cooker base or big vessel / uruli , take 4 cups of milk and 2 cups of water ( totally 6 cups). Allow it to boil in high flame till it is reduced to 3 cups. Now wash and add the rice and pressure cook in low flame for 3-4 whistle.
paal payasam tile1
  • After the rice is cooked well, open the cooker lid and mash the rice with a whisk or ladle.
paal payasam tile2
  • Add sugar , half cup of milk (if necessary) and let it boil for another 4-5 minutes. Then switch off the flame. You can see the payasam looking light pink in color. 
paal payasam tile3
  • As time proceeds , this payasam will thicken. So add  the remaining 3/4 cup of milk according to your desired consistency. Add cardamom powder if you like. Garnish with roasted cashews & dry grapes , enjoy !

paal payasam

NOTE
  • Adjust the quantity of milk and sugar given here as per your taste..
  • I used low fat milk. U can use whole milk or full fat milk to make the dish more rich.
  • Saffron can be used instead of cardamom powder. But color of this payasam will be in yellow side. If you add more milk at the end, you’ll get the white color..
  • U can add sugar anytime if you feel the sweet is less..

Continue Reading...


May 13, 2013

ONION TOMATO UTTAPAM | BREAKFAST RECIPES


ONION TOMATO UTHAPPAM

Last month we had a trip to kodaikanal and we ordered this uthappam for breakfast in a restaurant.We loved it very much because the taste was something different from the usual ones. I usually make onion tomato uthappam sprinkling some pepper powder or finely chopped green chillies. But in that dosa they sprinkled idli milagi podi and it was very nice with full of flavours.Also the tomato pieces were well roasted to black in color.The roasted tomato pieces had a nice flavour. Also the dosa was not too thick like our regular uthappam & above all not much oily Winking smile. Overall i liked that dosa very much..Last week I tried the same in my kitchen with left over idli batter and i was happy i could bring in the same taste. I think most of u know & make this combination at home.But still i am posting this recipe for beginners & bachelors .. So here is the recipe ..

INGREDIENTS
1 cup - 200ml
  • Idli , dosa batter – 1 cup
  • Big onion – 2 nos (slice cut)
  • Tomatoes – 2 nos ( i used bangalore tomato, chop into small pieces)
  • Curry leaves – few
  • Idli milagai podi – 1/4 cup ( to sprinkle)
  • Gingely oil – to drizzle

METHOD
  • As mentioned above , slice cut the onions , chop the tomatoes and curry leaves and set aside.Take the idli batter in a bowl and add little water( say 1/4 cup) to make it slightly thin..
  • Heat dosa tawa and pour a ladleful of batter. The batter will spread automatically , if not spread it little. ( Please make sure u don’t spread it too thin )
  • Now sprinkle the sliced onions , tomato pieces and curry leaves all over the dosa .. Please do not add too much of tomato pieces..Add 4-5 small pieces for one dosa.
  • Now sprinkle idli milagai podi all over the dosa and drizzle gingely oil in the sides as well as top of dosa.Let it cook for sometime in medium flame.
  • Now flip the dosa carefully. Do not press the dosa..Keep the flame medium for a minute & then high for another minute for the tomatoes & onions to get cooked & roasted..Again add a drop of oil..Remove and serve..
ONION TOMATO UTHAPPAM tile
Serve hot with chutney !!

Continue Reading...


May 10, 2013

ONION BAJJI | VENGAYA BAJJI – SNACKS RECIPES

bajji

This is my first post on bajji recipes. Myself and Sendhil loves bajji a lot. My MIL makes this onion bajji / vengaya bajji very often as an evening snack especially for guests. I have seen my friends making bajji with store bought readymade bajji mix. I had a thought that bajji batter is very difficult to prepare at home. But when I saw my MIL making bajji, I felt it so easy and it can be done in no time.

Before marriage, I have seen my mom making bajji on Diwali. She makes all the varieties ( i.e. Raw banana, brinjal, onion, potato) in one go. We choose our favourite among them and enjoy eating it along with sweets. Both mom & Mil follows the same recipe. Its so simple.. 

The ratio of besan flour & rice flour is 3:1. For this ratio, you’ll get a crispy exterior & a soft interior. Addition of cooking soda/ baking soda is also very important to get a puffy bajji. Otherwise bajji won’t bulge and it will be flat. Too much of cooking soda makes the bajji absorb more oil.  Adding a pinch would do. If you make bajji with store bought mix, try this recipe for a change. U’ll love it and you’ll stop buying the readymade ones.


bajji closeup

INGREDIENTS
1 cup - 250ml
  • Besan flour / Kadala maavu – 3/4 cup
  • Rice flour / Arisi maavu – 1/4 cup
  • Cooking soda / baking soda – A big pinch
  • Orange food color – A pinch (optional)
  • Red chilli powder – 1.5 tsp ( add 1 tsp for less spice)
  • Hing/Asafetida – 1/4tsp
  • Ajwain/ omam/ Carom seeds OR cumin seeds/ jeera – 1/2 tsp
  • Salt – As needed
  • Water – 3/4 - 1 cup ( adjust)

HOW TO MAKE ONION BAJJI - METHOD
  • Peel , wash and cut the head & tail portions of onions & slice into 1/4 inch thick rings. You can cut the onion with skin to get slices evenly. Set aside. 
onion bajji tile1
  • In a wide bowl , mix all the flours, powders, Ajwain / carom seeds or cumin seeds, salt and add water to make a slightly watery batter( like dosa batter). If you make it too watery, bajji will have tails. At the same time , thick batter yeilds hard bajjis. The batter should be slightly thick & flow like a ribbon. It should coat the onion pieces well. Adjust water & flour accordingly. Dip the onion rings in the batter & coat it well.
onion bajji tile2
onion bajji tile3
  • Heat oil in a kadai and check with a drop of batter to find the correct heating point.ie. If you put a drop of batter , the batter will rise immediately and floats on top. As soon as you get this heating point , simmer the flame and drop the onion rings coated well with batter..
onion bajji tile6onion bajji tile4
  • Deep fry till the color changes golden brown and the bubbles ceases..Flip it and again cook for a minute. Drain & remove in a tissue paper..
onion bajji tile5
Serve hot immediately..We love to have with coconut chutney !!

bajji piece

NOTE
  • Addition of food color gives a nice color to bajji as you see in stalls..
  • My mom & mil adds cumin seeds but i used ajwain for an enhanced flavour. Use any as per ur wish.
  • Please don’t skip adding baking soda . It gives a puffy , soft bajji. Make sure u don’t add much because bajji will be very oily and it is unhealthy too..
  • Adjust the consistency of batter.. Batter should not be too thin or too thick. If ur batter has become too thin , add besan & rice flour in 3:1 ratio and adjust the batter..If it is too thick add more water. Always add the extra water using a tbsp & check it..

Continue Reading...